Atdec A-STSWW Manual


Læs gratis den danske manual til Atdec A-STSWW (6 sider) i kategorien Ikke kategoriseret. Denne vejledning er vurderet som hjælpsom af 49 personer og har en gennemsnitlig bedømmelse på 4.4 stjerner ud af 25 anmeldelser. Har du et spørgsmål om Atdec A-STSWW, eller vil du spørge andre brugere om produktet?

Side 1/6
Installation Instructions
Wall Mounted
Sit-to-Stand Workstation
Component Checklist
Step 1. Check Components
A
B
C D E
Vertical Screen
Slider
Keyboard Tray Tilt Head
A-STSWW
• 8mm wrench
• Drill
• 10mm masonry bit
• 4.5mm drill bit
• Ratchet
• Spirit Level
• Stud Finder
• Pencil
5mm Allen 6mm Allen2.5mm Allen
M6X8 (x1) M4x10 (x4)M6X12 (x4)M8X20 (x1)
8mm
¼” Drive
Velcro
Strip (x2)
H J K L M N
PO Q R S T
Tools Required
Plastic
Washer (x1)
Coach
Screw (x6)
Nylon
Anchor (x6)
Metal
Washer (x1)
M6X10 (x3)
Hardware
F
G
Wall Mounting Hardware
Check that you have received all parts against the Component Checklist.
! IMPORTANT - Install as per Installation Instructions
! The manufacturer accepts no responsibility for incorrect installation.
! This product supports a maximum load 8Kg (17.6lbs.)
! The wall mount can be installed on vertical, flat, solid concrete or brick walls, or timber stud walls only.
! The wall should be strong enough to sustain a weight of at least four times that of the display and wall mount bracket combined.
If in doubt, consult a structural engineer.
! Check wall anchors and screws every 3 months from the time of installation to ensure the workstation is firmly fixed to the wall.
! Tighten all screws (do not exert excessive force to avoid breaking the screws or damaging their thread)
IMPORTANT INFORMATION
2.3
2.4
2.5
F
L
A
G
Wall Plate
Remove top and
bottom covers from
the wall plate.
Push nylon
anchors into
each hole.
Fix wall plate to
the wall using 6
coach screws
10mm
55mm
Wall
2.1
2.2
H
o
l
e
D
i
m
e
n
s
i
o
n
s
Spirit
Level
2.3
2.4
F
L
A
Wall Plate
Remove top and
bottom covers from
the wall plate.
Fix wall plate to
the wall using 4
coach screws
4.5mm
55mm
Stud
2.2
H
o
l
e
D
i
m
e
n
s
i
o
n
s
2.1
Spirit
Level
Step 2. Option B - Stud wall installation
Tip: Screw in the top coach screw first.
Use the supplied template
to mark and drill 4 holes
into the wall.
Two people
required
Note: Use a stud finder to ensure
all holes are drilled into the stud.
Step 2. Option A - Masonry or cement wall installation
Tip: Screw in the top coach screw first.
Use the supplied template
to mark and drill 6 holes
into the wall.
Two people
required
Note: For optimum performance, use a spirit
level to ensure straight installation.


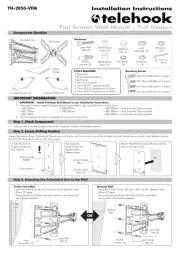
Produkt Specifikationer

Mærke: Atdec
Kategori: Ikke kategoriseret
Model: A-STSWW
Bredde: 1000.76 mm
Højde: 307.34 mm
Vægt: 11410 g
Produktfarve: Sølv
Husmateriale: Aluminium, Composite, Plastic, Steel
Monteringstype: Væg
Længde: 1445.26 mm
Højdejustering: Ja
Hældningsvinkelområde: 35 - 5 °
Panoreringsområde: 90 - 90 °
Monteringssæt: Ja
Maksimal vægtkapacitet: 7.9 kg
Forbedret kabelstyring: Ja
Armlængde: 2694.94 mm
Maksimal skærmstørrelse kompatibilitet: - "
Minimal skærmstørrelse kompatibilitet: - "
Montering interface kompatibilitet (min.): 75 x 75 mm
Montering interface kompatibilitet (maks.): 100 x 100 mm
Afstand til væggen (min.): 321.8 mm

Har du brug for hjælp?

Hvis du har brug for hjælp til Atdec A-STSWW stil et spørgsmål nedenfor, og andre brugere vil svare dig


Ikke kategoriseret Atdec Manualer

Ikke kategoriseret Manualer

Nyeste Ikke kategoriseret Manualer

Elektrobock

Elektrobock PT44 Manual

14 September 2025
BSS Audio

BSS Audio FDS-366T Manual

14 September 2025
Systemair

Systemair Airline R-114 Manual

14 September 2025
IFM

IFM SU2031 Manual

14 September 2025
IMC Networks

IMC Networks 232CL9R Manual

14 September 2025
Melissa & Doug

Melissa & Doug 9336 Manual

14 September 2025
Opus

Opus dataPREDATOR Manual

13 September 2025