Atoll IN400 Manual

Atoll Modtager IN400

Læs gratis den danske manual til Atoll IN400 (4 sider) i kategorien Modtager. Denne vejledning er vurderet som hjælpsom af 3 personer og har en gennemsnitlig bedømmelse på 5.0 stjerner ud af 2 anmeldelser. Har du et spørgsmål om Atoll IN400, eller vil du spørge andre brugere om produktet?

Side 1/4
ATOLL ELECTRONIQUE
OWNER’S MANUAL ~ INTEGRATED IN400 EVO
ATOLL ELECTRONIQUEPage 5
CONNECTINGS REMOTE CONTROL
Warning: reduce the volume of the source connected to BY-PASS before
any use of the BY-PASS Input.
14) ON / SLEEP button (preheating) by
pressing; source selection (rotation).
15) Headphones jack: speakers outputs
plugged in.
16) STANDBY LED.
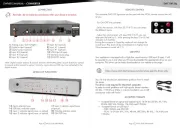
DETAIL OF FUNCTIONS
14 15 16 17 18
8) USB input (type B).
9 10)& Optical inputs 1 & 2.
11 12)& Coaxial inputs 1 & 2.
13) Bluetooth sensor.
Digital input card (optional):
Trigger cable must be a Male to Male stereo jack plug
Ø 3,5 mm (1/8”).
Jack
3,5 mm
1) Auxiliary input (optional phono), CD
input, Tuner, DVD, Tape (PLAY), Tape
output (REC), BY-PASS input, Preamp.
outputs (to 1 or 2 power amplifiers or to
a Subwoofer).
2) 2×XLR input – right channel.
3) 12V Trigger output: this output allows the
switching off/on of any device equipped with
a compatible Trigger input (see instructions).
4) 2×XLR input – left channel
5) ON/OFF switch and general plug-in
(with protection fuse).
6) Right speaker output (
+
& ).
7) Left speaker output (
+
& ).
17) Display: shows the selected source (on the
left) and volume level (on the right).
18) Power ON knob, volume and menus setup.
Access to Balance (1 press) and Light
(2 press). See “Remote control” chapter.
Optional
digital board
6
2
4 5
3
78 9 10 11 12 13
1
Page 4
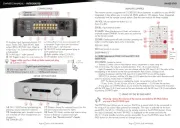
The remote control is supplied with 2 CR2032 Lithium batteries. In addition to your IN400
Integrated, it also allows you to control all ATOLL products: CD players, Tuner, Integrated
or preamps with the remote control option. (See the user manual for these models).
19) VOL: Volume adjustment button
+
/
(from 0 to 80).
20) SEL: Input selection button
21) MUTE: When the device is in Mute, no function is
available except STANDBY. To exit, press any active key
on the remote control.
22) DISP: Display power off and on button (pressing any
button turns the display back on for 3 seconds).
23) ON / SLEEP.
24) Direct access to sources.
25) BY-PASS (*).
26) NUM: Selection of COAX 1 & 2 and OPT 1 & 2
digital inputs.
27) CONFIG: Access to menus:
– Balance (1 press): once in the balance menu, adjustment is made using the
VOL
+
& keys. The volume is distributed from -9 to +9 on each channel.
– Light (2 presses): in this menu, you can choose with the keys VOL
+
& the color of the
backlighting of the buttons on the front panel between Red, Green, Orange or off.
– Display (3 presses): with the keys VOL
+
& select OFF to turn off the display.
– SBY ECO (4 presses): with the keys VOL
+
& select the time after which the device will
switch to economy mode when in STANDBY.
- OFF: the device remains in preheating mode: consumption will be 32 W.
- 10 sec, 5 min, 15 min, 30 min, 60 min: Consumption < 0,5 W after the set time.
– A long press on CONFIG allows you to rename the selected entry. Choose the characters
with the keys VOL
+
& and move to the next character with the SEL keys
+
& and validate
by pressing CONFIG again.
The BY-PASS input allows you to use your IN400 as a power block (to be connected to
the output of an audio-video preamp for example). This input is selected via the front
panel (25), the SEL
+
/ buttons on the remote control or the BY-PASS button. Once
this input is selected, the word “BY-PASS” is displayed on the screen and only the
SEL
+
/ and standby functions remain accessible. To exit the BY-PASS, press the BY-
PASS button on the remote control or change source.
(*) USING OF THE BY-PASS INPUT
Touches
non
fonction-
nelles
27
20
23
19
25
24
21
22
26
ATOLL ELECTRONIQUE
OWNER’S MANUAL ~ INTEGRATED IN400 EVO
ATOLL ELECTRONIQUEPage 3Page 6
CAUTIONS
Do not make any connections when your device is turned on.
Always switch off your appliance before moving it or before
any changes of wires on the rear.
Install your appliance in a dry, well-ventilated place away from
any source of heat.
Make sure you never put anything on your amplifier.
Avoid any short circuits.
Carefully observe the polarity & and, as well as the left and
right connection directions.
Never connect two speakers in parallel to the same output.
ADVISES
Your amplifier will provide you with optimal listening quality
approximately half an hour after switching it on, the time
it takes for the power stages to reach their ideal operating
temperature. Between two uses, it is therefore preferable to
use the rest position so that the power stages remain at their
optimal temperature. At night or when you leave your home, it
is preferable to use the main switch to turn off the device.
We advise you to choose good quality connection cables (to
other devices as well as to speakers). Do not hesitate to seek
advice from your specialist dealer.
BLUETOOT
Your appliance allows the reception of audio signals sent since any device having a
Bluetooth® transmitter (Smartphone, tab, computer…).
First time association:
Activate Bluetooth connectivity on your sending device.
BT
is displayed.
Select it from the list of devices (named IN300).
Once the connection is made, the symbol
BT
appears.
All the audio signals that will be played on your source device will then be
transmitted to your device. The device remains paired until the IN300 is turned off
or the connection is terminated. It will remain visible to your transmitter.
Association of another emitter:
Once associated with any transmitter, it is essential to completely turn off
your device at the ON/SLEEP (preheating) switch to be able to make it
visible to another transmitter.
For better reception quality, avoid being more than 5 meters from your device.
Your device is equipped with an asynchronous USB (type B) input (11). You will only
be able to use it after installing the correct driver on your computer. This driver can
be downloaded freely from our website:
Accepted format on Optical and Coaxial inputs: 16-24 bits (44,1 kHz,
48 kHz, 88,2 kHz, 96 kHz, 176,4 kHz and 192 kHz).
Accepted format on USB input:
– DSD: DSD64, DSD128 & DSD256.
– PCM: 16-32 bits (44,1 kHz, 48 kHz, 88,2 kHz, 96 kHz, 176,4 kHz,
192 kHz, 352,8 kHz, 384 kHz).
You will find attached an explanatory note on its installation.
This driver is not required for Macintosh computers.
In order to avoid problems with high quality format transfers
(24 bits / 192kHz), it is recommended to use a USB connection
cable with ferrite.
USB INPUT
ACCEPTED FORMATS
https://www.atoll-electronique.com/en/xmos-specific-driver-usb/


Produkt Specifikationer

Mærke: Atoll
Kategori: Modtager
Model: IN400
Bredde: 440 mm
Dybde: 330 mm
Højde: 130 mm
Vægt: 20000 g
Produktfarve: Sølv
Forbindelsesteknologi: Ledningsført
Lyd-output kanaler: - kanaler
klirfaktor (THD): 0.05 %
Signal/støjforhold: 100 dB
Spidseffekt pr. kanal: 300 W
Indgangsimpedans: 220000 ohm (Ω)
RMS udgangseffekt pr. kanal (4 Ohm): 300 W
RMS udgangseffekt pr. kanal (8 ohm): 160 W
Indgangsfølsomhed: 100 mV

Har du brug for hjælp?

Hvis du har brug for hjælp til Atoll IN400 stil et spørgsmål nedenfor, og andre brugere vil svare dig


Modtager Atoll Manualer

Atoll

Atoll IN400 Manual

9 Juli 2025
Atoll

Atoll IN100 Manual

18 December 2024
Atoll

Atoll IN200 Manual

18 December 2024
Atoll

Atoll IN80 Manual

18 December 2024
Atoll

Atoll AM 00 Manual

18 December 2024
Atoll

Atoll DAC200 Manual

18 December 2024
Atoll

Atoll AM200 Manual

18 December 2024
Atoll

Atoll IN50 Manual

18 December 2024

Modtager Manualer

Nyeste Modtager Manualer