Thank you for purchasing this Audio-Technica product. Before using
the product, read through this user manual to ensure that you will use
the product correctly. Please keep this manual for future reference.
• Keep the plastic bag provided with the product out of the
reach of small children and away from open flames to avoid
• Keep the product out of the reach of small children to avoid
accidents or malfunction.
• Do not put the product in a location where it is exposed to
direct sunlight, near heating devices, or in places with high
temperatures, high humidity, or high concentrations of dust to
• Do not touch the product’s cantilever, stylus tip, and magnets
• Do not attempt to disassemble or modify the product to avoid
• Do not subject the product to strong impact to avoid
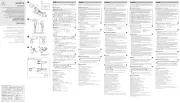
Become familiar with each part before using the product.
4 Stylus (Replacement stylus)
1. Determine the correct position for installing the product (adjust
· Adjust overhang following the instructions in the tonearm’s,
turntable’s, or headshell’s user manual. If you are unsure, align
the stylus tip to the cartridge originally attached to the tonearm
(as shown in the figure).
2. Adjust tracking force.
· Confirm the tracking force for the product in “Specifications.”
· Do not apply stylus pressure unnecessarily. It may not only
damage the record and stylus but impair audio quality.
3. Adjust tonearm height.
· Adjust the height so that the bottom surface of the headshell and
the record surface are parallel, as seen from the side. An
improper tonearm height may cause the body of the product to
make contact with the record and could impair audio quality or
4. Connect directly to the PHONO (MM) terminal of the mixer or
· If your mixer or preamplifier/amplifier does not have a PHONO
terminal, use a phono equalizer (sold separately).
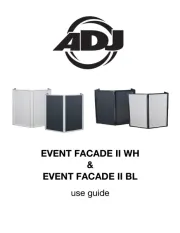
· Use a brush to remove dirt and dust from the stylus tip. Checking
the stylus tip before each use or session should be recommended
as dirt and dust are common when used in DJ applications.
· Always move the brush in the direction in which the record rotates.
· A stylus cleaner (sold separately) is recommended to remove
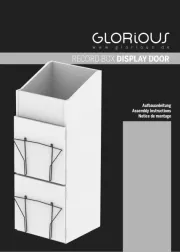
1. Remove the replacement stylus by pulling in the direction of the
arrow without touching the cantilever, stylus tip, and magnets.
2. Install a new replacement stylus onto the cartridge body.
· Lifetime of the replacement stylus is approx. 300 hours.
· Heavy scratching may shorten the life of the stylus.
Frequency response: 20 to 20,000 Hz
Output voltage: 6.0 mV (1 kHz, 5 cm/sec.)
Channel separation: 22 dB (1 kHz)
Output balance: 2.0 dB (1 kHz)
Tracking force: 2.0 to 4.0 g (3.0 g standard)
Coil impedance: 6.7 k ohms (1 kHz)
Recommended load impedance: 47 k ohms
Recommended load capacitance: 100 to 200 pF
Coil inductance: 1.0 H (1 kHz)
Static compliance: 20 × 10
Dynamic compliance: 8.0 × 10
Stylus: Elliptical bonded
Stylus curvature radius: 0.3 × 0.7 mil
Cantilever: Aluminum tapered pipe
Vertical tracking angle: 20°
Dimensions: 21.2 mm (0.83”) × 21.4 mm (0.84”) × 62.4 mm (2.46”)
Replacement stylus (sold separately): ATN-XP7
For product improvement, the product is subject to modification
Make this distance as exact as possible.
Nous vous remercions d’avoir fait l’acquisition de ce produit
Audio-Technica. Avant de l’utiliser, lisez entièrement ce manuel de
l’utilisateur afin de vous assurer que vous utiliserez correctement le
produit. Veuillez conserver ce manuel pour référence future.
• Gardez le sac plastique fourni avec le produit hors de portée
des jeunes enfants et éloigné de flammes afin d’éviter tout
• Gardez le produit hors de portée des jeunes enfants afin
d’éviter tout accident ou dysfonctionnement.
• Ne placez pas le produit dans un endroit où il est exposé aux
rayons directs du soleil, à proximité d’appareils de chauffage,
ou dans des lieux où règnent des températures élevées, une
humidité élevée ou des poussières à forte concentration pour
éviter tout dysfonctionnement.
• Ne touchez pas le cantilever, la pointe de lecture et les aimants
du produit pour éviter tout dysfonctionnement.
• Ne tentez pas de démonter ou d’apporter des modifications au
produit afin d’éviter tout dysfonctionnement.
• Ne soumettez pas le produit à de forts impacts afin d’éviter
Familiarisez-vous avec chaque élément avant d’utiliser le produit.
4 P (ointe de lecture pointe de
1. Déterminez la position correcte pour l’installation du produit
(réglage de l’avant de la cellule).
· Réglage de l’avant de la cellule en suivant les instructions du
manuel de l’utilisateur du bras de lecture, de la platine ou du
porte-cellule. En cas de doute, alignez la pointe de lecture à la
cellule fixée initialement au bras de lecture (comme indiqué dans
2. Réglez la force d’appui.
· Vérifiez la force d’appui du produit en vous référant aux
« Caractéristiques techniques ».
· N’appliquez pas inutilement de pression sur la pointe. Cela peut
non seulement endommager l’enregistrement et la pointe mais
également nuire à la qualité audio.
3. Réglez la hauteur du bras de lecture.
· Réglez la hauteur de sorte que la surface de fond du porte-cellule
et la surface du disque soient parallèles, comme vu de profil. Une
hauteur du bras de lecture incorrecte peut entraîner un contact
du corps du produit avec le disque et peut altérer la qualité audio
4. Connectez directement à la borne PHONO (MM) de la table de
mixage ou du préamplificateur/de l’amplificateur.
· Si votre table de mixage ou votre préamplificateur/amplificateur
ne dispose pas d’une borne PHONO, utilisez un préamplificateur
à égaliseur (Vendu séparément).
· Utilisez une brosse adaptée pour enlever les impuretés et la
poussière autour de la pointe de lecture. Nous vous recommandons
de vérifier l’état de la pointe avant chaque utilisation ou session
d’écoute, les dépôts de poussières et d’impuretés étant
particulièrement importants en utilisation DJ.
· Déplacez toujours la brosse dans le sens de rotation de
· Une solution nettoyante pour pointe de lecture (vendue séparément)
est recommandé pour enlever les impuretés persistantes.
■Remplacement de la pointe de lecture
1. Retirez la pointe de lecture de remplacement en tirant dans le
sens de la flèche sans toucher le cantilever, la pointe de lecture
2. Installez une nouvelle pointe de lecture de remplacement sur le
· La durée de vie de la pointe de lecture de remplacement est
· Des rayures importantes peuvent réduire la durée de vie du
■Caractéristiques techniques
Type : Double Aimant Mobile en V
Réponse en fréquence : 20 Hz à 20000 Hz
Tension de sortie : 6,0 mV (1 kHz, 5 cm/s.)
Séparation entre les canaux : 22 dB (1 kHz)
Équilibre des canaux : 2,0 dB (1 kHz)
Force d’appui : 2,0 à 4,0 g (3,0 g en standard)
Impédance de la bobine : 6,7 k ohms (1 kHz)
Impédance de charge recommandée : 47 k ohms
Capacité de charge recommandée : 100 à 200 pF
Inductance de la bobine : 1,0 H (1 kHz)
Compliance statique : 20 × 10
Compliance dynamique : 8,0 × 10
Pointe de lecture : collée, elliptique
Rayon de courbure de la pointe : 0,3 × 0,7 mil
Cantilever : tuyau conique en aluminium
Angle de lecture vertical : 20°
Dimensions: 21,2 mm × 21,4 mm × 62,4 mm (H × L × P)
Pointe de lecture de remplacement (vendue séparément) : ATN-XP7
À des fins d'amélioration, le produit peut être modifié sans préavis.
Vielen Dank für den Kauf dieses Audio-Technica-Produktes. Lesen Sie
vor dem Gebrauch dieses Produktes die Bedienungsanleitung für eine
ordnungsgemäße Nutzung. Bitte bewahren Sie diese Anleitung zum
späteren Nachschlagen auf.
• Bewahren Sie den Plastikbeutel, der dem Produkt beiliegt,
außerhalb der Reichweite von kleinen Kindern auf und fern von
offenen Feuern, um Unfälle oder Brände zu verhindern.
• Bewahren Sie das Produkt außerhalb der Reichweite von
kleinen Kindern auf, um Unfälle oder Fehlfunktionen zu
• Platzieren Sie das Produkt zur Vermeidung einer Fehlfunktion
nicht an einem Ort, an dem es direktem Sonnenlicht
ausgesetzt ist, in der Nähe von Heizgeräten oder an Orten, an
denen eine hohe Temperatur oder hohe Luftfeuchtigkeit
herrscht oder viel Staub vorhanden ist.
• Berühren Sie zur Vermeidung einer Fehlfunktion nicht den
Nadelträger, die Spitze der Abtastnadel und die Magneten des
• Versuchen Sie zur Vermeidung einer Fehlfunktion nicht das
Produkt auseinanderzubauen oder zu modifizieren.
• Setzen Sie das Produkt zur Vermeidung einer Fehlfunktion
keinen starken Stößen aus.
Machen Sie sich vor der Verwendung des Produktes mit der
Bezeichnung der Teile vertraut.
3 Tonabnehmerkopf (AT-HS6)
4 btastnadel A (Austauschnadel)
1. Bestimmen Sie die richtige Position für die Installation des
Produktes (Überhang justieren).
· Justieren Sie den Überhang gemäß den Anweisungen in der
Bedienungsanleitung des Tonarms, Plattenspielers oder
Tonabnehmerkopfes. Wenn Sie unsicher sein sollten, richten Sie
die Spitze der Abtastnadel an dem ursprünglich am Tonarm
befestigten Tonabnehmer aus (wie in der Abbildung dargestellt).
2. Justieren Sie die Auflagekraft.
· Prüfen Sie die Auflagekraft des Produkts unter „Technische
· Üben Sie keinen unnötigen Druck auf die Nadel aus. Dadurch
kann nicht nur die Schallplatte und die Nadel beschädigt sondern
auch die Audioqualität beeinträchtigt werden.
3. Justieren Sie die Tonarmhöhe.
· Justieren Sie die Höhe so, dass die Unterseite des
Tonabnehmerkopfs und die Schallplattenoberfläche parallel sind,
wie von der Seite aus betrachtet. Eine falsche Tonarmhöhe kann
eventuell dazu führen, dass das Produktgehäuse die Schallplatte
berührt, wodurch die Audioqualität beeinträchtigt oder die
Schallplatte beschädigt wird.
4. Stellen Sie eine direkte Verbindung mit dem PHONO-Anschluss
(MM-System) des Mixers oder Vorverstärkers/Verstärkers her.
· Sollte Ihr Mixer oder Vorverstärker/Verstärker keinen PHONO-
Anschluss besitzen, schließen Sie einen Phonovorverstärker an
(muss separat erworben werden).
· Verwenden Sie einen Pinsel, um Schmutz und Staub von der Spitze
der Abtastnadel zu entfernen. Es wird empfohlen vor jedem
Gebrauch die Abtastnadel zu überprüfen, da sich Staub und
Verschmutzungen üblicherweise bei DJ-Anwendungen
· Bewegen Sie den Pinsel immer in Drehrichtung der Schallplatte.
· Ein Abtastnadelreiniger (separat erhältlich) wird für die Entfernung
von hartnäckigem Schmutz empfohlen.
1. Nehmen Sie die Austauschnadel ab, indem Sie sie in
Pfeilrichtung abziehen, ohne den Nadelträger, die Spitze der
Abtastnadel und die Magneten zu berühren.
2. Setzen Sie eine neue Austauschnadel in den Tonabnehmer ein.
· Die Lebensdauer einer Austauschnadel beträgt etwa 300
· Übermäßiges Scratchen kann die Lebenszeit der Nadel verkürzen.
Frequenzgang: 20 bis 20.000 Hz
Ausgangsspannung: 6,0 mV (1 kHz, 5 cm/Sek.)
Kanaltrennung: 22 dB (1 kHz)
Ausgangsbalance: 2,0 dB (1 kHz)
Auflagekraft: 2,0 bis 4,0 g (3,0 g Standard)
Spulenimpedanz: 6,7 kOhm (1 kHz)
Empfohlene Lastimpedanz: 47 kOhm
Empfohlene Lastkapazität: 100 bis 200 pF
Spuleninduktivität: 1,0 H (1 kHz)
Statische Compliance: 20 × 10
Dynamische Compliance: 8,0 × 10
Abtastnadel: Elliptisch, verklebt
Rundungsradius der Nadel: 0,3 × 0,7 mil
Nadelträger: Verjüngendes Aluminiumrohr
Vertikaler Abtastwinkel: 20°
Abmessungen: 21,2 mm × 21,4 mm × 62,4 mm (H × B × T)
Austauschnadel (gesondert erhältlich): ATN-XP7
Produktänderungen zu Zwecken der Produktverbesserung ohne
Grazie per aver acquistato questo prodotto Audio-Technica. Prima di
utilizzare il prodotto, leggere con cura questo manuale dell’utente per
essere certi di utilizzare correttamente il prodotto. Si prega di
conservare il presente manuale in modo da poterlo consultare in futuro.
■Precauzioni di sicurezza
• Conservare la busta di plastica fornita col prodotto lontano dai
bambini e da fiamme vive per evitare incidenti o incendi.
• Conservare la busta di plastica lontano dai bambini per evitare
incidenti o problemi di funzionamento.
• Non posizionare il prodotto in luoghi in cui è esposto alla luce
diretta del sole, vicino a dispositivi di riscaldamento o in luoghi
con temperature elevate, umidità, o alte concentrazioni di
polvere per evitare problemi di funzionamento.
• Non toccare l’elemento a sbalzo, la puntina o i magneti per
evitare problemi di funzionamento.
• Non smontare o modificare il prodotto per evitare problemi di
• Evitare di sbattere il prodotto per evitare problemi di
■Nome di ciascun componente
Familiarizzare con ciascun componente prima di utilizzare il prodotto.
3 Testina sagomata (AT-HS6)
4 Puntina (puntina sostitutiva)
1. Stabilire la posizione corretta per installare il prodotto (regolare
· Regolare la sporgenza seguendo le istruzioni nel manuale
dell’utente del braccio, del giradischi o della testina sagomata. Se
non si è sicuri allineare la puntina con la capsula attaccata
originariamente al braccio con la puntina (come illustrato nella
2. Regolare la forza di tracciamento.
· Confermare la forza di tracciamento per il prodotto come
descritto in “Specifiche tecniche”.
· Non fare pressione sulla puntina. Si potrebbe danneggiare il disco
e la puntina, nonché compromettere la qualità audio.
3. Regolare l’altezza del braccio.
· Regolare l’altezza in modo che la superficie inferiore della testina
sagomata e la superficie del disco si trovino in parallelo, come si
vede lateralmente. Un’altezza del braccio inappropriata può
provocare il contatto della struttura del prodotto con il disco
rovinando la qualità audio o danneggiare il disco.
4. Collegare direttamente al terminale PHONO (MM) del mixer o
del preamplificatore/dell’amplificatore.
· Se il mixer o il preamplificatore/l’amplificatore non dispongono di
terminale PHONO, utilizzare un equalizzatore phono (venduto
· Utilizzare la spazzola per togliere sporco e polvere dalla puntina. Si
raccomanda di controllare l’ago della puntina prima dell’utilizzo ,
perché sporco e polvere sono frequenti quando nelle applicazioni da
· Spostare sempre la spazzola nella direzione in cui ruota il disco.
· Un detergente per puntine (in vendita separatamente) è consigliato
per togliere lo sporco ostinato.
■Sostituzione della puntina
1. Rimuovere la puntina sostitutiva tirando nella direzione della
freccia senza toccare l’elemento a sbalzo, la puntina e i magneti.
2. Installare la puntina sostitutiva sul corpo della capsula.
· La durata della cartuccia sostitutiva è di circa 300 ore di utilizzo.
· L’eccessiva presenza di graffi, potrebbe ridurre la durata della
Risposta in frequenza: da 20 a 20.000 Hz
Tensione in uscita: 6,0 mV (1 kHz, 5 cm/sec.)
Separazione dei canali: 22 dB (1 kHz)
Bilanciamento di uscita: 2,0 dB (1 kHz)
Forza di tracciamento: da 2,0 a 4,0 g (3,0 g standard)
Impedenza bobina: 6,7 k Ohm (1 kHz)
Carico di impedenza consigliato: 47 k Ohm
Carico di capacitanza consigliato: da 100 a 200 pF
Induttanza della bobina: 1,0 H (1 kHz)
Conformità statica: 20 × 10
Conformità dinamica: 8,0 × 10
Puntina: ellittica incollata
Raggio di Curvatura della puntina: 0,3 × 0,7 mil
Cantilever: tubo conico in alluminio
Angolo di tracciatura verticale: 20°
Dimensioni: 21,2 mm × 21,4 mm × 62,4 mm (A × L × P)
Puntina sostitutiva (in vendita separatamente): ATN-XP7
Per garantire un continuo miglioramento, il prodotto è soggetto a
modifiche senza preavviso.
お買い上げありがとうございます。ご使用の前にこの取扱説明書を必ずお
読みのうえ、正しくご使用ください。また、いつでもすぐ読める場所に保管し
本製品は安全性に充分な配慮をして設計をしていますが、使いかたを誤る
事故を未然に防ぐために下記の内容を必ずお守りください。
この表示は「取り扱いを誤った場合、使用者が死亡または⁃
⁃⁃同梱のポリ袋は幼児の手の届く所や火のそばに置かないでください。
⁃⁃幼児の手の届く所に置かないでください。事故や故障の原因になります。
この表示は「取り扱いを誤った場合、使用者が傷害を負う、⁃
または物的損害が発生する可能性があります」を意味しています。
⁃⁃直射日光の当たる場所、暖房器具の近く、高温多湿やほこりの多い
場所に置かないでください。故障や不具合の原因になります。
⁃⁃カンチレバー、スタイラスチップやマグネットは指で触れないでください。
⁃⁃分解や改造はしないでください。故障の原因になります。
⁃⁃強い衝撃を与えないでください。故障の原因になります。
ご使用になる前に、本製品の各部を確認してください。
本製品の取り付け位置を正確に決めます(オーバーハングの調整)。
⁃· トーンアーム、ターンテーブルまたはヘッドシェルの取扱説明書にし
たがって、オーバーハングの調整をします。不明な場合は、図のように
お手持ちのターンテーブルに最初から付いているカートリッジの針
⁃· 本製品の針圧は「テクニカルデータ」で確認してください。
⁃· 必要以上に針圧をかけて使用しないでください。レコードや針を傷め
⁃· ヘッドシェルの底面とレコード面が横から見て平行になるように、高
さを調整してください。トーンアームの高さが適切でないと、本製品
のボディがレコードに当たり、音質が劣化したり、レコードに傷が付
アンプ/ミキサーのPHONO(MM) 端子へダイレクトに接続します。
⁃· アンプ/ミキサーにPHONO端子がない場合は、フォノイコライザー
⁃· スタイラスチップにごみや汚れが付着した場合は、市販のブラシできれ
いにしてください。特にDJ用として使用する際はごみや汚れが付着しや
すいため、DJプレイの度にスタイラスチップを確認することをおすすめし
⁃· ブラシは必ずレコードの進行方向に動かしながら使用してください。
⁃· スタイラスチップの汚れがひどい場合は、スタイラスクリーナー(別売)
カンチレバー、スタイラスチップ、マグネットに手を触れないように、交
⁃· 激しいスクラッチプレイにより針の寿命が短くなる可能性があります。
出力電圧:6.0mV(1kHz、5cm/sec.)
外形寸法:21.2mm×21.4mm×62.4mm⁃(H×W×D)
ヘッドシェル付VM型(デュアルムービングマグネット)ステレオカートリッジ
Dual Moving Magnet Stereo Cartridge With Headshell
Cellule stéréo à double aimant mobile Avec Porte-Cellule
Dual Moving Magnet Stereo Tonabnehmersystem Mit Headshell
Fonorivelatore a Magnete Mobile Stereo Con Portatestina
Cápsula estéreo de imán móvil con portacapsulas
Cápsula Tipo “Moving Magnet” Dual Estéreo Com Headshell
Головка звукоснимателя стереофоническая
с двойным подвижным магнитом и держателем головки
本製品はDJ 用または Hi-Fi用としてご使用いただけます。
The product can be used in DJ and Hi-Fi applications.
Le produit peut être utilisé dans des applications de DJ et Hi-Fi.
Das Produkt kann in den Anwendungsbereichen DJ und Hi-Fi
Il prodotto può essere utilizzato in applicazioni DJ e Hi-Fi.
El producto se puede utilizar en aplicaciones DJ y Hi-Fi.
O produto pode ser usado em aplicações de DJ e Hi-Fi.
Данный проигрыватель можно использовать в диджейских пультах и
本製品をご家庭用として、取扱説明や接続・注意書きに従ったご使用に
おいて故障した場合、保証書記載の期間・規定により無料修理をさせて
いただきます。修理ができない製品の場合は、交換させていただきます。
お買い上げの際の領収書またはレシートなどは、保証開始日の確認のた
めに保証書と共に大切に保管し、修理などの際は提示をお願いします。
お問い合わせ先(電話受付 / 平日9:00 ~17:30)
製品の仕様・使いかたや修理・部品のご相談は、お買い上げのお店また
は当社窓口およびホームページのサポートまでお願いします。
(携帯電話・PHS などのご利用は 03-6746-0211)
FAX:042-739-9120 E メール:support@audio-technica.co.jp
(携帯電話・PHS などのご利用は 03-6746-0212)
servicecenter@audio-technica.co.jp
●ホームページ(サポート) www.audio-technica.co.jp/atj/support/