ENInstructionmanual
SAFETY
• Byignoringthesafetyinstructionsthe
manufacturercannotbeholdresponsiblefor
thedamage.
• Ifthesupplycordisdamaged,itmustbe
replacedbythemanufacturer,itsserviceagent
orsimilarlyqualifiedpersonsinordertoavoida
hazard.
• Nevermovetheappliancebypullingthecord
andmakesurethecordcannotbecome
entangled.
• Theappliancemustbeplacedonastable,level
surface.
• Theusermustnotleavethedeviceunattended
whileitisconnectedtothesupply.
• Thisapplianceisonlytobeusedforhousehold
purposesandonlyforthepurposeitismade
for.
• Thisapplianceshallnotbeusedbychildren
from0yearto8years.Thisappliancecanbe
usedbychildrenagedfrom8yearsandabove
andpersonswithreducedphysical,sensoryor
mentalcapabilitiesorlackofexperienceand
knowledgeiftheyhavebeengivensupervision
orinstructionconcerninguseoftheappliancein
asafewayandunderstandthehazards
involved.Childrenshallnotplaywiththe
appliance.Keeptheapplianceanditscordout
ofreachofchildrenagedlessthan8years.
Cleaningandusermaintenanceshallnotbe
madebychildrenunlessolderthan8and
supervised.
• Toprotectyourselfagainstanelectricshock,do
notimmersethecord,plugorapplianceinthe
wateroranyotherliquid.
•
Withinanequilateraltriangle,isusedto
indicatethataspecificcomponentshallbe
replacedonlybythecomponentspecifiedin
thatdocumentationforsafetyreason.
•
LIGHTNINGFLASHWITH
ARROWHEADSYMBOLwithinanequilateral
triangle,isintendedtoalerttheusertothe
presenceofuninsulateddangerousvoltage
withintheproductsenclosurethatmaybeof
sufficientmagnitudetoconstituteariskof
electricshocktopersons.
• Themainsplugisusedasthedisconnect
deviceanditshallremainreadilyoperable.To
completelydisconnectthepowerinput,the
Mainsplugoftheapparatusmustbe
disconnectedfromthemainsCompletely.The
mainsplugshouldnotbeobstructedorshould
beEasilyaccessedduringintendeduse.
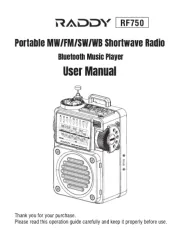
PARTSDESCRIPTION
1. POWERON–OFF/ALARMOFFBUTTON
2. SOURCEBUTTON
3. MEMORY/CLK.ADJ.BUTTON
4. ALARM1ONOFFSETBUTTON
5. SNOOZE/SLEEP/DIMMERBUTTON
6. ALARM2ONOFFSETBUTTON
7. SKIPBACKBUTTON
8. MEMORYUP/PLAY/PAUSEBUTTON/PAIRBUTTON
9. SKIPFORWARDBUTTON
10. VOLUMEKNOB
11. SPEAKER
12. SETKNOB
13. BATTERYCOMPARTMENT
14. DISPLAY
15. LINEINJACK
16. DCPOWERINPUT
17. USBCHARGINGSOCKET
18. FMANTENNA
BEFORETHEFIRSTUSE
• PlugtheACpowercordtoahouseholdoutletACsource.Thisunitis
equippedwithabatterybackupsystem,itrequiresa2xAAAbatteries
(notincluded).Insertthebatteriesinthebatterycompartment,making
certainthatthepositiveandnegative(+and)batteryterminalsare
attachedtothecorrespondingterminalsontheplateinthebattery
compartment.IfanACpowerfailureoccurs,theclockautomatically
switchestothebatterypowersupply,theclockandtimermemory
continuerunning,thelightfunctionwillnotworkinbatterybackup
mode.WhentheACpowerresumes,theclockswitchesbacktoAC
again.
USE
Settingthetime
• PressandholdtheClockAdjustbuttoninstandbymodetoentertime
settingmode.Firstchoosebetween12Hor24Hsystem.Cyclethrough
theoptionsusingtheSetknob.ConfirmyourchoicewiththeClock
Adjustbutton.
• TurntheSETKNOBtoadjusttheclockandpresstheclockadjust
buttontoconfirm.It'salsopossibletoadjustthetimefasterbypressing
andholdingtheSkipBackandSkipForwardbuttons.
Usingthealarmfunction
• PresstheAlarmbutton(1/2)duringstandbytoshowthealarmtime.
Nowpressandholdoneofthesebuttonstoenteralarmsetmode.Turn
theSETKNOBtoadjustthealarmandpresstheAlarmbutton(1/2)to
confirm.It'salsopossibletoadjustthetimefasterbypressingand
holdingtheSkipBackandSkipForwardbuttons.Afterconfirmingthe
alarmtime,usetheSetKnobtochoosebetweenabeepingalarm,ora
radioalarm.PresstheAlarmbutton(1/2)toconfirm.
• Beepalarmorradioalarmwillringfor60minutesifnokeyispressed,
thenitwillstopautomaticallyandwaitforsamealarmtimeonnextday.
• Pressandholdthealarmbutton(1/2)toenableordisablethealarm,
wheninstandbymode.Oncethealarmisactivated,adotwillappearon
thedisplay.
• Whenthealarmrings,presstheSnoozebuttontosuspendthealarm&
toactivatethesnoozefunction.BeeporRadioalarmwillstopandthe
alarmwillringagain9minuteslater.PresstheSnoozebuttonagain,and
thealarmwillbesuspendedagain,another9minuteslaterthealarmwill
ringagainandsoonuntilthenextalarmrings.
• Ifyouwanttodisablethesnoozefunctionandstopthealarm
completely,presstheON/OFFRadiobutton.Ifyoudon'tpressany
button,thealarmwillringduring60minutesandstopautomatically.
Radiomode
• EnsurethattheFMantennaiscompletelyunrolledandextendedto
havethebestFMreception.PresstheRadioON/OFFbuttontoturnthe
unitonandoff.PressSOURCEbutton(2)toselectradioplaymode,
TurntheSetKnobtotuneradiotoadesiredstation.Ifyoupressand
holdtheSKIPFORWARDbuttonorSKIPBACKBUTTONbuttonforone
second,thenrelease,theunitwillautomaticallyscantothenext
broadcastingstation.
• Tostorearadiostationtooneofthe10presets,Pressandholdthe
MemorySetbutton;“P01”willblinkinthedisplay.UsetheSkipForward
orSkipBackbuttontoselectthedesiredpresetstation(P01P10).Press
theMemorySetbuttonagaintosetthepreset.Repeattheprocessto
setmorepresets.
• Theunitcanpreset10stationsintotal.UsetheMem/M+buttontocycle
troughtthepresetswhenusingtheradiofunction.
• SetthevolumetothededesiredlevelwiththeVolume+andVolume
buttons.
Bluetoothsetup
• EnsurethattheBluetoothonyourmobilephoneispoweredon.You
mightneedtorefertothephoneusermanualfordetails.Placetheradio
andthephonewheretheyarenomorethan3feetapart.
• PowerontheunitbypressingthePowerbutton.PresstheSource
buttontoswitchtoBluetoothmode.Bluetoothmodeisindicatedby“BT”
onthedisplay.Thepairindicatorwillflashesquickly.5.Usingthenative
controlsonyourBluetoothdevice,select“RD1535”inyourBluetooth
settingstopair.Ifyourdevicerequestsapassword,enterthedefault
password“0000”.Refertotheuser’smanualforyourspecificdevice
forinstructionsonpairingandconnectingBluetoothdevices.
• Selectandconfirmthepairingonyourphone,theconnectionwillbe
completedinafewsecondsandtheradiowillproduceaconfirmation
tone,Whensuccessfullypairedandconnected,thepairindicatorwill
flashslowly.Afterinitialpairing,theunitwillstaypairedunlessunpaired
manuallybytheuserorerasedduetoaresetofthedevice.andyoucan
nowstartyourBluetoothmusicstreamingoperation.
Playingaudiowirelessly
• FollowtheinstructionsforpairingaBluetoothdevice.Usethenative
controlsontheconnectedBluetoothDevicetoselectatrack.Toplayor
pausetheselectedtrack,usethenativecontrolsontheconnected
BluetoothDeviceorpressthePlay/Pausebutton.Audioplayedthrough
theconnectedBluetoothdevicewillnowbeheardthroughthespeakers.
• Somemobilephonesmayconnectanddisconnectasyoumakeand
endcalls.Thisisnotanindicationofaproblemwithyourunit.
Occasionallywhileusingyourdeviceyoumaynoticeunexpected
Bluetoothbehaviorsuchasdisconnects,intermittentmusicsound,
RestartyourBluetoothaccessorybyturningitoffandthenon
connectivityagain.
Changingthebluetoothconnectiontoanewmobilephone
• PressandholdthePairbuttonfor3seconds.Thepairindicatorwill
flashesquicklyandtheradiowillproduceaconfirmationtone.Select
andconfirmthepairingonyournewmobilephone.
Linein
• Connectthe3.5mmaudiocabletotheLineInontheunitandanaudio
outputonanMP3playerorotheraudiosource.PresstheSourcebutton
toswitchtoLineInmode.UsethenativecontrolsontheconnectedMP3
playerorotheraudiosourcetoplayandcontrolaudioplayedthrough
theretroradio.
USBcharging
• TheproductfunctionsasachargerforyourmobilephoneandUSB
device.TheconnectorortheUSBchargingcableisnotsupplied.(The
cablelengthdoesnotexceed3m).
Otherfunctions
• Whenyoulistentotheradio,presstheSNOOZE/SLEEP/DIMMER
buttontoenterintothesleepmode.Youcanadjustthesleeptimerfrom
90minutesto15minutesbypressingrepeatedlytheSNOOZE/SLEEP/
DIMMERbuttonrepeatedly.Whenthesleeptimerisselected,theunit
willautomaticallyturnoffoncetimeisup.
• Thedimmerbuttonallowsyoutosetthebrightnessofthedisplaytohigh
ormedium.
CLEANINGANDMAINTENANCE
• Cleantheappliancewithadampcloth.Neveruseharshandabrasive
cleaners,scouringpadorsteelwool,whichdamagesthedevice.
• Neverimmersetheelectricaldeviceinwateroranyotherliquid.The
deviceisnotdishwasherproof.
GUARANTEE
• Thisproductisguaranteedfor24monthsgranted.Yourwarrantyisvalid
iftheproductisusedinaccordancetotheinstructionsandforthe
purposeforwhichitwascreated.Inaddition,theoriginalpurchase
(invoice,salessliporreceipt)istobesubmittedwiththedateof
purchase,thenameoftheretailerandtheitemnumberoftheproduct.
• Forthedetailedwarrantyconditions,pleaserefertoourservicewebsite:
www.service.tristar.eu
ENVIRONMENT
Thisapplianceshouldnotbeputintothedomesticgarbageatthe
endofitsdurability,butmustbeofferedatacentralpointfortherecycling
ofelectricandelectronicdomesticappliances.Thissymbolonthe
appliance,instructionmanualandpackagingputsyourattentiontothis
importantissue.Thematerialsusedinthisappliancecanberecycled.By
recyclingofuseddomesticappliancesyoucontributeanimportantpushto
theprotectionofourenvironment.Askyourlocalauthoritiesfor
informationregardingthepointofrecollection.
Support
Youcanfindallavailableinformationandsparepartsatservice.tristar.eu!
NLGebruiksaanwijzing
VEILIGHEID
• Defabrikantisnietaansprakelijkvoorschade
voortvloeienduithetnietopvolgenvande
veiligheidsinstructies.
• Alshetnetsnoerbeschadigdis,moethet
wordenvervangendoordefabrikant,de
onderhoudsmonteurvandefabrikantofdoor
personenmeteensoortgelijkekwalificatieom
gevaartevoorkomen.
• Verplaatshetapparaatnooitdooraanhet
snoertetrekken.Zorgervoordathetsnoer
nergensinverstriktkanraken.
• Hetapparaatmoetopeenstabiele,vlakke
ondergrondwordengeplaatst.
• Degebruikermaghetapparaatnietonbeheerd
achterlatenwanneerdestekkerzichinhet
stopcontactbevindt.
• Ditapparaatisuitsluitendvoorhuishoudelijk
gebruikenvoorhetdoelwaarhetvoorbestemd
is.
• Ditapparaatmagnietwordengebruiktdoor
kinderenvan0tot8jaar.Ditapparaatkan
wordengebruiktdoorkinderenvanaf8jaaren
doorpersonenmetverminderdelichamelijke,
zintuiglijkeofgeestelijkevermogensofgebrek
aandebenodigdeervaringenkennisindienze
ondertoezichtstaanofinstructieskrijgenover
hoehetapparaatopeenveiligemanierkan
wordengebruiktalsookdegevarenbegrijpen
diemethetgebruiksamenhangen.Kinderen
mogennietmethetapparaatspelen.Houdhet
apparaatenhetnetsnoerbuitenbereikvan
kinderenjongerdan8jaar.Laatreinigingen
onderhoudnietdoorkinderenuitvoeren,tenzij
zeouderzijndan8jaarenondertoezicht
staan.
• Dompelhetsnoer,destekkerofhetapparaat
nietonderinwaterofanderevloeistoffenom
elektrischeschokkentevoorkomen.
•
UITROEPTEKENineengelijkbenige
driehoekwordtgebruiktomaantegevendat
eenspecifiekonderdeelomveiligheidsredenen
alleenmagwordenvervangendoorhet
onderdeeldatindedocumentatieis
gespecificeerd.
•
LICHTFLITSMETPIJLSYMBOOLin
eengelijkbenigedriehoekwordtbedoeldals
waarschuwingvoordeaanwezigheidvan
ongeïsoleerdegevaarlijkevoltageinde
productbehuizingdiesterkgenoegisomeen
risicovanelektrischeschoktevormenvoor
personen.
• Metdenetstekkerkuntuhetapparaat
afkoppelenendezemoetdusgemakkelijk
bereikbaarblijven.Haalomhetapparaat
volledigvandevoedingaftekoppelende
netstekkervollediguithetstopcontact.De
netstekkermagnietwordenbelemmerden
moetgemakkelijktoegankelijkzijntijdenshet
beoogdegebruik.
ONDERDELENBESCHRIJVING
1. KNOPVOEDINGAAN–UIT/ALARMUIT
2. BRONKNOP
3. KNOPGEHEUGEN/KLOKAANPASSEN
4. INSTELKNOPALARM1AANUIT
5. KNOPSLUIMER/SLAAP/DIMMER
6. INSTELKNOPALARM2AANUIT
7. KNOPSNELACHTERUIT
8. KNOPGEHEUGENOMHOOG/AFSPELEN/PAUZEKNOP/
KOPPELEN
9. KNOPSNELVOORUIT
10. VOLUMEKNOP
11. LUIDSPREKER
12. INSTELKNOP
13. BATTERIJCOMPARTIMENT
14. DISPLAY
15. LIJNINGANG
16. INGANGGELIJKSTROOM
17. USBOPLAADAANSLUITING
18. FMANTENNE
VOORHETEERSTEGEBRUIK
• Sluithetnetsnoeraanopeenstopcontact.Thisunitisequippedwitha
batterybackupsystem,itrequiresa2xAAAbatteries(notincluded).
Plaatsdebatterijeninhetbatterijcompartiment.Zorgervoordatde
positieveennegatieve(+en)contactpuntenvandebatterijzijn
bevestigdaandeovereenkomstigeaansluitingenopdeplaatinhet
batterijcompartiment.IfanACpowerfailureoccurs,theclock
automaticallyswitchestothebatterypowersupply,theclockandtimer
memorycontinuerunning,thelightfunctionwillnotworkinbatteryback
upmode.Alsdenetspanninghersteldis,schakeltdeklokterugnaar
netvoeding.
GEBRUIK
Detijdinstellen
• DrukindestandbymodusopdeknopKlokAanpassenenhouddeze
vastomnaardetijdinstelmodustegaan.Kieseersttussen12uursof
24uursweergave.DoorloopdeoptiesmetdeknopInstellen.Bevestig
uwkeuzemetdeknopKlokAanpassen.
• DraaideINSTELKNOPomdeklokaantepassenendrukopdeknop
KlokAanpassenomtebevestigen.Hetaanpassenvandetijdkanook
snellerdooropdeknopSnelAchteruitofSnelVooruittedrukken.
Dealarmfunctiegebruiken
• DrukindestandbymodusopdeknopAlarm(1/2)omdealarmtijdte
latenverschijnen.Druknuopéénvandezeknoppenenhouddezevast
omindealarminstelmodustekomen.DraaideINSTELKNOPomhet
alarmaantepassenendrukopdeknopAlarm(1/2)omtebevestigen.
HetaanpassenvandetijdkanooksnellerdooropdeknopSnel
AchteruitofSnelVooruittedrukken.Gebruiknahetbevestigenvande
alarmtijddeknopInstellenomtussenwekkenmeteenpieptoonofmet
deradiotekiezen.DrukopdeknopAlarm(1/2)omtebevestigen.
• Wekkenmeteenpieptoonofmetderadiozal60minutenaanhouden
alsgeenknopwordtingedrukt.Daarnastopthetalarmautomatischen
zalditopdezelfdealarmtijddevolgendedagweerafgaan.
• DrukvanuitdestandbymodusopdeknopAlarm(1/2)enhouddeze
ingedruktomhetalarminofuitteschakelen.Zodrahetalarmis
geactiveerd,verschijnteenstipopdedisplay.
• DrukalshetalarmafgaatopdeknopSluimeromhetalarmte
onderbrekenendesluimerfunctieinteschakelen.Depieptoonofde
radiostoptendewekkergaat9minutenlaterweeraf.Druknogmaals
opdeknopSluimeromhetalarmweerteonderbreken,waarnade
wekker9minutenlaterweerafgaatenzoverdertothetvolgendealarm
klinkt.
• Drukomdesluimerfunctieuitteschakelenenhetalarmvolledigte
stoppenopdeAAN/UITdraaiknop.Alsugeenknopindrukt,zalde
wekkergedurende60minutenafgaanendaarnaautomatischstoppen.
Radiomodus
• ZorgdatdeFMantennevolledigisuitgeroldenuitgeschovenvoorde
besteFMontvangst.DrukopdeknopRadioAAN/UITomhettoestelin
enuitteschakelenDrukopdeknopBRON(2)omde
radioafspeelmodustekiezenendraaideknopInstellenomderadioop
hetgewenstestationaftestemmen.AlsudeknopSNELVOORUITof
SNELACHTERUITindruktenéénsecondevasthoudt,scanthettoestel
automatischtothetvolgenderadiostation.
• Drukomeenradiostationopéénvande10voorinstellingenopteslaan
opdeknopGeheugenInstellenenhouddezevast;“P01”knippertopde
display.GebruikdeknopSnelVooruitofSnelAchteruitomhet
gewenstevoorafingesteldestationteselecteren(P01P10).Druk
nogmaalsopdeknopGeheugenInstellenomdevoorinstellinginte
stellen.Herhaalditprocesommeervoorinstellingenintestellen.
• Intotaalkuntu10stationsophettoestelinstellen.Doorloopmetde
knopGeheugen/G+devoorinstellingenvanuitderadiofunctie.
• ZetmetdeknoppenVolume+enVolumehetvolumeophetgewenste
niveau.
Bluetoothinstellen
• ControleerofBluetoothopuwmobieletelefoonisingeschakeld.
Misschienmoetudegebruikershandleidingvandetelefoonraadplegen
voorbijzonderheden.Plaatsderadioendetelefoonnietmeerdan1
meteruitelkaar.
• Schakelhettoestelindooropdevoedingsknoptedrukken.Drukopde
knopBronomnaardeBluetoothmodustegaan.DeBluetoothmodus
wordtaangegevenmet“BT”opdedisplay.Dekoppelingsindicatorgaat
snelknipperen.5.Selecteermetbehulpvandebedieningstoetsenop
uwBluetoothtoestel“RD1535”inuwBluetoothinstellingenomte
koppelen.Voeralsuwtoestelomeenwachtwoordvraagthet
standaardwachtwoord“0000”in.Ziedegebruikershandleidingvan
uwspecifieketoestelvoorinstructiesvoorhetkoppelenenverbinden
vanBluetoothtoestellen.
• Selecteerenbevestigdekoppelingopuwtelefoonendeverbinding
wordtineenpaarsecondentotstandgebracht.Deradiogeeftalshet
koppelenenverbindenisgelukteenbevestigingstoonende
koppelingsindicatorknippertlangzaam.Nahettotstandbrengenvande
eerstekoppelingblijfthettoestelgekoppeld,tenzijdegebruikerdit
handmatigontkoppeltofdekoppelingwordtverwijderdviahetresetten
vanhettoestel.UkuntnuviaBluetoothmuziekstreamen.
Hetgeluiddraadloosafspelen
• VolgdeinstructiesvoorhetkoppelenvaneenBluetoothtoestel.
SelecteermetdebedieningstoetsenophetaangeslotenBluetooth
toesteleennummer.Gebruikvoorhetafspelenoftijdelijkstopzettenvan
hetgekozennummerdebedieningstoetsenophetaangesloten
BluetoothtoestelofdrukopdeknopAfspelen/Pauze.Hetviahet
aangeslotenBluetoothtoestelafgespeeldegeluidklinktnuviade
luidsprekers.
• Sommigemobieletelefoonskunnendeverbindingtotstandbrengenen
onderbrekenalsugesprekkenvoertenbeëindigt.Ditduidtnietopeen
storinginuwtoestel.SomskandeBluetoothtijdensgebruikvanhet
toestelonverwachtgedragvertonen,zoalshetverbrekenvande
verbinding,onderbrekingvanhetgeluidvandemuziek,hetopnieuw
opstartenvanhetBluetoothaccessoiredoordituitteschakelenen
vervolgensweerteverbinden.
DeBluetoothverbindingnaareennieuwemobieletelefoon
overzetten
• DrukopdeknopKoppelenenhouddeze3secondeningedrukt.De
koppelingsindicatorknippertnusnelenderadiogeefteen
bevestigingstoon.Selecteerenbevestigdekoppelingopuwnieuwe
mobieletelefoon.
Lijningang
• Sluitde3,5mmgeluidskabelopdelijningangophettoesteleneen
geluiduitgangopeenMP3spelerofeenanderegeluidsbronaan.Druk
opdeknopBronomnaardeLijningangsmodustegaan.Gebruikde
bedieningstoetsenopdeaangeslotenMP3spelerofdeandere
geluidsbronomhetgeluidviaderetroradioaftespelen.
USBopladen
• HetproductwerktalsopladervooruwmobieletelefoonenUSBtoestel.
DeconnectorofdeUSBoplaadkabelwordtnietbijgeleverd(dekabel
magnietlangerzijndan3m).
Overigefuncties
• DrukterwijlunaarderadioluistertopdeknopSLUIMER/SLAAP/
DIMMERomnaardeslaapmodustegaan.Ukuntdeslaaptimertussen
90minutenen15minuteninstellendoorherhaaldelijkopdeknop
SLUIMER/SLAAP/DIMMERtedrukken.Alsdeslaaptimeris
ingeschakeld,zalhettoestelnahetverstrijkenvandeingesteldetijd
automatischuitschakelen.
• MetdeknopDimmerkuntudehelderheidvanhetschermophoogof
mediuminstellen.
REINIGINGENONDERHOUD
• Reinighetapparaatmeteenvochtigedoek.Gebruiknooitagressieveen
schurendeschoonmaakmiddelen,schuursponzenofstaalwol;dit
beschadigthetapparaat.
• Dompelhetapparaatnooitonderinwaterofanderevloeistoffen.Het
apparaatisnietvaatwasserbestendig.
GARANTIE
• Opditproductwordteengarantievan24maandenverleend.Uw
garantieisgeldigindienhetproductisgebruiktinovereenstemmingmet
degebruiksaanwijzingenvoorhetdoelwaarvoorhetgemaaktis.
Tevensdientdeorigineleaankoopbon(factuur,kassabonofkwitantie)
tewordenoverlegdmetdaaropdeaankoopdatum,denaamvande
retailerenhetartikelnummervanhetproduct.
• Vooruitgebreidegarantievoorwaardenverwijzenwijunaaronze
servicewebsite:www.service.tristar.eu
MILIEU
Ditapparaatmagaanheteindevandelevensduurnietbijhet
normalehuisafvalwordengedeponeerd,maarmoetbijeenspeciaal
inzamelpuntvoorhergebruikvanelektrischeenelektronischeapparaten
wordenaangeboden.Hetsymboolophetapparaat,inde
gebruiksaanwijzingenopdeverpakkingattendeertuhierop.Deinhet
apparaatgebruiktematerialenkunnenwordengerecycled.Methet
recyclenvangebruiktehuishoudelijkeapparatenlevertueenbelangrijke
bijdrageaandebeschermingvanonsmilieu.Informeerbijuwlokale
overheidnaarhetinzamelpunt.
Support
Ukuntallebeschikbareinformatieenreserveonderdelenvindenop
service.tristar.eu!
FRManueld'instructions
SÉCURITÉ
• Sivousignorezlesinstructionsdesécurité,le
fabricantnesauraitêtretenuresponsabledes
dommages.
• Silecordond'alimentationestendommagé,il
doitêtreremplacéparlefabricant,son
réparateuroudespersonnesqualifiéesafin
d'évitertoutrisque.
• Nedéplacezjamaisl'appareilentirantsurle
cordonetveillezàcequecederniernesoitpas
entortillé.
• L'appareildoitêtreposésurunesurfacestable
etnivelée.
• Nelaissezjamaisledispositifsanssurveillance
s'ilestconnectéàl'alimentation.
• Cetappareilestuniquementdestinéàdes
utilisationsdomestiquesetseulementdansle
butpourlequelilestfabriqué.
• L'appareilnedoitpasêtreutilisépardes
enfantsdemoinsde8ans.Cetappareilpeut
êtreutilisépardesenfantsde8ansoupluset
despersonnesprésentantunhandicap
physique,sensorieloumentalvoirene
disposantpasdesconnaissancesetde
l'expériencenécessairesencasdesurveillance
oud'instructionssurl'usagedecetappareilen
toutesécuritéetdecompréhensiondesrisques
impliqués.Lesenfantsnedoiventpasjouer
avecl'appareil.Maintenezl'appareiletson
cordond'alimentationhorsdeportéedes
enfantsdemoinsde8ans.Lenettoyageetla
maintenanceutilisateurnedoiventpasêtre
confiésàdesenfantssaufs'ilsont8ansou
plusetsontsoussurveillance.
• Afindevouséviterunchocélectrique,
n'immergezpaslecordon,lapriseoul'appareil
dansdel'eauouautreliquide.
•
POINTD'EXCLAMATIONDansun
triangleéquilatéral,ilestutilisépourindiquer
qu'uncomposantspécifiquepeutuniquement
êtreremplacéparlecomposantspécifiédans
cettedocumentationpouruneraisonde
sécurité.
•
ÉCLAIRAVECSYMBOLEDEFLÈCHE
Dansuntriangleéquilatéral,ilestdestinéà
avertirl'utilisateurdelaprésencedetension
dangereusenonisoléeàl'intérieurduboîtierdu
produitquipeutêtredemagnitudesuffisante
pourconstituerunrisqued'électrocution.
• Laprisesecteursertdedispositifde
déconnexionetdoitdemeurerenétatde
fonctionnement.Pourêtretotalement
déconnectéedel'alimentation,lafichesecteur
del'appareildoitêtredébranchée
complètementdusecteur.Lafichesecteurne
doitpasêtreobstruéeoudoitêtrefacilement
accessiblependantl'utilisationprévue.
DESCRIPTIONDESPIÈCES
1. BOUTONMARCHEARRÊT/ARRÊTALARME
2. BOUTONSOURCE
3. BOUTONMÉMOIRE/RÉGL.HORL.
4. BOUTONRÉGLERALARME1MARCHE/ARRÊT
5. BOUTONRAPPELD'ALARME/VEILLE/ATTÉNUATION
6. BOUTONRÉGLERALARME2MARCHE/ARRÊT
7. BOUTONPRÉCÉDENT
8. BOUTONMÉMOIREHAUT/LECTURE/PAUSE/PAIRAGE
9. BOUTONSUIVANT
10. BOUTONVOLUME
11. HAUTPARLEUR
12. BOUTONRÉGLER
13. COMPARTIMENTDEPILES
14. ÉCRAN
15. PRISEJACKENTRÉEDELIGNE
16. PRISED'ALIMENTATIONCC
17. PRISEDERECHARGEMENTUSB
18. ANTENNEFM
AVANTLAPREMIÈREUTILISATION
• EnfichezlecordonCAdansunesourceCAàprisedomestique.Cette
unitébénéficied'unsystèmedepilesdesecoursnécessitant2xpiles
AAA(nonfournies).Insérezlespilesdansleurcompartimentenvous
assurantqueleursbornespositiveetnégative(+et)sontassociées
auxbornescorrespondantessurlaplaqueducompartiment.Encasde
panned'alimentationCA,l'horlogepasseautomatiquementsur
l'alimentationdebatterieetcontinuedefonctionnertoutcommela
mémoiredeminuterie.Lafonctiondelumièrenefonctionnepasen
modepilesdesecours.Lorsquel'alimentationCAestrétablie,l'horloge
passeànouveauàl'alimentationCA.
UTILISATION
Réglagedel’heure
• AppuyezsurleboutonRéglerHorlogesansrelâcherenmodeveille
pouraccéderaumodederéglaged'horloge.Choisissezd'abordle
format12hou24h.FaitesdéfilerlesoptionsavecleboutonRéglage.
ConfirmezvotrechoixavecleboutonRéglerHorloge.
• TournezleBOUTONRÉGLERpourajusterl'horlogeetappuyezsurle
boutonderéglaged'horlogepourconfirmer.Vouspouvezaussiajuster
l'heureplusviteenappuyantsurlesboutonsPrécédentetSuivantsans
relâcher.
Usagedelafonctiond'alarme
• AppuyezsurleboutonAlarme1/2enmodeveillepourafficherl'heure
d'alarme.Appuyezalorssurl'undesboutonssansrelâcherpour
accéderaumodederéglaged'alarme.TournezleBOUTONRÉGLER
pourajusterl'alarmeetappuyezsurleboutonAlarme(1/2)pour
confirmer.Vouspouvezaussiajusterl'heureplusviteenappuyantsur
lesboutonsPrécédentetSuivantsansrelâcher.Unefoisl'heure
d'alarmeconfirmée,utilisezleBoutonRéglerpourchoisirentreunbip
d'alarmeetunealarmeradio.AppuyezsurleboutonAlarme(1/2)pour
confirmer.
• Lebipd'alarmeoul'alarmeradiosonne60minutesenl'absencede
pressionsurunetouchepuissecoupeautomatiquementetattendla
mêmeheured'alarmelejoursuivant.
• Appuyezsurleboutond'alarme1/2sanslerelâcherpouractiver/
désactiverl'alarmeenmodeveille.Unefoisl'alarmeactivée,unpoint
s'afficheàl'écran.
• Lorsquel'alarmesonne,appuyezsurleboutonRappeld'alarmepourla
suspendreetactiverlafonctionderappeld'alarme.Lebipd'alarmeou
l'alarmeradiocesseetl'alarmesonneànouveau9minutesplustard.
AppuyezànouveausurleboutonRappeld'alarmeetl'alarmese
suspendànouveaupourreprendre9minutesplustardetainsidesuite
jusqu'àl'alarmesuivante.
• Pourdésactiverlafonctionderappeld'alarmeetcoupercomplètement
l'alarme,appuyezsurleboutonRadioMarche/Arrêt.Enl'absencede
pressionsurunbouton,l'alarmesonne60minutesetsecoupe
automatiquement.
Moderadio
• Assurezvousquel'antenneFMestcomplètementdérouléeetdéployée
pouroptimiserlaréceptionFM.AppuyezsurleboutonRadioMarche/
Arrêtpouractiver/désactiverl'unité.AppuyezsurleboutonSOURCE(2)
poursélectionnerlemodedelectureradio.TournezleboutonRégler
poursyntoniserlastationvoulue.Sivousappuyezsurlebouton
SUIVANTouPRÉCÉDENTsansrelâcherpendantunesecondepuis
vousrelâchez,l'unitébalaieautomatiquementjusqu'àlastation
suivante.
• Pourenregistrerunestationdansl'unedes10mémoirespréréglées,
appuyezsurleboutonRéglerMémoiresansrelâcher:“P01”clignoteà
l'affichage.UtilisezleboutonSuivantouPrécédentpoursélectionnerla