1
3. Attach the fpv monitor holder to the MLP4DSM
transmitter.
Slide the holder down over the antenna.a.
Tighten the clamp screw. Do not overtighten.b.
c. Open the clamp jaws and place the monitor in the
jaws. The angle of the monitor can be adjusted by
loosening the angle adjustment knob, rotating the
clamp up or down and tightening the adjustment knob.
NOTICE: Consult local laws and ordinances before operating FPV (fi rst person view) equipment.
In some areas, FPV operation may be limited or prohibited. You are responsible for operating this
product in a legal and responsible manner.
FPV RTF/BNF®
Instruction Manual / Bedienungsanleitung / Manuel d’utilisation / Manuale di Istruzioni
Age Recommendation: Not for children under 14 years. This is not a toy.
Charging Warnings
WARNING: Failure to comply with the
following warnings could result in product
malfunction, electrical issues, excessive heat,
FIRE, and ultimately injury and property damage.
• NEVER LEAVE CHARGING BATTERIES
UNATTENDED.
• NEVER CHARGE BATTERIES OVERNIGHT.
• Never charge damaged batteries. If the battery
begins to swell during charging or use, discontinue
immediately.
• Always use the included battery and charger.
Disconnect the battery after charging.
• Charge batteries away from fl ammable materials
in a well-ventelated area.
• Never charge, transport, or store batteries in hot,
cold, or very sunny places
(recommended between 40–120° F or 5–49° C).
EN
Specifications
Length 3.26 in (83mm) Propeller Diameter 2.56 in (65mm)
Height 1.10 in (28mm) Flying Weight .85 oz (24 g)
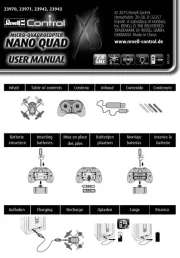
Install 4 AA batteries into the transmitter, noting
polarity. Replace the transmitter batteries when the
power LED fl ashes and the transmitter beeps.
We recommend using only alkaline AA batteries
in the transmitter, however, it is possible to use
rechargeable NiMH batteries.
CAUTION: If using rechargeable batter-
ies, charge only rechargeable batteries.
Charging non-rechargeable batteries may cause
the batteries to burst, resulting in injury to
persons and/or damage to property.
Charge the Flight Battery
Install the Transmitter Batteries (RTF)
Transmitter and Receiver Binding
NOTICE: Inspect the battery to make sure it is not damaged e.g., swollen, bent, broken or
punctured. Charge only batteries that are cool to the touch and are not damaged.
Insert the charger into a USB port.
Connect the battery to the charger.
CHARGING ( )Solid Red LED
MAX CHARGE (LED OFF )
Disconnect the fl ight battery from the charger immediately upon completion of charging.
CAUTION: Only use chargers specifi cally designed to charge the included Li-Po battery.
Failure to do so could result in fi re, causing injury or property damage.
CAUTION: Never exceed the recommended charge rate.
CAUTION: Once charging is complete, immediately remove the battery.
Never leave a battery connected to the charger.
Install the Flight Battery
1 2
BNF® Transmitter
If you are using a computer transmitter, in the channel input menu, set channel 6 (Aux1) to a momentary
switch such as the bind button ( I). Set the model type to “Acro” or “Airplane” mode. Bind the quadcopter
to your transmitter following the directions below.
General Binding Procedure (BNF®)
1. Disconnect the fl ight battery from the quadcopter.
2. Set the model type in your transmitter settings to “Acro” mode.
3. Center all trims on your transmitter.
4. Power off the transmitter and fully lower the throttle.
5. Connect the fl ight battery in the quadcopter. The LED on the 3-in-1 control unit fl ashes red
during initialization, then fl ashes blue when it is ready to bind.
6. Put the transmitter into bind mode while powering on the transmitter.
7. Release the bind button/switch after 2–3 seconds. The quadcopter is bound when the blue LED
on the 3-in-1 control unit turns solid.
8. Disconnect the fl ight battery and power the transmitter off.
MLP4DSM Binding Procedure (RTF)
1. Disconnect the fl ight battery from the quadcopter.
2. Center all trims on your transmitter.
3. Power off the transmitter and fully lower the throttle.
4. Connect the fl ight battery in the quadcopter. The LED on the 3-in-1 control unit fl ashes red during
initialization, then fl ashes blue when it is ready to bind.
5. When the blue light is fl ashing, push in and hold down the left stick while powering on the trans-
mitter (you will hear a ‘click’ and a long tone).
6. Release the left stick. The transmitter will beep and the power LED will blink. The quadcopter is
bound when the blue LED on the 3-in-1 control unit turns solid.
7. Disconnect the fl ight battery and power the transmitter off.
If you encounter problems, obey the binding instructions and refer to the troubleshooting guide for
other instructions. If needed, contact the appropriate Horizon Product Support offi ce. For a list of
compatible DSM® transmitters, please visit www.bindnfl y.com.
CAUTION: Always disconnect the Li-Po battery from the aircraft
when not fl ying to avoid over-discharging the battery. Batteries
discharged to a voltage lower than the lowest approved voltage may
become damaged, resulting in loss of performance and potential fi re
when the batteries are charged.
Throttle down Power ON
Transmitter Control (RTF)
A B C D E F
Mode
1
Aileron (Left/Right)
Throttle (Up/Down)
Throttle
Trim
Aileron
Trim
Rudder
Trim
Elevator
Trim
Rudder (Left/Right)
Elevator (Up/Down)
Mode
2
Aileron (Left/Right)
Elevator (Up/Down)
Elevator
Trim
Aileron
Trim
Rudder
Trim
Throttle
Trim
Rudder (Left/Right)
Throttle (Up/Down)
Operating Safety Precautions
• As the user of this product, you are responsible for
operating it safely, not endangering yourself and others,
or damaging the product or the property of others.
• Operate your product in open spaces away from
people and property.
• Never operate your product with damaged electrical
components.
• Keep the transmitter powered on while model is
powered on.
• Let parts cool after use before touching, motors will
get hot in use.
• Remove batteries after use, as applicable.
General Product Safety Precautions
• Keep all batteries, chemicals, small parts and
anything electrical out of the reach of children.
• Avoid water exposure to this product. Keep parts dry.
• Keep moving parts clean.
The LEDs on the Inductrix indicate the front and back of the quadcopter. The white LEDs indicate the front.
The red LEDs indicate the back.
Takeo
Increase the throttle until the model is approximately 2 ft. (600mm) off the ground in a low-level hover and
concentrate on balancing the throttle stick’s position so that the quadcopter holds a steady hover altitude. In
some cases, you may need to make a few short “hops” to an altitude of just a few inches until you become
familiar with the control inputs and trim settings required to maintain a steady hover and altitude.
Hovering
The Inductrix quadcopter requires minor throttle adjustments to maintain its altitude in hover. Remem-
ber to keep these throttle adjustments as minimal as possible. Large adjustments could result in a
loss of control or a possible crash.
While attempting to establish a low-level hover, check to see if any trim adjustments are required to
help keep the quadcopter from constantly drifting in various directions. If you fi nd that it constantly drifts
without any directional control input, land the model before making any adjustments to the trim settings.
• If the nose of the quadcopter rotates to the left or right, adjust the rudder trim.
• If the quadcopter continually drifts forward or backward, adjust the elevator trim.
• If the quadcopter continually drifts to the left or right, adjust the aileron trim.
Continue making minor trim adjustments until the machine hovers at a low altitude with very little
drifting and directional control input. If this is your fi rst multicopter or helicopter, seek the help of an
experienced pilot to trim the model for you before making your fi rst fl ight.
With your quadcopter properly trimmed and maintaining a stable low-level hover, practice using the
rudder, elevator and aileron controls to familiarize yourself with the machine’s responses to control
inputs. Remember to keep the control inputs as minimal as possible.
Average fl ight times are approximately 4 minutes.
NOTICE: Crash damage is not covered under warranty.
To prevent excessive wear to the motors, always allow the motors to cool between fl ights.
Fly the Quadcopter
Low Voltage Cuto (LVC)
Video Monitor (RTF)
FPV Camera and Video Transmitter
Once the battery reaches 3V under load, the ESC will continuously lower power supplied to the motor
until complete shutdown occurs. This helps prevent over-discharge of the Li-Po battery. Land imme-
diately once the ESC activates LVC. Continuing to fl y after LVC can damage the battery, cause a crash
or both. Crash damage and batteries damaged due to over-discharge are not covered under warranty.
Repeatedly fl ying the aircraft until LVC activates will damage the fl ight battery.
Disconnect and remove the Li-Po battery from the aircraft after use to prevent trickle discharge.
During storage, make sure the battery charge does not fall below 3V per cell.
3
4
Dual rate
selection
Bind/
Flight Mode
Selection
Rate Selection – RTF
The Inductrix® RTF quadcopter comes with the Blade
®
MLP4DSM transmitter.
• When powered on, this transmitter is automatically high rate.
• Change rates by pressing and releasing the right control stick.
• In low-rate mode, the quadcopter is limited to a lower bank
angle and will self-level when the control sticks are released.
This mode is typically preferred by pilots looking for smoother/
easier control response during fi rst time use.
• In high-rate mode, the quadcopter has a higer possible bank
angle and will self-level when the control sticks are released.
Flight Mode Selection
Cycle between the fl ight modes by pressing and releasing the left stick of the MLP4DSM or by pressing and
releasing the momentary switch on your computer transmitter as programmed in the binding section above.
• S tability mode (blue LED): the bank angle is limited. When the sticks are released, the quadcop-
ter will return to level fl ight.
• A gility mode (red LED): the quadcopter has no bank angle limits and will not return to level fi ght if
the sticks are released. Use rates and expo to tune the performance according to your fl ying style.
NOTICE: Do not attempt to change fl ight modes while fl ying with the MLP4DSM transmitter.
Attempting to do so will cause the transmitter to register a faulty center position. Always land the
quadcopter and release the sticks before changing fl ight modes.
Dual rate selection
Aileron
Elevator
Rudder
Understand the Primary Flight Controls
If you are not familiar with the controls of your Inductrix quadcopter, take a few minutes to familiarize
yourself with them before attempting your fi rst fl ight.
Throttle
Aileron left Aileron right
ForwardElevator down Elevator up Backward
Left Side View Left Side View
Rudder left Rudder right
Nose Yaws RightNose Yaws Left
Throttle downThrottle up
Left Side View Left Side View
Descend
Climb
Left
Rear View
Right
Rear View
D
E
F
Power LED indicator
C
B
A
USB Li-Po
Charger
EFLC1008
SOLID RE LEDD
–Charging
DC Input 5.0V 350mA:
DC Output 4.2V 300mA:
LED OFF
–Charge
Complete
Your RTF transmitter comes prebound to the Inductrix. If you need to re-bind, follow the directions below.
On/Off Switch
When pressed down, trim buttons make a sound that increases or decreases in pitch at each
pressing. The middle or neutral trim position is heard as a middle tone in the pitch range of the
sounds. The end of the control range is sounded by a series of beeps.
To receive product updates, special offers and more, register your product at www.bladehelis.com.
1. Before using the Spektrum® 4.3 inch Video Monitor make sure the monitor is charged thoroughly.
Connect the micro USB connector to a 5V USB power source. The charge indicator LED will glow
red while charging and green when the monitor is fully charged.
2. Attach the included antenna to the antenna connector located on
the top of the monitor.
CAUTION: Do not power the monitor on without the antenna
attached. Doing so will damage the video transmitter and
receiver amplifi ers. Amplifi er damage is not covered by warranty.
5.8GHz Antenna connector
Menu Button:
Use the and buttons to modify:+ –
Channel Selection Button
Single push to change channel
Frequency Band Button
Single push to change band
AV In
Brightness
Contrast
Color
Mode (16:9, 4:3)
Language
Reset
1. Power on your radio transmitter, then power on the aircraft.
2. Power on the video receiver to make sure the channel is clear.
3. Select the desired video transmitter channel by pressing the
button on the quadcopter as shown to scroll through the
available bands (Fat Shark/IRC or Race) and channels (1-8).
Fatshark channel 1 is indicated by a red internal LED on the
quadcopter. Keep pressing and releasing the button to scroll
through the remaining channels.
4. Perform a range test before fl ying.
If you experience static in the video feed, select a different channel.
NOTICE: The 25mW micro video transmitter range on your quadcopter is less than your fl ight
control transmitter range. Ensure you have adequate video camera range for fi lming.
Tip: If you are fl ying with an FPV headset and are prone to motion sickness, sit in a chair. If you start to
suffer from motion sickness while fl ying, lower your chin against your chest.
Fly in open areas, away from people, trees, cars, and buildings. The range of the system can be
impacted by any obstructions blocking your signal. It is normal to see break up in the video going
behind trees and other obstacles.
ON/Off Switch
Charge Status LED
Red = charging
Green = charged
5V Micro USB Charge Port
WARNING: Read the ENTIRE instruction manual to become familiar with the features of the product
before operating. Failure to operate the product correctly can result in damage to the product, personal
property and cause serious injury.
This is a sophisticated hobby product. It must be operated with caution and common sense and requires some
basic mechanical ability. Failure to operate this Product in a safe and responsible manner could result in injury
or damage to the product or other property. This product is not intended for use by children without direct
adult supervision. Do not attempt disassembly, use with incompatible components or augment product in any
way without the approval of Horizon Hobby, LLC. This manual contains instructions for safety, operation and
maintenance. It is essential to read and follow all the instructions and warnings in the manual, prior to assembly,
setup or use, in order to operate correctly and avoid damage or serious injury.
MEANING OF SPECIAL LANGUAGE
The following terms are used throughout the product literature to indicate various levels of potential
harm when operating this product:
NOTICE: Procedures, which if not properly followed, create a possibility of physical property damage
AND a little or no possibility of injury.
CAUTION: Procedures, which if not properly followed, create the probability of physical property damage
AND a possibility of serious injury.
WARNING: Procedures, which if not properly followed, create the probability of property damage,
collateral damage, and serious injury OR create a high probability of superfi cial injury.
NOTICE
All instructions, warranties and other collateral documents are subject to change at the sole
discretion of Horizon Hobby, LLC. For up-to-date product literature, visit horizonhobby.com and
click on the support tab for this product.
a
b
c
4. Turn on the monitor and look for a clear channel. Clear channels will have a consistent static background.
Channels with interference will display horizontal static lines. Select one of the clear channels. The video
transmitter included with the Inductrix FPV quadcopter transmits only on the Fat Shark/IRC and RaceBand
bands, channels 1-8.
5. Once you have chosen a clear channel on the monitor, select the same channel on the video transmitter.
BAND CH 1 CH 2 CH 3 CH 4 CH 5 CH 6 CH 7 CH 8
Fat Shark/IRC 5740 5760 5780 5800 5820 5840 5860 5880
RaceBand 5658 5695 5732 5769 5806 5843 5880 5917
Band E5705 5685 5665 5645 5885 5905 5925 5945
Band A5865 5845 5825 5805 5785 5765 5745 5725
If you are operating this product in North America, you are required to have
an Amateur Radio (HAM) license. Visit www.arrl.org for more information.