| Gebrauchsanleitung | Instruction manual
| Instruction d’emploi | Gebruiksaanwijzing
Batterie-Diodenrücklicht IXBACK senso
Vor Nutzung unbedingt sorgfältig lesen!
1 Spezialschraube kurz, schwarz
1 Spezialschraube lang, blank
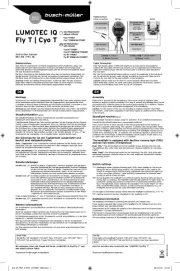
Gehäuse an Sattelstütze montieren
Darauf achten, dass Frontfläche senkrecht zur Fahrbahn ausge-
richtet ist. Richtige Position = Kleines Loch im Gehäuse befindet
sich unten. Das Gehäuse kann auf drei verschiedene Arten
Mit Klick-Fix-Metallschelle. Höchste Diebstahlresistenz.
Das Rücklicht ist ohne Werkzeug nicht demontierbar und damit
am besten gegen Diebstahl geschützt. Edelstahlband um die Sat-
telstütze (Enden zeigen nach hinten) legen. Enden durch Schlitze
der Spannplatte führen. (Bei Bedarf zum Schutz Gummiband
unterlegen.) Scharfkantige Seite der Spannplatte muss zum Sat-
telrohr zeigen. Edelstahlband so fest wie möglich straffen (am
besten mit Hilfe einer Zange) und Enden umbiegen (Abb. links).
Enden so eng wie möglich an die Sattelstütze andrücken (Abb.
rechts). Gehäuse mittig auf Spannplatte setzen und anschrauben
(längere, blanke Spezialschraube). Anschrauben zieht Spannplatte
automatisch an und strafft das Edelstahlband. Halteklammer des
Gehäuses kann zusätzlich mit einem Gummiring an das Sattelrohr
Mit Kabelbinder. Mittlere Diebstahlresistenz. Einen Kabelbinder
durch die vier Öffnungen der Halteklammer am Gehäuse fädeln.
Um Sattelstütze führen und festzurren (zweiter Kabelbinder ist
Mit Gummiring. Kein Diebstahlschutz. Entsprechend Durchmes-
ser der Sattelstütze einen der zwei Gummiringe wählen. Gummi-
ring um die Sattelstütze und über gewölbte Ränder der Halte-
Zur Rutschsicherheit Klebepads in die Halteklammer einkleben.
Lichtbox einsetzen/entnehmen
Lichtbox seitlich so einschieben, dass Drucktaster links ist.
Rastet in Endposition ein. Entnehmen: Kräftiger Druck von
rechts, bis Widerstand der Rasterung überwunden ist.
Lichtbox kann auch umgekehrt mit Drucktaster rechts eingesetzt
werden, dann ist aber nachfolgende Schraubfixierung nicht
Lichtbox im Gehäuse gegen Diebstahl
Lichtbox im Gehäuse mit schwarzer Spezialschraube und Spezial-
schlüssel verschrauben. Schrauböffnung befindet sich rechts
unten. Ohne den Spezialschlüssel kann die Lichtbox nicht ent-
Batteriefachdeckel auf Rückseite der Lichtbox öffnen und
2 Batterien einsetzen: Lady/LR1/N/AM5 1,5 V.
Einsatz von Akkus ist möglich. Je nach Akkukapazität
variiert die Leuchtdauer.
Taster 2 Sek. lang drücken.
Taster kurz drücken: Wechselt zwischen den Modi Dauerlicht- und
Das Rücklicht wird von den integrierten Hell/Dunkel- und Bewe-
gungssensoren gesteuert. Es schaltet sich automatisch ein, wenn
das Fahrrad bei Dämmerung und Dunkelheit bewegt wird. Setzt
die Bewegung aus oder wird es hell, leuchtet das Rücklicht noch
vier Minuten nach. Beim Einschalten im bzw. Wechsel in den
Senso-Modus leuchtet das Rücklicht zunächst vier Minuten.
Nur möglich beim IXBACK senso flash (Art.-Nr. 382SF). Kurzer
Tasterdruck wechselt zwischen den Modi Dauer-Permanentlicht,
Dauer-Blinklicht, Senso-Permanentlicht und Senso-Blinklicht.
ACHTUNG: Nach StVZO sind blinkende Fahrradrücklichter in
Deutschland nicht zulässig.
Die Indikator-LED hinter dem Taster blinkt im Dauerlicht-Modus
rot und im Senso-Modus grün (ca. 1x/Sek).
Hohe Blinkfrequenz der LED (5x/Sek): Die von der StVZO vorge-
schriebene Lichtstärke wird unterschritten – neue Batterien ein-
Art.-Nr. 382S – IXBACK senso
Art.-Nr. 382SF – IXBACK senso flash
Batterien: 2x Lady/LR1/N/AM5 (1,5 V)
Leuchtdauer: etwa 25 Stunden im Permanent-Modus bei maximaler
und gleichbleibender Helligkeit durch Stromregelung (mit Akkus
kürzer), danach langsam dunkler; bis zu 200 Stunden im Blink-
Wir wünschen Ihnen viel Freude mit Ihrem „IXBACK“ und eine
Technische Änderungen vorbehalten. Stand: 10/2009.
The battery diode rear light IXBACK senso
Please read this instruction manual carefully before using
1 casing with holding bracket
1 short special screw, black
1 long special screw, unpainted
1 key for special screws (T20)
Mounting the casing on the saddle tube
Please note that the front surface has to be at a right angle to the
road surface. Correct position = small aperture in the casing is at
the bottom. The casing can be mounted in three different ways:
With Klick-Fix metal bracket. Best protection against theft.
IXBACK senso cannot be removed without tools. Bend the steel
band around the saddle tube (free ends face backwards). Stick
free ends through the slots of the metal fixing plate with the
sharp edged side of the plate facing the saddle tube (if required,
put rubber strip beneath the steel band). Tighten the steel band
as much as possible (pliers work best) and bend the free ends
(left picture). Press the ends as closely as possible against the
saddle tube (right picture). Screw the casing onto the fixing plate
(longer, unpainted screw) through the central hole. Screwing
down pulls the fixing plate into the casing and tightens the steel
band. The mounting bracket of the casing can be flattened
against the saddle tube with a rubber band.
With cable straps. Second best protection against theft. Guide a
cable strap through the four holes on the casing’s mounting
bracket, put it around the saddle tube and tighten the strap
(one reserve cable strap).
With rubber band. No theft protection. Choose one of the two
rubber bands depending on the saddle tube’s diameter. Put the
rubber band around the saddle tube and over the arched outer
edges of the mounting bracket.
For slip proof mounting, please attach the adhesive pads to the
Insertion of the Light Box
Laterally slide the Light Box into the casing with the push button
facing left. Snaps into end position. Removal: firmly push on the
right side until the catch releases.
Light Box can be inserted with the push button facing right, but
then the following screw fixing is not possible.
Theft proof fixing of the Light Box
Using the black special screw and the special key, screw together
the Light Box and the casing. The screw aperture is at the bot-
tom right. Without the special screw the Light Box cannot be
Open the battery lid on the rear side of the Light Box and insert
two batteries: LR1 1.5 V.
Using rechargeable batteries is possible. Depending on the
capacity of the batteries, the light duration varies.
Push lateral button for two seconds.
A short push onto the button switches between the modes of
operation: continuous light or senso.
The rear light is controlled by integrated light/dark and motion
sensors. It activates automatically when the bicycle is moved dur-
ing dusk or darkness. If the bicycle stops or if there is light, the
rear light continues to shine for four minutes. When activated in
or switched into senso mode, the rear light initially shines for
Only possible with IXBACK senso flash (ref. no. 382SF).
A short push onto the button switches between the modes of
operation: continuous permanent light, continuous flashing light,
senso permanent light and senso flashing light.
ATTENTION: According to the StVZO traffic regulation, flashing
bicycle rear lights are not permitted in Germany.
The indicator LED located behind the push button flashes red in
continuous light mode and green in senso mode (about once per
second). High flash frequency of the LED (five times per second):
the minimum light output mandated by German traffic
regulations is no longer reached – insert new batteries.
Ref. no. 382S – IXBACK senso
Ref. no. 382SF – IXBACK senso flash
Batteries: 2x LR1 (1.5 V)
Light duration: aproux 25 h at full and constant intensity by
current regulation (shorter when using rechargeable batteries)
in permanent light mode, after that the light output decreases
slowly; up to 200 h in flashing mode.
We wish you many years of enjoyable and safe cycling with your
Technical modifications reserved. Revised: 10/2009.
Busch & Müller KG • 58540 Meinerzhagen, Germany • Tel. +49(0)2354-915-6 • info@bumm.de • www.bumm.de
RZ_BPZ IXBACK senso lay k_BU.qxd 24.09.2013 19:07 Uhr Seite 1