CANON U.S.A., Inc.
One Canon Park, Melville, NY 11747, USA
Tel
No
. 1-800-OK-CANON (1-800-652-2666)
POWER
ZOOM
ADAPTER
PZ-E2
ENG
POWER
ZOOM
ADAPTER
PZ-E28
Instructions
These instructions describe important safety notes and basic instructions on how to handle
this product. For more detailed information, Please download and refer to the instructions
from the Canon website below:
m
-
I!]
https://cam.start.canon/
~
I!]
•
Refer also
to
the instructions for the camera and lens.
Be
sure the latest version firmware is installed in the camera
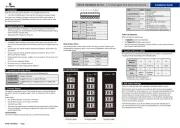
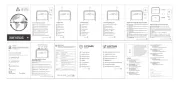
Nomenclature
CD
Mounting screws
® Digital terminal
@ Zoom operation switch
© Positioning pins
®Gear
® Contacts
(j) Zoom mode switch
® Zoom speed adjustment dial
® Zoom/Focus remote connector (PZ-E2B only)
Thank you for purchasing a Canon product.
The Canon Power Zoom Adapter PZ-E2, PZ-E2B
is
an
accessory that allows servo
zoom (powered zooming) when attached to a lens for EOS R series cameras*.
* For EOS R series camera lenses supported for this product, please check the Canon
website.
Safety Precautions
~
Warning Details pertaining to risks that may result
in
death or serious injury.
•
Do
not allow the product
to
maintain contact with the same area of skin for
extended periods of time during use.
This may result
in
low-temperature contact
burns, including skin redness and blistering, even if the product does not feel hot. The
use of a tripod or similar equipment
is
recommended when using the product
in
hot
places and for people with circulation problems or less sensitive skin.
• When carrying a lens or a camera to which the adapter
is
attached, always carry
it
by
the lens/camera body. If you hold only the adapter, the lens or camera may fall off
the adapter and cause a malfunction or injury.
~
Caution
Details pertaining to risks that may result in injury
or
damage
to
other
objects.
•
Do
not insert your finger or hair between the lens zoom
ring
and the product. It
may become caught and cause injury.
General Precautions
Handling Precautions
• Do not leave the product
in
excessive heat such as
in
a car
in
direct sunlight. High
temperatures can cause the product to malfunction.
• If the product
is
taken from a cold environment into a warm one, condensation may
develop
on
the product surface and internal parts.
To
prevent condensation
in
this case,
first put the product into
an
airtight plastic bag before taking it from a cold
to
warm
environment. Then take out the product after it has warmed gradually. Do the same
when taking the product from a warm environment into a cold one.
• If there
is
sand, dust, etc. on the product, use a commercially available blower
to
remove
it.
Operating the product with sand, dust, etc. on it can cause the product
to
malfunction.
• Please also read any related handling precautions listed in your lens or camera's
instruction manual.
This
device complies
with
Part
15
of
the
FCC
Rules.
Operation
is
subject
to
the
following
two
conditions:
(1)
This
device
may
not
cause
harmful interference,
and
(2)
this
device must accept
any
interference
received
, including interference
that
may
cause
undesired operation.
Do
not
make
any
changes or modifications
to
the
equipment unless otherwise specified
in
the
instructions. If
such
changes
or
modifications
should
be
made
,
you
could
be
required
to
stop
operation of
the
equipment.
This
equipment
has
been
tested
and
found
to
comply
with
the
limits
for
a class B digital device,
pursuant
to
part
15
of
the
FCC
Rules.
These
limits
are
designed
to
provide reasonable protection
against harmful interference
in
a residential installation.
This
equipment generates,
uses
and
can
radiate
radio
frequency energy
and
, if not installed
and
used
in
accordance with
the
instructions,
may
cause
harmful interference
to
radio communications.
However,
there
is
no
guarantee
that
interference
will
not
occur
in
a particular installation. If
this
equipment
does
cause
harmful interference
to
radio
or television reception ,
which
can
be
determined
by
turning
the
equipment off
and
on
,
the
user
is
encouraged
to
try
to
correct the interference
by
one
or
more
of
the
following measures:
• Reorient
or
relocate
the
receiving
antenna.
• Increase
the
separation
between
the
equipment
and
receiver.
• Connect
the
equipment
into
an
outlet
on
a circuit different
from
that
to
which
the
receiver
is
connected.
• Consult
the
dealer or
an
experienced radiofTV technician for
help
.
CAN ICES-3
(Bl/
NMB-3
(Bl
1.
Attaching and Removing Adapter
Attaching
1 Line up the positioning pins at the power zoom adapter attachment holes on the lens
and hold it against the lens. (Fig.
O:
(IXti@)
2 While pressing the mounting screws, turn it in the direction of the arrow with a coin, etc.
to fasten the adapter to the lens. (Fig.
f):
(j)Q))
, Pay attention to the orientation
of
the adapter vis-a-vis the lens and the line-up
position of the positioning pins.
, This adapter will not operate if it is not attached to the lens.
Removing
1 Hold the adapter firmly and turn the mounting screws
in
the direction
of
the arrow with a
coin, etc. (Fig.
0)
2
0
Remove the adapter from the lens
in
the reverse order for attaching
it.
• Do not use excess force in attaching or removing the adapter. It can cause it
to
break
or
malfunction.
• Take care not to damage the contacts or the gear when you remove the adapter.
, Any damage, dirt, fingerprints, etc. on the contacts can cause poor contact
or
corrosion, leading to operational problems. Any dirt on the contacts should be wiped
off with a soft cloth.
2.
Setting Zoom Mode
1 The zoom mode switch can be set
to
either servo zoom [SERVO] or manual zoom
[MANU]. (Fig.
0)
2
To
zoom using servo zooming, set the switch to servo zoom [SERVO].
3
To
zoom by directly turning the zoom ring on the lens, set the switch to manual zoom
[MANU].
0 Do not force the zoom ring on the lens when using the servo zoom [SERVO] zoom
mode. It can cause damage to the lens.
3.
Setting Zoom Speed
• Use the zoom speed adjustment dial to set the speed of the servo zoom. (Fig.
0)
•
To
raise the zoom speed, turn the dial
in
direction (D.
To
lower the zoom speed, turn the
dial
in
direction ®·
4.
Using Servo Zoom
Use the zoom operation switch to use the servo zoom. Pressing
[WJ
will zoom the lens out
(wide angle} and pressing
[TJ
will zoom the lens in (telephoto). (Fig.
0)
0 . The motor noise may be recorded when using servo zoom during movie shooting.
Lowering zoom speed will reduce the motor noise .
• While using the zoom operations switch, do not touch the zoom ring
of
the lens
or
apply force in the direction where the adapter parts from the lens. It can cause
abnormal noise or malfunction.
Specifications
Dimensions (W x H x
D)
105 x
81
x 60
mm/
4.13 x 3.19 x 2.36 inch
Weight (body only)
PZ-E2: Approx. 155g / 5.5 oz
PZ-E2B: Approx. 165g / 5.8 oz
Accessories
Soft case, Thumb rest, Hex key
•
All data listed is measured according to Canon standards
• Product specifications and appearance are subject to change without notice.
CANON U.S.A., Inc.
One Canon Park, Melville, NY 11747, USA
Tel
No
. 1-800-OK-CANON (1-800-652-2666)
POWER
ZOOM
ADAPTER
PZ-E2
ENG
POWER
ZOOM
ADAPTER
PZ-E28
Instructions
These instructions describe important safety notes and basic instructions on how to handle
this product. For more detailed information, Please download and refer to the instructions
from the Canon website below:
m
-
I!]
https://cam.start.canon/
~
I!]
•
Refer also
to
the instructions for the camera and lens.
Be
sure the latest version firmware is installed in the camera
Nomenclature
CD
Mounting screws
® Digital terminal
@ Zoom operation switch
© Positioning pins
®Gear
® Contacts
(j) Zoom mode switch
® Zoom speed adjustment dial
® Zoom/Focus remote connector (PZ-E2B only)
Thank you for purchasing a Canon product.
The Canon Power Zoom Adapter PZ-E2, PZ-E2B
is
an
accessory that allows servo
zoom (powered zooming) when attached to a lens for EOS R series cameras*.
* For EOS R series camera lenses supported for this product, please check the Canon
website.
Safety Precautions
~
Warning Details pertaining to risks that may result
in
death or serious injury.
•
Do
not allow the product
to
maintain contact with the same area of skin for
extended periods of time during use.
This may result
in
low-temperature contact
burns, including skin redness and blistering, even if the product does not feel hot. The
use of a tripod or similar equipment
is
recommended when using the product
in
hot
places and for people with circulation problems or less sensitive skin.
• When carrying a lens or a camera to which the adapter
is
attached, always carry
it
by
the lens/camera body. If you hold only the adapter, the lens or camera may fall off
the adapter and cause a malfunction or injury.
~
Caution
Details pertaining to risks that may result in injury
or
damage
to
other
objects.
•
Do
not insert your finger or hair between the lens zoom
ring
and the product. It
may become caught and cause injury.
General Precautions
Handling Precautions
• Do not leave the product
in
excessive heat such as
in
a car
in
direct sunlight. High
temperatures can cause the product to malfunction.
• If the product
is
taken from a cold environment into a warm one, condensation may
develop
on
the product surface and internal parts.
To
prevent condensation
in
this case,
first put the product into
an
airtight plastic bag before taking it from a cold
to
warm
environment. Then take out the product after it has warmed gradually. Do the same
when taking the product from a warm environment into a cold one.
• If there
is
sand, dust, etc. on the product, use a commercially available blower
to
remove
it.
Operating the product with sand, dust, etc. on it can cause the product
to
malfunction.
• Please also read any related handling precautions listed in your lens or camera's
instruction manual.
This
device complies
with
Part
15
of
the
FCC
Rules.
Operation
is
subject
to
the
following
two
conditions:
(1)
This
device
may
not
cause
harmful interference,
and
(2)
this
device must accept
any
interference
received
, including interference
that
may
cause
undesired operation.
Do
not
make
any
changes or modifications
to
the
equipment unless otherwise specified
in
the
instructions. If
such
changes
or
modifications
should
be
made
,
you
could
be
required
to
stop
operation of
the
equipment.
This
equipment
has
been
tested
and
found
to
comply
with
the
limits
for
a class B digital device,
pursuant
to
part
15
of
the
FCC
Rules.
These
limits
are
designed
to
provide reasonable protection
against harmful interference
in
a residential installation.
This
equipment generates,
uses
and
can
radiate
radio
frequency energy
and
, if not installed
and
used
in
accordance with
the
instructions,
may
cause
harmful interference
to
radio communications.
However,
there
is
no
guarantee
that
interference
will
not
occur
in
a particular installation. If
this
equipment
does
cause
harmful interference
to
radio
or television reception ,
which
can
be
determined
by
turning
the
equipment off
and
on
,
the
user
is
encouraged
to
try
to
correct the interference
by
one
or
more
of
the
following measures:
• Reorient
or
relocate
the
receiving
antenna.
• Increase
the
separation
between
the
equipment
and
receiver.
• Connect
the
equipment
into
an
outlet
on
a circuit different
from
that
to
which
the
receiver
is
connected.
• Consult
the
dealer or
an
experienced radiofTV technician for
help
.
CAN ICES-3
(Bl/
NMB-3
(Bl
1.
Attaching and Removing Adapter
Attaching
1 Line up the positioning pins at the power zoom adapter attachment holes on the lens
and hold it against the lens. (Fig.
O:
(IXti@)
2 While pressing the mounting screws, turn it in the direction of the arrow with a coin, etc.
to fasten the adapter to the lens. (Fig.
f):
(j)Q))
, Pay attention to the orientation
of
the adapter vis-a-vis the lens and the line-up
position of the positioning pins.
, This adapter will not operate if it is not attached to the lens.
Removing
1 Hold the adapter firmly and turn the mounting screws
in
the direction
of
the arrow with a
coin, etc. (Fig.
0)
2
0
Remove the adapter from the lens
in
the reverse order for attaching
it.
• Do not use excess force in attaching or removing the adapter. It can cause it
to
break
or
malfunction.
• Take care not to damage the contacts or the gear when you remove the adapter.
, Any damage, dirt, fingerprints, etc. on the contacts can cause poor contact
or
corrosion, leading to operational problems. Any dirt on the contacts should be wiped
off with a soft cloth.
2.
Setting Zoom Mode
1 The zoom mode switch can be set
to
either servo zoom [SERVO] or manual zoom
[MANU]. (Fig.
0)
2
To
zoom using servo zooming, set the switch to servo zoom [SERVO].
3
To
zoom by directly turning the zoom ring on the lens, set the switch to manual zoom
[MANU].
0 Do not force the zoom ring on the lens when using the servo zoom [SERVO] zoom
mode. It can cause damage to the lens.
3.
Setting Zoom Speed
• Use the zoom speed adjustment dial to set the speed of the servo zoom. (Fig.
0)
•
To
raise the zoom speed, turn the dial
in
direction (D.
To
lower the zoom speed, turn the
dial
in
direction ®·
4.
Using Servo Zoom
Use the zoom operation switch to use the servo zoom. Pressing
[WJ
will zoom the lens out
(wide angle} and pressing
[TJ
will zoom the lens in (telephoto). (Fig.
0)
0 . The motor noise may be recorded when using servo zoom during movie shooting.
Lowering zoom speed will reduce the motor noise .
• While using the zoom operations switch, do not touch the zoom ring
of
the lens
or
apply force in the direction where the adapter parts from the lens. It can cause
abnormal noise or malfunction.
Specifications
Dimensions (W x H x
D)
105 x
81
x 60
mm/
4.13 x 3.19 x 2.36 inch
Weight (body only)
PZ-E2: Approx. 155g / 5.5 oz
PZ-E2B: Approx. 165g / 5.8 oz
Accessories
Soft case, Thumb rest, Hex key
•
All data listed is measured according to Canon standards
• Product specifications and appearance are subject to change without notice.
•
1
l
u
1
l
.
1
l
3
u