Pat. and Design Pat. Pending
Copyright© 2011 CATEYE Co., Ltd.
正常な使用状態で故障した場合は無料修理・交換いたします。
返品にあたっては、お客様の連絡先・故障状況を明記の上、
ご購入日が確認できる領収書のコピー等を添えて、当社宛に
直接お送りください。ご購入日が特定できない場合、保証期
間は製造年月日から起算させて頂きます。事故などによる外
的要因や取扱説明書に記載していない用途・方法での誤使用
による要因では保証の対象外となります。なお、お送りいた
だく際の送料はお客様にてご負担願います。修理完了後、送
〒 546-0041大阪市東住吉区桑津 2 丁目 8 番 25 号
TEL:(06)6719-6863ダイヤルイン
ホームページhttp://www.cateye.com
E メールsupport@cateye.co.jp
2-year Warranty: Light unit only
CatEye products are warranted to be free of defects from materials and
workmanship for a period of 2 years from original purchase. If the product
fails to work during normal use, CatEye will repair or replace the defect at
no charge. Service must be performed by CatEye or an authorized retailer.
To return the product, pack it carefully and enclose the warranty certifi cate
(proof of purchase) with instruction for repair. Please write or type your
name and address clearly on the warranty certifi cate. Insurance, handling
and transportation charges to CatEye shall be borne by person desiring
service. For UK and REPUBLIC OF IRELAND consumers, please return to
the place of purchase. This does not affect your statutory rights.
Garantie de 2 ans : Lampe uniquement
Les produits CatEye sont garantis sur le produit et la main d’oeuvre
pendant une période de 2 ans après la date d’achat originale. Si le
produit tombait en panne lors d’une utilisation normale, Cateye rem-
placerait ou réparerait le compteur gratuitement. Ce service devant
être effectué par CatEye ou un revendeur autorisé. Lorsque vous re-
tournez le produit, emballez le soigneusement et joignez au compteur
le certifi cat de garantie (preuve d’achat), avec vos instructions sur
le dysfonctionnement. Veuillez écrire lisiblement vos coordonnées
sur le certifi cat de garantie, les frais de transport pour le retour du
produit sont à la charge de CatEye, les frais pour l’envoi du produit
sont à la charge de la personne souhaitant la garantie.
CatEye提供自購買日起,2年產品物料和製作瑕疵更換的保固
服務。若產品於正常使用下發生故障,CatEye將提供免費維修
或更換的服務,且需由CatEye或授權經銷商進行維修。如要寄
回產品,請小心包裝產品,並附上保固證明書(購買證明)及
維修說明。請在保固證明書上書寫或打上您的姓名和地址。顧
CatEye提供自购买日起,2年产品物料和制作瑕疵更换的保固
服务。若产品于正常使用下发生故障,CatEye将提供免费维修
或更换的服务,且需由CatEye或授权经销商进行维修。如要寄
回产品,请小心包装产品,并附上保固证明书(购买证明)及
维修说明。请在保固证明书上书写或打上您的姓名和地址。顾
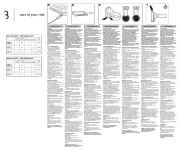
FlexTight™ bracket (H-34N)
Support FlexTight™ (H-34N)
Before using the product, please thoroughly read
this manual and keep it for future reference.
Avant d’utiliser le produit, veuillez lire attentive-
ment ce manuel et le garder pour une consultation
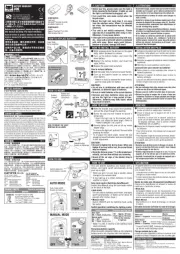
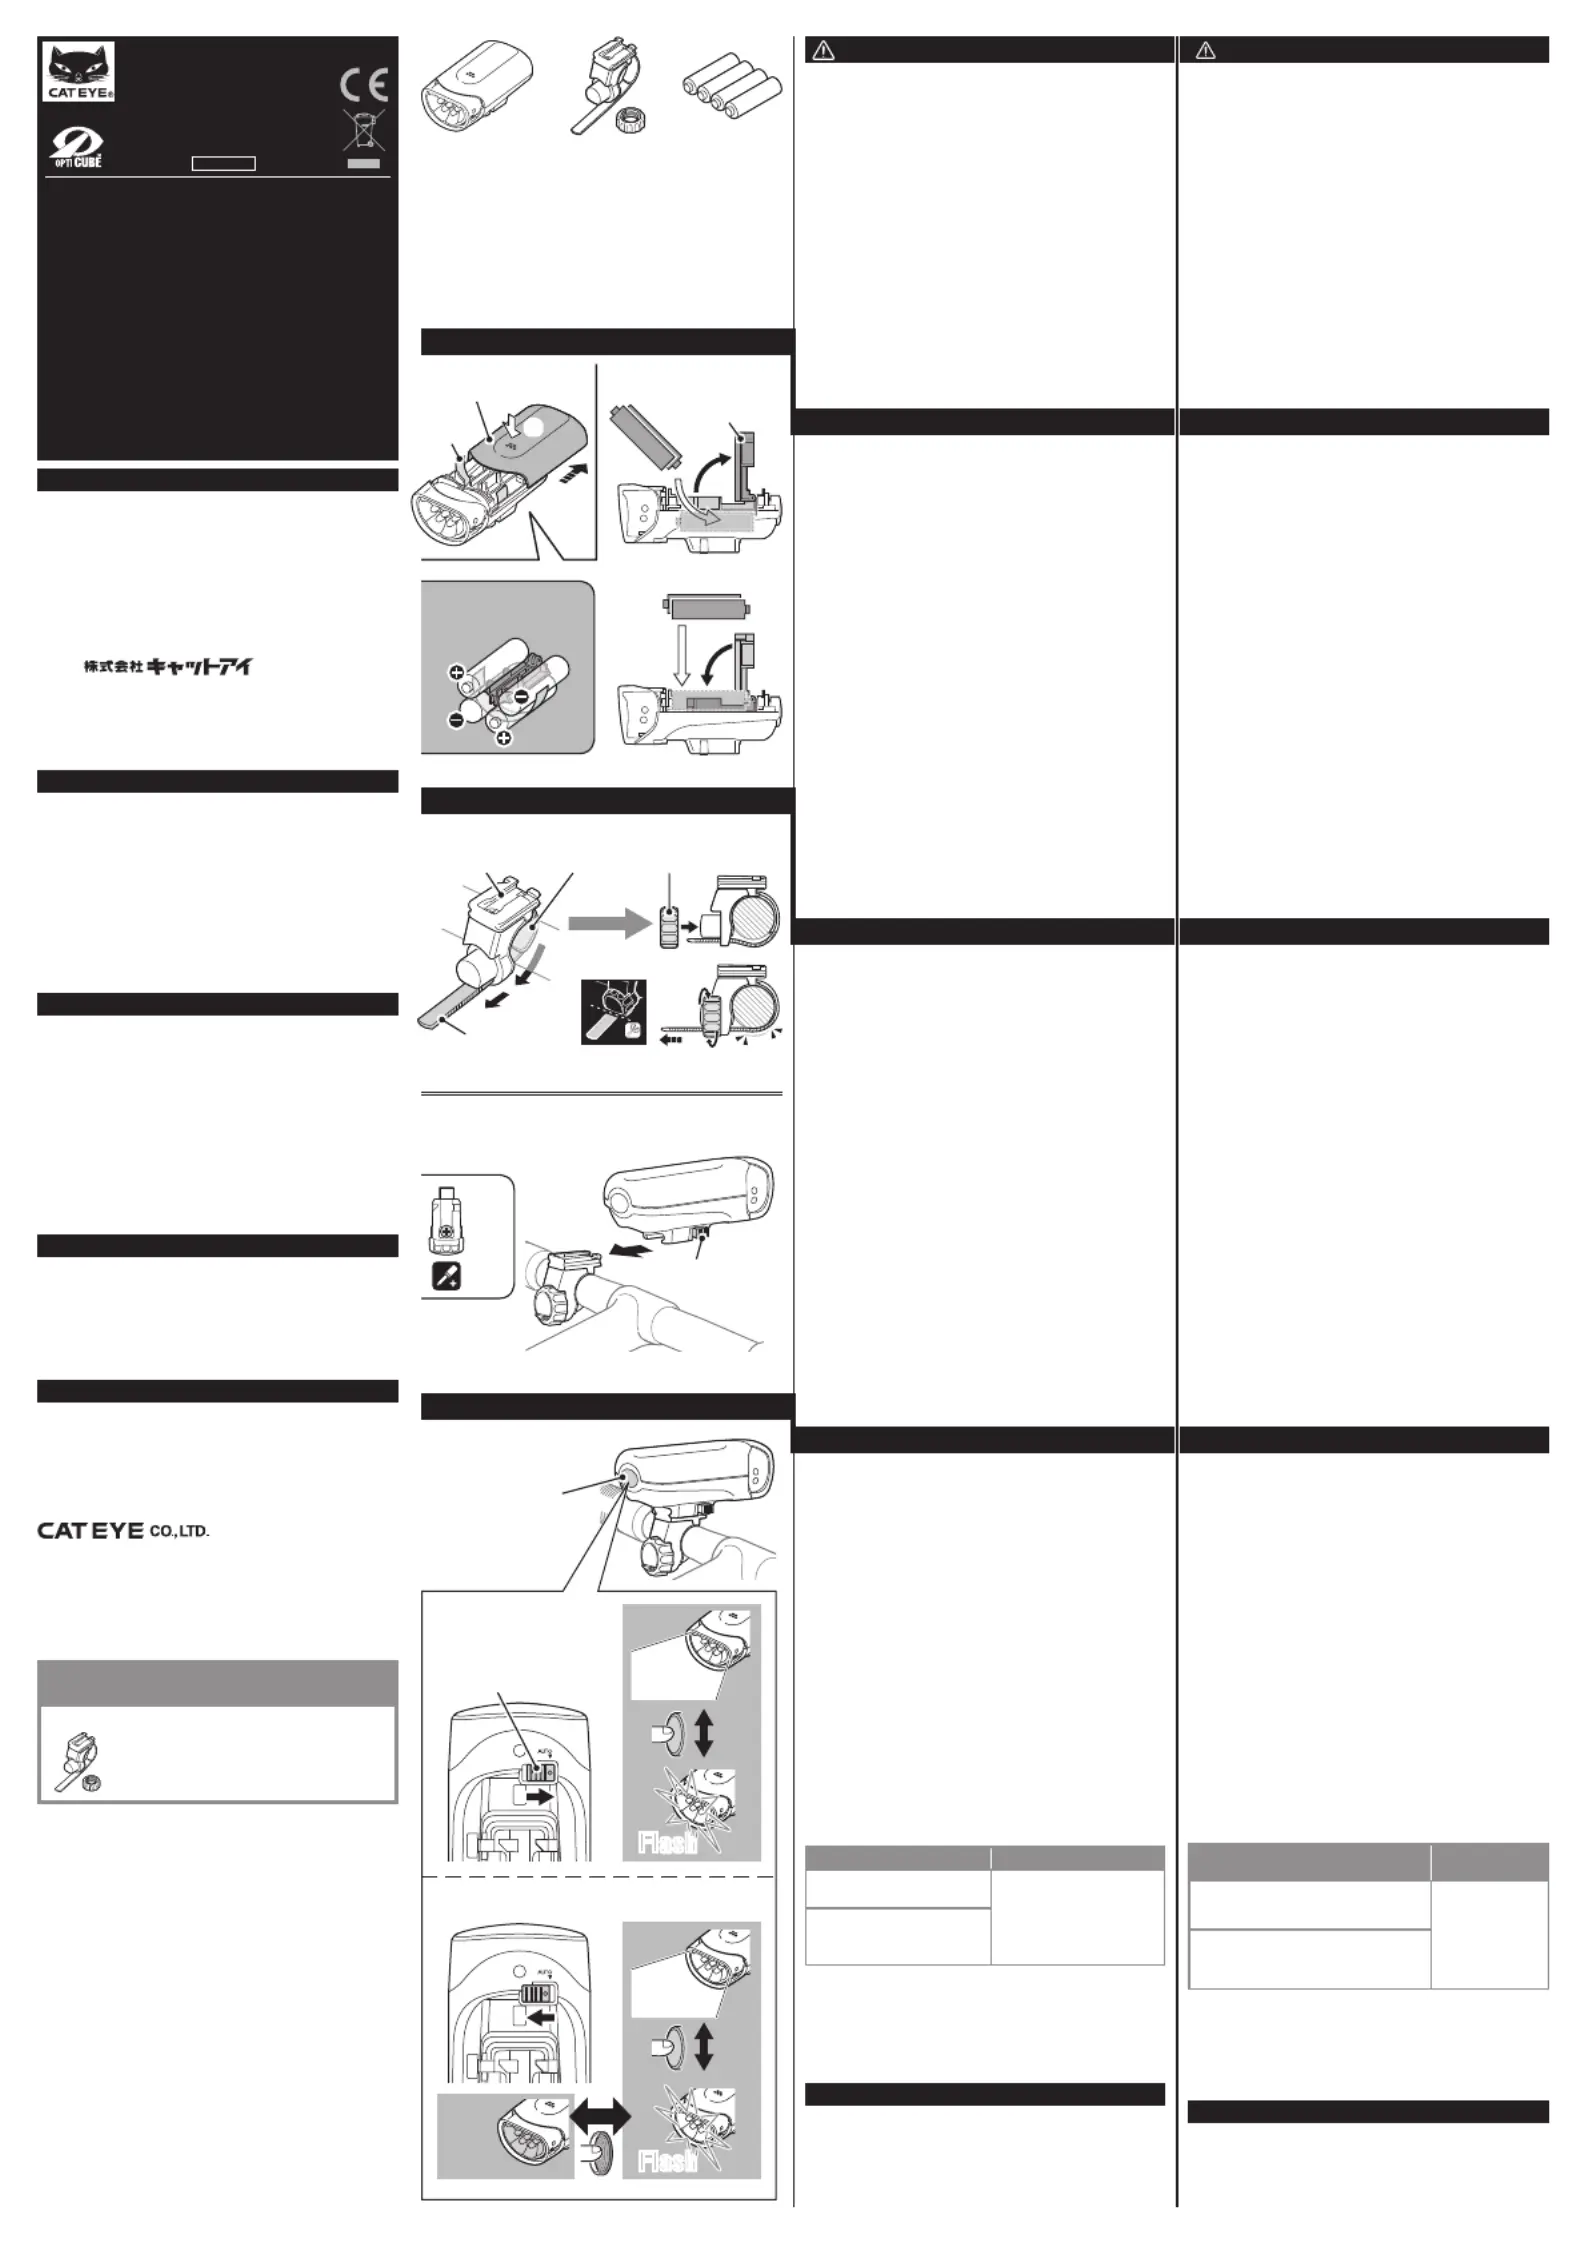
Wind the bracket strap around the handlebar, 1
and put the strap through the opening.
Screw the dial into the bracket to secure it 2
Insert the light unit to the bracket until it *
clicks, and adjust the beam angle. (Refer to
“HOW TO MOUNT THE LIGHT”)
Securely tighten the dial, and cut off any excess
To remove the light unit, pull out it forward while *
To re-adjust the beam angle, loosen the dial *
enough to move the bracket, and securely tighten
Be sure to tighten the dial by hand. When you •
tighten it too hard with a tool, the screw thread
Check the dial and screw (*1) on the bracket peri-•
odically, and use them without any loosening.
Round off the cut edge of the bracket strap to •
Before your trip, please make sure the light is •
fi rmly mounted to the bracket, it lights up, and
the light is not blocked by baggage, etc.
Turn on/off the auto-mode switch when the •
Mount the light unit more than 3 cm away •
from the wireless meter. When it is mounted
too close, the transmission may be affected
This unit is not totally waterproof. Please •
wipe and dry it completely after using in rain.
Otherwise, it may cause failure.
If the light unit or parts become dirty with mud, •
etc., clean with a soft cloth which is moistened
with mild soap. Never apply paint thinner,
benzine or alcohol; damage will result.
While pressing down the dot part on the upper 1
body, slide it backward to remove.
Turn up the battery holder, and insert the 2
Replace the battery holder, and insert the 3
Replace the upper body as before.4
Slide the upper body to remove the upper battery.
Turn up the battery holder to remove the 2
When it is hard to remove the lower battery, *
pull the strap under the battery.
Do not use in combination with new and old •
batteries, or different types of batteries.
Be sure to install batteries in the correct direction.•
Remove and store batteries when you will •
not use the light for a long period of time.
Otherwise, batteries may leak liquid, which
This unit detects darkness and motion with a
sensor, and lights up/off automatically during
When you put it in your bag or pocket, please *
change to the manual mode.
It may light up at a certain darkness, in cloudy *
Auto-mode switch (Switching Auto/Manual)
Switch Auto/Manual using the auto-mode switch
on the back of the light.
The unit detects darkness and motion, and lights
up/off automatically. (It lights up for about 40
seconds after motion stops.)
Switch ON/OFF and the lighting mode using
Switch operation (switching the lighting mode)
Switch operation Standard operating time
When it is ON, it returns to the lighting mode *
Remaining battery capacity
When the switch (indicator) lights up, the remaining
battery level is low. Replace with new batteries.
Light source ..............White LED x 5
Battery ......................AA alkaline battery x 4
Operating time ..........
ON : Approx. 30 hours, Flash : Approx. 60 hours
Temperature range ....14˚F – 104˚F (-10˚C – 40˚C)
.....3-15/16” x 2-3/16” x 1-41/64” (100 x 52 x
41.8 mm) / 5.9 oz (166 g) (Including batteries)
The specifi cations and design are subject to change without notice.*
FlexTight™ bracket (H-34N)
Support FlexTight™ (H-34N)
Avant votre voyage, assurez-vous que la lumière est bien •
installée sur le support, qu’il s’allume correctement et
que la lumière n’est pas bloquée par des valises etc.
Allume/éteint le bouton de mode auto lorsque le •
Installer la lampe à une distance supérieure à 3 cm •
environ du dispositif de mesure sans fi l. En effet,
les transmissions pourraient être défaillantes en
cas de montage trop proche.
Cet appareil n’est pas complètement étanche. Essuyez •
et séchez-le complètement après l’avoir utilisé sous la
pluie. Autrement il pourrait tomber en panne.
Si la lampe ou certaines parties de la lampe sont •
salies par de la boue, etc., nettoyez à l’aide d’un
chiffon propre humecté de savon doux.Ne jamais
utiliser de solvant, de benzène ou d’alcool ; cela
Lorsque vous appuyez sur la partie point sur le corps
supérieur, faites glisser vers l’arrière pour enlever.
Tournez le support de batterie, et insérez la batterie 2
Remettez le support de batterie et insérez la batterie 3
Remettez le corps supérieur comme avant.4
Comment faire pour enlever les batteries
Faites glisser le corps supérieur pour enlever la 1
Tournez le support de batterie pour enlever la 2
Lorsqu’il est diffi cile d’enlever la batterie inférieure, *
utilisez l’onglet situé sous la batterie.
Ne pas mélanger des piles neuves avec des piles •
usées ou des piles de différents types.
Assuez-vous de mettre les piles dans le bon sens.•
Retirez les piles et rangez-les si vous n’avez pas •
l’intention d’utiliser la lampe pendant une longue
période. Les piles pourraient couler et causer des
Enroulez la sangle du support de fi xation autour du 1
guidon et insérez la sangle dans l‘ouverture.
Vissez le disque sur le support afi n de le fi xer 2
Emboîtez la lampe sur le support jusqu’à ce *
qu’un clic se fasse entendre, puis ajustez l’angle
du faisceau lumineux. (Voir la section intitulée
Serrez bien le disque et coupez la sangle du support 3
Pour retirer la lampe, tirez dessus tout en appuyant *
Pour réajuster l’angle du faisceau lumineux, desser-*
rez disque suffi samment pour pouvoir faire tourner
le support, puis serrez le bien après ajustement.
Assurez-vous de bien serrer le disque à la main. Si •
vous le serrez trop fort avec un outil, vous risquez
d’endommager le pas de vis.
Vérifi ez régulièrement le disque et la vis (*1) sur le •
support, et ne les utilisez que s’ils sont bien serrés.
Arrondir l’extrémité de la sangle du support qui a •
été coupée pour éviter les blessures.
Cet appareil détecte la nuit et les mouvements avec un
capteur, et s’allume/s’éteint automatiquement lorsque
Lorsque vous le mettez dans un sac ou une poche, *
Il peut s’allumer dans des endroits obscurs, les jours *
nuageux ou à l’intérieur.
Bouton du mode auto (Changement Auto/Manuel)
Change entre Auto/Manuel en utilisant le bouton de
mode auto à l’arrière de la lampe.
Cet appareil détecte la nuit, les mouvements et les
vibrations, et s’allume/s’éteint automatiquement.
(il reste allumé pendant environ 40 secondes après
que les mouvements se soient arrêtés.)
Allume/Éteint et le mode d’éclairage en utilisant
Utilisation du bouton (sélection du mode d’éclairage)
Marche Clignotant ↔: Pression simple
Marche Arrêt ↔ : Pression longue
Marche Clignotant ↔: Pression simple
Lorsqu’il est ALLUMÉ, il retourne automatiquement *
au dernier mode d’éclairage utilisé.
Charge restante de la pile
Lorsque le bouton (indicateur) s’allume, la durée de vie de
la batterie est faible. Remplacez avec des nouvelles piles.
Source lumineuse .........DEL blanche x 5
Pile ................................Piles alcalines AA x4
...Marche : Environ 30 heures, Clignotant : Environ 60 heures
Température ..................-10˚C – 40˚C
Dimensions/poids .........100 x 52 x 41,8 mm / 166 g (avec les batteries)
Les caractéristiques, la forme et la présentation générale sont sujettes à modifi cation *
Sumiyoshi-ku, Osaka 546-0041
Attn: CATEYE Customer Service
E-mail : support@cateye.co.jp
URL : http://www.cateye.com
2825 Wilderness Place Suite 1200,
E-mail : service@cateye.com