GREAT BRITAIN • CUSTOMER SERVICE contact number: 020 8247 9300 e-mail: customerservice@clasohlson.co.uk internet: www.clasohlson.co.uk
SVERIGE • KUNDTJÄNST tel: 0247/445 00 fax: 0247/445 09 e-post: kundservice@clasohlson.se internet: www.clasohlson.se
Ver. 20160118
Regeldetektor
Art.nr 40-8626 Modell Pro LCD
Läs igenom hela bruksanvisningen före användning och spara den sedan för framtida bruk. Vi reserverar oss för ev.
text- och bildfel samt ändringar av tekniska data. Vid tekniska problem eller andra frågor, kontakta vår kundtjänst.
Produktbeskrivning
Stud Detector
Art.no 40-8626 Model Pro LCD
Read the entire instruction manual before use and then safe it for future reference. We reserve the right to make
changes to text, images and technical data without prior notice. If you have any technical problems or questions,
please contact our customer services.
Product description
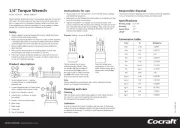
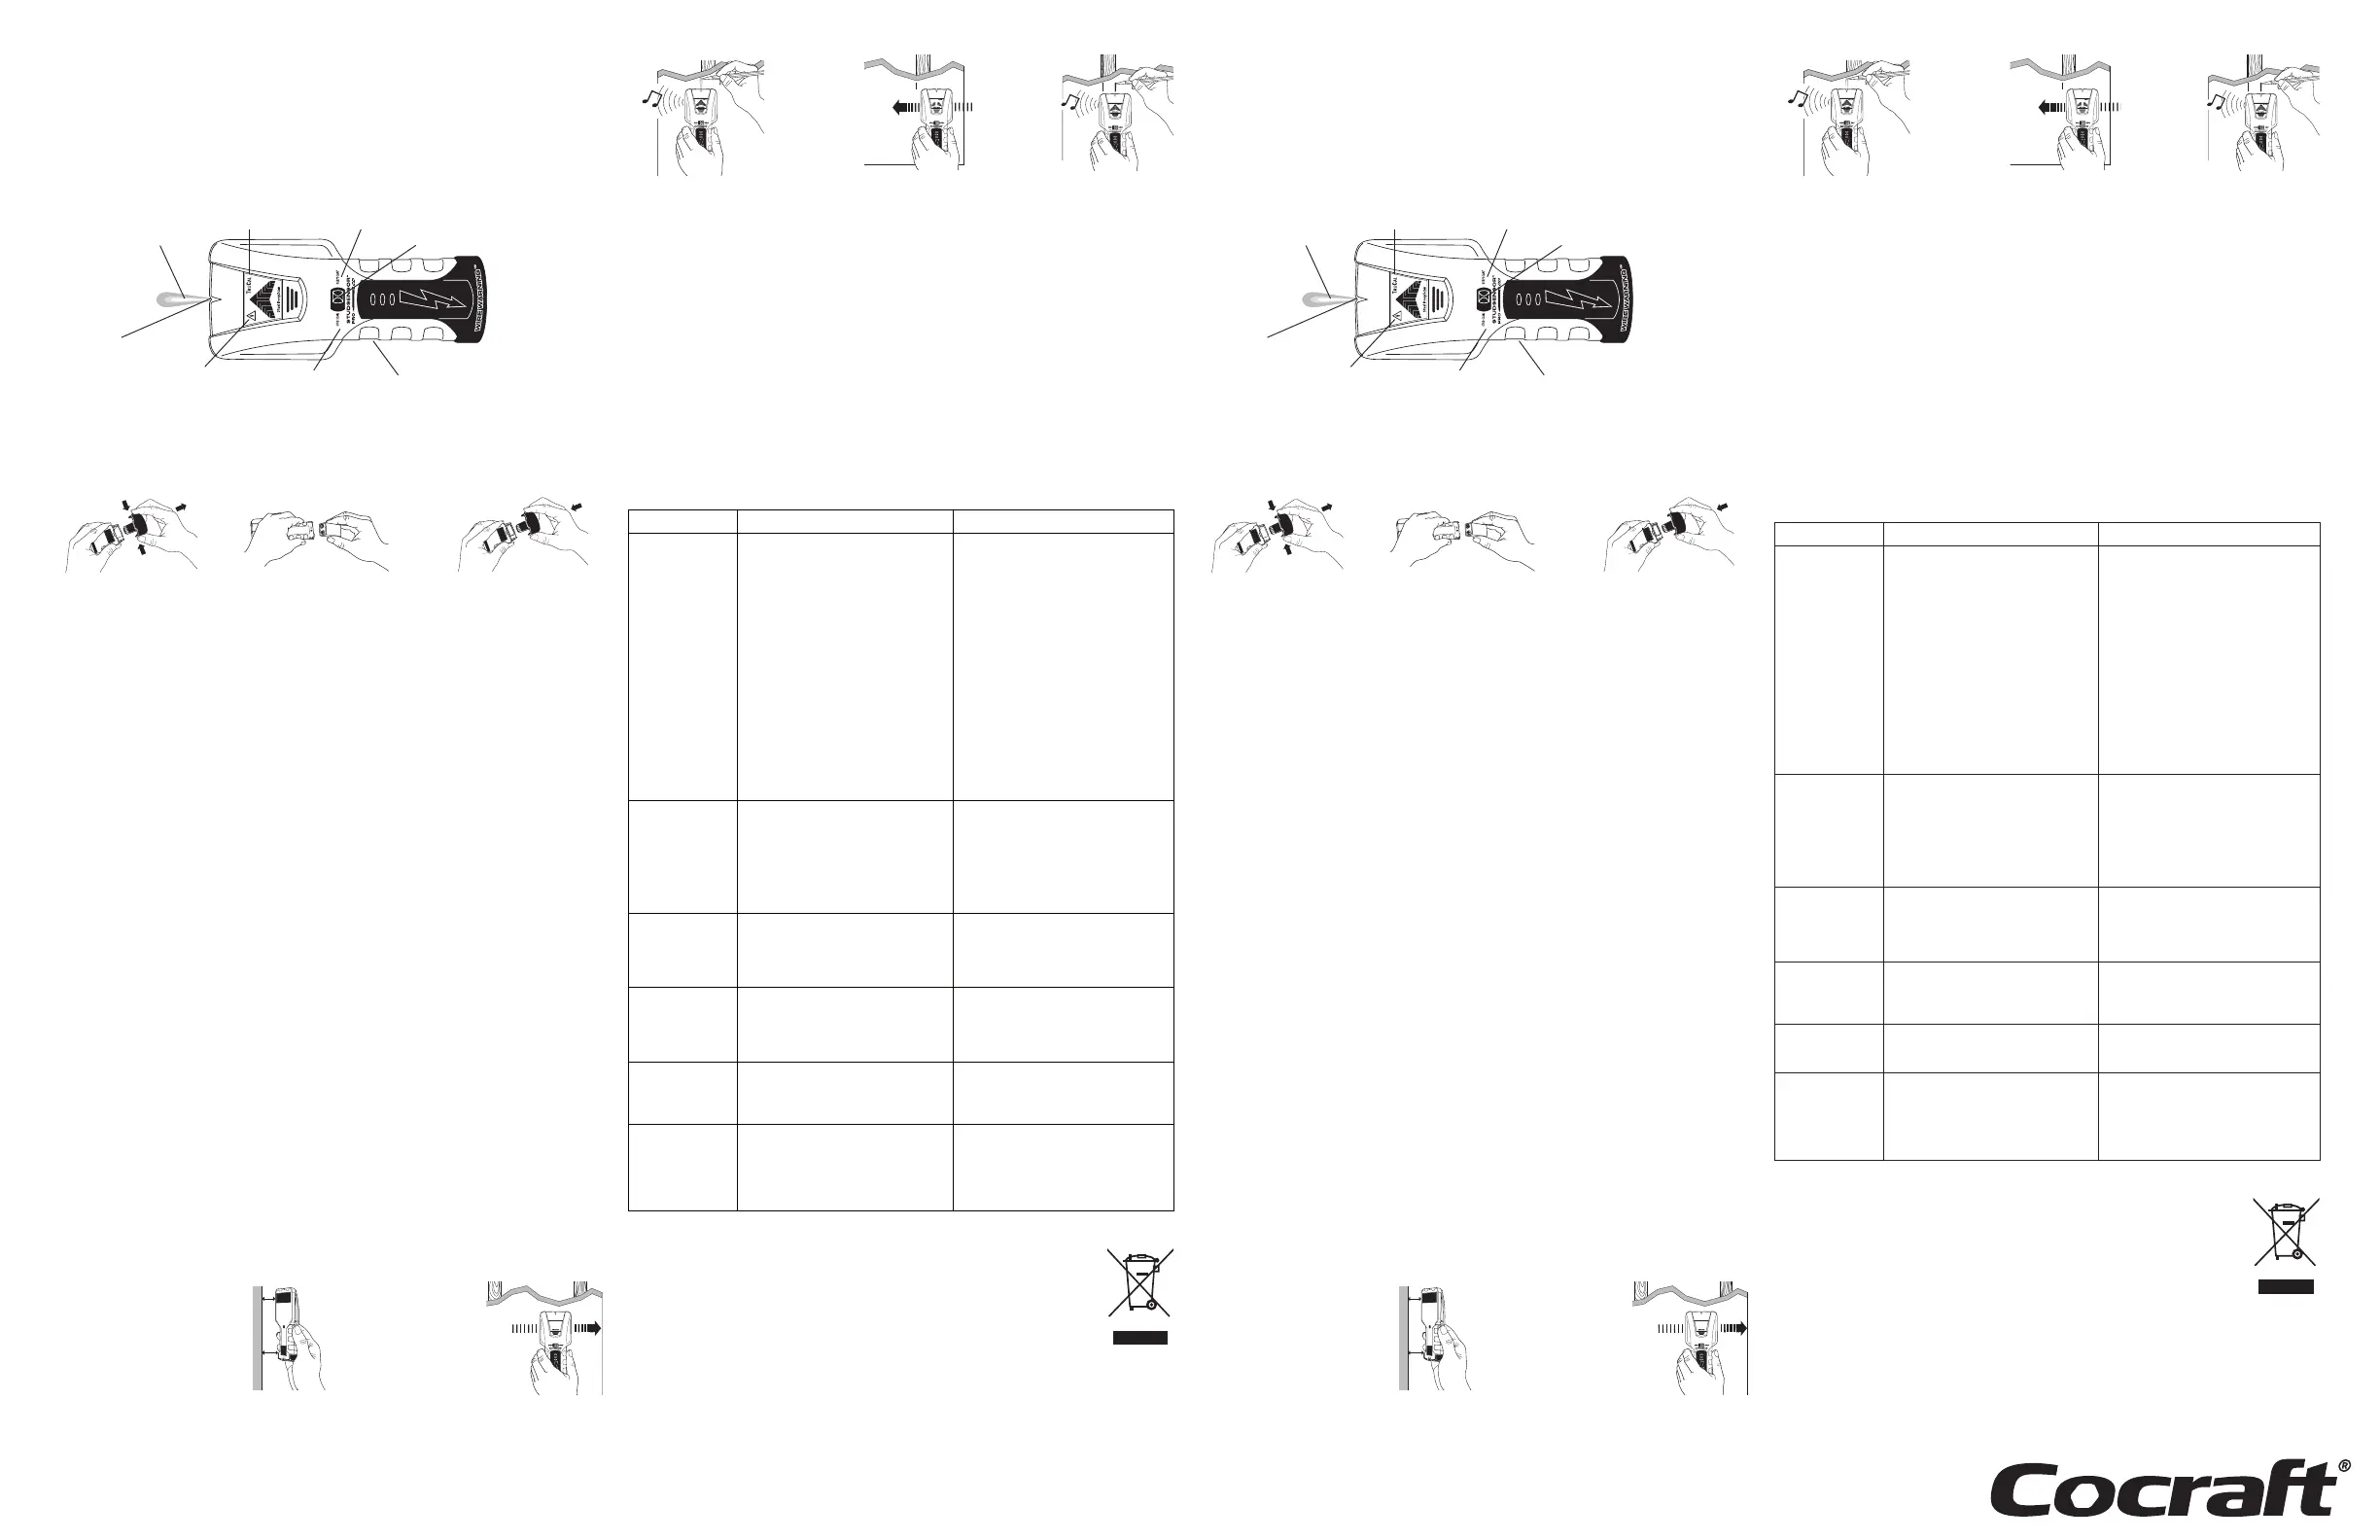
Skåra för markering
av regelns kant
Stud Edge Groove
SpotLite
®
Markeringssystem
SpotLite
®
Pointing System
WireWarning
®
Växelströmsindikering
WireWarning
®
Detection
Regelsökningsläge
(STUD SCAN)
STUD SCAN mode
StrömbrytarePower button
TruCal
®
-ikon.
Indikering av kalibrering
TruCal
®
Icon
Djupsökningsläge
(DEEP SCAN
®
)
DEEP SCAN
®
mode
LägesomkopplareMode switch
WireWarning
®
– Indikering av strömförande elledningar
WireWarning®-funktionen arbetar kontinuerligt med att detektera strömförande växelströmsledningar i både regel-
sökningsläge (STUD SCAN) och djupsökningsläge (DEEPSCAN®). Om man påbörjar en regelsökning över en strömfö-
rande ledning kommer ikonen WireWarning® att blinka kontinuerligt.
Varning! Verktyg som detekterar elektriska fält kan i vissa fall misslyckas med att indikera förekomst av strömförande
elledningar. Detta gäller om det finns fukt i väggen, om ledningarna ligger djupare än 51 mm in i väggen, inuti lednings-
rör, bakom puts på plywood eller där väggfärg eller tapet innehåller metall.
Varning! Förutsätt inte att väggen är fri från strömförande elledningar. Utför inte arbeten som kan vara farliga att utföra
ifall väggen innehåller strömförande elledningar. Stäng alltid av elektrisk ström, gas och vatten innan arbete som medför
genombrytning av ytan påbörjas. Om dessa instruktioner inte följs kan det leda till allvarliga skador på person och/eller
egendom genom elektriska stötar eller brand.
Varning! Bryt alltid strömmen till de elledningar som ligger nära det område där du tänker såga, borra, spika eller skruva.
Felsökning
Symptom Troliga orsaker Lösningar
Alla ikoner på
displayen blinkar
och enheten avger
en kontinuerlig
tonsignal.
• Sökningen påbörjades på en massiv
del av väggen, eller över en regel.
• Enheten kanske lyftes eller vinklades
från ytan under sökningen.
• Ytan är för tät eller fuktig för att
verktyget ska gå att använda.
• Släpp upp strömbrytaren, flytta verk-
tyget 5–8 cm åt sidan och börja om.
• På grova ytor kan en tunn bit papp
placeras mellan verktyget och väggen.
Verktyget kan på så sätt föras fram mjukt
över ytan.
• Håll den fria handen åtminstone 15 cm
från enheten medan verktyget kalibreras
och söker over ytan. Håll enheten med
tummen och pekfingret i höjd med
handgreppet. Var noga med att inte flytta
fingrarna efter kalibreringen.
• Håll alltid verktyget parallellt med regeln
och för det vinkelrätt mot regeln som söks.
• Om verktyget används på en nyligen
tejpad, målad eller tapetserad vägg, låt
väggen torka och försök sedan igen.
Kan inte detektera
reglar i regel-
sökningsläget.
Det mittersta
displaysegmentet
tänds inte eller
blinkar i regel-
sökningsläget.
Väggen är massiv eller tjockare än normalt. • Växla till djupsökningsläge (DEEP
SCAN®) för att detektera regeln.
• Tolka det mittersta paret staplar i
displayen som närmast regelns kant.
TruCal®-ikonen
tänds, men inget
annat händer då
man söker
• Enheten kanske lyftes från ytan under
sökningen.
• Om djupsökningsläget är valt
(DEEPSCAN®-indikatorn lyser), kan
verktyget p1-ha kalibrerats over en regel.
• Håll enheten så att de två glidremsorna
på baksidan har kontakt med väggen.
• Kalibrera om verktyget på ett annat ställe
och gör om sökningen.
Djupsökningsläget
(DEEPSCAN®) är
valt, men reglar kan
inte detekteras
Verktyget kan p1-ha kalibrerats över en regel. • Flytta verktyget 5–8 cm åt sidan och
kalibrera om.
• Håll enheten så att de två glidremsorna
på baksidan ligger an mot väggen.
Andra objekt än
reglar detekteras.
Elledningar, plast- eller metallrör kan finnas
alldeles under ytan på väggen.
Sök efter andra reglar med jämt avstånd,
normalt ca 30, 41, eller 61 cm, eller sök efter
samma regel ovanför eller under samma ställe.
Den yta som
detekteras som
strömförande är
orimligt stor.
Statisk elektricitet kan bildas i en gipsskiva
nära en elledning. Detta gör att verktyget
kan detektera växelström upp till ca 30 cm
på varje sida om ledningen.
För att göra detekteringen mer exakt, stäng
av och slå på enheten medan den hålls i
närheten av den plats där ledningen börjar
detekteras. Avsök sedan området igen.
Stäng alltid av strömmen då du ska såga,
borra eller spika i närheten av elledningar.
Avfallshantering
Denna symbol innebär att produkten inte får kastas tillsammans med annat hushållsavfall.
Dettagäller inom hela EU. Föratt förebygga eventuell skada på miljö och hälsa, orsakad av
felaktig avfallshantering,ska produkten lämnas till återvinning så att materialet kan tas omhand på
ettansvarsfulltsätt. Närdu lämnar produkten till återvinning, använd dig av de returhanteringssystem
som finns där du befinner dig eller kontakta inköpsstället. Dekan se till att produkten tas om hand på
ettför miljön tillfredställandesätt.
WireWarning® – Detection of live electrical wiring
The WireWarning® function works continuously to detect the presence of live AC electrical wiring in both STUD SCAN
mode and DEEPSCAN® mode. If a scan for a stud is begun over a live wire, the WireWarning® icon will flash continuously.
Warning! Instruments which detect electric fields can sometimes fail to detect the presence of live wiring. This is often
the case if the wall is damp, if the wiring is deeper than 51 mm, inside a conduit, behind plasterboard on plywood or if
the paint or wall covering contains metal.
Warning! Never assume that a wall is free of live electrical wiring. Do not begin any work on a wall which might be
dangerous if the wall contains live electrical wiring. Always switch off the electricity, gas and water before piercing
the surface of the wall. The failure to follow these instructions and warnings can lead to serious personal injury or
damage to property.
Warning! Always disconnect the power to any electric cables close to where you are about to saw, drill, nail or screw.
Troubleshooting
Symptom Probable cause Remedy
All the icons on the
display flash and the
detector emits an
audible tone.
• The scan was initiated over a solid part
of the wall or over a stud.
• The detector might have been tilted or
lifted off the wall during scanning.
• The surface is too dense or too damp
for the detector to work properly.
• Release the on/off switch, move the
detector 5-8 cm to the side and begin
again.
• On rough surfaces, a thin piece of paper
can be placed between the detector and
the wall. This will help the detector to
move smoothly over the surface.
• Keep your free hand at least 15 cm away
from the detector while it is calibrating
and scanning. Hold the detector
between your thumb and forefinger, level
with the grip. Make sure not to move
your fingers until a calibration reading
has been registered.
• Always hold the detector parallel to
the stud and move it at right angles to
the scanned stud.
• If the detector is being used on a newly
scrimmed, painted or papered wall, allow
the wall to dry before scanning it.
Doesn’t detect
studs in STUD
SCAN mode.
The centre segment
of the display does
not light up or
flashes in STUD
SCAN mode.
The wall is solid or thicker than a normal
wall.
• Switch the detector to DEEP SCAN
mode.
• Count the two innermost segments as
indicating the edge of the stud.
The TruCal®-icon
appears, but nothing
else happens during
a scan.
• The detector might have been tilted or
lifted off the wall during scanning.
• If you have set the detector to
DEEPSCAN®, it might have been
calibrated over a stud.
• Hold the detector with the two glide
pads on the back touching the wall.
• Recalibrate the detector at another
location and try re-scanning.
DEEPSCAN® mode
has been selected
but the instrument
does not detect
studs.
The detector might have been calibrated
over a stud.
• Move the detector 5-8 cm to the side
and recalibrate it.
• Hold the detector with the two glide
pads on the back touching the wall.
Objects other than
studs are detected.
Electrical wires, plastic or metal pipes
could be present just below the surface.
Scan for studs with equidistant spacing,
normally 40 or 60 cm, or search for
the same stud by scanning above or below
the original location.
The area indicated
as live wiring is
unreasonably large.
Static electricity can build up in plaster-
board close to an electric cable. This could
cause the detector to indicate the presence
of AC wiring up to 30 cm on either side of
the actual cable.
To increase the accuracy, switch
the detector off and on whilst it is held over
the edge of the detection area.
Commence the scan again.
Always turn the power off before beginning
to saw, drill or nail close to electrical wiring.
Responsible disposal
This symbol indicates that this product should not be disposed of with general householdwaste.
Thisapplies throughout theentire EU. Inorder to prevent any harm to theenvironment or health
hazards caused by incorrect waste disposal, theproduct must be handed in for recycling so that
thematerial can be disposed of in aresponsible manner. Whenrecycling your product, take it to your
local collection facility or contact theplace of purchase. Theywill ensure that theproduct is disposed
of in anenvironmentally sound manner.
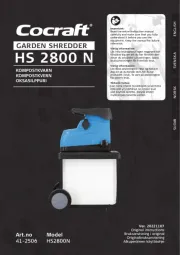
Sätta i batteriet
VIKTIGT! Lossa inte skruven baktill på verktyget.
Inserting the battery
IMPORTANT: Do not remove any of the screws on the back panel of the instrument.
1. Tryck lätt på sidorna för att
ta bort batteriluckan.
1. Gently press in the sides of
the instrument to release
the battery cover.
2. Placera ett 9 V-batteri i batteri-
facket. Var noga med att passa
in plus- (+) och minuspolerna
(-) korrekt.
2. Insert one 9 V battery ensuring
that the positive and negative
terminals are connected
correctly.
3. Sätt tillbaka batteriluckan.3. Refit the battery cover.
Användningstips
För optimala sökresultat:
• Håll verktyget rakt upp, parallellt med reglarna. Undvik att vrida verktyget.
• Håll verktyget helt plant mot väggen. Undvik att vinkla upp verktyget eller trycka det för hårt mot ytan
som ska avsökas.
• Vidrör inte ytan som ska avsökas med den lediga handen eller annan del av kroppen.
• I vissa fall kan elledningar eller rör i väggen detekteras på samma sätt som reglar. Var alltid mycket försiktig med att
såga, borra eller spika i väggar, golv eller tak där dessa typer av objekt finns.
• Som en tumregel kan man utgå från att reglar och tvärbjälkar har ett jämnt mellanrum på cirka 41 eller 61 cm, och
att de normalt är cirka 38–45 mm breda. Objekt med andra avstånd eller bredd kan vara något annat än en
regel, tvärbjälke eller brandavskiljande konstruktion.
• Oregelbundna eller felaktiga sökresultat kan bero på luftfuktighet, fukt inuti väggen/skivmaterialet eller att väggen är
nymålad eller nytapetserad. De här typerna av fukt syns för det mesta inte men påverkar verktygets sensorer. Vänta
ett par dagar och låt väggen torka upp.
Varning! Man ska inte förlita sig enbart på en regeldetektor för att upptäcka föremål bakom en yta. Använd också
andra informationskällor för att lokalisera föremål innan ytan genombryts, t.ex. byggritningar och synliga genomföringar
av rör och elektriska ledningar som exempelvis kan ses från källarplan. Bryt alltid strömmen till de elledningar som
ligger nära det område där du tänker såga, borra, spika eller skruva.
Arbeta på olika väggytor
Regeldetektorn är avsedd för användning på torra innerväggar och kan effektivt detektera reglar genom de flesta
material, inklusive:
• Massiva trägolv. Använd djupsökningsläget (DEEP SCAN®).
• Linoleum på trä.
• Gipsskivor på plywoodskivor.
• Tapetserade väggar (då dessa är helt torra).
• Texturmålade eller putsade tak om ytbehandlingen är jämntjock.
(Placera en tunn bit papp mellan verktyget och ytan för att förhindra skador på ytbehandlingen).
Regeldetekorn är inte avsedd för material som:
• Keramiskt klinkergolv.
• Tjocka heltäckningsmattor.
• Tapet som innehåller metallfibrer.
• Nymålade väggar som fortfarande är fuktiga (det kan ta en vecka eller mer innan färgen torkat helt).
• Puts på plywood.
• Folietäckt isolering.
• Glas eller andra material med hög densitet.
OBS! Sökdjup och känslighet kan variera beroende på fukt, typ av material, ytbehandling och färg.
Välj detekteringsläge
Flytta omkopplaren till läge STUD SCAN för att lokalisera trä- eller metallreglar eller DEEP SCAN
®
för att lokalisera
reglar bakom vägg som är mer än 19 mm tjock. Verktyget förblir avstängt om inte strömbrytaren hålls intryckt.
Söka efter reglar
Useful tips
For best results:
• Hold the instrument vertical, parallel to the studding in the wall. Try not to rotate the instrument during scanning.
• Hold the instrument flat against the wall. Avoid tilting the instrument or pressing it too hard against the surface
being scanned.
• Do not touch the surface being scanned with your free hand or any other part of your body.
• In certain instances concealed electric cables or pipes can be detected as studding so you should always be very
careful when sawing, drilling or nailing into walls, floors or ceilings where these objects might be located.
• As a rule of thumb, wall studs and noggings are usually spaced 400 or 600 mm between centres and are normally
about 50 mm wide. Objects with other spacings or widths might be something other than studs, noggings
or fire barrier constructions.
• Irregular or inaccurate results could be caused by air humidity, dampness in the walls or because the wall has just
been painted or wallpapered. This type of moisture is not visually apparent but can affect the instrument’s sensors.
Wait a couple of days to allow the wall to dry.
Warning! One should not rely solely on a stud detector to locate concealed objects. Use other sources of information
to help locate concealed objects such as building plans or following the path of visible pipes or cables to ascertain the
probable location of hidden sections. Always disconnect the power to any electric cables close to where you are about
to saw, drill, nail or screw.
Effective on a variety of materials
This stud detector is designed for use on dry interior walls and can detect studs through most materials, including:
• Solid wood floors, using the deep scan mode (DEEP SCAN®).
• Linoleum on wood.
• Plasterboard on plywood.
• Wallpapered walls (when completely dry).
• Artexed or plastered ceilings if the coating is of even thickness.
(Place a thin piece of paper between the surface and the instrument to prevent surface damage).
The stud detector is not designed for use on:
• Ceramic floor tiles.
• Thick carpets.
• Wallpaper containing metallic fibres.
• Freshly painted walls that are still not completely dry (paint can take up to a week to fully dry).
• Plastered plywood.
• Foil-backed insulation.
• Glass or other material with a high density.
Note: Scanning depth and sensitivity can vary depending on humidity, type of material, surface coating and paint.
Selecting detection mode
Set the selector to STUD SCAN mode for the detection of wooden or metal studding or DEEP SCAN® for the detection
of studding hidden behind a wall more than 19 mm thick. The instrument will remain switched off unless the on/off
switch is held down.
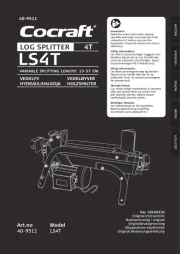
Scanning for studding
1. Håll alltid skannern plant mot
ytan som ska avsökas. För om-
kopplaren till läget STUD SCAN,
håll verktyget plant mot ytan, tryck
därefter ned strömbrytaren och håll
den intryckt. Flytta inte verktyget
förrän kalibreringen är klar och den
röda indikatorn (READY) lyser.
1. Always hold the stud detector flat
against the surface being scanned.
Set the selector to STUD SCAN
mode, hold the detector against
the wall, press the on/off switch
and hold it down. Do not move the
detector until it has calibrated and
the red READY light comes on.
2. Fortsätt att hålla
strömbrytaren intryckt
och för verktyget
horisontellt över ytan.
Då verktyget närmar
sig en regel kommer
segmenten i pil-ikonen
att tändas upp.
2. Keep the on/off switch
pressed down and
move the detector
horizontally across
the surface. When the
detector gets close to
a stud, a segmented
arrowhead will appear
on the display screen.
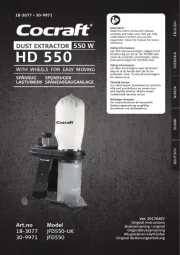
3. När verktyget detekterar en kant
på en regel tänds den översta
röda indikatorn (EDGE), en
tonsignal hörs och SpotLite®-
markören lyser. Märk ut denna
punkt på väggen.
3. When the edge of a stud is
detected a full arrow will display,
an audible signal will be emitted
and the SpotLite® Pointing
System will appear. Mark this
point on the wall.
4. Fortsätt att hålla strömbrytaren
intryckt, och fortsätt sökningen
förbi den markerade punkten tills
den röda EDGE-indikatorn slocknar.
För nu verktyget tillbaka mot samma
punkt för att detektera den andra
kanten på regeln.
4. Keep the on/off switch pressed
down and continue the scan past
the point you have just marked until
some segments of the arrow turn off.
Now move the detector back
towards the same mark to detect
the other edge of the stud.
5. Märk ut även denna punkt.
Regelns centrum finns mitt
emellan de två markerade
punkterna.
5. Mark this point on the
wall as well. The middle
of the stud will be halfway
between the two marks.