Cocraft HT-155 Manual


Læs gratis den danske manual til Cocraft HT-155 (5 sider) i kategorien Laser pointer. Denne vejledning er vurderet som hjælpsom af 27 personer og har en gennemsnitlig bedømmelse på 3.7 stjerner ud af 14 anmeldelser. Har du et spørgsmål om Cocraft HT-155, eller vil du spørge andre brugere om produktet?

Side 1/5
GREAT BRITAIN • CUSTOMER SERVICE tel. 020 8247 9300 e-mail customerservice@clasohlson.co.uk internet www.clasohlson.co.uk postal 1013 Market Place, Kingston Upon Thames, Surrey, KT1 1JZ
5
6
1
4
3
2
7
8
9
10
11
12
13
14
15
16
Ver. 20170105
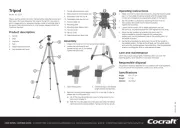
Tripod
Art.no 41-1225
Please read theentire instruction manual before using theproduct and
then save it for future reference. We reserve theright for any errors in
text or images and any necessary changes made to technical data. In
theevent of technical problems or other queries, please contact our
Customer Services.
Product description
Assembly
1. Unpack thetripod and remove all packing materials.
1. Handle
2. Legs
3. Leg locks
4. Feet
5. Height adjustment crank
6. Leg spreader lock knob
Operating instructions
1. Make sure that thetripod stands level by using thetripod’s bubble
vial (11), thebubble should be centred within thetarget circle.
Correct any imbalances by adjusting thelength of thefeet (4).
2. Set thehandle’s (1) position by loosening thelock knob (7),
then position thehandle into thedesired position.
Tighten thelock knob.
3. Loosen thelock knob (16) for height adjustment and use
thecrank (5), for precise adjustment, then tighten thelock knob.
4. Adjust thepan position by loosening thelock knob (14).
Use thehandle to rotate thehead into thedesired pan
position and use thegraduated scale on thepanning disc (10)
for greater accuracy.
5. Set thetilt by loosening thelock knob (15) and tilt thehandle to
thedesired position. To help set thetilt level use thebubble vial (8)
and centre thebubble between thebubble lines. Use thegraduated
scale on thetilting disc (9) for amore precise tilt angle.
Care and maintenance
Clean theproduct using alightly moistened cloth. Use only mild
cleaning agents, never solvents or corrosive chemicals.
Responsible disposal
Theproduct should be disposed of in accordance with local regulations.
If you are unsure how to proceed, contact your local council.
Specications
Height 68−175 cm
Weight 2.1 kg
Material Aluminium
7. Handle adjustment lock knob
8. Measuring instrument bubble vial
9. Graduated scale disc for tilt
10. Graduated scale disc for pan
11. Tripod bubble vial
12. Mounting plate
13. Mounting plate release catch
14. Pan lock knob
15. Tilt lock knob
16. Height adjustment lock knob
2. Loosen thelock knob (6) and
spread thelegs out (2) completely.
Tighten thelock knob.
3. Open theleg locks. 4. Extend thelegs to thedesired
length and lock theleg locks.
5. Slide themounting plate release catch (13) to theside in order to
release themounting plate (12).
a) Lift off themounting plate and screw its fixing screw to your
instrument to fasten it.
b) Refit themounting plate back into place and slide therelease
catch back into its locked position, making sure that it is secure.
SVERIGE KUNDTJÄNST tel 0247/445 00 fax 0247/445 09 e-post kundservice@clasohlson.se internet www.clasohlson.se brev Clas Ohlson AB, 793 85 INSJÖN
5
6
1
4
3
2
7
8
9
10
11
12
13
14
15
16
Ver. 20170105
Stativ
Art.nr 41-1225
Läs igenom hela bruksanvisningen före användning och spara den
sedan för framtida bruk. Vi reserverar oss för ev. text- och bildfel samt
ändringar av tekniska data. Vid tekniska problem eller andra frågor,
kontakta vår kundtjänst.
Produktbeskrivning
Montering
1. Packa upp stativet och avlägsna emballaget.
1. Handtag
2. Ben
3. Snäpplås
4. Fot
5. Vev för höjdjustering
6. Låsvred för att fälla ut benen
Användning
1. Kontrollera att stativet sr ivåg med hjälp av libellen (11), bubblan
ska vara centrerad icirkeln på fönstret. Korrigera genom att ändra
benens längd med de justerbara fötterna (4).
2. Ställ in handtagets (1) position genom att lossa låsvredet (7),
vrid handtaget till önskad position. Dra åt låsvredet.
3. Lossa låsvredet (16) för höjdjustering och finjustera höjden med
veven (5), dra åt låsvredet.
4. Justera den horisontella positionen för mätinstrumentet genom att
lossa låsvredet (14). För handtaget isidled och dra åt låsvredet vid
önskad position, här kan den horisontella gradskivan (10) vara till hlp.
5. Ställ in den vertikala positionen genom att lossa på låsvredet (15),
pressa handtaget uppåt eller nedåt för att hitta önskad position.
Om det vertikala läget ska vara ivåg kan du använda libellen (8),
bubblan ska vara mellan strecken på fönstret. Om annan position
önskas kan den vertikala gradskivan (9) vara till hjälp.
Skötsel och underhåll
Rengör produkten med enlätt fuktad trasa. Använd ettmilt rengörings-
medel, aldrig lösningsmedel eller frätande kemikalier.
Avfallshantering
När du ska göra dig av med produkten ska detta ske enligt lokala föreskrifter.
Är du osäker på hur du ska gå tillväga, kontakta din kommun.
Specikationer
Höjd 68−175 cm
Vikt 2,1 kg
Material Aluminium
7. Låsvred för handtagsjustering
8. Libell för mätinstrument
9. Vertikal gradskiva
10. Horisontell gradskiva
11. Libell för stativ
12. Fästplatta för mätinstrument
13. Spärr för fästplatta
14. Låsvred för horisontalläge
15. Låsvred för vertikalläge
16. Låsvred för höjdjustering
2. Lossa låsvredet (6) och vik ut
benen (2) helt. Dra åt låsvredet.
3. Öppna snäpplåsen (3). 4. Dra ut benen till önskad
längd och stäng sedan
snäpplåsen.
5. Tryck spärren (13) isidled för att frigöra fästplattan (12).
a) Lyft av plattan och fäst ditt mätinstrument genom att skruva
fast det med skruven ifästplattan.
b) Sätt plattan på plats genom att åter trycka spärren isidled,
se till att den hakar iordentligt.


Produkt Specifikationer

Mærke: Cocraft
Kategori: Laser pointer
Model: HT-155

Har du brug for hjælp?

Hvis du har brug for hjælp til Cocraft HT-155 stil et spørgsmål nedenfor, og andre brugere vil svare dig


Laser pointer Cocraft Manualer
Cocraft

Cocraft NLL01 Manual

8 September 2024
Cocraft

Cocraft HT-155 Manual

15 August 2024
Cocraft

Cocraft HL 10-S Manual

15 August 2024
Cocraft

Cocraft HL10-ST Manual

15 August 2024
Cocraft

Cocraft LC50-SP Manual

7 August 2024
Cocraft

Cocraft HL 20-SG Manual

6 August 2024
Cocraft

Cocraft RL13BMC Manual

21 Juli 2024

Laser pointer Manualer

Nyeste Laser pointer Manualer