Constructa CM321053 Manual
Læs gratis den danske manual til Constructa CM321053 (7 sider) i kategorien Komfur. Denne vejledning er vurderet som hjælpsom af 13 personer og har en gennemsnitlig bedømmelse på 4.1 stjerner ud af 7 anmeldelser.
Har du et spørgsmål om Constructa CM321053, eller vil du spørge andre brugere om produktet?

Produkt Specifikationer
| Mærke: | Constructa |
| Kategori: | Komfur |
| Model: | CM321053 |
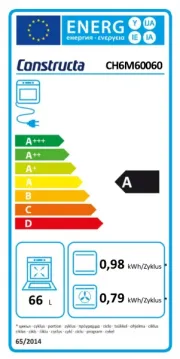
| Vekselstrømsindgangsspænding: | 220 - 240 V |
| Vekselstrømsindgangsfrekvens: | 50-60 Hz |
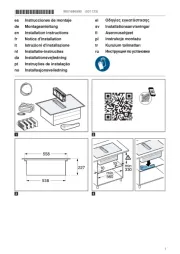
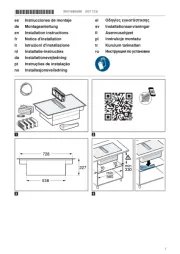
| Bredde: | 583 mm |
| Dybde: | 513 mm |
| Højde: | 43 mm |
| Vægt: | 6860 g |
| Produktfarve: | Sort |
| Indbygget skærm: | Ingen |
| Pakkevægt: | 8000 g |
| Pakkedybde: | 590 mm |
| Pakkebredde: | 750 mm |
| Pakkehøjde: | 100 mm |
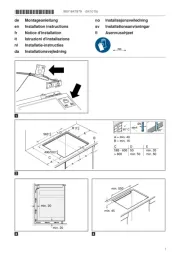
| Placering af apparat: | Indbygget |
| Installationsrum bredde: | 560 mm |
| Installationsrum højde: | 43 mm |
| Komfurtype: | Keramisk |
| Overfladetype: | Keramisk |
| Antal kogeplader / madlavningsområde: | 4 |
| Antal elektriske kogeplader: | 4 |
| Blus/kogeplade zone 1 strøm: | 2000 W |
| Blus/kogeplade zone 2 strøm: | 1200 W |
| Blus/kogeplade zone 1 type: | Regelmæssig |
| Kogezone 1 form: | Rund |
| Blus/kogeplade zone 1 position: | Venstre bagende |
| Blus/kogeplade zone 1 strømkilde: | Elektrisk |
| Blus/kogeplade zone 2 type: | Simre |
| Kogezone 2 form: | Rund |
| Blus/kogeplade zone 2 position: | Venstre front |
| Blus/kogeplade zone 2 strømkilde: | Elektrisk |
| Tilsluttet belastning (elektrisk): | 6600 W |
| Ovnbredde størrelse: | 60 cm |
| Blus/kogeplade zone 3 type: | Simre |
| Blus/kogeplade zone 4 type: | Stor |
| Blus/kogeplade zone 2 diameter: | 145 mm |
| Blus/kogeplade zone 1 diameter: | 180 mm |
| Blus/kogeplade zone 3 diameter: | 145 mm |
| Blus/kogeplade zone 4 diameter: | 210 mm |
| Blus/kogeplade zone 4 strømkilde: | Elektrisk |
| Kogezone 4 form: | Rund |
| Blus/kogeplade zone 3 strømkilde: | Elektrisk |
| Kogezone 3 form: | Rund |
| Blus/kogeplade zone 3 position: | Højre bagende |
| Blus/kogeplade zone 4 position: | Højre forside |
| Restvarmeindikator: | Ingen |
| Tilsluttet belastning (gas): | 0 W |
| Højde under bordplade: | 20 mm |
| Blus/kogeplade zone 4 strøm: | 2200 W |
| Blus/kogeplade zone 3 strøm: | 1200 W |
| Sensorkog: | 4 |
| Ramme, farve: | Rustfrit stål |
| Antal pander og gryder, der anvendes på samme tid: | 4 |
| Installation, rum dybde (maks.): | 500 mm |
| Rammetype: | Fuld beskæring |
| Installation, rum dybde (min.): | 490 mm |
Har du brug for hjælp?
Hvis du har brug for hjælp til Constructa CM321053 stil et spørgsmål nedenfor, og andre brugere vil svare dig
Komfur Constructa Manualer


Komfur Manualer
- MPM
- FAR
- Bomann
- Heinner
- Atosa
- Unold
- Heller
- Wilfa
- PITSOS
- Voss
- Technika
- Fuxtec
- Eurochef
- Avanti
- Everglades
Nyeste Komfur Manualer


