Replacement of Output Cable
1. Disconnect power source.
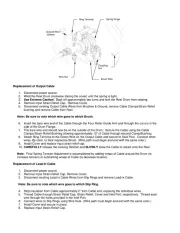
2. Wind the Reel Drum clockwise (facing the cover) until the spring is tight.
3. Use Extreme Caution! Back off approximately two turns and lock the Reel Drum from rotating.
4. Remove Input Strain Relief Cap. Remove Cover.
5. Disconnect existing Output Cable Wires from Brushes & Ground, remove Cable Clamps/Strain Relief
bushing and remove Cable from Reel.
Note: Be sure to note which wire goes to which Brush.
6. Insert the bare wire end of the Cable through the Four Roller Guide Arm and through the cut-out in the
7. The bare wire end should now be on the outside of the Drum. Secure the Cable using the Cable
Clamps/Strain Relief Bushing allowing approximately 10" of Cable through second Clamp/Bushing.
8. Attach Ring Terminal to the Green Wire on the Output Cable and secure to Stud Post. Connect other
wires, By color, to their respective Brush. (Wire path must begin and end with the same color.)
9. Install Cover and replace input strain relief cap.
10. CAREFULLY release the Locking Ratchet and SLOWLY allow the Cable to retract onto the Reel.
Note: Final Spring Tension Adjustment is accomplished by adding wraps of Cable around the Drum (to
increase tension) or subtracting wraps of Cable (to decrease tension).
Replacement of Lead-In Cable
1. Disconnect power source.
2. Remove Input Strain Relief Cap. Remove Cover.
3. Disconnect existing Lead-in Cable Wires from Slip Rings and remove Lead-in Cable.
Note: Be sure to note which wire goes to which Slip Ring.
4. Strip insulation from Cable approximately 2” from Cable end, exposing the individual wires.
5. Thread Cable through Strain Relief Cap, Strain Relief, Cover and Inlet Port, respectively. Thread each
wire through the holes provided in the Inlet Port.
6. Connect wires to Slip Rings using Wire Nuts. (Wire path must begin and end with the same color.)
7. Install Cover and secure in place.
8. Replace Input Strain Relief Cap.