GB/IE/NI GB/IE/NI GB/IE/NI GB/IE/NI GB/IE/NI GB/IE/NI GB/IE/NI
GB/IE/NI GB/IE/NI GB/IE/NI GB/IE/NI GB/IE/NI GB/IE/NI GB/IE/NI
rights are not limited in any way by our warranty
The warranty for this product is 3 years from the
date of purchase. Should this product show any
fault in materials or manufacture within 3 years
from the date of purchase, we will repair or re-
place it – at our choice – free of charge to you.
The warranty period begins on the date of
purchase. Please keep the original sales receipt in
a safe location. This document is required as your
proof of purchase. This warranty becomes void if
the product has been damaged, or used or main-
The warranty applies to defects in material or ma-
nufacture. This warranty does not cover product
parts subject to normal wear, thus possibly conside-
red consumables (e.g. batteries) or for damage to
fragile parts, e.g. switches, rechargeable batteries
amendments. Return batteries and / or the product
to the provided recycling facilities.
Improper disposal of batteries
can harm the environment!
Never dispose of batteries in your household waste.
They may contain toxic heavy metals and are sub-
ject to hazardous waste regulations. The chemical
symbols of the heavy metals are: Cd = cadmium,
Hg = mercury, Pb = lead. Therefore, dispose of used
batteries through your municipal collection site.
The product has been manufactured to strict quality
guidelines and meticulously examined before deli-
very. In the event of product defects you have legal
rights against the retailer of this product. Your legal
The product and packaging materials
are recyclable, dispose of it separately
for better waste treatment. The Triman
logo is valid in France only.
Contact your local refuse disposal
authority for more details of how to
dispose of your worn-out product.
In the interest of the environment, do not
throw out your product with your house-
hold refuse. Take it to a suitable centre
where it can be disposed of properly.
Your local council will be able to tell you
where the collection centres are located
Faulty or used batteries must be recycled in accord-
ance with Directive 2006 / 66 / EC and its
At longer time the product is not used, take out
the battery and change it as described in the
chapter “Replacing batteries “
The packaging is made entirely of recy-
clable materials, which you may dispose
of at local recycling facilities. The Green
Dot is not valid for Germany.
Observe the marking of the packaging
materials for waste separation, which
are marked with abbreviations (a) and
numbers (b) with following meaning:
1–7: plastics / 20–22: paper and fibre-
board / 80–98: composite materials.
The product contains electronic components. There-
fore, interference may occur when it is near devices,
which transmit radio signals.
If error messages appear in the display, remove
these devices from the proximity of the product. In
the event of such malfunctions, remove the batteries
briefly and reinsert them.
Never use liquids or abrasive cleaning agents
as they could damage the product.
Only the exterior of the product should be
cleaned with a soft, dry and lint-free cloth.
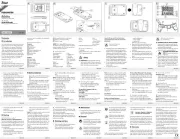
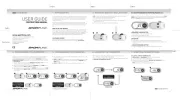
Add a cord to hang the product around your
neck. Use the fastening eye on the left of the
Note: Do not hang the product around your neck
when you are jogging or running.
The product now registers the impacts of the body
and records the number of steps covered, the dis-
tance covered, the calories burnt and the time re-
quired. You can read the values in the LC display
, as described in chapter „Prior to start-up“. You
can also read the data from the last 7days and
the entire number of steps walked during the last
Note: The recorded values are approximate. A
varying step length and external factors such as
clothing, terrain etc. can hinder exact measurement.
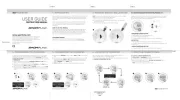
Proceed with changing the batteries as illus-
Ensure correct polarity. This is indicated in the
Wear the product as described below:
You can securely attach the product to your trouser
belt by means of the belt clip
in your trouser pocket, or hang it around your neck.
Read the following instructions to obtain an accu-
Put the product in your front trouser pocket and
not in your back pockets.
Ensure that the product lies securely against
your body / clothing in order to obtain an ac-
GB/IE/NI GB/IE/NI GB/IE/NI GB/IE/NI GB/IE/NI GB/IE/NI GB/IE/NI
Every consumer is legally obliged to dispose
of batteries in the proper manner!
Keep the battery out of reach of children, do not
throw the battery into fire, do not short-circuit
or take the battery apart.
If you do not observe these instructions, the
battery could be discharged beyond the cut-off
voltage. This will then pose a risk of leaking. If
the battery has leaked inside your product,
you should remove it immediately in order to
prevent damage to the product!
Avoid contact with the skin, eyes and mucous
membranes. Any part of the body coming into
contact with battery acid should be rinsed off
with a large amount of water and / or a doctor
should be contacted if necessary!
Use only the recommended battery type.
Remove the protective film from the LC display
before you use the product for the first
Then place a battery type CR2032 (3 V
lithium) in the battery compart-
Note: The product will now perform a brief display
check. All displays will be shown for approx.1sec-
ond. The product then switches into the set-up mode.
Your product is now ready to be configured.
You must enter your personal data before you use
the product for the first time. You can change the
following values successively:
browse through the different values.
- Set the distance unit (km / mile).
Note: Changing the distance unit (km / mile) will
also change the unit for weight (kg / lb) and height
(cm / inch) and step length accordingly.
- Set the time format (12 / 24 hr).
- Set the day of the week.
Note: Ensure when entering that you take addi-
tional weight into consideration such as clothing or
Note: Measure the step length.
1. Measure a 28-meter distance. Mark the
starting and finishing line.
2. Count the number of steps you need to
finish the distance of 28 meters.
3. Divide 28 meters by the number of steps
and you will get the step length.
Confirm your setting by pressing the SET button.
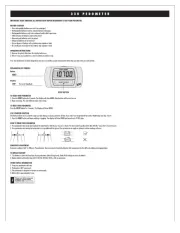
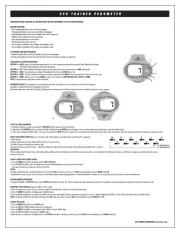
browse through the different modes (TIME,
STEP and 7-day storage modes).
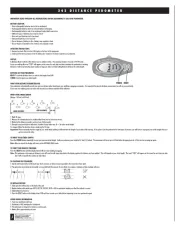
The product is equipped with the
indicates the current time and
The number of the measured steps of the current
day, as well as the trip time, are displayed.
Note: This product is equipped with 10-step-filter
to enhance the step count accuracy. This requires
at least 10 steps for the sensor to gather user’s trip
behavior for speed and distance calculation.
Hence the initial display of the step count will be
through Trip time / Trip distance / Calories
used/ Fat burnt in STEP mode.
The activity time of the product for the current day
The distance covered on the current day (in km).
Calories used and fat burnt:
The calories used and fat burnt (in g) on the current
Previous Day Mode and 7-day storage:
The number of steps, exercise time, distance comple-
ted, calorie counter and fat burnt per day is saved
automatically by the product. The values are re-set
respectively at 0:00 o‘clock.
through the saved data from the last 7 days,
total week record for the last 7 days and the
accumulated total trip distance ODO (km).
onds. The backlight illuminates for 3 seconds.
If the product is not used for approx. three
minutes, it switches automatically to the energy
savings mode. The LC-display
multaneously pressed. All stored data will be
deleted. The product then switches back into
Note: You may also change the time without
losing the stored training data.
In the time mode, keep the SET button pressed
until TIME is displayed on the LC-display.
To change the time, proceed as described in
Note: All stored data will be deleted when you
Note: Please ensure the LC-Display is protected
from scratches when replacing batteries.
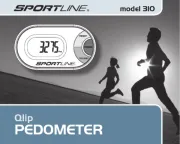
We congratulate you on the purchase of your new
product. You have chosen a high quality product.
The instructions for use are part of the product.
They contain important information concerning
safety, use and disposal. Before using the product,
please familiarise yourself with all of the safety
information and instructions for use. Only use the
product as described and for the specified applica-
tions. If you pass the product on to anyone else,
please ensure that you also pass on all the
The product records the number of steps you have
taken, the distance covered, the required time and
the calorie consumption. The product is only for
private use and is not suitable for the recording of
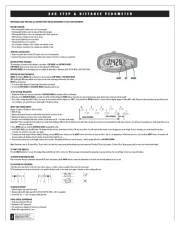
Battery compartment cover
PM symbol (afternoon in 12hr format)
Display for low battery warning
be switched off. However, the power consumption
required to operate the LCD is very low and com-
parable to that of a wristwatch.
Step display: 0–99999 steps
Distance display: 0–9999 km
Calorie display: 0–99999 kcal
Adjustable user weight: 30–219 kg (can be
Adjustable step length: 25–249 cm
Battery: 1 battery CR2032
Permissable temperature range: 0–50 °C
(direct current), Lithium)
1 Set of operating instructions
WARNING! Please read all the safety infor-
mation and instructions. Failure to observe the
safety information and instructions can result in
electric shock, fire and / or serious injury.
PLEASE KEEP ALL SAFETY INSTRUCTIONS
AND INSTRUCTIONS FOR USE FOR FUTURE
This product can be used by children aged from
years and above and persons with reduced
physical, sensory or mental capabilities or lack of
experience and knowledge if they have been
given supervision or instruction concerning use of
the product in a safe way and understand the
hazards involved. Children shall not play with the
product. Cleaning and user maintenance shall
not be made by children without supervision.
Do not use the product if damaged. Damaged
products represent a danger of death from
Otherwise it may be damaged.
Please note that the guarantee does not cover
damage caused by incorrect handling, non-
compliance with the operating instructions or
interference with the product by unauthorised
Never disassemble the product. Improper re-
pairs may result in considerable danger for the
Always have repairs performed by a profes-
Keep the product dry. Never immerse the prod-
uct in water or other liquids.
WARNING! RISK OF FATAL INJURIES!
Batteries could be swallowed, which may be
life-threatening. If a battery has been swallowed,
seek medical help immediately.
Remove the battery from the product if it is not
going to be used for a prolonged period.
ARD! The batteries may never be
When inserting the battery ensure the correct po-
larity! This is indicated in the battery compart
Clean the battery and device contact before you
insert the battery with a dry cloth if necessary.
Remove the dead battery immediately from the
product. There is an increased risk of leaks!
Batteries may not be disposed of with normal
Operation and Safety Notes
Bedienungs- und Sicherheitshinweise