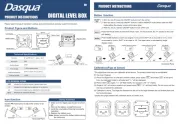
Dasqua SB-010 Manual

Dasqua Måling SB-010

Læs gratis den danske manual til Dasqua SB-010 (5 sider) i kategorien Måling. Denne vejledning er vurderet som hjælpsom af 4 personer og har en gennemsnitlig bedømmelse på 4.4 stjerner ud af 2.5 anmeldelser. Har du et spørgsmål om Dasqua SB-010, eller vil du spørge andre brugere om produktet?

Side 1/5
DIGITAL LEVEL BOX
GB
PRODUCT INSTRUCTIONS
Please read the product instruction carefully and use the product correctly under the instruction.
Symbol showing how to adjust the surface to be
leveled.
1. Make sure the digital angle locator is turned
off.
2. Remove the battery compartment cover.
3. Install the new battery following the polarity
indication.
4. Replace the battery cover
Note: Always remove the battery before storing
the instrument.
Horizontal Plane
Horizontal Plane
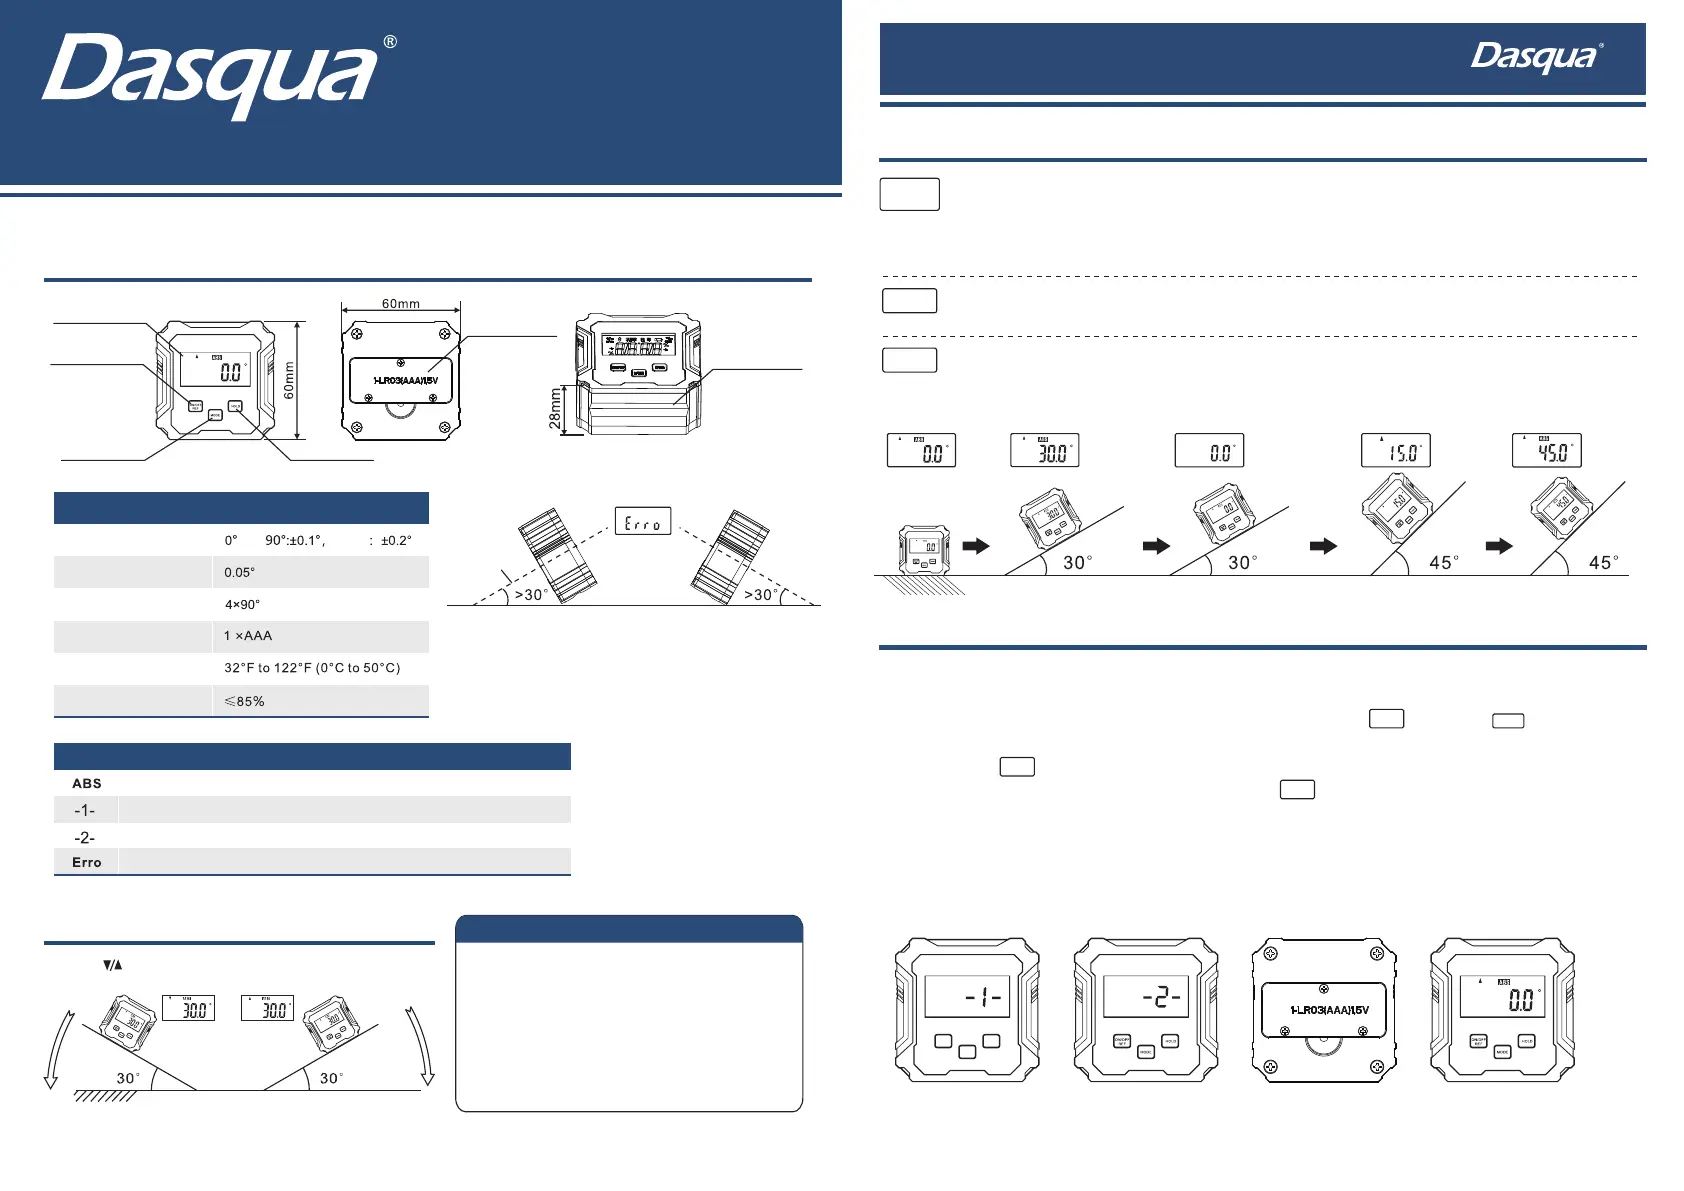
ABS Mode ABS Mode ABS Mode Relative Measuring Mode Relative Measuring Mode
LCD Display
ON/OFF Button
MODE Button
Accuracy
Resolution
Working Range
Power Supply
alkaline battery
others
vertical axis
and
Working temperature
Working Humidity
Indicates that the level is working in absolute angle mode.
Indicates that the digital level is calibrating for one direction.
Indicates that the digital level is calibrating for another direction.
Warning of the vertical axis deviation.
HOLD Button
Battery Cover
Magnetic (Hide)
*The digital level has been pre-calibrated at the factory, The product should only be recalibrated.
if it has been dropped
(1) Place the digital level on a flat and smooth surface, press button and button at the same
time, the calibration mode is activated and "-1-" will be displayed.
(2) Press button again, "-1-" will flash briefly. Do not move until "-2-" display.
(3) Rotate it 180° in the same location and press button , "-2-" will flash briefly. Do not move until the
unit has completed the calibration.
(4) Calibration is done. The angle be displayed on the unit is the angle between the cali brated plane and
the horizontal plane.
* display the angle between the calibration plane and water level.
Calibration(Figs as below)
Product Figure and Buttons
1. With the unit off, press the ON/OFF button to turn the unit on.
2. With the unit on, press the ON/OFF button to switch ABS/REF mode.(When enter the REF
mode,setting the display to zero at the same time).
3. With the unit on, hold the ON/OFF button to turn off the unit.
Press the HOLD button to enter/exit HOLD mode. (In HOLD mode, the “H” symbol on the LCD
will display).
Press MODE button to swtich unit degree (°),(%),mm/m,IN/FT.(% is accurate to 0.1%, mm/m
is accurate to 1mm/m, IN/FT is accurate to 1/8. The slope value is calculated by angle
degree value).
Button function
Icon function
Technical Specifications
LCD SCREEN ICONS
Battery Installation
HOLD
ON/OFF
REF
MODE
HOLD
ON/OFF
REF
MODE
HOLD
ON/OFF
REF
ON/OFF
REF
ON/OFF
REF
HEIGHT GAUGE PRODUCT INSTRUCTIONS
Accuracy
Resolution
Working Range
Power Supply
Working temperature
Working Humidity
±0.1mm/±0.004in
0.05mm/0.002in
Scale 0-80 mm(0-3 in),
Needle 0-50 mm(0-2 in)
CR2032 3V button cell
32°F to 122°F
(0°C to 50°C)
≤85%
lndicates that the tool is working in incremental mode.
INC
ABS
mm
in
in(flash)
Indicates that the tool is working in absolute mode.
lndicates that the tools measuring by Metric System.
Indicates that the tool is measured by British Imperial System.
British Imperial measuring with fraction display.
BUTTON FUNCTION
LOCKING KNOB
BATTERY INSTALLATION AND REPLACEMENT
SEPARATING DIGITAL READOUT FROM THE GAUGE BODY
1. Keep body faces clean, prevent liquid from getting into the slider for fear of damaging the electronic.
2. Faces should be cleaned gently with alcohol or other cleaners. Never use other organic solutions and
never clean caliper by immersing it in any liquid.
3. Never apply any voltage on any part of the caliper and never use any electric pen in case of damaging its
core.
4. Other notes refer to conventional calipers.
INSTRUCTION
PICTURE
SPECIFICATIONS AND FUNCTIONS
1. Made of extra strong plastic material, Light-weight and durable to use.
2. Wide range of usage: a teaching tool, familial tool, a tool of carpenter, in the laboratory, in the breeding
farm, etc.
3. Unique switch design, flexible and efficiency.
Measuring range:
Resolution:
Accuracy:
Measuring system:
Power:
Operating temperature:
Storage temperature:
Influence of humidity:
75MM-3"/150MM-6"
0.01MM-0.0005"
±0.2MM
Non-contact linear CAP
battery, 1.SV
0°C-+40°C
-20°C-+ 70°C
normal operation relative humidity within 0~80%.
1. MOOE BUTTON(Short press metric/inch/fraction conversion)
2. ON/OFF BUTTON(Short press to turn on or off)
3.ZERO BUTTON
FEATURES
TROUBLE SHOOTING
FIBERGLASS DIGTAL CALIPER
Technical Specifications
LCD SCREEN ICONS
No display or
ambiguous reading
Flashing number
Lower voltage, no battery or
incorrect installation of battery
Number skip or
frozen display
Low voltage
Internal error
Reinstall battery or
replace battery
Replace battery
Remove battery, wait
1 minute and replace
Problem Possible Cause Solution
ON/OFF
mm/inch/
fraction
INC/ABS
Short press ON/OFF to turn on. Gauge is in ABS mode-a short press of the ON/OFF button sets ZERO.
Long press(over 3 seconds) turns the gauge off The gauge shuts off automatically after 5 minutes without use.
Short press in/mm/fraction converts between the three systems. In FRACTION mode, the gauge displays to the nearest 1/32".
a flashing "in" on the display indicates the gauge is rounding the measurement off.
A short press of the INC/ABS button converts between incremental and absolute modes. In absolute mode, you can perform
differential measuring between two points without losing the original ZERO position.
Turning the locking knob clockwise locks the scale, counterclockwise releases it. Please be careful not to
over-tighten the knob.
To re-install, simply reverse the process, please be careful not to bend any of the parts.
(1) Do not clean the gauge with solvents.
Instead, use a dry soft cloth.
(2) Please do not drop the gauge.
(3) The gauge can not be installed into high
vibration machines.
MAINTENANCE
To install or replace battery
pull the tab on the top of
the LCD.
Losses the
screw
Pull the scale
Rubber flap
Take out the
digital readout
Loosen the four mounting screws Pull the scale to the end Take out the digital readout
Remove the old battery. Insert the
new battery type CR2032 3V. Pay
attention to the polarity of battery.
Push the battery holder back in
carefully. Do not tilt or twist.
Pull out the battery holder.
110
Battery compartment Scale
LCD Display
Locking Screw
ON/OFF Button
Depth Pin
ON/OFF
mm/Inch/Fraction
INC/ABS
mm/Inch/Fraction Button
INC/ABS Button
Pull Position
1 2 3 4
Negative pole
Pull up
Push down


Produkt Specifikationer

Mærke: Dasqua
Kategori: Måling
Model: SB-010

Har du brug for hjælp?

Hvis du har brug for hjælp til Dasqua SB-010 stil et spørgsmål nedenfor, og andre brugere vil svare dig