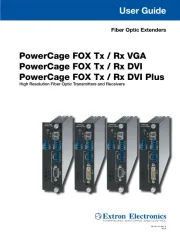
Extron PowerCage FOX Tx DVI Plus Manual

Extron AV forlænger PowerCage FOX Tx DVI Plus

Læs gratis den danske manual til Extron PowerCage FOX Tx DVI Plus (2 sider) i kategorien AV forlænger. Denne vejledning er vurderet som hjælpsom af 59 personer og har en gennemsnitlig bedømmelse på 3.9 stjerner ud af 30 anmeldelser. Har du et spørgsmål om Extron PowerCage FOX Tx DVI Plus, eller vil du spørge andre brugere om produktet?

Side 1/2
This guide provides instructions for an experienced installer to set up and operate an Extron ®
PowerCage™ FOX Tx/Rx DVI Plus ber optic video and audio extenders (transmitter and receiver).
NOTES: The ber optic output signal from a PowerCage FOX Tx DVI Plus transmitter
can be received by a PowerCage FOX or FOXBOX DVI Plus receiver.only
The PowerCage FOX DVI Plus r
eceiver can accept signals from any
PowerCage FOX, FOXBOX, or FOX 500 transmitter, including VGA models.
Step 1 — Mounting
Install the Tx, Rx, or both in PowerCage enclosures as required.
NOTES: PowerCage boards are hot-swappable.
Ensur
e the boards are ush with the rear of the
enclosure and the screws securely tightened
with a screwdriver before applying power.
Step 2 — Input and Output Connections
a. Connect a DVI video source to the Input connector on the
transmitter and a DVI display to the Output connector on the
receiver.
b. Connect a balanced or unbalanced, stereo or mono audio input to
the transmitter via the Audio Input captive screw connector and
a balanced or unbalanced stereo or mono audio device to the receiver via
the Audio Output captive screw connector. See the drawing below.
Unbalanced Stereo Output Balanced Stereo Output
L R
Ring
Sleeve(s)
Tip
Tip
Ring
L R
Sleeve(s)
L R
L R
Tip
Tip
NO GROUND HERE.
NO GROUND HERE.
Unbalanced Stereo Input
Balanced Stereo Input
Ring
Slee (s)ve
Tip
Sleeve
Tip
Sleeve
Tip
Tip
Ring
Do not tin the wires!
CAUTION: For unbalanced audio, connect the sleeves to the ground contact. connect the sleeves to the negative (-) DO NOT
contacts).
c. If you want the PowerCage FOX units to pass serial data or control signals, such as for serial control of a
RS-232
O
VER FIBER
Tx Rx
projector, connect the primary device to the transmitter and the secondary device to the receiver via the rst three poles
of the RS-232 Over Fiber captive screw connectors on units.both
NOTE: For RS-232 responses (from the receiver to the transmitter), you must install the cable in step and leave the receiver in 2c
normal conguration.
d. For serial control of the transmitter and receiver, connect a host device, such as a computer, to the Remote RS-232
1 2
REMOTE
RS-232
Tx Rx
ALARM
port on unit via three poles (Tx, Rx, and either
_) of the Remote RS-232/Alarm 5-pole captive screw connector on either
unit. The protocol for these ports is as follows:
9600 baud no parity 8 data bits
1 stop bit no ow control
Refer to the for detailed information about using the Simple Instruction Set (SIS™) commands and PowerCage FOX Tx/Rx User Guide
the Windows
®
-based FOX Extender program to set up and operate the transmitter and receiver and to take advantage of the various
adjustments and test patterns available on the PowerCage FOX units.
e. For remote monitoring of the status of the Rx optical link on either the transmitter or receiver, connect a locally
1 2
REMOTE
RS-232
Tx Rx
ALARM
constructed or obtained device to the two Alarm poles of the Remote RS-232/Alarm 5-pole captive screw connector on
that unit. The two poles are shorted together when no light is detected. The shorted pins complete a circuit, allowing the
monitoring device to sense the alarm.
M
AU T
1 2P GAIN
C
INPUT
Power
MTP R A
Tx Rx
HD/SDI OUTPUTS
PowerCage
FOX 3G HD-SDI
1 2x Rx
Tx
LARM
Rx
PowerCage
FOX Rx AV
5A MAX.
100-240V 50/60Hz
1 2
REM EOTRS-232
RS-232OVER FIBER
Tx Rx
Tx
ALARM
RxOUTPUT
RGB
PowerCage
FOX TX DVI Plus
Tx Rx
L RAUDIO
16 slots fit either:
16 single slot boards,
8 double slot boards,
or a mix of board sizes.
Power
Supply
Scre
ws
DVI
1
PowerCage FOX Tx/Rx DVI Plus Setup Guide


Produkt Specifikationer

Mærke: Extron
Kategori: AV forlænger
Model: PowerCage FOX Tx DVI Plus
Type: AV sender
Vægt: 500 g
Produktfarve: Sort
Pakkevægt: 1000 g
Pakkedybde: 340 mm
Pakkebredde: 229 mm
Pakkehøjde: 67 mm
Understøttede videotilstande: 480p, 576p, 720p, 1080i, 1080p
Opbevaringstemperatur (T-T): -40 - 70 °C
Relativ luftfugtighed ved drift (H-H): 10 - 90 %
Relativ luftfugtighed ved opbevaring (H-H): 10 - 90 %
Strømforbrug (typisk): 5.68 W
Driftstemperatur (T-T): 0 - 50 °C
Maksimal opløsning: 4096 x 2160 pixel
Understøttede grafikopløsninger: 640 x 480 (VGA),1920 x 1200 (WUXGA),3840 x 2160,4096 x 2160
Forbindelsesteknologi: Ledningsført
Certificering: CE, C-tick, FCC Class A, ICES, VCCI
LED-indikatorer: Ja
Bæredygtighedscertifikater: RoHS
Farvedybde: 8 Bit
Indgangsstrøm: 1 A
Driftsspænding: 12 V
Maksimal overførselsafstand: 30000 m
Lyd (L, R) udgang: 1
Billedhastighed: 60 fps
Seriel grænsefladetype: RS-232
Antal serielle porte: 2
Baud hastighed: 115.2 Kbit/s
Båndbredde: 4.95 Gbit/sek.
DVI indgangs-porte: 1
Bølgelængder understøttet: 850,1310 nm

Har du brug for hjælp?

Hvis du har brug for hjælp til Extron PowerCage FOX Tx DVI Plus stil et spørgsmål nedenfor, og andre brugere vil svare dig


AV forlænger Extron Manualer

AV forlænger Manualer

Nyeste AV forlænger Manualer

EtherWAN

EtherWAN ED3638 Manual

1 November 2025
EtherWAN

EtherWAN ED3538 Manual

30 Oktober 2025
Kramer

Kramer TP-120-OD Manual

21 Oktober 2025
Kramer

Kramer VM-218DT Manual

17 Oktober 2025
Kramer

Kramer KIT-401 Manual

16 Oktober 2025
Kramer

Kramer TP-580CT Manual

16 Oktober 2025
CYP

CYP PUV-1230PL-KIT Manual

15 Oktober 2025
Smart-AVI

Smart-AVI DVX-RXPROS Manual

13 Oktober 2025
StarTech.com

StarTech.com BT2A Manual

4 Oktober 2025