Warnung
.................................................
Unter Druckluft stehende Produkte können Personen-
oder Sachschäden verursachen.
• Schalten Sie vor Installations- und Wartungsarbeiten
die Druckluftversorgung aus.
• Verwenden Sie zur Entlüftung der Anlage Absperrven-
tile in der Druckluftzuleitung.
Hinweis
..................................................
Einbau und Inbetriebnahme nur von autorisiertem
Fachpersonal, gemäß Bedienungsanleitung.
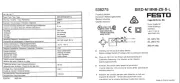
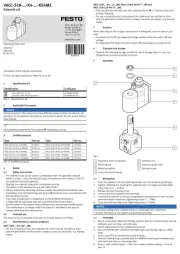
Diese Produkte (Fig. 1) sind ausschließlich zur
Verwendung mit Druckluft vorgesehen. Zur Verwendung
mit anderen Medien (Flüssigkeiten oder Gasen) sind sie
nicht geeignet.
Fig. 1
3
4
MS12-LFR MS12-LR
MS12-LR-...-PO
MS12-LF...
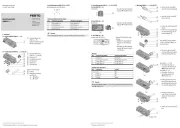
Fig. 2
1
2
Fig. 4
5
7
6
MS12-...- MS12-...-M V
Fig. 3
Fig. 5
8
9
aJaA
Fig. 6
Fig. 7 Fig. 8
9
Fig. 9
Fig. 10 Fig. 11
Fig. 12
MS12-LWS
10 … 12 Nm
Fig. 13 aB
aC
aD
20 Nm ± 10 %
Filterregelventil MS12-LFR, de
................................
Druckregelventil MS12-LR, Filter MS12-LF(M)/-LFX,
Wasserabscheider MS12-LWS
1 Anwendung
Bestimmungsgemäß regelt das Filterregelventil MS12-LFR
und das Druckregelventil MS12-LR. Druckluft im nach-
folgenden Strang auf den eingestellten Ausgangsdruck
p2. Dabei glättet das MS12-LFR/LR Druckschwankungen.
Der Ausgangsdruck p2 ist innerhalb des Druckregelbe-
reichs (Kapitel Technische Daten) abhängig vom Ein-
gangsdruck p1 einstellbar.
Das Filterregelventil MS12-LFR und der Filter MS12-LF mit
Zentrifugalabscheidung entfernen Schmutzpartikel und
Kondensat, der Fein-/Feinstfilter MS12-LFM Schmutz-
partikel und Öltröpfchen, der Aktivkohlefilter MS12-LFX
gasförmige Öllbestandteile, der Wasserabscheider
MS12-LWS Kondensat aus der durchgeleiteten Druckluft.
2 Voraussetzungen für den Produkteinsatz
Hinweis
. . . . . . . . . . . . . . . . . . . . . . . . . . . . . . . . . . . . . . . . . . . . . . . . . .
Durch unsachgemäße Handhabung entstehen Fehl-
funktionen. Stellen Sie sicher, dass die nachfolgenden
Vorgaben stets eingehalten werden.
• Vergleichen Sie die Grenzwerte in dieser Bedienungs-
anleitung mit denen Ihres Einsatzfalls (z. B. Betriebsme-
dium, Drücke, Kräfte, Momente, Temperaturen, Durch-
flüsse).
• Berücksichtigen Sie die Vorschriften der Berufsgenos-
senschaft, des Technischen Überwachungsvereins oder
entsprechende nationale Bestimmungen.
• Berücksichtigen Sie die Umgebungsbedingungen am
Einsatzort.
• Entfernen Sie die Transportvorkehrungen wie Folien
(Polyamid), Kappen (Polyethylen), Kartonagen
(außer den Verschlusselementen der pneumatischen
Anschlüsse).
• Verwenden Sie das Produkt im Originalzustand ohne
jegliche eigenmächtige Veränderung.
• Entfernen Sie Partikel in den Zuleitungen mittels Durch-
blasen der Rohre und Schläuche. Dadurch schützen Sie
das Gerät vor frühzeitigem Ausfall oder höherem
Verschleiß (siehe DIN ISO 4414, Abs. 9.4).
• Berücksichtigen Sie die Warnungen und Hinweise
– am Produkt
– in dieser Bedienungsanleitung.
• Sorgen Sie für Druckluft mit ordnungsgemäßer
Aufbereitung.
3 Einbau
3.1 Mechanisch
Hinweis
. . . . . . . . . . . . . . . . . . . . . . . . . . . . . . . . . . . . . . . . . . . . . . . . . .
Informationen zur Montage von Modulverbinder, An-
schlussplatte und Befestigungswinkel finden Sie in der
Bedienungsanleitung, die dem Zubehör beigelegt ist.
• Wählen Sie eine Montagealternative in Verbindung mit
dem entsprechenden Zubehör nach folgender Tabelle:
Alternative Anschlussplatte Befestigungswin-
kel
Zubehör-Typ MS12-AG../AQ.. MS12-WP
Position An der linken und rechten
Seite des Produkts
Vor und nach jedem
Gerät
• Beachten Sie die Durchflussrichtung von 1 nach 2.
Als Orientierung dienen die Ziffern 2auf dem Produkt-
gehäuse und der Anschlussplatte (Fig. 2).
• Platzieren Sie das MS12-LFR/LF/LFM/LFX/LWS mit aus-
reichend Platz unterhalb der Filterschale:
– MS12-LFR/LF/LWS: min. 250 mm
– MS12-LFM/LFX: min. 350 mm
Das erleichtert, die Filterpatrone zu wechseln.
• Justieren Sie das MS12-LFR/LF/LFM/LFX/LWS senk-
recht stehend ±5°.
Beim Zusammenbau von Fein- und Feinstfilter zu einer
Filterkombination:
• Beachten Sie die Reihenfolge entlang der Durchfluss-
richtung.
Richtig montiert, sitzt der Feinstfilter MS12-LFM-...-A
(0,01 µm) nach dem Feinfilter MS12-LFM-...-B (1 µm).
Beim Zusammenbau mit einem bereits vorhandenen
Wartungsgerät der gleichen Baureihe (Fig. 4):
1.Platzieren Sie den Befestigungswinkel MS12-WP 3in
den Nuten der Einzelgeräte. Dabei muss zwischen den
Einzelgeräten eine Dichtung vorhanden sein.
2.Drehen Sie die 2 Schrauben in den Befestigungswinkel.
3.2 Pneumatisch
Bei Verwendung von Anschlussverschraubungen:
• Beachten Sie die Einschraubtiefe der Anschlussge-
winde.
Max. Einschraubtiefe [mm]
ISO 228 NPT
MS12-...-AGF: MS12N-...-AQT:18 17
MS12-...-AGG: MS12N-...-AQU:20 18
MS12-...-AGH: MS12N-...-AQV:22 18,5
MS12-...-AGI: MS12N-...-AQW:24 20
• Drehen Sie die Verschraubungen in die pneumatischen
Anschlüsse unter Verwendung von geeignetem Dicht-
material.
Beim MS12-LR-...-PO:
• Drehen Sie die Verschraubung unter Verwendung von
geeignetem Dichtmaterial in den pneumatischen An-
schluss im Deckel. Achten Sie bei der Montage, dass
keine Schmutzpartikel in das Gerät gelangen.
4 Inbetriebnahme
Einstellung des Ausgangsdrucks beim MS12-LFR/LR:
1.Ziehen Sie den Drehknopf nach oben vom Gehäuse weg
(ggf. Bügelschloss entfernen und Entriegelungssperre
1einschieben Fig. 2).
2.Drehen Sie den Drehknopf in Richtung „-“ ganz zu.
3.Belüften Sie Ihre Anlage langsam.
4.Drehen Sie den Drehknopf in Richtung „+“ bis der
gewünschte Ausgangsdruck am Manometer angezeigt
wird.
Der zulässige Ausgangsdruck (Druckregelbereich
Kapitel Technische Daten) darf dabei nicht
überschritten werden. Eine Umdrehung entspricht ca.
folgender Druckänderung
Typ Druckänderung pro Umdrehung
MS12-LR/LFR-...-D6 0,5 bar
MS12-LR/LFR-...-D7 1 bar
MS12-LR/LFR-...-D8 1,3 bar
Richtig beaufschlagt, liegt der Betriebsdruck p1 um
mindestens 0,5 bar höher als der Ausgangsdruck p2.
5. Drücken Sie den Drehknopf nach unten zum Gehäuse
hin. Dadurch sperrt sich der Knopf gegen ungewolltes
Verdrehen.
Bei Bedarf:
• Drücken Sie die Entriegelungssperre 1(Fig. 2 ) nach
außen. Ein vorhandenes Bügelschloss LRVS-D sichert
die Entriegelungssperre.
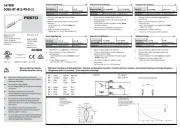
Einstellung des Ausgangsdrucks p2 mit einem Steuer-
druck p12 (nur MS12-LR-...-PO )
1.Belüften Sie Ihre Anlage langsam.
2.Beaufschlagen Sie über ein externes Druckregelventil
den Anschluss im Deckel des MS12-LR-...-PO mit dem
erforderlichen Steuerdruck p12. Beachten Sie, dass der
Steuerdruck immer über dem gewünschten Ausgangs-
druck liegen muss. Das Diagramm (Kapitel
Technische Daten) zeigt das Verhältnis zwischen
Steuerdruck p12 und Ausgangsdruck p2.
Bei kondensatreicher Druckluft am MS12-LFR/LR mit
Drehknopf (z. B. direkt hinter dem Kompressor)
• Drehen Sie die Drosselschraube 5(Fig. 3 ) 0,5 bis
max. 2 Umdrehungen heraus, je nach anfallender Kon-
densatmenge. Dadurch entweicht das Kondensat über
die Drosselschraube aus der Vorsteuer-Kammer. Ein
vollständiges Herausdrehen erhöht die Leckage und ist
nicht erforderlich.
Bei ordnungsgemäß aufbereiteter Industriedruckluft
mit üblicher Kondensatmenge kann die Drossel-
schraube geschlossen bleiben (Werkseinstellung).
5 Wartung und Pflege
Ablass des Kondensats (Fig. 5)
Bei Kondensatpegelhöhe an der Markierung 4
(Fig. 4):
Manueller Ablass
-M
Vollautomatischer Ablass
-V
Schutzhülse gegebenenfalls herausdrehen.
Ablass-Schraube 7von unten
gesehen gegen den Uhrzeiger-
sinn aufdrehen.
Filter entleert selbständig
[manuelle Entleerung: Ablass-
Ring 6gegen den Uhrzeigersinn
(von unten gesehen) bis zum
Anschlag drehen].
Anzugsdrehmoment beim Zudre-
hen: 0,35 … 0,4 Nm
Betätigungsmoment:
0,5 Nm (bei 12 bar)
Dadurch fließt das Kondensat ab.
Stecknippelanschluss für Schlauch Typ PCN-4-NT vorhanden.
Wechsel der Filterpatrone beim MS12-LFR/LF/LFM/LFX
• Wechseln Sie die Filterpatrone bei folgenden Anzei-
chen:
MS12-LFR/LF MS12-LFM MS12-LFX
Geringer Durchfluss
trotz unveränderter
Druckeinstellung
Druckabfall Δp
größer 0,35 bar
Wechsel alle 1000
Betriebsstunden
empfohlen
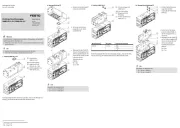
1.Entlüften Sie das Gerät.
2.Schieben Sie den Entriegelungsschieber 8in Pfeilrich-
tung (Fig. 6).
3.Drehen Sie die Filterschale von Hand oder am Sechs-
kant gegen den Uhrzeigersinn (von unten gesehen) bis
zum spürbaren Anschlag.
4.Ziehen Sie die Filterschale vom Gerät weg (Fig. 7).
5.Drehen Sie den Filterteller 9(bei MS12-LFM/LFX die
gesamte Filterpatrone) gegen den Uhrzeigersinn
(Fig. 9).
6.Tauschen Sie die Filterpatrone mit zugesetzten Poren.
Ergreifen Sie die neue Filterpatrone nur am unteren
Ende (Fig. 10).
7.Bei LFR/LF: Setzen Sie die neue Filterpatrone auf den
Filterteller und drehen Sie diesen handfest an.
Bei LFM.../LFX: Greifen Sie die neue Filterpatrone nur
am unteren Ende und drehen Sie diese handfest an.
8.Montieren Sie die Einzelteile wieder in umgekehrter
Reihenfolge. Dabei gelten folgende Kontrollpunkte:
– der Arretierstift aJ der Filterschale weist auf die
große Aussparung aA am Gehäuse (Fig. 11).
– der Entriegelungsschieber rastet bei Erreichen des
Endanschlags deutlich hörbar ein (Fig. 12).
9.Vollziehen Sie die Wiederinbetriebnahme nach Kapitel
„Inbetriebnahme“.
10. Entsorgen Sie die verbrauchte Filterpatrone in Über-
einstimmung mit den örtlichen Abfallbestimmungen.
Reinigung des Siebbechers aC beim MS12-LWS-...-V
Durch Verunreinigungen im Kondensat muss der Siebbe-
cher in regelmäßigen Abständen gereinigt werden. Das
Intervall für die Reinigung ist abhängig vom
Verschmutzungsgrad der verwendeten Druckluft und des
Leitungssystems. Eine Reinigung ist notwendig, wenn das
Schalenschauglas voller Kondensat steht und dieses nicht
abgelassen wird. Spätestens jedoch nach einem Jahr
muss der Siebbecher gereinigt werden.
1.Entleeren Sie die Filterschale ggf. durch eine manuelle
Entleerung.
2.Entlüften Sie das Gerät.
3.Drehen Sie den Schalendeckel entgegen dem Uhr-aB
zeigersinn heraus (Fig. 13).
4.Ziehen Sie den Schalendeckel vom MS12-LWS ab. Ach-
ten Sie darauf, dass der O-Ring aD nicht verloren geht.
5.Ziehen Sie den Siebbecher aus der Schale heraus.aC
6.Halten Sie die Außenseite des Siebbechers unter
fließendes Wasser. Drehen Sie dabei den Siebbecher.
Verwenden Sie eine weiche Bürste zum Lösen von fest-
gesetzten Verunreinigungen im Siebbecher. Verwenden
Sie keine spitzen Gegenstände, da sonst das Sieb
beschädigt werden kann.
7.Setzen Sie den Siebbecher ein und drehen ihn imaC
Uhrzeigersinn bis er einrastet,
8.Drehen Sie den Schalendeckel aB im Uhrzeigersinn hin-
ein.
9.Nehmen Sie die Anlage wieder in Betrieb.
Reinigung des Wartungsgeräts
Reinigen Sie bei Bedarf das Gerät mit einem weichen
Lappen von außen.
Zulässige Reinigungsmedien sind Seifenlauge
(max. +60 °C) oder Waschbenzin (aromatenfrei).
6 Störungsbeseitigung
Störung mögliche Ursache Abhilfe
Keine Druckanzeige Absperrventil
geschlossen
Absperrventil öffnen
Druck nicht eingestellt Mit Drehknopf den
gewünschten Druck
einstellen
Geringer Durchfluss
(bei Luftverbrauch
bricht der Betriebs-
druck zusammen)
Filterpatrone ist
verschmutzt
Filterpatrone
wechseln (Kapitel
Wartung und Pflege)
Verengung zwischen
Absperrventil und
Wartungseinheit
Leitung kontrollieren
Druck steigt an über
den eingestellten
Betriebsdruck
Ventilteller am
Dichtsitz defekt
Gerät zu Festo
senden
Hörbares Abblasen
am Drehknopf
Ventilsitz beschädigt Gerät zu Festo
senden
Hörbares Abblasen
an der Ablass-
schraube
Ablassschraube
undicht
Festdrehen oder
erneuern
Beim MS12-LWS
fließt im Vergleich
zum Neuzustand nur
wenig Kondensat
während der Entlee-
rungsphase ab
Siebbecher mit
Verunreinigungen
zugesetzt
Reinigung des
Siebbechers
(Kapitel
Wartung und Pflege)
Schalenschauglas
steht voller Konden-
sat, aber das
Kondensat wird nicht
abgelassen
7 Technische Daten
Typ MS12-
Eingangsdruck
[bar]
LFR/LF/LFM-...-M 0,8 … 20
LFR/LF/LFM/
LWS-...-E...
0,8 … 16
LFR/LF/LFM/
LWS-...-V
2 … 12
LFX-... 0 … 20
LR-... 0,8 … 21
Druckregelbereich
[bar]
LFR/LR-...-D6 0,5 … 7
LFR/LR-...-D7 0,5 … 12
LFR/LR-...-D8 0,5 … 16
LR-...-PO 0,5 … 16
Mediums-
temperatur [°C]
LFR/LF/LFM-...-M –10 … +60
LFR/LF/LFM/
LWS-...-E...
+1 … +60
LFR/LF/LFM/
LWS-...-V
+5 … +60
LFX-... +5 … +30
LR-... –10 … +60
Einbaulage LFR/LF/LFM/LFX/
LFM
senkrecht ±5°
LR beliebig
Filterfeinheit [μm] LFR/LF-...-E/-C... 40/5
LFM-...-B/-A... 1/0,01
Betriebsmedium LFR-...-…V Druckluft nach
ISO 8573-1:2010 [7:4:-]
LFR Druckluft nach
ISO 8573-1:2010 [-:4:-]
LF-...-...V Druckluft nach
ISO 8573-1:2010 [7:9:-]
LF Druckluft nach
ISO 8573-1:2010 [-:9:-]
LR Druckluft nach
ISO 8573-1:2010 [7:4:4]
LWS Druckluft nach
ISO 8573-1:2010 [-:-:-]
LFM-...-B/-A... Druckluft nach
ISO 8573-1:2010 [6:8:4]
LFX Druckluft nach
ISO 8573-1:2010 [3:4:2]
Werkstoffe Gehäuse, Anschlussplatten: GD-Al
Abdeckungen: PA
Deckel (unten): Al
Innenteile: St, POM, PA, Al
Schale: Al
Sichtscheibe: PA
Manometerglas: PC
Filterelement: LFR/LF-...-E/-C...: CuZn
LFM-...-B/-A...: Borsilikat
LFX: Aktivkohle
Dichtungen, Membran: NBR
Druckeinstellknopf: PA/POM
Gilt nur für MS12-LR-...-PO:
Differenz Steuerdruck p12 – Ausgangsdruck p2
MS12-LFR/LR/LWS
MS12-LF(M)/LFX
Bedienungsanleitung
Original: de
Festo SE & Co. KG
Postfach
D-73726 Esslingen
Phone:
+49 711 347-0
www.festo.com
8040774
1409d
[8040775]