Warnung, Warning
.....................................
de Unter Druckluft stehende Produkte können
Personen- oder Sachschäden verursachen.
• Schalten Sie vor Installations- und
Wartungsarbeiten die Druckluftversorgung aus.
• Verwenden Sie zur Entlüftung der Anlage
Absperrventile in der Druckluftzuleitung.
en Devices under compressed air pressure can cause
injury to human beings and damage to property.
• Before carrying out installation and maintenance
work always switch off the compressed air
supply.
• Use shut-off valves in the compressed air tubing
for exhausting the system.
Hinweis, Note
...........................................
de Einbau und Inbetriebnahme nur von autorisiertem
Fachpersonal, gemäß Bedienungsanleitung.
Dieses Produkt ist ausschließlich zur Verwendung
mit Druckluft vorgesehen. Zur Verwendung mit
anderen Medien (Flüssigkeiten oder Gasen) ist das
Produkt nicht geeignet.
en Fitting and commissioning to be carried out only
by qualified personnel in accordance with the
operating instructions.
This product is designed to be operated with
compressed air only. The product is not suitable for
use with other media (liquids or gases).
6
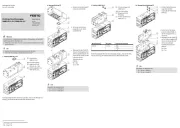
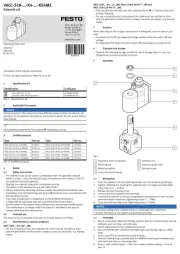
Bild 1/Fig. 1
1
MS9-LOE-G MS9-LOE-¾/1
2
3
4
8 Nm
Bild 2/Fig. 2
5
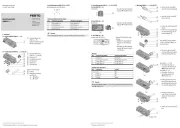
Bild 7/Fig. 7 Bild 8/Fig. 8 Bild 9/Fig. 9
Bild 6/Fig. 6Bild 5/Fig. 5
Bild 3/Fig. 3
Bild 4/Fig. 4
7
8
0,2 Nm
7
Öler MS9-LOE de
. . . . . . . . . . . . . . . . . . . . . . . . . . . . . . . . . . . . . . . . . . . . . . . . . .
1 Anwendung
Bestimmungsgemäß führt der Öler MS9-LOE der
durchströmenden Druckluft eine dosierbare Ölmenge zu.
Über eine Regulierschraube an der Oberseite kann die
gewünschte Ölmenge eingestellt werden. Die eingestellte
Ölmenge wird proportional zum Durchfluss der Druckluft
gehalten. Zur Filterung von Schmutz im Öl dient ein
integrierter Sinterfilter.
Die Entlüftungsschraube mit Ventil ermöglicht während
des Betriebs die Entlüftung der Ölerschale und das
Nachfüllen von Öl durch Abbau der Ölerschale.
2 Voraussetzungen für den Produkteinsatz
Hinweis
. . . . . . . . . . . . . . . . . . . . . . . . . . . . . . . . . . . . . . . . . . . . . . . . . .
Durch unsachgemäße Handhabung entstehen
Fehlfunktionen. Stellen Sie sicher, dass die
nachfolgenden Vorgaben stets eingehalten werden.
• Vergleichen Sie die Grenzwerte in dieser
Bedienungsanleitung mit denen Ihres Einsatzfalls
(z.B. Betriebsmedium, Drücke, Temperaturen,
Durchflüsse).
• Berücksichtigen Sie die Vorschriften der
Berufsgenossenschaft, des Technischen
Überwachungsvereins oder entsprechende nationale
Bestimmungen.
• Berücksichtigen Sie die Umgebungsbedingungen am
Einsatzort.
• Entfernen Sie die Transportvorkehrungen wie
Schutzwachs, Folien (Polyamid), Kappen (Polyethylen),
Kartonagen (außer den Verschlusselementen der
pneumatischen Anschlüsse).
• Verwenden Sie das Produkt im Originalzustand ohne
jegliche eigenmächtige Veränderung.
• Entfernen Sie Partikel in den Zuleitungen mittels
Durchblasen der Rohre und Schläuche. Dadurch
schützen Sie das Gerät vor frühzeitigem Ausfall oder
höherem Verschleiß (siehe DIN ISO 4414, Abs. 9.4).
• Berücksichtigen Sie die Warnungen und Hinweise
– am Produkt
– in dieser Bedienungsanleitung.
3 Einbau
3.1 Mechanisch
Hinweis
. . . . . . . . . . . . . . . . . . . . . . . . . . . . . . . . . . . . . . . . . . . . . . . . . .
Informationen zur Montage von Modulverbinder,
Anschlussplatte und Befestigungswinkel finden Sie
in der Bedienungsanleitung, die dem Zubehör
beigelegt ist.
• Platzieren Sie das Gerät so nahe wie möglich am
Einsatzort. Kurze Druckluftleitungen ermöglichen, dass
der Ölnebel in der Druckluft gleichmäßig verteilt bleibt.
• Plazieren Sie das Gerät mit ausreichend Platz unterhalb
der Ölerschale (min. 225 mm).
• Justieren Sie das Gerät senkrecht stehend (±5°) mit der
Ölerschale nach unten.
• Beachten Sie die Durchflussrichtung von 1 nach 2.
Als Orientierung dienen die Ziffern 2auf dem
Produktgehäuse (Bild 1).
Direktmontage eines Einzelgeräts MS9-LOE-¾/1 mit
Befestigungsschrauben
1.Drücken Sie alle Schutzkappen 4nach vorne aus den
Anschlussplatten (Bild 2). Schieben Sie dazu einen
schmalen Gegenstand durch die hintere Öffnung der
Anschlussplatte.
2.Befestigen Sie das Einzelgerät mit vier
Befestigungsschrauben 5der Größe M6 und einer
Mindestlänge von 90 mm (Bild 3). Der Abstand
zwischen den Bohrungen beträgt 90 mm in der Breite
und 66 mm in der Höhe.
Zusammenbau mit einem oder mehreren bereits
vorhandenen Wartungsgeräten der gleichen Baureihe
(Bild 4)
1.Demontieren Sie den bestehenden
Wartungsgerätestrang abhängig vom geplanten
Einbauort des Geräts innerhalb des Strangs.
Bei Einbau am Anfang oder Ende des
Wartungsgerätestrangs:
– Druckluftleitung am Wartungsgerätestrang
demontieren oder
– Anschlussplatte am Wartungsgerätestrang
demontieren.
Bei Einbau zwischen zwei Wartungsgeräten des
Wartungsgerätestrangs:
– Modulverbinder MS9-MV 6zwischen den beiden
Wartungsgeräten durch Lösen der Schrauben
entfernen.
2.Platzieren Sie das Gerät an den gewünschten
Einbauort.
3.Platzieren Sie die Modulverbinder MS9-MV 6in den
Nuten von MS9-LOE und benachbartem
Wartungsgerät. Dabei ist zwischen den
Wartungsgeräten eine Dichtung erforderlich.
4.Befestigen Sie die Modulverbinder MS9-MV mit zwei
Schrauben.
5.Montieren Sie die entfernten Teile und Geräte aus
Schritt 1 wieder zu einem Wartungsgerätestrang
zusammen.
3.2 Pneumatisch
Bei Verwendung von Anschlussverschraubungen:
• Beachten Sie die Einschraubtiefe der
Anschlussgewinde.
Max. Einschraubtiefe [mm]
ISO 228 NPT
MS9-…- MS9-…-N¾/1: 18,5 ¾/N1: 18,5
MS9-…-AGD/AGE/AGF: 18,5 18,5MS9-…-AQR/AQS/AQT:
MS9-…-AGG/AGH: 31,5 31,5MS9-…-AQU/AQV:
• Drehen Sie die Verschraubungen in die pneumatischen
Anschlüsse unter Verwendung von geeignetem
Dichtmaterial.
4 Inbetriebnahme
1.Füllen Sie die Ölerschale mit Spezialöl von Festo auf
(Vorgehensweise Schritte 1 bis 7 im Kapitel 5.1
“Öl nachfüllen”).
2.Belüften Sie Ihre Anlage langsam.
3.Drehen Sie die Regulierschraube 1(Bild 1) auf dem
Schauglas bis die gewünschte Ölmenge eingestellt ist.
Drehrichtung der
Regulierschraube 1Veränderung der
Öltropfenzahl
gegen den Uhrzeigersinn erhöht die Tropfenzahl
im Uhrzeigersinn vermindert die Tropfenzahl
Konkret richtet sich der Ölbedarf nach der Auslegung
Ihrer Anlage. Es gelten folgende Richtwerte:
Ölnebelstärke Einstellung
leichter Ölnebel ca. 1 Tropfen Öl pro 1000 l Luftdurchsatz
starker Ölnebel ca. 10 Tropfen Öl pro 1000 l Luftdurchsatz
Mit verändertem Durchfluss verändert sich die
Tropfenzahl automatisch.
4.Prüfen Sie, ob Ölnebel in feiner Zerstäubung an der
entferntesten Entlüftungsbohrung der Anlage ankommt.
Richtig eingestellt, färbt sich im Betrieb ein Testpapier
vor der Entlüftungsbohrung nach einiger Zeit gelblich.
Dabei signalisiert Öltropfenbildung einen zu starken
Ölnebel.
5 Wartung und Pflege
5.1 Öl nachfüllen
Sinkt der Ölstand unterhalb der Markierung 3(Bild 1),
muss Öl nachgefüllt werden.
Hinweis
..................................................
Stellen Sie sicher, dass die Ölerschale beim Nachfüllen
des Öls drucklos ist. Andernfalls entweichen Restöl und
Druckluft unkontrolliert.
1.Drehen Sie die Entlüftungsschraube 7(Bild 5)
neben dem Schauglas ganz heraus. Dadurch wird die
Ölschale drucklos gemacht.
Konstruktionsbedingt kann nach der Entlüftung
weiterhin ein hörbares schwaches Druckluftgeräusch
auftreten.
2.Schieben Sie den Entriegelungsschieber 8in
Pfeilrichtung.
3.Drehen Sie die Ölerschale von Hand oder am Sechskant
gegen den Uhrzeigersinn (von unten gesehen) bis zum
spürbaren Anschlag.
4.Ziehen Sie die Ölerschale vom Gerät weg (Bild 6).
5.Füllen Sie die Ölerschale mit Spezialöl von Festo auf
(Bild 7).
Andere zulässige Öle mit geeigneter Viskosität sind im
Katalog dokumentiert (www.festo.com/catalogue).
6.Montieren Sie die Ölerschale wieder in umgekehrter
Reihenfolge. Dabei gelten folgende Kontrollpunkte:
– Die Nase am Entriegelungsschieber der Ölerschale
weist auf die Aussparung am Gehäuse (Bild 8).
– Der Entriegelungsschieber rastet bei Erreichen des
Endanschlags deutlich hörbar ein (Bild 9).
7.Drehen Sie die Entlüftungsschraube 7(Bild 9)
wieder ein.
8.Prüfen Sie, ob die Öltropfenzahl im Schauglas mit der
anfänglich eingestellten übereinstimmt.
Gründe für eine Abweichung können sein:
– Verwendung eines anderen Öls
– Verschmutzung des Sinterfilters im Förderschlauch.
Stellen Sie bei Bedarf die Ölmenge nach Kapitel 4
“Inbetriebnahme” neu ein. In der Regel braucht die
Ölmenge nicht nachgestellt werden.
5.2 Reinigung
• Reinigen Sie bei Bedarf das Gerät mit einem weichen
Lappen von außen.
Zulässige Reinigungsmedien sind Seifenlauge
(max. +60 °C) oder Waschbenzin (aromatenfrei).
5.3 Leckagen in der Anlage
• Sorgen Sie dafür, dass die Leckage abgestellt wird.
Leckage bedingt unter Umständen, dass sich der
MS9-LOE über lange Stillstandzeiten entleert.
6 Störungsbeseitigung
Störung Mögliche Ursache Abhilfe
Keine
Ölförderung Regulierschraube 1
geschlossen
Regulierschraube öffnen
Ölspiegel zu niedrig Öl nachfüllen
Sinterfilter im
Förderschlauch
verschmutzt
Sinterfilter reinigen
Öl kommt
nicht am
Verbraucher an
ungünstige oder zu
lange Leitungsführung
MS9-LOE möglichst nahe
an Verbraucher setzen,
möglichst gerade
Leitungsführung vorsehen
7 Zubehör
Bezeichnung Typ
Festo-Spezialöl nach ISO VG 32 OFSW-32
8 Technische Daten
Typ MS9-LOE
Betriebsdruck p1 [bar] 1 … 16
Betriebsmedium Luftqualitätsklasse 5:7:–
nach DIN ISO 8573-1
Einbaulage Senkrecht ±5°
Umgebungstemperatur
Mediumstemperatur
Lagertemperatur
[°C]
[°C]
[°C]
–10 … +60
–10 … +60
–10 … +60
Minimaldurchfluss
für Öler-Funktion [l/min] 100
Max. Ölfüllmenge [ml] 490
Lubricator MS9-LOE en
. . . . . . . . . . . . . . . . . . . . . . . . . . . . . . . . . . . .
1 Application
The lubricator MS9-LOE is designed to supply a
controllable amount of oil to the compressed air flowing
through. The desired amount of oil can be set by means of
a regulating screw on the top. The set amount of oil is
kept proportional to the compressed air flowing through.
An integrated sinter filter is used to filter out dirt in the oil.
The venting screw with valve permits venting of the
lubricator bowl and refilling of oil through removal of the
lubricator bowl during operation.
2 Requirements for product use
Note
.......................................................
Improper handling can result in malfunctions.
Make sure that the following specifications are always
observed:
• Compare the limit values specified in these operating
instructions with your actual application
(e.g. operating medium, pressures, temperatures,
flow rates).
• Comply with the regulations of the trade association,
the German Technical Control Board (TÜV) or
corresponding national regulations.
• Take into consideration the ambient conditions at the
location of use.
• Remove all transport packing such as protective wax,
foils (polyamide), caps (polyethylene), cardboard boxes
(except for the sealing elements of the pneumatic
connections).
• Use the product in its original condition without any
unauthorised modifications.
• Remove dirt particles in the supply lines by blowing out
the tubing with compressed air. In this way you will
protect the device from premature failure or heavy wear
(see DIN ISO 4414, section 9.4).
• Please observe the warnings and instructions:
– on the product
– in these operating instructions.
3 Installation
3.1 Mechanical
Note
......................................................
Information about mounting module connectors,
sub-bases and mounting brackets can be found in the
operating instructions enclosed with the relevant
accessories.
• Place the device as close as possible to the location
where it will be used. Short compressed-air lines permit
the oil mist in the compressed air to be distributed
evenly.
• Place the device with sufficient space below the
lubricator bowl (min. 225 mm).
• Adjust the device vertically (±5°) with the lubricator
bowl downwards.
• Note the direction of flow from 1 to 2.
The numerals 2on the product housing serve as an
orientation (Fig. 1).
Direct mounting of an MS9-LOE-¾/1 with fastening
screws
1.Press all protective caps 4forwards out of the
sub-base (Fig. 2). To do this, push a narrow object
through the rear opening of the sub-base.
2.Fasten the individual device with four fastening
screws 5of size M6 and a minimum length of 90 mm
(Fig. 3). The distance between the holes is 90 mm
in width and 66 mm in height.
Assembly with one or several already available
service units of the same series (Fig. 4)
1.Dismantle the existing service unit string depending on
the planned location of the device within the string.
If the device is to be installed at the beginning or end of
the service unit string:
– Disconnect the compressed air line from the service
unit string or
– remove the sub-base from the service unit string.
If the device is to be fitted between two service units in
the service unit string:
– Remove the module connector MS9-MV 6between
the two service units by loosening the screws.
2.Mount the device in the desired location.
3.Place the module connectors MS9-MV 6in the grooves
of the MS9-LOE and the adjoining service unit.
There must be a seal between the service units.
4.Fasten the module connectors MS9-MV with two
screws.
5.Fit the removed parts and devices from step 1 together
into a service unit string again.
3.2 Pneumatic
If using screw connectors:
• Note the screw-in depth of the connector threads.
Max. screw-in depth [mm]
ISO 228 NPT
MS9-…- MS9-…-N¾/1: 18,5 ¾/N1: 18,5
MS9-…-AGD/AGE/AGF: 18,5 18,5MS9-…-AQR/AQS/AQT:
MS9-…-AGG/AGH: 31,5 31,5MS9-…-AQU/AQV:
• Screw the connectors into the pneumatic connections
using a suitable sealing material.
MS9-LOE
Bedienungsanleitung
Operating instructions
Original: de
Festo SE & Co. KG
Postfach
D-73726 Esslingen
Phone:
+49/711/347-0
www.festo.com
1112NH 8002715