www.geemarc.com
UNPACKING THE LOOPHEAR
When unpacking the LoopHEAR
TM
160v2, you should find the
following in the box :
● 1 LoopHEAR
TM
main unit
● 1 user guide.
● 1 power adaptor 15V 1,5A DC (optional)
● 1 Loop Antenna (optional)
● 1 hand held HAC receiver (optional)
● 1 external lapel microphone (optional)
INTRODUCTION
The LH160v2 has been designed as a standalone Induction
Loop system for use inside a vehicle, point of sale desks, banks,
ticket counters or other customer service locations. It is easy
to install and use.
The unit is designed for use with the standard Geemarc multi
turnsloop antenna which can cover an area of about 1m
2
.
The functions and features include the following:
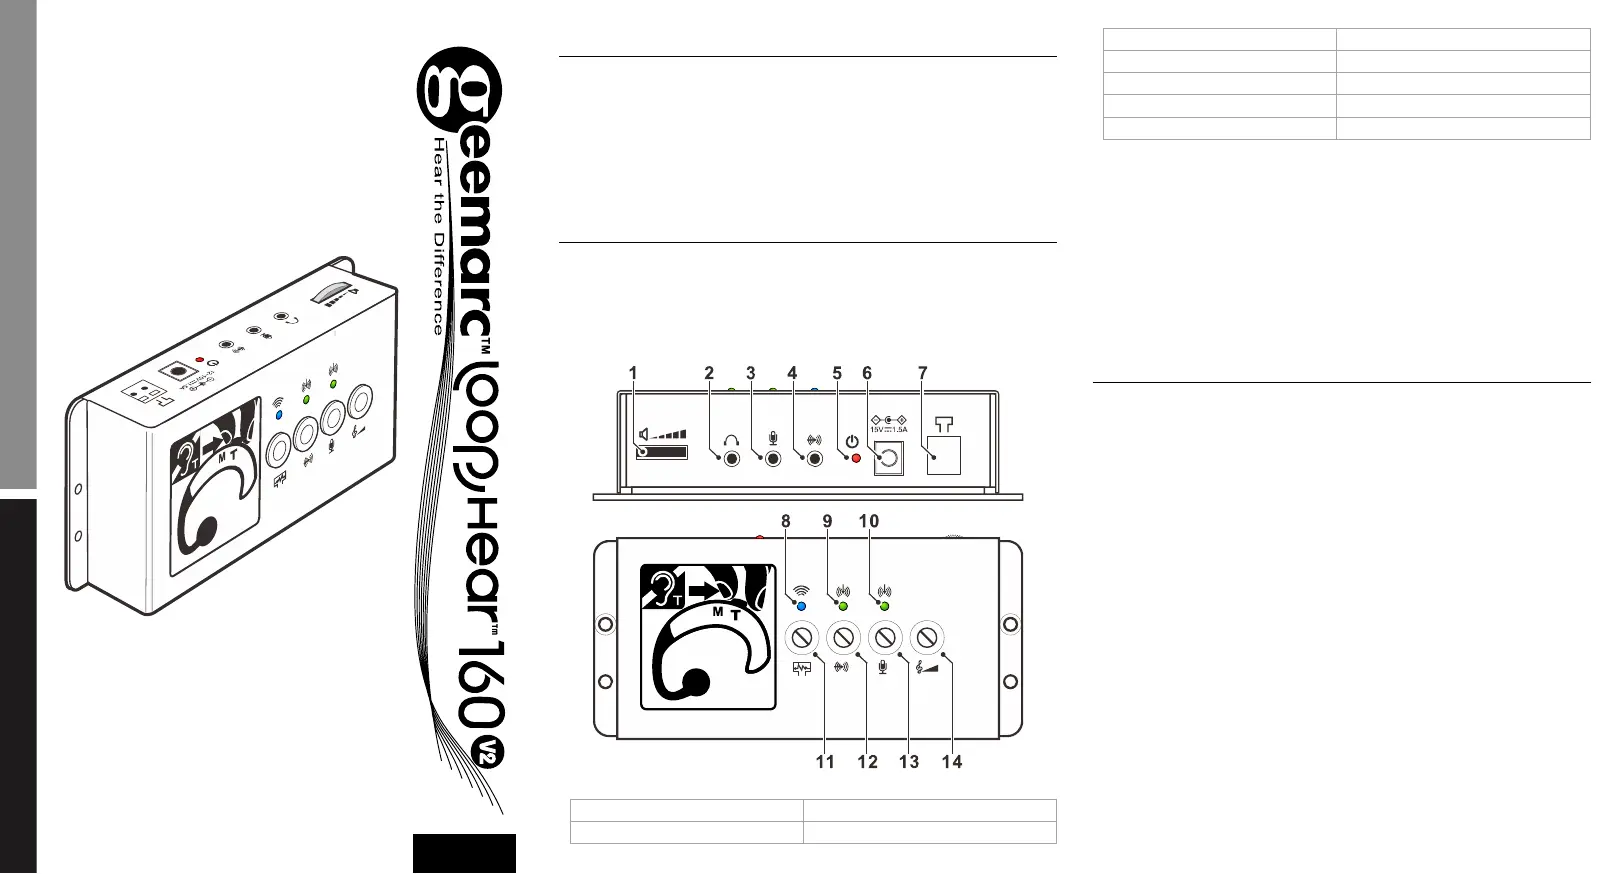
1. Headset volume control 8. Loop current indicato
2. Headset Output socket 9. AUX input indicato
3. MIC input socket 10. MIC input indicato
4. AUX input socket 11. Loop current ad
ustment
5. Power On indicato
12. AUX level ad
ustment
6. Power input socket 13. MIC level ad
ustment
7. Loop antenna connecto
14. TONE ad
ustment
● Microphone input for use with standard desktop or lapel
Microphones.
● Input for Aux signal (like from a MP3 player).
● Headset output
● Power input from a car battery via a car cigarette lighter
socket or a 15V 1.5A DC power adaptor.
● Loop output with spring clamps for easy connection.
● Individual level controls for each input and loop output.
● LED indication of Power, Input signals and Loop output
current for easy set up.
INSTALLATION & OPERATION
Choose a suitable location, free from magnetic or electrical
interference for installation and use of LH160v2.
(1) Install the LH160v2 onto a panel or wall, ensuring that the
cables are securely anchored.
(2) Connect the loop antenna or other compatible loop coil to
the loop output terminals. For optimal performance the
loop antenna should be located about 40 to 60cm in front
of the customer.
Press the tab above the connector terminal and release
after inserting the wire of the loop antenna (or coil). Polarity
is not important.
(3) Connect the supplied (optional) lapel microphone or any
other compatible Geemarc Microphone to the Mic jack.
(4) If required connect Aux input to the Aux jack.
(5) Using a small common blade flat screwdriver, turn the Mic,
Aux, Tone and Field Strength controls fully anti-clockwise
(to their minimum levels).
(6) Connect the AC power adaptor (optional) to the power input
socket. Check that the Power ON LED illuminates.
(7) Apply the input signal (for example speaking into the Mic) to
Mic and turn the corresponding control clockwise until the
corresponding LED begins to light up.
Small area and
counter loop
Am
lifier
English
1 2