Golden Lighting Marco 6068-5 Manual

Golden Lighting Lys Marco 6068-5

Læs gratis den danske manual til Golden Lighting Marco 6068-5 (1 sider) i kategorien Lys. Denne vejledning er vurderet som hjælpsom af 4 personer og har en gennemsnitlig bedømmelse på 4.6 stjerner ud af 2.5 anmeldelser. Har du et spørgsmål om Golden Lighting Marco 6068-5, eller vil du spørge andre brugere om produktet?

Side 1/1
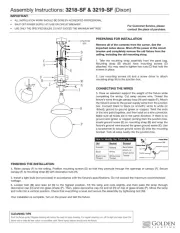
Assembly Instructions: (Marco)6068-5/8
IMPORTANT:
• ALL INSTALLATION WORK SHOULD BE DONE BY ACCREDITED PROFESSIONAL.
• SHUT OFF POWER SUPPLY AT FUSE OR CIRCUIT BREAKER!
• USE ONLY THE SPECIFIED BULBS. DO NOT EXCEED THE MAXIMUM WATTAGE!
PREPARING FOR INSTALLATION
Carefully remove all of the contents from the carton. See the
important notes above. Shut off the power at the circuit breaker
andcompletelyremovetheoldxturefromtheceiling,including
Fromthepartsbag,removethemountingstrapassembly.One
endofnipple(F)shouldbeattachedtomountingstrap(A)with
washerandhexnut(C&D)inplace.Theotherendshouldhave
canopy loop (H) attached.
Attachmountingstrap(A)tothejunctionboxusingmounting
screws(B)andascrewdriver.Tightensecurely.Unscrewcanopy
loop collar (I) from canopy loop (H). Pass canopy (G) over the
mountedcanopylooptotesttheheight.Approximatelyhalf
ofthecanopyloop’sexteriorthreadsshouldbeexposed,and
thecanopyloopcollarshouldtsnuglyontothecanopyloop.
Removecanopy(G)andadjusttheheightofnipple(F)and
canopyloop(H)untilthedesiredheightisreached.Removethe
canopy loop collar and canopy and place to the side.
ASSEMBLING THE FIXTURE
Placethebodyofthextureontoaatsurface.Threadcenter
column(N)tocenterpost(S)untiltight.Insertsteelwireropes
(O)topostholes(R)atthetopofsquareframe(P).Adjustthe
wires until frame (P) is level. Depress the cylinder lock at the top
cap to release the steel wire ropes (O)
Toploop(L)isonthexture’swires,butarenotattachedtotop
cap(M).Tightentoploop(L)ontothethreadsatthetopoftop
cap (M). Pull the wires until taut.
Bymeasuring,determinethecorrectlengthofchainneededfor
properhangingheight.Ifnecessary,useapairofplierstoopen
andremoveanyexcesschain.Attachoneofchainconnectors
(K)tochain(J).Passthexture’swiresthroughtoploop(L).
Pull the wires until taut. Attach one end of chain connector (K)
totoploop(L)andclosechainconnector(K).Feedthexture’s
wiresupthroughthechain(everythreelinksorso),pullingthe
wires until taut. Use the free chain connector (K) to attach chain
(J) to canopy loop (H). Slide canopy loop collar (H) then canopy
(G) down onto the chain/wires. Pull the wires until taut. Trim the
wirestothedesiredlengthplus8to10inches.
CONNECTING THE WIRES
Haveanassistantsupportthexture’sweightwhilecompleting
thewiring.Attachthexture’swirestothepowersupplywires
fromthejunctionbox.Connectblacktoblack(orsmooth);
whitetowhite(orribbed);groundtoground(greenorcopper).
Twisttheendsofthewirepairstogether,thentwistonawire
connector. Make sure all twists are in the same direction. If there
isnogroundwire(greenorcopper)comingfromthejunction
box,locategroundscrew(E)onmountingstrap(A)andwrapthe
xture’sgroundwirearoundthegreengroundscrew(E).Usea
screwdrivertosecuregroundscrew(E)ontomountingstrap(A).
Tuckallwiresneatlyintothejunctionbox.
FINISHING THE INSTALLATION
Pushcanopy(G)uptotheceilingandslidecanopyloopcollar(I)
upbeneaththecanopy.Tightlythreadcanopyloopcollar(I)onto
canopy loop (H) to secure canopy (G) in place.
Slideglass(T)overthesockets.
Installcandlesleeves(U),thenglass(T)beforeinstallingthe
lightbulbs(notincluded)inaccordancewiththexture’s
specications.Donotexceedthemaximumrecommended
wattage.
Your installation is now complete. Turn on the power and test
thexture.
CLEANING TIPS
Treat the xture gently! Regular cleaning will reduce the need for deep cleaning. For regular cleaning, turn off the light and wipe down the
xture with a clean lint-free cotton or microber cloth. Never spray cleaner directly onto the xture.
For Customer Service, contact
the place of purchase to arrange
for replacement parts.
BLACK
(Hot)
WHITE
(Neutral)
GREEN
(Ground)
HOUSE WIRES
SMOOTH
(Or Black)
FIXTURE WIRES
RIBBED
(Or White)
BARE COPPER
(Or Green)
A
B
C
G
E
D
F
H
I
J
K
L
M
N
0
Q
R
T
U
S
P


Produkt Specifikationer

Mærke: Golden Lighting
Kategori: Lys
Model: Marco 6068-5

Har du brug for hjælp?

Hvis du har brug for hjælp til Golden Lighting Marco 6068-5 stil et spørgsmål nedenfor, og andre brugere vil svare dig