1. Before using this product, please read the text carefully to ensure
that the correct operation of the product carried out. to is Failure
follow and not following the instructions and warnings in this
document may cause damage to the product or other
surrounding items, or even harm you and others around you.
2. By using this product, you are deemed to have carefully read the
disclaimer and warning, understand and agree all the terms to
and contents of this statement, and promise to take full
responsibility for the use of this product and the possible
3. Design and specifications are subject to change without notice.
Welcome to "GVM-YK22", this product is specifically made for
professional photographers, by matching the channel value of the
remote control and the device, you can have full control of the GVM
series of photography lights.
1 There are 3 light effect modes: CCT mode, HSI mode, and FX .
2 There are 3 color temperature shortcut buttons: 3200K, 5600K, .
3 There are 9 color shortcut buttons: Red, Green, Blue, Cyan, .
Magenta, Yellow, Pink, Violet, Orange.
4 There are 3 custom buttons: 1, 2, 3. Double-click to save the .
current lighting parameters to the corresponding custom
button, and click the button to switch to the lighting parameters
saved by the custom button.
5.Equipped with 9 remote control protocols: 00-08, adaptable for
We firmly believe that the correct use of this product will definitely
be a great help to your shooting workflow. Before using the
product, it is strongly recommended that you read the following
Product Name : Remote Control For Video Light
Product Type : Remote Control
Wireless Frequency Distance : 433MHz
Distance (Open Space) : 100 Meters
Working Environment Temperature : -10~40℃
Power Supply Mode: Battery Powered 3.0V (AAA×2)
Product Size (mm) : 168×43×15
Commodity Origin : China. Huizhou
This product can control the products with the model number below:
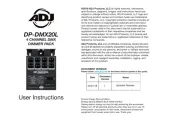
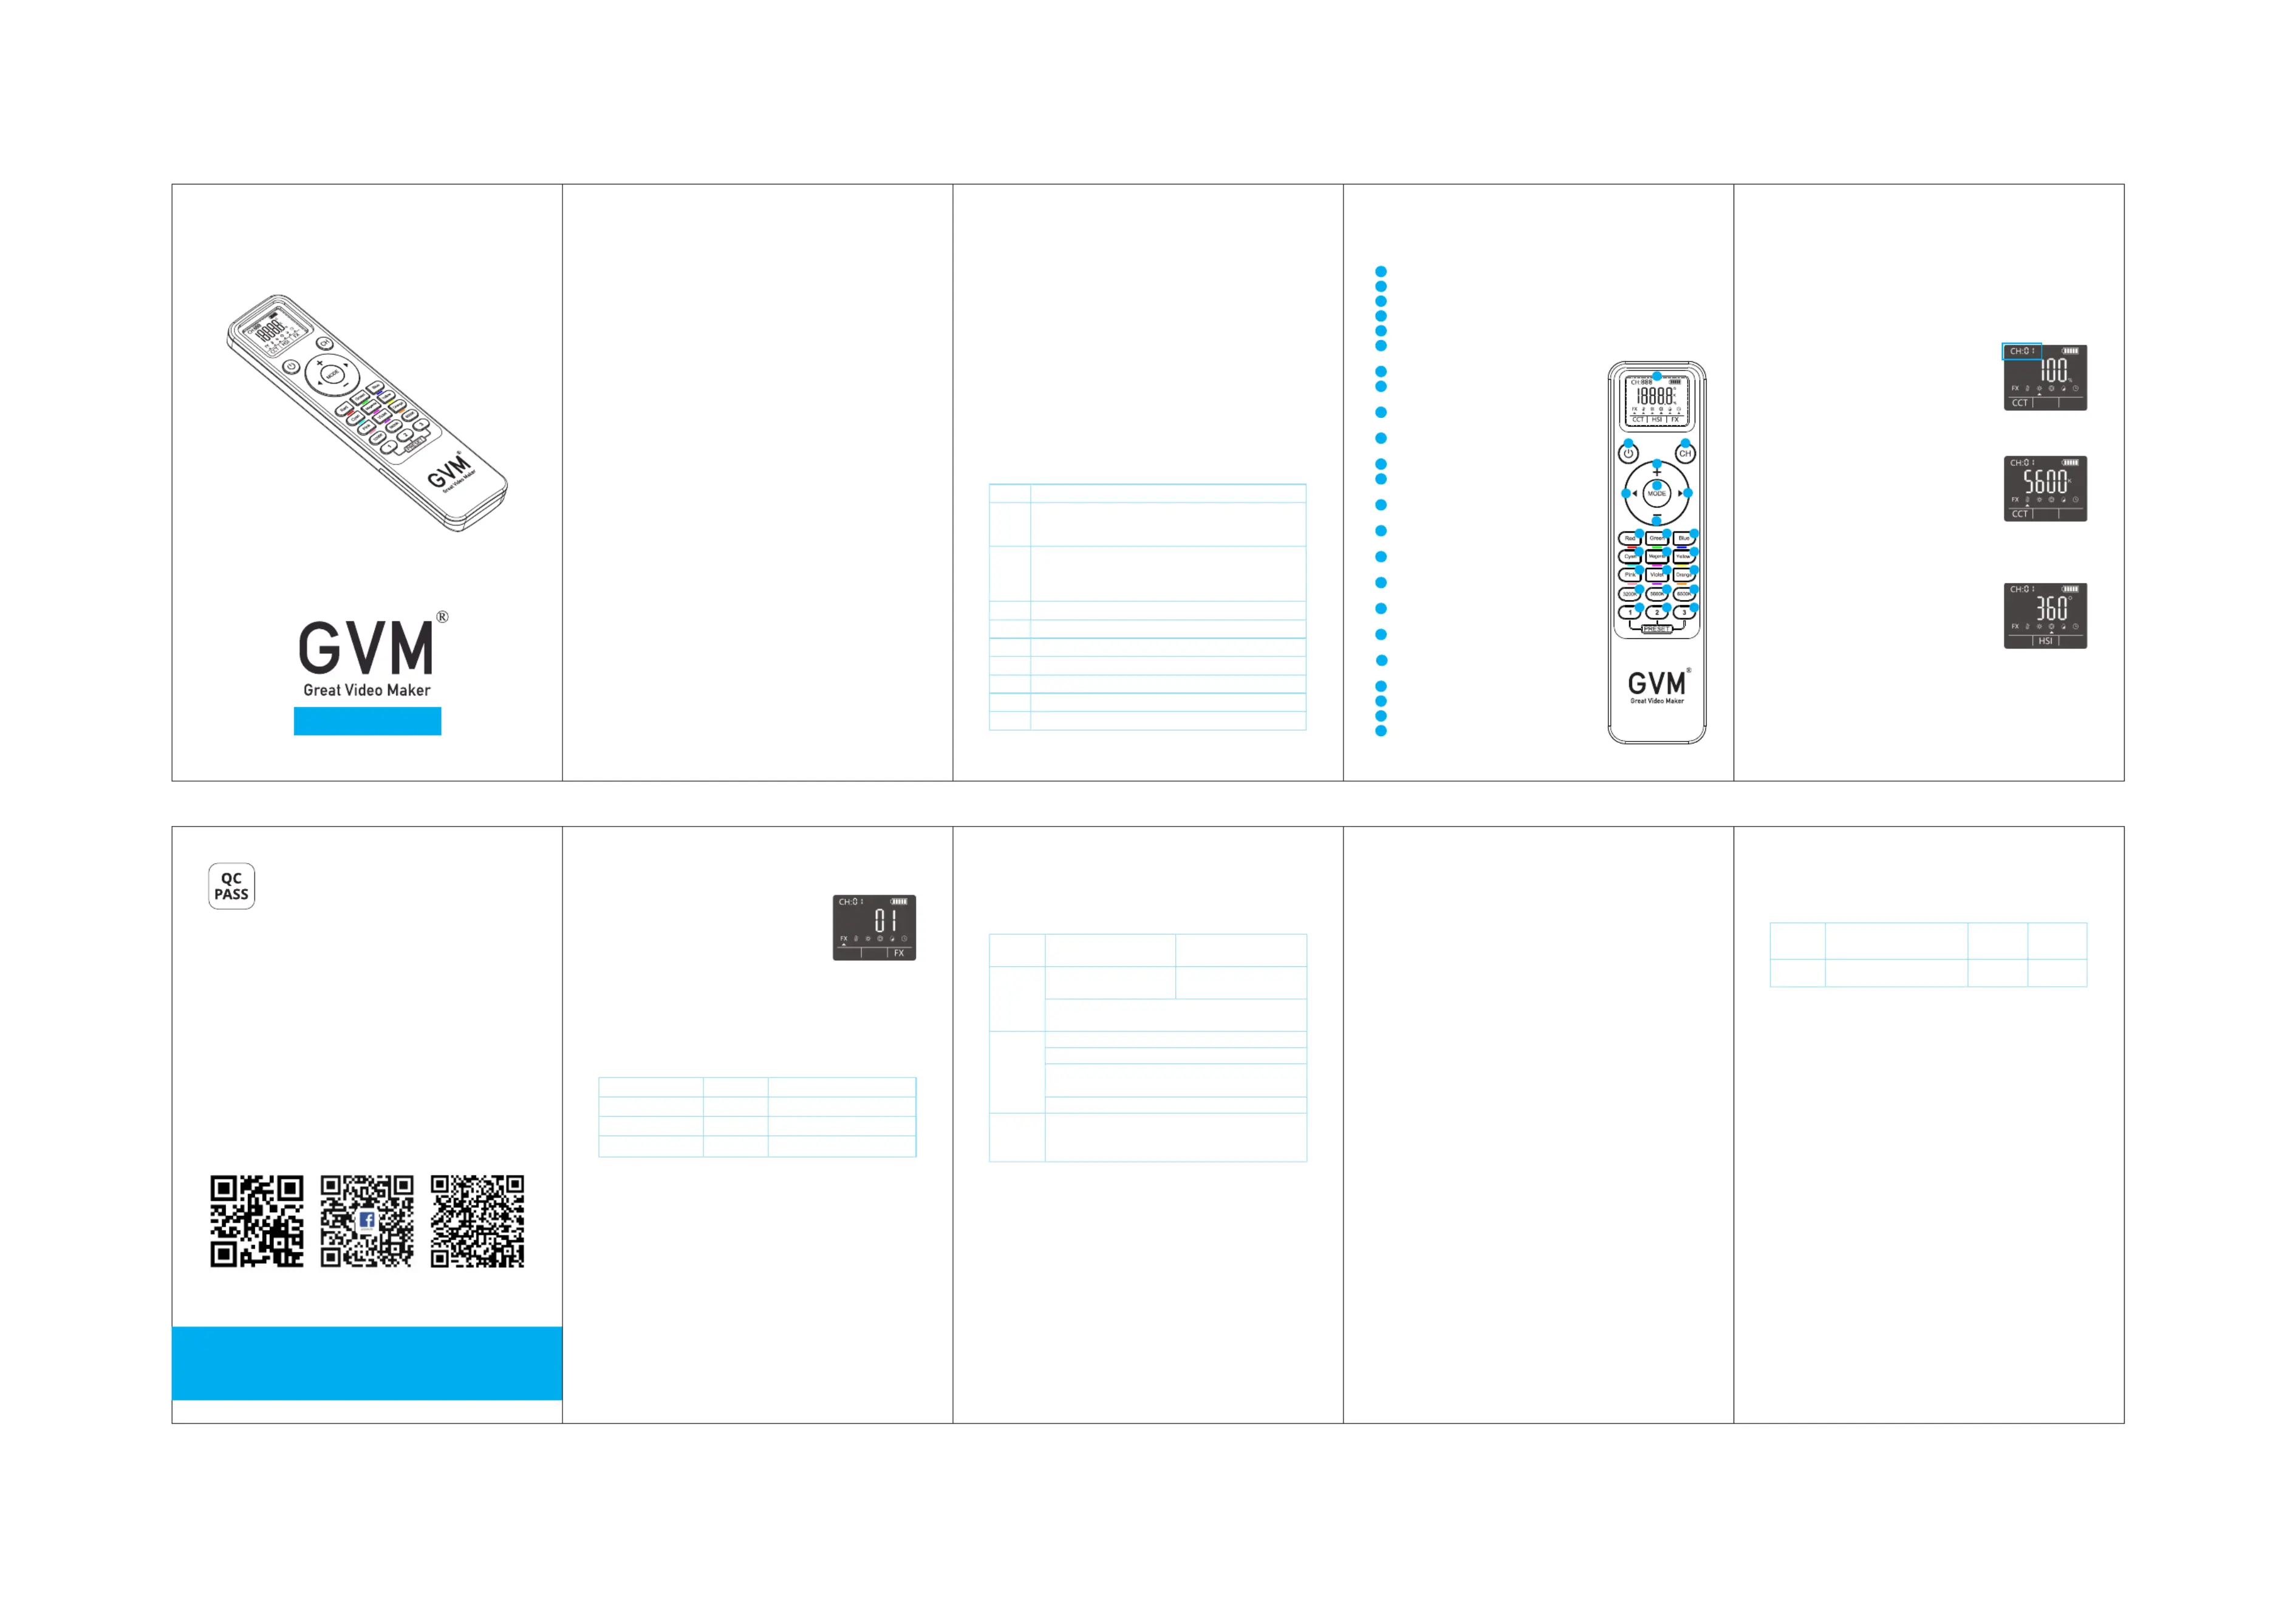
Display screen: Display various parameters of the current light setting.
On Off Switch the remote.: Press this button to turn on/off
Channel Button page: press this button to enter the channel setting .
Mode button: Short press to switch the light effect mode, long press
for 3 seconds to enter the 00-08 model protocol settings
Red button: red light effect shortcut button.
Green button: Green light effect shortcut
Blue button: blue light effect shortcut button.
Cyan button: Cyan light effect shortcut button.
Magenta button: Magenta light effect
Yellow button: Yellow light effect shortcut
Pink button: Pink light effect shortcut button.
Violet button: Violet light effect shortcut
Orange button: Orange light effect shortcut
3200K button: 3200K color temperature and
5600K button: 5600K color temperature and
6500K button: 6500K color temperature and
Preset 1 preset channel: Shortcut button 1 for
storing channel settings.
Preset 2 preset channel: Shortcut button 2 for
storing channel settings.
Preset 3 preset channel: shortcut button 3 for
storing channel settings.
Plus button: parameter increase.
Left button: select left.
Right button: select right.
Minus parameter reduction.button:
Short press the switch button to turn on/off the remote; 2 minutes of
inactivity to enter sleep; Automatic shutdown without operation for 4
②Remote control channel CH:
Press the [CH] channel button, and the [CH]
channel icon flashes, press the up and down
keys to select the channel range: 1~12. from the
Only when the channel of the device number
and the remote control are matched then the
device can be controlled by the remote control.
Press the [MODE] to select [CCT] to enter button
the CCT mode, press the left and right buttons
to select the color temperature and brightness,
press the up and down keys to adjust the color
temperature or brightness.
You can also directly short press [3200K],
[5600K], [6500K] to select the corresponding
color temperature: 3200K, 5600K, 6500K.
Press the [MODE] key to select [HSI] to enter
lighting mode, and press the left and right keys
to select brightness, hue, and .color purity
Press the up and down keys to adjust the
brightness, range: 0%~100%.
Press the up and down keys to adjust the hue, range: 0°~360°.
Press the up and down keys to adjust the color purity, range:
You can also directly select the corresponding color on the button
remote : Red, Green, Blue, Cyan, Magenta, Yellow, to change color to
⑤ FX light effect mode settings:
1. Press the [MODE] key to select [FX] to enter
the light effect mode, press the left and
right keys to select the specific light effect,
and press the up and down keys to adjust
the light effect mode type. You can connect
and control different types of lights
corresponds to their own modes, according
2. Press the left and right keys to select the brightness and speed
mode, and adjust the brightness and speed according to your
1.The product is not waterproof, it needs to be protected against wet
conditions condensation, dripping and splashing water, air
2.The product is not anti-corrosion, do not let the product get into
contact with any corrosive liquid;
3.When the product is in use, ensure that the product is placed firmly
to prevent it from falling and being damaged;
4.When the product is not used for a long time, please turn off the
power of the product to save energy consumption;
Dear user, this warranty card is important proof for applying for
warranty service. Please cooperate with the salesperson to fill it out
and keep it properly. Thank you!
Note: this form should be confirmed by the salesperson's stamp.
This document applies to the products listed in the relevant
"Product Warranty Information" (see instructions below). Other
products or components that do not fall within this scope (such as
promotional products, gift items, and other components added
after the factory) are not covered by this warranty promise.
The corresponding warranty period for products and components
shall be executed according to the relevant "Product Warranty
Information". The warranty period starts from the first day of
purchase of the product, and the date of registration on the
warranty card at the time of purchase shall prevail.
Model Number Product Barcode
How to Obtain Warranty Service
You can directly contact the product salesperson or authorized
service agency, or call GVM's after-sales service hotline to contact
us and have our service personnel arrange service for you. When
applying for warranty service, you should provide a valid warranty
card as a warranty certificate to be eligible for warranty service. If
you cannot provide a valid warranty card, we may also provide you
with warranty service under the circumstance that our products or
components are confirmed to be within the warranty scope, but this
Cases where warranty does not apply:
If the product meets the following conditions, the warranty and
service under this document will not apply:
1.The product or parts have exceeded the corresponding warranty
2.Malfunctions or damages caused by incorrect or improper use,
maintenance, or storage, such as improper handling, use for
purposes other than the reasonable expectations of the product,
incorrect insertion or removal of external devices, falling or
crushing due to external force, or exposure to inappropriate
temperature, solvents, acids, alkalis, water immersion, or damp
3.Malfunctions or damages caused by unauthorized installation,
repair, modification, addition, or disassembly by institutions or
personnel not authorized by GVM.
4.Modifications, changes, or removals of the original identification
information of the product or its parts.
5.Lack of valid warranty card.
6.Malfunctions or damages caused by the use of unauthorized, non-
standard or non-publicly released software.
7.Malfunctions or damages caused by force majeure or accidents.
8.Other malfunctions or damages not caused by quality issues of
the product itself. In such cases, you should seek solutions from
the relevant responsible parties, and GVM will not be held liable.
Malfunctions or damages caused by components, accessories, or
software not covered by the warranty or beyond the warranty
scope that renders the product unable to function properly are
not covered by the warranty. Fading, wear, and consumption that
is normal during the product usage process are not covered by
Product Warranty and Service Support Information
The product warranty period and service types are implemented
according to the following "Product Warranty Information" for each
product category, component, and optional equipment:
GVM Email: support@gvmled.com
Amazon Email: amazonsupport@gvmled.com
Warehouse Address: 12285 MCNULTY RD, STE 105 PHILADELPHIA, Pennsylvania 19154, USA
Huizhou City Latu Photographic Equipment Co., Ltd.
Protocol Applicable models
00 GVM-PRO-SD200B / GVM-PRO-SD300B / GVM-PRO-
SD400B / GVM-PRO-SD500B / GVM-PRO-SD650B / GVM-
30SM / GVM-PRO-YU600C / GVM-B200C
01 GVM-800D-Ⅱ / GVM-850D / GVM-1000D / GVM-1200D /
GVM-1300D / GVM-1500D / GVM-50RS-Ⅱ / GVM-880RS
/ GVM-R500R / GVM-680RS / GVM-MB832 / GVM-Ring-
02 GVM-PR150R / GVM-SD200R
04 GVM-SD200D / GVM-SD200S
05 GVM-SD300D / GVM-SD300S / GVM-PR150D
06 GVM-110RS / GVM-YR200D
07 GVM-Y30D160 / GVM-Y60D256 / GVM-G100W
* Scan the QR code on the back cover to get the latest fit.