Hikvision DS-PDD12-EG2 Manual


Læs gratis den danske manual til Hikvision DS-PDD12-EG2 (26 sider) i kategorien Bevægelsesdetektor. Denne vejledning er vurderet som hjælpsom af 25 personer og har en gennemsnitlig bedømmelse på 4.4 stjerner ud af 13 anmeldelser. Har du et spørgsmål om Hikvision DS-PDD12-EG2, eller vil du spørge andre brugere om produktet?

Side 1/26
1
Disassembling the Detector
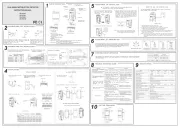
2The Printed Circuit Board(PCB)
3
4 5
Installation Hints
6
The 12 m Lens
7
Resistor Wiring
8
Choose the Connection Type
9
Powering up
10 11
Dimension and Weight
(a) Lens (b) LED Light Pipe
(c) Lens Holder
(e) Nut
(d) PCB
(f) Casing Screw
DS-PDD12-EG2
12m Dual-Tech Detector (10m Pet Tolerance)
(g) Alarm
Resistor Headers
1K, 2K2,
4K7, 5K6, 6K8
(a) PIR Sensor
(f) Terminals
(h) Tamper
Spring
(e) Tamper
Resisitor Headers
1K,2K2,
4K7,5K6
11
2
2
3
3
(1) Ceiling Bracket Fing (Non EN compliant) (2) Wall Bracket Fing
(2) Single End of Line Wiring(1) Normally Closed (3) Double End of Line Wiring
99 g
(3.5 oz)
12
3
4
The detector has two method for resistor wiring:
(1) Using headers to select the End of Line resistance on the ALARM/TAMPER header pins.(Control panel dependent)
(2) Select an resistance (Control panel dependent), and add the resistor to ALARM/TAMPER wiring ports of the detector.
Note: If EOL (End of Line) wiring is not used, leave the headers OFF. If the headers and the header pins does not match, do not
force the header, please select the method 2 to wire the resistor. Method 1 and method 2 should not be used on the
ALARM/TAMPER at the same me.
Technical Specification
85.9°
(a) Detecon Range
(b) Mounng Height
52 zones
4 planes
Mounng height range from
1.8 m to 2.4 m.
The recommended
mounng height is 2.2 m.
=
=
(a) Alarm
Resistance
(b) Tamper
Resistance
1K,
2K2,
4K7,
5K6,
6K8
1K,
2K2,
4K7,
5K6
©2020 Hangzhou Hikvision Digital Technology Co., Ltd. All rights
reserved.
About this Manual
The Manual includes instrucons for using and managing the Product.
Pictures, charts, images and all other informaon hereinaer are for
descripon and explanaon only. The informaon contained in the
Manual is subject to change, without noce, due to firmware updates or
other reasons. Please find the latest version of this Manual at the
Hikvision website (hps://www.hikvision.com/).
Please use this Manual with the guidance and assistance of
professionals trained in supporng the Product.
Trademarks
and other Hikvision's trademarks and logos are the
properes of Hikvision in various jurisdicons.
Other trademarks and logos menoned are the properes of their
respecve owners.
This product and - if applicable - the supplied accessories too are
marked with "CE" and comply therefore with the applicable
harmonized European standards listed under the RE Direcve
2014/53/EU, the EMC Direcve 2014/30/EU, the LVD Direcve
2014/35/EU, the RoHS Direcve 2011/65/EU.
2012/19/EU (WEEE direcve): Products marked with this symbol cannot
be disposed of as unsorted municipal waste in the European Union. For
proper recycling, return this product to your local supplier upon the
purchase of equivalent new equipment, or dispose of it at designated
collecon points. For more informaon see: www.recyclethis.info
UD17437B-A
IC Information
CLASS B: CAN ICES-3 (B)/NMB-3(B)
Industry Canada ICES-003 Compliance
This device meets the CAN ICES-3 (B)/NMB-3(B) standards requirements.
This device complies with Industry Canada licence-exempt RSS standard(s). Operaon is subject
to the following two condions:
(1) this device may not cause interference, and
(2) this device must accept any interference, including interference that may cause undesired
operaon of the device.
Le présent appareil est conforme aux CNR d'Industrie Canada applicables aux appareils
radioexempts de licence. L'exploitaon est autorisée aux deux condions suivantes :
(1) l'appareil ne doit pas produire de brouillage, et
(2) l'ulisateur de l'appareil doit accepter tout brouillage radioélectrique subi, même si le
brouillage est suscepble d'en compromere le fonconnement.
Under Industry Canada regulaons, this radio transmier may only operate using an antenna of
a type and maximum (or lesser) gain approved for the transmier by Industry Canada. To
reduce potenal radio interference to other users, the antenna type and its gain should be so
chosen that the equivalent isotropically radiated power (e.i.r.p.) is not more than that necessary
for successful communicaon.
Conformément à la réglementaon d'Industrie Canada, le présent émeeur radio peut
fonconner avec une antenne d'un type et d'un gain maximal (ou inférieur) approuvé pour
l'émeeur par Industrie Canada. Dans le but de réduire les risques de brouillage radioélectrique
à l'intenon des autres ulisateurs, il faut choisir le type d'antenne et son gain de sorte que la
puissance isotrope rayonnée équivalente (p.i.r.e.) ne dépasse pas l'intensité nécessaire à
l'établissement d'une communicaon sasfaisante.
This equipment should be installed and operated with a minimum distance 20cm between the
radiator and your body.
Cet équipement doit être installé et ulisé à une distance minimale de 20 cm entre le radiateur
et votre corps.
FCC Informaon
Please take aenon that changes or modificaon not expressly
approved by the party responsible for compliance could void the
user’s authority to operate the equipment.
FCC compliance: This equipment has been tested and found to comply with the
limits for a Class B digital device, pursuant to part 15 of the FCC Rules. These limits
are designed to provide reasonable protecon against harmful interference in a
residenal installaon. This equipment generates, uses and can radiate radio
frequency energy and, if not installed and used in accordance with the
instrucons, may cause harmful interference to radio communicaons. However,
there is no guarantee that interference will not occur in a parcular installaon. If
this equipment does cause harmful interference to radio or television recepon,
which can be determined by turning the equipment off and on, the user is
encouraged to try to correct the interference by one or more of the following
measures:
—Reorient or relocate the receiving antenna.
—Increase the separaon between the equipment and receiver.
—Connect the equipment into an outlet on a circuit different from that to which
the receiver is connected.
—Consult the dealer or an experienced radio/TV technician for help.
This equipment should be installed and operated with a minimum distance 20cm
between the radiator and your body.
FCC Condions
This device complies with part 15 of the FCC Rules. Operaon is subject to the
following two condions:
1. This device may not cause harmful interference.
2. This device must accept any interference received, including interference that
may cause undesired operaon
a. Alarm Control Panel a. Alarm Control Panel
b. Detector b. Detector
a. Alarm Control Panel
b. Detector
Aer powering on, the indicator flashes rapidly. Once the
detector self test is completed, the LED indicator will go
out unl the detector detects movement.
45.5 mm
65.7 mm
103.8 mm
The connecon shows
the example:
1. Normal: 1K
2. Alarm: 2K
3. Tamper: 0 K or infinite
The connecon shows
the example:
1. Normal: 1K
2. Alarm: Infinite
3. Tamper: 0 K
NOT READY READY
(j) Sensivity Sengs
LOW
AUTO (Default)
HIGH
(i) LED ON/OFF
LED ON
LED OFF
Screw Model number
PA_3.5 ×25 4
Installation Method - Detector Backplane Installation
Installation Method - Bracket Installation
1K
10m 12m1m 2m 4m 6m 8m
10m 12m1m
2.4m
2m 4m 6m 8m
10m
12m
1m
2m
4m
6m
8m
ALARMTAMPER
6K8
5K6
4K7
2K2
1K
+- ALARMTAMPER
EOLEOL
5K6
4K7
2K2
1K
ALARMTAMPER
6K8
5K6
4K7
2K2
1K
+- ALARMTAMPER
EOLEOL
5K6
4K7
2K2
1K
ALARMTAMPER
6K8
5K6
4K7
2K2
1K
5K6
4K7
2K2
1K
+- ALARMTAMPER
EOLEOL
ALARMTAMPER
6K8
5K6
4K7
2K2
1K
5K6
4K7
2K2
1K
+- ALARMTAMPER
EOLEOL
ZONE2
COM
ZONE1
COM
+-
ALARMTAMPER +-
6K8
5K6
4K7
2K2
1K
ALARMTAMPER
EOLEOL
5K6
4K7
2K2
1K
ALARMTAMPER +-
6K8
5K6
4K7
2K2
1K
ALARMTAMPER
EOLEOL
5K6
4K7
2K2
1K
ALARMTAMPER +-
6K8
5K6
4K7
2K2
1K
5K6
4K7
2K2
1K
ALARMTAMPER
EOLEOL
ZONE2
COM
ZONE1
COM
+-
ZONE2
COM
ZONE1
COM
+-
1K
Legal Disclaimer
TO THE MAXIMUM EXTENT PERMITTED BY APPLICABLE LAW, THE PRODUCT
DESCRIBED, WITH ITS HARDWARE, SOFTWARE AND FIRMWARE, IS
PROVIDED “AS IS”, WITH ALL FAULTS AND ERRORS, AND HIKVISION MAKES
NO WARRANTIES, EXPRESS OR IMPLIED, INCLUDING WITHOUT LIMITATION,
MERCHANTABILITY, SATISFACTORY QUALITY, FITNESS FOR A PARTICULAR
PURPOSE, AND NON-INFRINGEMENT OF THIRD PARTY. IN NO EVENT WILL
HIKVISION, ITS DIRECTORS, OFFICERS, EMPLOYEES, OR AGENTS BE LIABLE TO
YOU FOR ANY SPECIAL, CONSEQUENTIAL, INCIDENTAL, OR INDIRECT
DAMAGES, INCLUDING, AMONG OTHERS, DAMAGES FOR LOSS OF BUSINESS
PROFITS, BUSINESS INTERRUPTION, OR LOSS OF DATA OR DOCUMENTATION,
IN CONNECTION WITH THE USE OF THIS PRODUCT, EVEN IF HIKVISION HAS
BEEN ADVISED OF THE POSSIBILITY OF SUCH DAMAGES.
REGARDING TO THE PRODUCT WITH INTERNET ACCESS, THE USE OF
PRODUCT SHALL BE WHOLLY AT YOUR OWN RISKS. HIKVISION SHALL NOT
TAKE ANY RESPONSIBILITIES FOR ABNORMAL OPERATION, PRIVACY LEAKAGE
OR OTHER DAMAGES RESULTING FROM CYBER ATTACK, HACKER ATTACK,
VIRUS INSPECTION, OR OTHER INTERNET SECURITY RISKS; HOWEVER,
HIKVISION WILL PROVIDE TIMELY TECHNICAL SUPPORT IF REQUIRED.
SURVEILLANCE LAWS VARY BY JURISDICTION. PLEASE CHECK ALL RELEVANT
LAWS IN YOUR JURISDICTION BEFORE USING THIS PRODUCT IN ORDER TO
ENSURE THAT YOUR USE CONFORMS THE APPLICABLE LAW. HIKVISION
SHALL NOT BE LIABLE IN THE EVENT THAT THIS PRODUCT IS USED WITH
ILLEGITIMATE PURPOSES.
IN THE EVENT OF ANY CONFLICTS BETWEEN THIS MANUAL AND THE
APPLICABLE LAW, THE LATER PREVAILS.
(d) Microwave Module
(b) AND/OR Mode
(c) Microwave Range Control
Max: 12 m
Medium: 0 to 8 m
Min: Off
EN50131-1:2006+A1:2009+A2:2017
EN 50131-2-4:2008
Security Grade (SG) 2
Environmental Class (EC) II
(c)
50Hz as default
60Hz remove header
Note:
Brackets are oponal.
Note: PET immunity is
available up to 10 m and at a
height that is below the top
plane of view.
To use the pet immunity funcon,
please install a pet mask.
Sensivity mode High Auto Low
Weight 5 kg 10 kg 15 kg
PET Table
Low is non EN and non INCERT compliant.
Detec on range
12m, 85.9°
Detec on speed 0.3 ~ 2 m/s
Sensivity High, Auto, Low
Auto sensi vity Yes
Onboard EOL Yes
Digital temperature compensa on Yes
Technology Digital microprocessor based
Sealed op cs Yes
Creep zone protec on Yes
Tamper protec on Front
LED indicators Green(PIR), Orange(microwave), Blue(alarm)
Microwave frequency 24Ghz (24.15Ghz to 24.25Ghz)
Microwave range Poten ometer adjustment
AND/OR mode
AND = PIR + MW
OR = PIR / MW (shouldn’t be used with pets)
Pet immunity 10Kg (With op onal pet mask)
Power supply 9 to 16 DC (standard: 12 DC)V V
Current consump 17mA quiescent and maximum at 12V DCon
Opera ng temperature
-10 °C to 55 °C (14 °F to 131 °F)
-10 °C to 40 °C (14 °F to 104 °F) Cer edfi
Storage temperature -20 °C to 60 °C (-4 °F to 140 °F)
Opera ng humidity 10% to 90%
Installa on height 1.8 to 2.4m
Dimension (H × W × D) 103.8 mm × 65.7 mm × 45.5 mm
Weight 99 g
Bracket Op onal wall & ceiling accessory
Scan the QR for EU statement:
Pet immunity is available within 10 m
Cerfied by Teleficaon
OR is non EN compliant
Español Français Italiano
Português РусскийPolski Svenska
Deutsch
(a) PIR-Sensor
(f) Anschlüsse(e) Sabotagewiderstands-Jumper
(b) UND/ODER-Modus (c) 50 Hz standardmäßig, für 60 Hz Jumper enernen
(g) Alarmwiderstands-Jumper
(j) Empfindlichkeitseinstellungen HOCHAUTO (Standard)NIEDRIG
LED ANLED AUS(i) LED AN/AUS
85,9°
4
3. Montagemethode (Montage der Rückwand des Melders)
Schraubenausführung Anzahl
PA_3,5 x 25
4. Montagemethode (Montage der Halterung) (1) Deckenhalterung (nicht EN-konform)
(2) Wandmontagehalterung
5. Installaonshinweise
6. Das 12-m-Objekv
(a) Erkennungsbereich (b) Montagehöhe
Montagehöhe zwischen 1,8 m und 2,4 m.
Die empfohlene Montagehöhe beträgt 2,2 m.
52 Meldegruppen 4 Ebenen
7. Widerstandsverdrahtung
Der Melder verfügt über zwei Methoden zur Widerstandsverdrahtung:
(1) Verwendung von Jumpern, um den Leitungs-Abschlusswiderstand (abhängig von der Zentrale) auf der ALARM/SABOTAGE-Sleiste zu wählen.
(2) Auswahl eines Widerstands (abhängig von der Zentrale) und Anschluss an die ALARM/SABOTAGE-Anschlüsse des Melders.
Hinweis: Wenn keine Leitungsabschlussverdrahtung (EOL) verwendet wird, benutzen Sie keine Jumper. Wenn die Jumper nicht auf die
Sleiste passen, versuchen Sie nicht, sie mit Gewalt aufzustecken, sondern wählen Sie Methode 2, um den Widerstand zu verdrahten.
Methode 1 und 2 dürfen nicht gleichzeig auf den ALARM/SABOTAGE-Sleisten verwendet werden.
(a) Alarmwiderstand (b) Sabotage-Widerstand
8. Verbindungstyp wählen
(1) Ruhekontakt a. Alarmzentrale b. Melder
(2) Verdrahtung Leitungsabschluss-Einzelwiderstand a. Alarmzentrale b. Melder
(3) Verdrahtung Leitungsabschluss-Doppelwiderstand a. Alarmzentrale b. Melder
Die Verbindung wird im Beispiel dargestellt: 1. Normal: 1K 2. Alarm: Unbegrenzt 3. Sabotage: 0K
Die Verbindung wird im Beispiel dargestellt: 1. Normal: 1K 2. Alarm: 2K 3. Sabotage: 0K oder unbegrenzt
9. Hochfahren
Nach dem Einschalten blinkt die Anzeige schnell. Sobald der Selbsest des Melders abgeschlossen ist, erlischt die LED-Anzeige, bis der Melder
eine Bewegung erkennt.
NICHT BEREIT BEREIT
10. Abmessungen und Gewicht
11. Technische Daten
1. Demontage des Melders
2. Gedruckte Leiterplae (PCB)
(a) Objekv (c) Objekvhalter (b) LED-Lichtleiter
(d) Leiterplae (e) Muer (f) Gehäuseschraube
1K, 2K2, 4K7, 5K6, 6K8 1K, 2K2, 4K7, 5K6
(d) Mikrowellenmodul
(h) Sabotage-Feder
(c) Mikrowellensteuerung
Max.: 12 m
Miel: 0 bis 8 m
Min.: Aus
Hinweis:
Die Halterungen sind oponal.
Hinweis: Hauser-Unterdrückung ist in einem Bereich
von bis zu 10 m und bis in eine Höhe unterhalb der
oberen Sichtebene verfügbar.
Hauser-Unterdrückung ist innerhalb eines Bereichs
von 10 m verfügbar.
Um die Funkon Hauser-Unterdrückung zu
nutzen, installieren Sie bie eine Hausermaske.
Empfindlichkeit Hoch Auto Niedrig
Gewicht 5 kg 10 kg 15 kg
HAUSTIER-Tabelle
Niedrig ist nicht EN- und nicht INCERT-konform.
Erkennungsbereich 12 m, 85,9° Mikrowellenreichweite Potenometer-Einstellung
Erfassungsgeschwindigkeit 0,3 bis 2 m/s UND/ODER-Modus
Empfindlichkeit Hauser-Unterdrückung 10 kg (mit oponaler Hausermaske)Hoch, Auto, Niedrig
Auto-Empfindlichkeit Ja 9 bis 16 V DC (Standard: 12 V DC)Spannungsversorgung
Onboard-EOL StromaufnahmeJa 17 mA Ruhestrom und Maximum bei 12 V DC
Ja Betriebstemperatur
Technologie Mit digitalem Mikroprozessor Lagertemperatur -20 °C bis 60 °C
Versiegelte Opk Ja Betriebsfeuchgkeit 10 % bis 90 %
Kriechzonenschutz Montagehöhe 1,8 bis 2,4 mJa
Sabotageschutz Vorne Maße (H x B x T) 103,8 mm x 65,7 mm x 45,5 mm
LED-Anzeigen Grün (PIR), Orange (Mikrowelle),
Blau (Alarm) Gewicht 99 g
Mikrowellenfrequenz 24 Ghz (24,15 Ghz bis 24,25 Ghz) Halterung Oponales Zubehör für Wand- und Deckenmontage
Digitaler
Temperaturkompensaon
-10 °C bis 55 °C
-10 °C bis 40 °C
Zerfiziert
UND = PIR + MW
ODER = PIR/MW (nicht mit Hauseren
verwenden)
(a) Sensor infrarrojo pasivo (PIR)
(f) Terminales(e) Conectores de la resistencia de manipulación
(b) Modo Y/O (c) 50 Hz por defecto, 60 Hz quitar conector
(g) Conectores de la resistencia de la alarma
(j) Ajustes de sensibilidad ALTAAUTOTICO
(por defecto)
BAJA
LED DESACTIVADOLED ACTIVADO(i) LED ACTIVADO/DESACTIVADO
85,9°
4
3. Método de instalación (instalación de la placa base del detector)
Modelo de tornillo mero
PA_3,5 × 25
4. Método de instalación (instalación del soporte) (1) Accesorio para el soporte de techo (no conforme
a la norma EN)
(2) Accesorio para el soporte de pared
5. Consejos de instalación
6. La lente de 12 m
(a) Alcance de detección (b) Altura de montaje
Intervalo de altura de montaje de 1,8 m a 2,4 m.
La altura de montaje recomendada es de 2,2 m.
52 zonas 4 planos
7. Cableado de la resistencia
El detector es compable con dos métodos para el cableado de la resistencia:
(1) Use los conectores para seleccionar la resistencia de fin línea (en función del panel de control) sobre los pines de los conectores de
ALARMA/MANIPULACIÓN.
(2) Seleccione una resistencia (en función del panel de control) y añádala a los puertos de cableado de ALARMA/MANIPULACIÓN del detector.
Nota: Si no usa un cableado de fin de línea, no use los conectores. Si los conectores y los pines de los conectores no son compables, no fuerce
los conectores y seleccione el método 2 para cablear la resistencia. No ulice el método 1 y el método 2 al mismo empo para la
ALARMA/MANIPULACIÓN.
(a) Resistencia de alarma (b) Resistencia de manipulación
8. Elija el po de conexión
(1) Normalmente cerrado a. Panel de control de la alarma b. Detector
(2) Cableado de fin de línea simple a. Panel de control de la alarma b. Detector
(3) Cableado de fin de línea doble a. Panel de control de la alarma b. Detector
Conexiones mostradas en el ejemplo: 1. Normal: 1K 3. Manipulación: 0 K2. Alarma: Infinito
Conexiones mostradas en el ejemplo: 1. Normal: 1K 2. Alarma: 2k 3. Manipulación: 0 K o infinito
9. Encendido
Una vez conectada la alimentación, el indicador parpadea rápidamente. Una vez completado el autodiagnósco del detector, el indicador led se
apagará hasta que el detector capte un movimiento.
NO PREPARADA PREPARADA
10. Dimensiones y peso
11. Especificaciones técnicas
1. Desmontaje del detector
2. Placa de circuito impreso
(a) Lente b) Tubo de luz led (c) Soporte de la lente
(d) Placa de circuito impreso (e) Tuerca (f) Tornillo de la carcasa
1k, 2k2, 4k7, 5k6 y 6k8 1k, 2k2, 4k7 y 5k6
(d) Módulo de microondas
(h) Resorte de manipulación
(c) Control de microondas
Máx.: 12 m
Media: 0 a 8 m
Mín.: Apagado
Nota:
Los soportes son opcionales.
Nota: La inmunidad a las mascotas está disponible a
una distancia de menos de 10 m y a una altura por
debajo del plano de visión superior.
Inmunidad a las mascotas a menos de 10 m.
Instale una scara de mascotas para poder usar
la función de inmunidad a las mascotas.
Mondo de sensibilidad Alta BajaAutomáca
Peso 5 kg 10 kg 15 kg
Tabla de MASCOTAS
El ajuste «Bajo» de la sensibilidad no cumple con las cerficaciones EN e INCERT.
Alcance de detección 12 m, 85,9° Intervalo de microondas Ajuste del potenciómetro
Velocidad de detección 0,3 - 2,0 m/s Modo Y/O
Sensibilidad Inmunidad a las mascotas 10 kg (con máscara opcional para mascotas)Alta, automáca y baja
Sensibilidad automáca 9 a 16 VCC (estándar: 12 VCC)Fuente de alimentación
Fin de línea integrado Consumo de corriente 17 mA en modo inacvo con un máximo de
12 V CC
Temperatura de funcionamiento
Tecnología En función del microprocesador digital Temperatura de almacenamiento -20 °C a 60 °C (-4 °F a 140 °F)
Ópca sellada Humedad de funcionamiento 10 % a 90 %
Protección de zona gradual Altura de instalación 1,8 a 2,4 m
Protección anmanipulación Dimensiones (alto x ancho x fondo) 103,8 mm x 65,7 mm x 45,5 mmFrontal
Indicadores led Verde (Infrarrojo pasivo), anaranjado
(microondas) y azul (alarma) Peso 99 g
Frecuencia de microondas 24 GHz (24,15 GHz a 24,25 GHz) Soporte Accesorio opcional de pared y techo
Compensación de temperatura
digital
-10 °C a 55 °C (14 °F a 131 °F)
-10 °C a 40 °C (14 °F a 104 °F)
Cerficado
Y = Infrarrojo pasivo (PIR) + Microondas
O = Infrarrojo pasivo (PIR) / Microondas
(no se debe usar con mascotas)
O no es compable con EN
(a) Capteur PIR
(f) Terminaux(e) Embases de résistance an-sabotage
(b) Mode ET/OU (c) 50 Hz par défaut, rerez l’embase pour 60 Hz
(g) Embases de résistance d'alarme
(j) Paramètres de sensibilité HAUTEAUTOMATIQUE
(par défaut)
BASSE
LED ÉTEINTELED ALLUMÉE(i) LED ALLUMÉE/ÉTEINTE
85,9°
4
3. Méthode d’installaon (installaon du fond de panier du détecteur)
Modèle de vis Chiffre
PA_3,5 ×25
4. Méthode d’installaon (installaon du support) (1) Montage du support au plafond (non cerfié EN)
(2) Montage du support mural
5. Conseils d’installaon
6. Objecf de portée 12 m
(a) Portée de détecon (b) Hauteur de montage
Hauteur de montage : de 1,8 m à 2,4 m.
La hauteur de montage recommandée est de 2,2 m.
52 zones 4 niveaux
7. Câblage des résistances
Le détecteur offre deux méthodes de câblage des résistances :
(1) Ulisez les embases pour leconner la résistance de fin de ligne (en foncon du panneau de commande) sur les broches d’embases ALARME/ANTI-SABOTAGE ;
(2) Séleconnez une résistance (en foncon du panneau de contrôle), et ajoutez lasistance aux ports ALARME/ANTI-SABOTAGE du détecteur.
Remarque : si le câblage EOL (fin de ligne) n’est pas ulisé, laisser les embases éteintes. Si les embases et les broches d’embases ne correspondent pas, ne
forcez pas l’embase ; optez pour la 2e méthode de câblage de la résistance. La 1re et la 2e méthodes ne doivent pas être ulisées en même temps sur
l’ALARME/ANTI-SABOTAGE.
(a) Résistance d’alarme (b) Résistance an-sabotage
8. Séleconnez le type de connexion
(1) Normalement fermé a. Panneau de contrôle d’alarme b. Détecteur
(2) Câblage de fin de ligne simple a. Panneau de contrôle d’alarme b. Détecteur
(3) Câblage de fin de ligne double a. Panneau de contrôle d’alarme b. Détecteur
La connexion montre l’exemple : 1. Normal : 1K 2. Alarme: infinie 3. An-sabotage : 0 K
La connexion montre l’exemple : 1. Normal : 1K 2. Alarme: 2k 3. An-sabotage : 0 K ou infini
9. Mise sous tension
Une fois allumé, le voyant clignote rapidement. À la fin de l’autodiagnosc du détecteur, l’indicateur LED s’éteint jusqu’à ce qu’un mouvement soit détecté.
PAS PRÊT PRÊT
10. Dimensions et poids
11. Spécificaons techniques
1. Démontage du détecteur
2. Circuit imprimé (PCB)
(a) Objecf (b) Tube lumineux LED (c) Support d’objecf
(d) PCB (e) Écrou (f) Vis du boîer
1k, 2k2, 4k7, 5k6, 6K8 1k, 2k2, 4k7, 5k6
(d) Module micro-ondes
(h) Ressort an-sabotage
(c) Contrôle des micro-ondes
Max. : 12 m
Moyenne : de 0 à 8 m
Min. : éteint
Remarque :
les supports sont en opon.
Remarque : Le filtre à animaux de compagnie fonconne sur
une portée de 10 m et à une hauteur située en dessous du
plan supérieur du champ de vision.
Le filtre à animaux de compagnie fonconne sur une portée
de 10 m.
Pour uliser la foncon de filtre à animaux de compagnie,
veuillez installer un masque à animaux de compagnie.
Mode de sensibilité Haute BasseAutomaque
Poids 5 kg 10 kg 15 kg
Tableau ANIMAUX DE COMPAGNIE
Faible est non conforme aux normes EN et INCERT.
Portée de détecon Réglage du potenomètre12 m, 85,9° Portée des micro-ondes
Vitesse de détecon De 0,3 m/s à 2 m/s Mode « ET/OU »
Sensibilité Élevée, automaque, faible Filtre à animaux de compagnie 10 kg (avec masque animaux de compagnie)
Sensibilité auto Oui Alimentaon électrique 9 à 16 V CC (standard : 12 V CC)
EOL embarqué Oui Consommaon de courant 17 mA au repos et maximale à 12 V CC
Oui Température de fonconnement
Technologie Microprocesseur numérique Température de stockage De -20 °C à 60 °C
Opques scellées Humidité de fonconnementOui De 10 à 90 %
Protecon de zone au ras du mur Hauteur d’installaonOui De 1,8 à 2,4 m
Protecon an-sabotage Dimension (L x l x h)Panneau avant 103,8 mm × 65,7 mm × 45,5 mm
Indicateurs LED Vert (PIR), orange (micro-ondes),
bleu (alarme) Poids 99 g
Fréquence des micro-ondes 24 GHz (24,15 GHz à 24,25 GHz) Support Accessoire mural et plafond facultaf
Compensaon numérique de la
température
De -10 °C à 55 °C
De -10 °C à 40 °C
Cerfié
ET = PIR + MW
OU = PIR / MW (ne doit pas être ulisé avec les
animaux de compagnie)
Le mode OU n’est pas conforme EN
(a) Sensore PIR
(f) Terminali(e) Poncelli resistenza anmanomissione
(b) Modalità AND/OR (c) 50 Hz predefinito 60 Hz rimuovere poncello
(g) Poncelli resistenza allarme
(j) Impostazioni sensibilità ALTOAUTO (valore
predefinito)
BASSO
LED SPENTOLED ACCESO(i) LED ACCESO/SPENTO
85,9°
4
3. Metodo di installazione (installazione backplane del rilevatore)
Tipo di vite Numero
PA_3,5 ×25
4. Metodo di installazione (installazione staffa) (1) Installazione staa per soffio (non conforme EN)
(2) Montaggio con staffa a parete
5. Consigli di installazione
6. Obievo 12 m
(a) Raggio di rilevamento (b) Altezza di montaggio
Altezza di montaggio compresa tra 1,8 e 2,4 m.
Si consiglia di montare a un'altezza di 2,2 m.
52 zone 4 piani
7. Cablaggio della resistenza
Il rilevatore supporta due metodi di collegamento per la resistenza:
(1) Ulizzare i poncelli per selezionare la resistenza di fine linea (in base al pannello di controllo) sui terminali ALARM/TAMPER.
(2) Selezionare una resistenza (in base al pannello di controllo) e aggiungere la resistenza alle porte di cablaggio ALARM/TAMPER del rilevatore.
Nota: Se non si ulizza il cablaggio di fine linea (EOL), lasciare i poncelli DISINSERITI. Se i poncelli e gli alloggiamen non corrispondono,
non forzare i poncelli e scegliere il secondo metodo di collegamento della resistenza. Il primo e il secondo metodo non devono essere
ulizza contemporaneamente.
(a) Resistenza allarme (b) Resistenza anmanomissione
8. Scegliere il po di connessione
(1) Normalmente chiuso a. Pannello di controllo allarme b. Rilevatore
(2) Cablaggio di fine linea singolo a. Pannello di controllo allarme b. Rilevatore
(3) Cablaggio di fine linea doppio a. Pannello di controllo allarme b. Rilevatore
Esempio di collegamento: 1. Normale: 1k 3. Manomissione: 0 k2. Allarme: Infinita
Esempio di collegamento: 1. Normale: 1k 2. Allarme: 2k 3. Manomissione: 0 k o infinita
9. Accensione
Quando si accende il rilevatore, l'indicatore lampeggerà rapidamente. Al termine dei test autodiagnosci, l'indicatore LED si spegne finché
viene rilevato un movimento.
NON PRONTO PRONTO
10. Dimensione e peso
11. Specifiche tecniche
1. Smontaggio del rilevatore
2. Circuito stampato (PCB)
(a) Obievo (b) Tubo LED (c) Supporto dell'obievo
(d) PCB (e) Dado (f) Vite alloggiamento
1k, 2k2, 4k7, 5k6, 6k8 1k, 2k2, 4k7, 5k6
(d) Modulo microonde
(h) Molla anmanomissione
(c) Controllo microonde
Max: 12 m
Media: 0-8 m
Min: Spento
Nota:
le staffe sono opzionali.
Nota: l'immuni per gli animali domesci disponibile fino
a 10 m, a un'altezza inferiore al piano visivo superiore.
L'immunità per gli animali domesci è ava entro 10 m.
Per la funzione di immunità per gli animali domesci,
installare una maschera per animali domesci.
Modalità sensibilità Alto BassoAutomaca
Peso 5 kg 10 kg 15 kg
Tabella animali domesci
Basso non è conforme alle normave EN e INCERT.
Campo di rilevamento 12 m, 85,9° Gamma microonde Regolazione potenziometro
Velocità di rilevamento 0,3-2 m/s Modalità E/O
Sensibilità Alta, automaca, bassa Immunità per gli animali domesci 10 kg (con maschera per animali domesci opzionale)
Sensibilità automaca 9-16 VCC (standard: 12 VCC)Sì Alimentazione
EOL integrata Assorbimento 17 mA quiescente e massimo a 12V DC
Temperatura operava
Tecnologia Con microprocessore digitale Temperatura di conservazione Da -20 °C a 60 °C (da -4 °F a 140 °F)
Componen oci sigilla Umidità operava Da 10% a 90%
Protezione zona anstrisciamento Sì Altezza di installazione 1,8-2,4 m
Protezione anmanomissione Parte anteriore Dimensioni (A × L × P) 103,8 mm × 65,7 mm × 45,5 mm
Indicatori LED Verde (PIR), arancione (microonde),
blu (allarme) Peso 99 g
Frequenza microonde 24 GHz (24,15 GHz - 24,25 GHz) Staffa Accessorio da parete e soffio opzionale
Compensazione digitale della
temperatura
Da -10 °C a 55 °C (da 14 °F a 131 °F)
Da -10 °C a 40 °C (da 14 °F a 104 °F)
Cerficato
AND = PIR + MW
OR = PIR / MW (da non usare con animali
domesci)
Oppure non è conforme a EN
(a) Czujnik PIR
(f) Zaciski(e) Złącza rezystorów zabezpieczenia antysabotażowego
(b) Tryb ORAZ/LUB (c) 50 Hz domyślna, 60 Hz po usunięciu zworki
(g) Złącza rezystorów obwodu alarmowego
(j) Ustawienia czułości WYSOKAAUTOMATYCZNIE
(domyślnie)
NISKA
LED WYŁ.LED WŁ.(i) LED WŁ./WYŁ.
85,9°
4
3. Metoda instalacji (płyta tylna detektora)
Model śruby Liczba
PA 3,5 × 25
4. Metoda instalacji (uchwyt) (1) Montaż na uchwycie sufitowym (nie zapewnia zgodności z certyfikatem EN)
(2) Montaż na uchwycie ściennym
5. Wskazówki dotyczące instalacji
6. Soczewka 12 m
(a) Zasięg detekcji (b) Wysokość montażu
Zakres wysokości montażu 1,8–2,4 m.
Zalecana wysokość montażu 2,2 m.
52 strefy 4 płaszczyzny
7. Podłączenie rezystora
Dostępne są dwie metody podłączenia rezystorów detektora:
(1)Użycie złączy do ustawienia rezystancji EOL (zależnie od centrali alarmowej) przy użyciu zworek ALARM/SABOTAŻ.
(2) Wybór rezystora (zależnie od centrali alarmowej) i dodanie go do złączy ALARM/SABOTAŻ detektora.
Uwaga: Jeżeli połączenie EOL nie jest stosowane, należy pozostawić złącza rozwarte (OFF). Jeżeli zworki nie pasują do złączy, nie wolno instalować ich przy
użyciu nadmiernej siły i należy podłączyć rezystor zgodnie z metodą 2. Nie wolno używać metody 1 i 2 równocześnie do wykonania połączeń ALARM/SABOTAŻ.
(a) Rezystancja alarmu (b) Rezystancja alarmu sabotażu
8. Wybierz typ połączenia
(1) Rozwierne a. Centrala alarmowa b. Detektor
(2) Połączenia SEOL a. Centrala alarmowa b. Detektor
(3) Połączenia DEOL a. Centrala alarmowa b. Detektor
Przykładowe połączenia: 1. Stan normalny: 1K 2. Alarm: otwarcie obwodu 3. Sabotaż: 0 k
Przykładowe połączenia: 1. Stan normalny: 1K 2. Alarm: 2k 3. Sabotaż: 0 k lub otwarcie obwodu
9. Włączanie zasilania
Po włączeniu zasilania wskaźnik miga szybko. Po ukończeniu automatycznego testu detektora wskaźnik LED jest wyłączony do chwili, gdy detektor wykryje ruch.
NIEGOTOWY GOTOWY
10. Wymiary i waga
11. Specyfikacje techniczne
1. Demontaż detektora
2. Płyta z obwodami drukowanymi (PCB)
(a) Soczewka (b) Światłowód LED (c) Uchwyt soczewki
(d) Płyta z obwodami drukowanymi (PCB) (e) Nakrętka (f) Śruba obudowy
1k, 2k2, 4k7, 5k6, 6K8 1k, 2k2, 4k7, 5k6
(d) Moduł mikrofalowy
(h) Sprężyna zabezpieczenia
antysabotażowego
(c) Ustawienia czujnika mikrofalowego
Maks.: 12 m
Średni: od 0 m do 8 m
Min.: wyłączony
Uwaga:
uchwyty są opcjonalne.
Uwaga: Funkcja niereagowania na zwierzęta domowe
jest dostępna przy zasięgu 10 m i na wysokości poniżej
najwyższej płaszczyzny widoku.
Funkcja niereagowania na zwierzęta domowe jest
dostępna przy zasięgu 10 m.
Aby korzystać z funkcji niereagowania na zwierzęta
domowe, należy zainstalować osłonę zapobiegającą
wykrywaniu zwierząt domowych.
Czułość Wysoka Automatycznie Niska
Waga 5 kg 10 kg 15 kg
Tabela zwierząt domowych
Ustawienie „Niska” nie zapewnia zgodności z certyfikatami EN i INCERT.
Zasięg detekcji Zasięg mikrofal12 m, 85,9° Ustawienia potencjometru
Prędkość wykrywanych obiektów 0,3–2 m/s Tryb ORAZ/LUB
Czułość Funkcja niereagowania na zwierzęta domoweWysoka, automatycznie, niska 10 kg (z opcjonalną osłoną zapobiegającą wykrywaniu
zwierząt domowych)
Automatyczna regulacja czułości Od 9 V do 16 V DC (standardowo: 12 V DC)Tak Zasilanie
Zintegrowany EOL Tak Pobór prądu 17 mA w trybie gotowości; wartość maksymalna przy 12 V
DC
Tak Temperatura (użytkowanie)
Technologia Mikroprocesor cyfrowy Temperatura (przechowywanie) Od –20°C do 60°C
Hermetyczny układ optyczny Wilgotność (użytkowanie)Tak Od 10% do 90%
Ochrona strefy podejścia Wysokość instalacjiTak Od 1,8 m do 2,4 m
Zabezpieczenie antysabotażowe Wymiary (wys. × szer. × głęb.)Przód 103,8 mm × 65,7 mm × 45,5 mm
Wskaźniki LED Zielony (PIR), pomarańczowy (mikrofale),
niebieski (alarm)
Waga 99 g
Częstotliwość mikrofal Opcjonalne akcesoria do montażu ściennego i sufitowego24 GHz (od 24,15 GHz do 24,25 GHz) Uchwyt
Cyfrowa kompensacja temperatury
Od –10°C do 55°C
Od –10°C do 40°C
Certyfikowane
ORAZ = PIR + MF
LUB = PIR / MF (nie należy używać w przypadku zwierząt
domowych)
(a) Sensor PIR
(f) Terminais(e) Cabeçotes de resistor anviolação
(b) Modo E/OU (c) 50 Hz como padrão Remover o jumper para 60 Hz
(g) Cabeçotes de resistor de alarme
(j) Configurações de sensibilidade ALTAAUTOTICA (padrão)BAIXA
LED desligadoLED ligado(i) LED LIGADO/DESLIGADO
85,9°
4
3. Modo de instalação (instalação da placa principal do detector)
Modelo do parafuso Número
PA_3,5 ×25
4. Modo de instalação (instalação do suporte) (1) Montagem no suporte de teto (não compavel com EN)
(2) Instalação em suporte de parede
5. Dicas de instalação
6. Lente de 12 m
(a) Faixa de detecção (b) Altura de instalação
Faixa de altura de instalação: 1,8 m a 2,4 m.
Altura de instalação recomendada: 2,2 m.
52 zonas 4 planos
7. Conexão do resistor
O detector tem dois métodos para a conexão do resistor:
(1) Use jumpers para selecionar a resistência de fim de linha (conforme o painel de controle) nos cabeçotes dos pinos de ALARME/VIOLAÇÃO.
(2) Selecione uma resistência (conforme o painel de controle) e adicione o resistor às portas de conexão de ALARME/VIOLAÇÃO do detector.
Observação: Se a conexão EOL (fim de linha) não for usada, deixe os cabeçotes desligados. Se os jumpers e os cabeçotes dos pinos não forem
compaveis, não force o jumper. Selecione o método 2 para conectar o resistor. Os métodos 1 e 2 não devem ser usados ao mesmo tempo
para ALARME/VIOLAÇÃO.
(a) Resistência do alarme (b) Resistência de anviolação
8. Escolha o po de conexão
(1) Normalmente fechado a. Painel de controle de alarme b. Detector
(2) Fiação de fim de linha único a. Painel de controle de alarme b. Detector
(3) Fiação de fim de linha duplo a. Painel de controle de alarme b. Detector
Conexão mostrada no exemplo: 1. Normal: 1 K 2. Alarme: Infinito 3. Violação: 0 K
Conexão mostrada no exemplo: 1. Normal: 1 K 2. Alarme: 2 K 3. Violação: 0 K ou infinito
9. Ligando
Após ligado, o indicador piscará rapidamente. Quando o autoteste do detector esver concluído, o indicador de LED apagará até que o detector
detecte um movimento.
NÃO ESTÁ PRONTO PRONTO
10. Dimensões e peso
11. Especificações técnicas
1. Desmontagem do detector
2. Placa de circuito impresso (PCB)
(a) Lente (b) Tubo da luz de LED (c) Suporte da lente
(d) PCB (e) Porca (f) Parafuso do invólucro
1k, 2k2, 4k7, 5k6, 6K8 1k, 2k2, 4k7, 5k6
(d) Módulo de micro-ondas
(h) Mola anviolação
(c) Controle de micro-ondas
Máx.: 12 m
Médio: 0 a 8 m
Mín.: Desligado
Observação:
os suportes são opcionais.
Observação: a imunidade a PET está disponível a até
10 m e a uma altura abaixo do plano de visão
superior.
A imunidade a pet está disponível a até 10 m.
Para usar a função de imunidade a pet,
instale uma máscara pet.
Modo de sensibilidade Alta Automáca Baixa
Peso 5 kg 10 kg 15 kg
Tabela de PET
O nível baixo não possui cerficação EN e INCERT.
Alcance de detecção Faixa de micro-ondas Ajuste do potenciômetro12 m, 85,9°
Velocidade de detecção 0,3 a 2 m/s Modo E/OU
Sensibilidade Imunidade a pet 10 Kg (com máscara pet opcional)Alta, automáca e baixa
Sensibilidade automáca Fonte de alimentação 9 a 16 VCC (padrão: 12 VCC)Sim
EOL integrado Sim Consumo de corrente 17 mA em inavidade e máxima em 12 VCC
Sim Temperatura de operação
Tecnologia Baseado em microprocessador digital Temperatura de armazenamento -20 °C a 60 °C (-4 °F a 140 °F)
Ópca selada Umidade de operaçãoSim 10% a 90%
Proteção da zona de rastejamento Sim 1,8 m a 2,4 mAltura de instalação
Proteção anviolação Dimensões (A × L × P)Parte dianteira 103,8 mm × 65,7 mm × 45,5 mm
Indicadores LED Verde (PIR), Laranja (micro-ondas),
Azul (alarme) Peso 99 g
Frequência de micro-ondas 24 Ghz (24,15 Ghz a 24,25 Ghz) Suporte Acessório opcional de parede e teto
Compensação de
temperatura digital
-10 °C a 55 °C (14 °F a 131 °F)
-10 °C a 40 °C (14 °F a 104 °F)
Cerficado
E = PIR + MW
OU = PIR / MW (não deve ser usado
com pets)
OU não é compavel com EN
(a) Пассивный инфракрасный датчик (PIR)
(f) Контакты(e) Перемычки резисторов защиты от взлома
(b) Режим И/ИЛИ (c) 50 Гц по умолчанию, для частоты 60 Гц удалите перемычку
(g) Перемычки резисторов сигнализации
(j) Уровень чувствительности ВЫСОКИЙАВТО (по умолчанию)НИЗКИЙ
Светодиод ВЫКЛ.Светодиод ВКЛ.(i) Светодиод ВКЛ./ВЫКЛ.
85,9°
4
3. Способ установки (установка объединительной платы датчика)
Тип винта Номер
PA_3,5 ×25
4. Способ установки (монтажный кронштейн) (1) Монтаж на потолочный кронштейн (несовместим со стандартом EN)
(2) Монтаж на настенный кронштейн
5. Советы по установке
6. Объектив 12 м
(a) Диапазон обнаружения (b) Высота монтажа
Высота монтажа выбирается в диапазоне от 1,8 м до 2,4 м.
Рекомендуемая высота монтажа: 2,2 м.
52 зоны 4 плоскости
7. Разводка для подключения резистора
Имеется два способа подключения резистора:
(1) С помощью перемычек выберите резистор в конце линии (зависит от панели управления), замыкая контакты в группе "СИГНАЛИЗАЦИЯ/ЗАЩИТА ОТ ВЗЛОМА".
(2) Выберите резистор (зависит от панели управления) и подключите его к портам разводки датчика "СИГНАЛИЗАЦИЯ/ЗАЩИТА ОТ ВЗЛОМА".
Примечание. Если резистор в конце линии не используется, отставьте перемычки в положении ВЫКЛ. Если перемычка не подходит к контактам, не прилагайте усилие к
перемычке и выберите способ 2 для подключения резистора. Способ 1 и способ 2 не должны применяться в группе "СИГНАЛИЗАЦИЯ/ЗАЩИТА ОТ ВЗЛОМА"
одновременно.
(a) Сопротивление сигнализации (b) Сопротивление защиты от взлома
8. Выбор типа подключения
(1) Нормально замкнутый a. Панель управления сигнализацией b. Датчик
(2) Подключение датчика с одним резистором в конце линии a. Панель управления сигнализацией b. Датчик
(3) Подключение датчика с двумя резисторами в конце линии a. Панель управления сигнализацией b. Датчик
Показан пример соединения: 1. Нормальный режим: 1 кОм 2. Тревога: бесконечное 3. Взлом: 0
Показан пример соединения: 1. Нормальный режим: 1 кОм 2. Тревога: 2 кОм 3. Взлом: 0 или бесконечное
9. Включение питания
После подключения питания индикатор начинает часто мигать. После завершения самопроверки детектора светодиодный индикатор выключается, пока датчик не
обнаружит движение.
НЕ ГОТОВ ГОТОВ
10. Размеры и вес
11. Технические характеристики
1. Разборка датчика
2. Печатная плата
(a) Объектив (b) Светодиодная трубка (c) Держатель объектива
(d) Печатная плата (e) Гайка (f) Винт корпуса
1 кОм, 2,2 кОм, 4,7 кОм, 5,6 кОм, 6,8 кОм 1 кОм, 2,2 кОм, 4,7 кОм, 5,6 кОм
(d) Микроволновый модуль (MW)
(h) Пружина защиты от взлома
(c) Контроль микроволнового излучения
Макс. 12 м
Средний: от 0 до 8 м
Мин.: выкл.
Примечание.
Крепления заказываются отдельно.
Примечание. Защита от срабатывания на животных действует
на расстоянии до 10 м и на высоте ниже верхней плоскости
обзора.
Защита от срабатывания на животных действует в пределах 10
м.
Для использования функции защиты от срабатывания
на животных установите маску для домашних
животных.
Уровень чувствительности Высокий Авто Низкий
Вес 5 кг 10 кг 15 кг
Таблица срабатывания на животных
Низкий уровень не соответствует требованиям EN и INCERT.
Радиус действия 12 м, 85,9° Диапазон микроволнового датчика Регулировка потенциометра
Скорость обнаружения 0,3–2 м/с Режим И/ИЛИ
Уровень чувствительности Высокий, авто, низкий Защита от срабатывания на животных 10 кг (с дополнительной маской для домашних животных)
Автоматическая настройка чувствительности От 9 до 16 В пост. тока (стандартное значение: 12 В пост. тока)Да Источник питания
Концевой резистор на плате Да Энергопотребление 17 мА в режиме ожидания, максимально при 12 В пост. тока
Да Рабочая температура
Технология На базе цифрового микропроцессора Температура при хранении от -20 °C до 60 °C
Герметичная оптика Да Рабочая влажность 10–90%
Защита нижней зоны Да Высота монтажа от 1,8 до 2,4 м
Защита от взлома Передняя панель Размеры (В × Ш × Г) 103,8 х 65,7 х 45,5 мм
Светодиодные индикаторы
Зеленый (инфракрасный), оранжевый
(микроволновый), синий (тревога) Вес 99 г.
Частота микроволного излучения 24 ГГц (от 24,15 до 24,25 ГГц) Кронштейн Дополнительные принадлежности для крепления на стене и
потолке
Цифровая компенсация температуры
от -10 °C до 55 °C
от -10 °C до 40 °C
Сертифицировано
И = PIR (инфракрасный) + MW (микроволновый)
ИЛИ = PIR/MW (этот режим не должен использоваться
при наличии домашних животных)
ИЛИ не совместим со стандартом EN
(a) PIR-sensor
(f) Anslutningar(e) Sabotageresistors
(b) OCH/ELLER-läge (c) 50 Hz förvalt 60 Hz ta bort shuvud
(g) Larmresistors
(j) Känslighetsinställningar HÖGAUTO (standard)LÅG
LED AVLED PÅ(i) LED AV/PÅ
85,9°
4
3. Installaonsmetod (Installaon av detektorns bakplåt)
Typ av skruv Nummer
PA_3,5 × 25
4. Installaonsmetod (installaon av fäste) (1) Montering på takfäste (ej EN-kompabel)
(2) Montering på väggfäste
5. Installaonsps
6. 12 m-objekvet
(a) Detekteringsområde (b) Monteringshöjd
Monteringshöjd från 1,8 m ll 2,4 m.
Rekommenderad monteringshöjd är 2,2 m.
52 zoner 4 plan
7. Kabeldragning för resistor
Detektorn har två metoder för kabeldragning för resistorer:
(1) Använda byglar för a välja ändmotstånd (beroende på kontrollpanel) på LARM/SABOTAGE-sen.
(2) Välj en resistans (beroende på kontrollpanel) och lägg ll resistorn i detektorns kabelanslutningar för LARM/SABOTAGE.
Obs: Om ändmotståndskablage inte används, lämna byglarna AV. Om byglar och s inte passar ihop, tvinga inte bygeln. Välj metod 2 för a
koppla resistorn. Metod 1 och metod 2 ska inte användas på LARM/SABOTAGE samdigt.
(a) Larmresistans (b) Sabotageresistans
8. Välj typen av anslutning
(1) Normalt sluten a. Larmkontrollpanel b. Detektor
(2) ”Single End of Line”-kabeldragning a. Larmkontrollpanel b. Detektor
(3) ”Double End of Line”-kabeldragning a. Larmkontrollpanel b. Detektor
Anslutningen visar exemplet: 1. Normal: 1K 2. Larm: Oändligt 3. Sabotage: 0 K
Anslutningen visar exemplet: 1. Normal: 1K 2. Larm: 2k 3. Sabotage: 0 K eller oändligt
9. Uppstart
Eer start blinkar indikatorn snabbt. När detektorns självtest är färdigt slocknar LED-indikatorn och förblir släckt lls detektorn känner av
rörelse.
INTE KLAR KLAR
10. Må och vikt
11. Teknisk specifikaon
1. Isärtagning av detektorn
2. Kretskortet
(a) Objekv (c) Objekvhållare (b) LED-ljusrör
(d) Kretskort (e) Muer (f) Skruv ll kåpa
1k, 2k2, 4k7, 5k6, 6K8 1k, 2k2, 4k7, 5k6
(d) Mikrovågsmodul
(h) Sabotageäder
(c) Mikrovågsstyrning
Max: 12 m
Medium: 0 ll 8 m
Min: Av
Obs:
Fästen är llval.
Obs: Husdjursimmunitet är llgänglig upp ll 10 m
och på en höjd som ligger under det översta
bildplanet.
Husdjursimmunitet är llgänglig inom 10 m.
Installera en husdjursmask om du vill använda
funkonen för husdjursimmunitet.
Känslighetsläge Hög Auto Låg
Vikt 5 kg 10 kg 15 kg
Tabell för husdjur
Låg är icke-EN och icke-INCERT-kompabel.
Detekteringsområde Mikrovågsräckvidd Justeras med potenometer12 m, 85,9°
Detekteringshasghet 0,3 ~ 2 m/s OCH/ELLER-läge
Känslighet HusdjursimmunitetHög, auto, låg 10 kg (med husdjursmask (llbehör))
Automask känslighet Ja 9 ll 16 V DC (standard: 12 V DC)Strömförsörjning
Inbyggt ändmotstånd Ja Strömförbrukning 17 mA viloström och maximalt vid 12
V DC
Ja Dritemperatur
Teknik Digital mikroprocessorbaserad Förvaringstemperatur -20 °C ll 60 °C (-4 °F ll 140 °F)
Försluten opk Ja Lufukghet vid dri 10 % ll 90 %
Krypzonsskydd Ja Installaonshöjd 1,8 ll 2,4 m
Sabotageskydd Front (Framsida) 103,8 mm × 65,7 mm × 45,5 mmMå (H × B × D)
LED-indikatorer Grön (PIR), orange (mikrovåg),
blå (larm) Vikt 99 g
Mikrovågsfrekvens 24 GHz (24,15 GHz ll 24,25 GHz) Extra llbehör för vägg och takFäste
Digital
temperaturkompensaon
-10 °C ll 55 °C (14 °F ll 131 °F)
-10 °C ll 40 °C (14 °F ll 104 °F)
Cerfierad
OCH = PIR + MV
ELLER = PIR/MV (bör ej användas med
husdjur)
ELLER är inte kompabelt med EN
ODER ist nicht EN-konform
Konfiguracja OR nie jest uwzględniona w certyfikacie EN


Produkt Specifikationer

Mærke: Hikvision
Kategori: Bevægelsesdetektor
Model: DS-PDD12-EG2

Har du brug for hjælp?

Hvis du har brug for hjælp til Hikvision DS-PDD12-EG2 stil et spørgsmål nedenfor, og andre brugere vil svare dig


Bevægelsesdetektor Hikvision Manualer

Bevægelsesdetektor Manualer

Nyeste Bevægelsesdetektor Manualer