Hotpoint H7I HP42 L UK Manual
Hotpoint
Opvaskemaskine
H7I HP42 L UK


| Mærke: | Hotpoint |
| Kategori: | Opvaskemaskine |
| Model: | H7I HP42 L UK |
| Vekselstrømsindgangsspænding: | 220-240 V |
| Vekselstrømsindgangsfrekvens: | 50 Hz |
| Bredde: | 598 mm |
| Dybde: | 555 mm |
| Højde: | 820 mm |
| Vægt: | 35500 g |
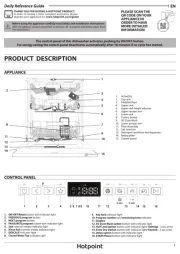
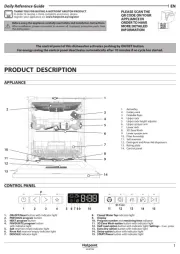
| Kontroltype: | Knapper |
| Indbygget skærm: | Ja |
| Skærmtype: | LED |
| Strøm: | 13 A |
| Ledningslængde: | 1.3 m |
| Pakkevægt: | 37500 g |
| Pakkedybde: | 675 mm |
| Pakkebredde: | 625 mm |
| Pakkehøjde: | 910 mm |
| Årligt energiforbrug: | 218 kWh |
| Strømforbrug (slukket): | 0.5 W |
| Dimensioner (BxDxH): | 598 x 555 x 820 mm |
| Placering af apparat: | Fuldt indbygget |
| Indvendig belysning: | Ingen |
| Dørhængsel: | Fastgjort |
| Inverter-teknologi: | Ja |
| Installationsrum bredde: | 600 mm |
| Installationsrum dybde: | 560 mm |
| Tilsluttet belastning: | 1900 W |
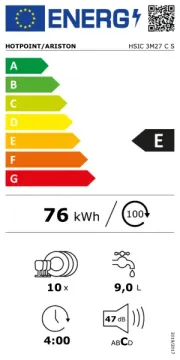
| Støjniveau: | 42 dB |
| Tilløbsslange, længde: | 1.55 m |
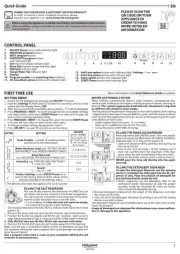
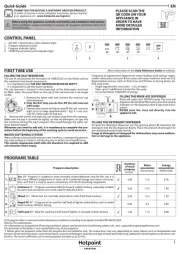
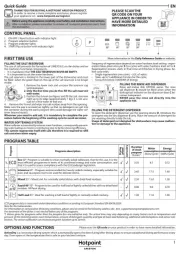
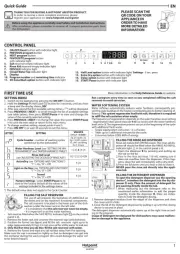
| Antal vaskeprogrammer: | 10 |
| Forsinket start-timer: | Ja |
| Børnesikring: | Ingen |
| Justerbare fødder: | Ja |
| Dør farve: | Ikke anvendelig |
| Balje materiale: | Rustfrit stål |
| Vandforbrug pr. cyklus: | 9.5 L |
| Indbygget vandblødgører: | Ja |
| Bestik rum type: | Kurv og skuffer |
| Farve på kontrolpanel: | Sort |
| Antal kuverter: | 15 kuverter |
| Cyklustid: | 210 min. |
| Forsinket start (maks.): | 24 t |
| Opvaskeprogrammer: | Auto, Delicate 45°C, Eco 50°C, Hygiene, Intensive 65°C, Mixed, Night, Quick 45°C, Self-Clean 65°C, Soak |
| Halv belastning: | Ja |
| Tørringsklasse: | A |
| Årligt vandforbrug: | 2660 L |
| Indikator for afspændingsmiddel: | Ja |
| Energieffektivitetsskala: | A til G |
| Selvrensende: | Ja |
| Antal temperaturindstillinger: | 3 |
| Pakkens dimensioner (BxDxH): | 625 x 675 x 910 mm |
| AquaStop funktion: | Ingen |
| Installationsrum højde (min.): | 820 mm |
| Installationsrum højde (maks.): | 900 mm |
| Udøsslange længde: | 1.5 m |
| Produktstørrelse: | Fuld størrelse (60 cm) |
| Vandpåfyldning: | Kold |
| Overløbsbeskyttelse: | Ja |
| Støjemissionsklasse: | B |
| Energieffektivitetsklasse: | C |
| Energiforbrug pr. 100 cyklusser: | 76 kWh |
| Brugerdefineret panel klar: | Ja |
| Temperatur (maks): | 70 °C |
| Saltindikator: | Ja |
| Øverste kurv indstillelig højde: | Ja |
| Kurves indstillelige placering: | Øvre |
| Strømforbrug (fortsat-tændt): | 6 W |
| Oprindelsesland: | Polen |
| Tørresystem: | Naturlig |
| Ekstra tørt: | Ja |
| Bruttovægt: | 37500 g |
| Antal kurve: | 1 kurv(e) |
| Strømstiktype: | Type G |
| Automatisk døråbning: | Ja |
| Pakkevolumen: | 0.302 cm³ |
| Quick wash: | Ja |
| Gulvindikatorlys: | Ja |
| Automatiske programmer: | Ja |
| Toldproduktkode (TARIC): | 84221100 |
| Nettovægt: | 35500 g |
| Hotpoint-teknologier (opvaskemaskine): | 3D Zone Wash, Maxi Space Tub |
Har du brug for hjælp?
Hvis du har brug for hjælp til Hotpoint H7I HP42 L UK stil et spørgsmål nedenfor, og andre brugere vil svare dig
Opvaskemaskine Hotpoint Manualer
25 Juli 2025

25 Juli 2025
16 Juli 2025

16 Juli 2025
16 Juli 2025
15 Juli 2025
15 Juli 2025
20 Juni 2025
19 Juni 2025

18 Juni 2025
Opvaskemaskine Manualer
- Luxor
- Master Kitchen
- Infiniton
- Sauter
- Meiko
- High One
- Eurotech
- Winia
- Bella
- Kernau
- Kaiser
- Elis And Elsa
- General Electric
- WhiteLine
- InAlto
Nyeste Opvaskemaskine Manualer
30 Juli 2025
30 Juli 2025

30 Juli 2025
30 Juli 2025
30 Juli 2025

30 Juli 2025
30 Juli 2025

30 Juli 2025
29 Juli 2025
29 Juli 2025