1-1-32 Kamiminami, Hirano-ku,
Icom and the Icom logo are registered trademarks of
Icom Incorporated (Japan) in Japan, the United States,
the United Kingdom, Germany, France, Spain, Russia,
Australia, New Zealand, and/or other countries.
AMBE+2 is a trademark and property of Digital Voice
All other products or brands are registered trademarks or
trademarks of their respective holders.
This instruction sheet includes some functions that are
usable only when they are preset by your dealer. The
transceiver may have other functions and operations that
are not described in this instruction sheet. Ask your dealer
for preset function details.
Personal injury, re hazard or electric
CAUTION Equipment damage may occur.
Recommended for optimum use.
No risk of personal injury, re or electric
A key element in the performance of any communication
systems is the antenna. Contact your dealer for
information regarding antennas and how to install them.
Fuses are installed in the supplied DC power cable . If a *
fuse blows, track down the source of the problem, repair it,
and then replace the damaged fuse with a new rated one.
*Depending on version, only 1 fuse holder may be attached.
LFuse rating: 250 V 10 A (for 1 fuse holder)/
20 A (for 2 fuse holders)
NOTE: Use only specied fuses.
ABOUT GPS/GLONASS RECEIVER
DO NOT install the GPS antenna near the transceiver or
A GPS or GLONASS receiver may not work if the
transceiver transmits or receives in the frequency ranges
For the IC-F5400D/IC-F5400DP series (Unit: MHz)
GPS Receiver GLONASS Receiver
142.850 ~ 142.860 145.275 ~ 145.945
157.135 ~ 157.145 159.805 ~ 160.540
146.845 ~ 147.110 149.745 ~ 150.790
For the IC-F6400D/IC-F6400DP series (Unit: MHz)
GPS Receiver GLONASS Receiver
392.840 ~ 392.865 399.515 ~ 401.343
443.545 ~ 444.065 449.335 ~ 451.425
The crossed-out wheeled-bin symbol on your product,
literature, or packaging reminds you
that in the European Union, all electrical
and electronic products, batteries, and
accumulators (rechargeable batteries) must
be taken to designated collection locations at
the end of their working life. Do not dispose
of these products as unsorted municipal
waste. Dispose of them according to the
Hereby, Icom Inc. declares that the versions
of IC-F5400D, IC-F5400DS, IC-F5400DP,
IC-F5400DPS, IC-F6400D, IC-F6400DS,
IC-F6400DP, and IC-F6400DPS which have
the “CE” symbol on the product, comply with
the essential requirements of the Radio Equipment
Directive, 2014/53/EU, and the restriction of the use of
certain hazardous substances in electrical and electronic
equipment Directive, 2011/65/EU. The full text of the EU
declaration of conformity is available at the following
https://www.icomjapan.com/support/
These versions also comply with the essential
requirements of the Battery Regulation, (EU) 2023/1542.
Icom is not responsible for the destruction or damage to
the Icom transceiver, if the malfunction is because of:
Force majeure, including, but not limited to, res,
earthquakes, storms, oods, lightning, other natural
disasters, disturbances, riots, war, or radioactive
The use of Icom transceivers with any equipment that is
not manufactured or approved by Icom.
RWARNING! NEVER connect the transceiver to an AC
outlet. This may pose a re hazard or result in an electric
RWARNING! NEVER operate the transceiver during a
lightning storm. It may result in an electric shock, cause
a re or damage the transceiver. Always disconnect the
power source and antenna before a storm.
RWARNING! NEVER connect the transceiver to a power
source of more than 16 V DC such as a 24 V battery. This
could damage the transceiver.
RWARNING! NEVER cut the DC power cable between
the DC plug and fuse holder. If an incorrect connection is
made after cutting, the transceiver might be damaged.
RWARNING! NEVER place the transceiver where normal
operation of the vehicle may be hindered or where it could
CAUTION: DO NOT expose the transceiver to rain, snow
CAUTION: DO NOT use the non-specied microphone
only. Other microphones have different pin assignments
and may damage the radio.
CAUTION: DO NOT place or leave the transceiver in
areas with temperatures below –30°C (–22°F) or above
+60°C (+140°F), or in areas subject to direct sunlight, such
CAUTION: DO NOT operate the transceiver without
running the vehicle’s engine. The vehicle’s battery will
quickly run out when the transceiver transmits while the
CAUTION: DO NOT place or leave the transceiver in
excessively dusty environments.
CAUTION: DO NOT place the transceiver against walls.
Otherwise heat dissipation will be obstructed.
CAUTION: DO NOT use harsh solvents such as
Benzine or alcohol when cleaning, as they damage the
CAUTION: CONFIRM that all connectors and jacks are
dry and clean before attachment. Exposing them to dust or
water will result in serious damage to the transceiver.
NEVER place the transceiver in an insecure place to avoid
inadvertent use by unauthorized persons.
BE CAREFUL! The transceiver will become hot when
operating continuously for long periods of time.
BE CAREFUL! DO NOT block the air vent when installing
the transceiver. This transceiver has an air vent on
the bottom panel of the transceiver to meet the IP55
Operate the transceiver that complies with your local laws
Depending on countries and/or regions, transceiver’s
output power and/or operations on specic frequencies
may be restricted to avoid interferences with existing radio
SAFETY TRAINING INFORMATION
Your Icom radio generates RF
electromagnetic energy during
transmit mode. This radio is designed
for and classied as “Occupational
Use Only”, meaning it must be used
only during the course of employment
by individuals aware of the hazards,
and the ways to minimize such
hazards. This radio is NOT intended for use by the
“General Population” in an uncontrolled environment.
For compliance with FCC and IC RF Exposure
Requirements, the transmitter antenna installation shall
comply with the following three conditions:
1. The transmitter antenna gain shall not exceed 0 dBi.
The antenna is required to be located outside of a
vehicle and kept at a distance of 57 centimeters (23
inches) or more between the transmitting antenna of
this device and any persons during operation. For small
vehicle as worst case, the antenna shall be located on
the roof top at any place on the center line along the
vehicle in order to achieve 57 centimeters (23 inches)
separation distance. In order to ensure this distance is
met, the installation of the antenna must be mounted at
least 57 centimeters (23 inches) away from the nearest
edge of the vehicle in order to protect against exposure
The antenna is required to be located outside of a
vehicle and kept at a distance of 42 centimeters
(17 inches) or more between the transmitting antenna of
this device and any persons during operation. For small
vehicle as worst case, the antenna shall be located on
the roof top at any place on the center line along the
vehicle in order to achieve 42 centimeters (17 inches)
separation distance. In order to ensure this distance is
met, the installation of the antenna must be mounted at
least 42 centimeters (17 inches) away from the nearest
edge of the vehicle in order to protect against exposure
Transmit only when people outside the vehicle are
at least the recommended minimum distance of 136
centimeters (54 inches) away from the properly installed
antenna. This separation distance will ensure that
there is sufcient distance from a properly installed
externally-mounted antenna to satisfy the RF exposure
requirements in the applicable RF exposure compliance
Transmit only when people outside the vehicle are
at least the recommended minimum distance of 119
centimeters (47 inches) away from the properly installed
antenna. This separation distance will ensure that
there is sufcient distance from a properly installed
externally-mounted antenna to satisfy the RF exposure
requirements in the applicable RF exposure compliance
To ensure that your exposure to RF
electromagnetic energy is within the
FCC and IC allowable limits for
occupational use, always adhere to
the following guidelines:
• DO NOT operate the radio without a proper antenna
attached, as this may damage the radio and may also
cause you to exceed FCC and IC RF exposure limits. A
proper antenna is the antenna supplied with this radio by
the manufacturer or an antenna specically authorized
by the manufacturer for use with this radio.
• DO NOT transmit for more than 50% of total radio
use time (“50% duty cycle”). Transmitting more than
50% of the time can cause FCC and IC RF exposure
compliance requirements to be exceeded. The radio is
transmitting when the status indicator lights red. You can
cause the radio to transmit by pressing the “PTT” switch.
Electromagnetic Interference/Compatibility
During transmissions, your Icom radio generates RF
energy that can possibly cause interference with other
devices or systems. To avoid such interference, turn off
the radio in areas where signs are posted to do so. DO
NOT operate the transmitter in areas that are sensitive to
electromagnetic radiation such as hospitals, aircraft, and
If the transceiver becomes dusty or dirty, wipe it clean with
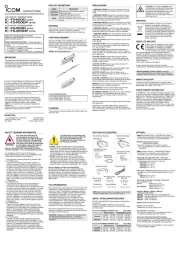
Mounting bracket DC power cable
Flat washers Spring washers Nuts
NOTE: Some accessories are not supplied, or the shape
is different, depending on the transceiver version.
•SEPARATION KIT + SEPARATION CABLE* RMK-5
Enables you to separately install the transceiver’s main
unit from the front panel for convenient operation.
• HAND MICROPHONE + HM-218
Command microphone with a built-in speaker
LYou need the RMK-5 to connect the HM-218 to the
• RMK-7 DUAL HEAD KIT + SEPARATION CABLE*
Enables you to connect two control heads to the
transceiver’s main unit for dual head operation.
OPC-2364 OPC-2365 OPC-2366 OPC-2367, , , or
SEPARATION CABLE is used to connect between the
control head and the transceiver’s main unit.
•: 1.9 m / 6.3 ftOPC-2364
OPC-2373 OPC-2374 or SEPARATION CABLE for command
microphone is used to connect between the HM-218 and
•: 1.9 m / 6.3 ft OPC-2373
• SP-30, SP-35, SP-35L EXTERNAL SPEAKERS
: Rated input= 20 W SP-30
: Rated input= 5 W, SP-35/SP35L
• HM-220 HM-220T HM-221 HM-221T, , ,
: Self-grounding heavy duty microphoneHM-220
: Self-grounding heavy duty DTMF microphoneHM-220T
• DESKTOP MICROPHONESM-29
Enables you to use the GPS function.
(For only the transceiver with the Bluetooth function.)
The Bluetooth headset with a [PTT] switch.
•About the third party Bluetooth
Icom has checked the PTT operation with some 3M
Peltor headsets such as the WS Headset XP, WS ProTac
XP and WS Alert XP. (Compatibility not guaranteed.)
LSome options may not be available in some countries.
Ask your dealer for details.
This equipment has been tested and found to comply with
the limits for a Class A digital device, pursuant to part 15
of the FCC Rules. These limits are designed to provide
reasonable protection against harmful interference when
the equipment is operated in a commercial environment.
This equipment generates, uses, and can radiate
radio frequency energy and, if not installed and used
in accordance with the instruction manual, may cause
harmful interference to radio communications. Operation
of this equipment in a residential area is likely to cause
harmful interference in which case the user will be
required to correct the interference at his own expense.
This device complies with Part 15 of the FCC Rules.
Operation is subject to the condition that this device does
not cause harmful interference.
CAUTION: Changes or modications to this transceiver,
not expressly approved by Icom Inc., could void
your authority to operate this transceiver under FCC
Thank you for choosing this Icom product.
READ ALL INSTRUCTIONS carefully and completely
before using this product.
SAVE THESE INSTRUCTIONS — These instructions
contain important operating instructions for the following
•VHF DIGITAL TRANSCEIVERS
IC-F5400D, IC-F5400DS, IC-F5400DP, IC-F5400DPS
•UHF DIGITAL TRANSCEIVERS
IC-F6400D, IC-F6400DS, IC-F6400DP, IC-F6400DPS
Fuse Coding: FUSE 250 V 10 A
Fuse Voltage Rating: 250 Volts
Fuse Current Rating: 10 Amperes
About E-marking: Detailed installation notes for
Icom mobile transceivers to be tted into vehicles are
available. Please contact your Icom dealer or distributor.
To obtain the UKCA Declaration of Conformity, please
contact Icom UK Limited by email at info@icomuk.co.uk or
alternatively call + 44(0) 1227 741741.
The AMBE+2™ voice coding Technology embodied in this
product is protected by intellectual property rights including
patent rights, copyrights and trade secrets of Digital Voice
Systems, Inc. This voice coding Technology is licensed
solely for use within this Communications Equipment.
The user of this Technology is explicitly prohibited from
attempting to extract, remove, decompile, reverse
engineer, or disassemble the Object Code, or in any other
way convert the Object Code into a human-readable form.
#8,359,197 and #7,970,606.
CAUTION: DO NOT Hot surfaces. touch
the transceiver’s surface after continuously
transmitting for long periods of time. The
transceiver’s chassis radiates heat, and it
will become hot to protect the power
amplier unit from overheating. Touching it