Standard room temperature controller with display
The unit may only be opened by an electrician
and installed according to the circuit
diagram on the unit or in these instructions.
Observe existing safety instructions.
To satisfy the requirements of protection class II,
corresponding installation measures are required.
This independently-mountable electronic device
is exclusively for controlling the temperature in
dry, enclosed rooms with normal surroundings.
This device conforms with EN 60730 and
functions according to operating mode 1C.
Damage to the device, re or other hazards may
arise if these instructions are not followed.
These instructions are a component part of the
product and must remain with the end customer.
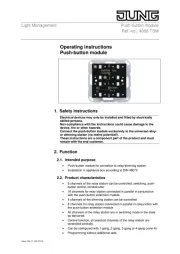
Fig. 1: Layout of the temperature controller
(5) Design frame (not including delivery)
(6) Socket for the plug-in contacts
–Measuring and controlling the room temperature
–Measuring and controlling the oor temperature
–Room temperature control via oor heating with
a limiting function (for example in conjunction
–Can be used for "heating only" or "cooling only"
–Installable in a box in conformance with
–Only for use in dry, enclosed rooms
–Large display with backlighting
–Text display for self-explanatory operation
–Dierent user languages can be selected
–Internal temperature sensor
–An external remote sensor can be connected
–ECO input [clock] for the activation of a freely-
settable temperature, e.g. for night reduction
–Time limit for the manually-selected temperature
–Simply switch between 2 temperatures (comfort,
–Short-time timer ("party function")
–Frost protection function
–Display of energy consumption for electric
–Pulse width modulation (PWM) or two-point
–Adjustable cycle time (PWM), hysteresis and
minimum on/o time (two-point)
–Switch on delay, such as for burners (with two-
–Adaptation to valves normally open or closed
–Valve protection (as a room temperature
controller with and without a limiting function)
–Resetting separate from user and installer
The temperature controller controls the room
or oor temperature according to the set target
temperature and is equipped with an internal sensor
for measuring the room temperature. In addition,
an external remote sensor can be connected,
for example to measure the oor temperature.
The temperature controller compares the measured
temperature with set values. If the temperature falls
below the current setting, the heating system is
Two temperature values, T+ and T-, can be preset
(comfort and reduction temperature), between which
it is possible to switch at the touch of a button.
Optionally, an external switch (e.g. a timer) can
be used to control the temperature automatically
to another preset ECO value.
The depends on the type of heating control method
and is determined by the installer:
–Room temperature controller: The heating
is turned on when the room temperature
falls below the set target temperature
(measured with an internal sensor or external
–Floor temperature controller: The underoor
heating is turned on when the oor temperature
falls below the set target temperature
(measured using an external remote sensor).
–Room temperature controller with a limiter:
(in conjunction with underoor heating):
The room temperature is measured
and regulated using the internal sensor.
An additional external remote sensor is
connected to measure the oor temperature,
and a target temperature range for the oor
is set. The room temperature control is
deactivated when the oor temperature is
outside of this range. If temperature falls below
this range, the heater is turned on, and if the
temperature is above this range, the heater
is turned o independent of the current room
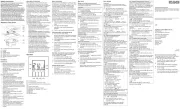
(8) Function display (such as the mode)
(9) Large display (such as the current temperature)
(11) Heating mode display
(12) Display (e.g. target temperature)
button (OK, switchover T+/T−/ECO)
Four buttons below the display are used to operate
the temperature controller (Fig. 2, items (13) to (16)).
In the menu, you can activate operating modes
and make settings. If a button is not pressed for
more than three minutes, the unit automatically
switches back to the previous function and the basic
Operation when the controls are removed
The unit can also be operated when the controls are
removed. The current temperature is not displayed,
the "heating mode" display ashes, and the display
is not illuminated. If a button is not pressed for more
than three minutes, the display goes dark.
Display information on the current mode
To go to the default display when the controls
are removed and the display is dark, press any
Information on the current mode/setting is
■Return to the default display by pressing
Selecting modes and setting menus
MENU briey appears in the function display (8).
A help text as a marquee appears at the bottom
buttons to switch to the desired
■Select the desired mode/setting by pressing
Another menu opens depending on the
■Go back to the last display/setting by
■Return to the default display by pressing
Manually adapting the target temperature
You can always adapt the target temperature in
■In the default display, press
The current target temperature ashes.
■Set the desired temperature by pressing
■Accept the displayed temperature by pressing
The device returns to the default display.
■In the default display, press the
First "MENU" appears in the display.
After 10 seconds, the device switches to the
default display and "OFF" appears.
■Turn the controls back on by selecting a mode.
Modes and setting menus (overview 1)
To follow is an overview of the modes and setting
menus within the main menu.
Control of the temperature to the value set here:
T− = Reduction temperature
ECO = When the ECO function is active, the preset
temperature or that set here.
T* = Temperature changed with
Short-time timer to specify the room temperature
for a set number of hours ("Party function").
to set the hours and conrm
to set the temperature and
The display (12) shows the number of
On exiting, that mode is continued which was
active before TIMER. TIMER continues when
ECO is activated and ECO is delayed accordingly.
Manual exiting of TIMER by selecting the
Open the menu for the user settings.
The display (9) shows the menu ID G1.
■To select the desired submenu, see "User
Open the setting menu for the installer.
The display (8) shows the menu ID H1.
■To select the desired submenu, see "Installer
Overview 1: Modes and setting menus
Select the desired mode/setting menu
The device is in the default display.
The help text "MENU..." appears at the bottom
item (mode or setting menu) appears.
The function is activated in modes CONTROL
With the other menu items, the device jumps to
additional settings (see overview 1).
A marquee at the bottom of the display shows
information for an individual menu items identied
The menu item G3 is not available and,
depending on the set control procedure,
the menu items G11 and G12 are not available.
(The menu displays and set all values are in
UPPERCASE, and the settings are
Presetting of the comfort temperature:
– For H1 = ROOM or LIMITER:
to set the temperature and conrm
Presetting of the reduction temperature:
– For H1 = ROOM or LIMITER:
to set the temperature and conrm
Turn o the temperature control:
If OFF HEATING PERMANENT = YES is selected,
the frost protection is active, provided that it has
been set by the installer, see also Installer settings
H6 - FROST PROTECTION ≠ OFF.
Display function (8): OFF
Turn on the control again: Select a function using
The maximum validity period for T* can be set,
e.g. setting to 3 hrs: After 3 hrs, the previously
selected temperature (T+, T−, ECO) is used.
Select the number of hours with
Protect the controller against unauthorized use.
Use is not possible when access protection is
–access protection onYES =
Remove access protection: Press any button,
and when CODE is displayed, set 93 with
G7 TEMP LIMIT MIN/MAX TEMP
Set the lower and upper temperature to be
For room temperature controller
For oor thermostat (H1 = FLOOR):
For room temperature controller
For oor thermostat (H1 = FLOOR):
Set the temperatures with
In CONTROL mode, the temperature range is
limited to the values set here.
Enter the estimated energy costs per hour for the
room in which the temperature is being controlled:
If the energy cost meter is to serve
as an operating hour meter, set the value
The determined consumption is displayed
G9 ENERGY CONSUMPTION TO DATE
Display of the approximate energy consumption
in euros (or operating hours) per time period.
The current day is included up to the displayed time.
Calculation: Time heat turned on x COST/HR (G8).
EURO/2DAYS, EURO/WEEK, EURO/30DAYS,
Select the period for calculating the energy
consumption, display it with
Reset using INSTALLER SETTINGS (H9)
Setting for the target temperature to be shown in
the display instead of the current room temperature:
This menu item is not available when used as
a oor temperature controller.
Specify a correction value to be displayed and
Useful adaptations are for example matching
calibrated thermometers, or adapting to
installation heights or locations that are
Adjust the correction value with
G12 NUMBER FOR FLOOR TEMP
This menu item is not available when used
as a room temperature controller with/without
Activate the oor temperature display for
information (without the unit °C).
–YES = display the oor temperature
= display the room temperature
Set the display lighting:
= short time after pressing the button
–PERMANENT (only when using a remote sensor)
Select SHORT/OFF or PERMANENT with
Select the language for the texts shown in the
display: GERMAN, ENGLISH, DUTCH, FRENCH,
RUSSIAN, SPANISH, ITALIAN, POLISH, TURKISH
Display controller type and controller version:
Display the controller version with
G16 RESET USER SETTINGS ONLY
Reset the user settings to the defaults.
The counter ENERGY CONSUMTION TO
DATE is not reset. This is reset by the installer
Overview 2: User settings
ALBRECHT JUNG GMBH & CO. KG
58579 Schalksmühle, Germany
Telephone: +49 (0)2355 8060
Operating and installation instructions
Open the settings menu and make settings
The display shows the menu code G1 in the display
(9) and, beneath that, the marquee T+ SET.
to select the desired menu.
The menu ID and a help text appear at the
bottom edge of the display (8) and (12).
The rst settable value ashes in the display.
■Set the desired value by pressing
The next settable value ashes in the display.
Once all the values are set, the display returns
to the higher level and displays the menu ID.