Klein Tools 56308 Manual


Læs gratis den danske manual til Klein Tools 56308 (4 sider) i kategorien Lommelygte. Denne vejledning er vurderet som hjælpsom af 2 personer og har en gennemsnitlig bedømmelse på 4.8 stjerner ud af 1.5 anmeldelser. Har du et spørgsmål om Klein Tools 56308, eller vil du spørge andre brugere om produktet?

Side 1/4
1
56308
Wide-Beam Headlamp – Instructions (Page 2)
Luz frontal de haz de luz ancho – Instrucciones (Página 3)
Lampe frontale à faisceau large– Instructions (Page 4)
BASED ON: 1390625 Rev 12/23 A
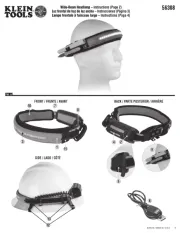
SIDE / LADO / CÔTÉ
12
13
FRONT / FRENTE / AVANT
8
10
11
7
3
1
BACK / PARTE POSTERIOR / ARRIÈRE
2
4
5
9
6
FIG. A
2
ENGLISH
CONTENTS
56308 Wide Beam Headlamp
Removable sweatband
Hard hat strap clips (×4)
Removable marker & pencil holder
20" (50.8 cm) USB-C charging cable
This instruction sheet
GENERAL SPECIFICATIONS
Dimensions: 9.5" × 2.0" × 1.75" (241 mm × 51 mm × 44 mm)
Weight: 5.93 oz. (168 g)
Battery Type: Internal, 18650 Li-Ion, 3.7V / 3350mAh (12.06Wh)
Charging Requirements: Maximum 5V DC, Maximum 2A
Lighting Mode Speci cations:
MODE LUMENS HOURS* DISTANCE INTENSITY
FOCUS
High 220 8*
70' (21 m)
110 CD
Low
120 12* 50' (15 m) 60
CD
ALL-ON
High
575 4* 110' (34 m) 280
CD
Medium
410 7* 90' (27 m) 200
CD
Low
210 8* 65' (20 m) 100
CD
Operating Temperature: -4° to 122°F (-20° to 50°C)
Charging Temperature: 32 ° to 113°F (0° to 45°C)
Storage Temperature: (up to 3 months): -4° to 113°F (-20° to 45°C)
Relative humidity: <65% non-condensing
Drop Protection: 9.8 ft. (3 m)
Ingress Protection (IP) Rating: IP64
Certi cations: CE, UKCA, REACH, RoHS, DOE/CEC, NRCan
*NOTE: Listed runtimes are based on fully-charged battery and
continuous use. Frequent switching on and off will result in battery
drain and reduced runtime.
Specifications subject to change.
WARNINGS
Read, understand, and follow these instructions to ensure safe
operation. Failure to observe these warnings can result in risk
of  re, electric shock, serious injury and/or property damage.
DO NOT use the product if it is damaged or modified.
Damaged or modified batteries may exhibit unpredictable
behavior resulting in fire, explosion, or injury.
Risk of fire and burns. DO NOT open, crush, heat above
specified maximum temperature or incinerate. Prolonged
exposure to direct sunlight can result in elevated temperatures
DO NOT immerse in water or other liquids
Properly seal the charging port cover to achieve specified water
& foreign object ingress protection. Keep seal free of dirt, oil,
sand, or other material that interferes with proper sealing.
Failure to do so can result in risk of fire or electric shock.
DO NOT open the charging port cover if wet or in a wet
environment. Thoroughly dry the unit and the seal around
water-resistant cover completely before opening water resistant
cover
DO NOT subject to impacts or drops greater than 9.8' (3 m).
Drops larger than this may not show signs of damage, but
internal components may have been compromised. It is
advisable to replace the unit if any such severe events occur
To reduce the risk of injury, do not stare at operating lamp.
serious eye injury could occur.
DO NOT attempt to repair the product or charging cable. There
are no user-serviceable parts.
FEATURE DETAILS (FIG.A)
1
Power/Mode Button
8
Strap Adjustment Slides
2
Battery Level Indicator
9
Marker & Pencil Holder
3
LED Band
10
Removable Sweatband
4
Battery Pack
11
Hook & Loop Connectors
5
USB-C Charging Port
12
Hard Hat Clips ×4
6
USB-C Charging Cable
13
Strap Slots
7
Fabric/Silicon Strap
SYMBOLS ON PRODUCT
Warning or Caution
Risk of Electrical Shock
Do Not Stare at Operating Lamp: Visible Radiation
Read Instructions
Direct Current (DC)
Conformité Européenne. Conforms with
European Economic Area Directives
Conforms with United Kingdom Conformity
Assessment Requirements
WEEE – Electronics Disposal
OPERATING INSTRUCTIONS
ADJUSTING FABRIC STRAP
Move the Strap Adjustment Slides
8
to adjust the Fabric
Strap
7
to the desired fit.
MARKER AND PENCIL HOLDER
The Marker & Pencil Holder
8
is attached to the strap.
If desired, it can be moved along the strap or removed
altogether. It is designed to hold one standard fine-point
permanent marker and one standard carpenter's pencil. The
marker can be snapped/slid into the slots on the side. The
carpenter's pencil can be snapped/slid into the secondary
opening on top.
REMOVABLE SWEATBAND
The Removable Sweatband
10
is attached and secured via Hook
& Loop Connectors
11
. If desired, it can be removed from the
strap. The sweatband is made of sweat-wicking materials and is
machine washable.
ATTACHING HEADLAMP TO HARD HAT
NOTE: Remove the sweatband from the strap when mounting
the headlamp to a hard hat.
Attach all four Hard Hat clips
12
to the Fabric/Silicon Strap
7
by sliding the strap into the Strap Slots
13
. Once attached to
the Fabric Strap
7
, dress the headlamp onto the hard hat as
low as possble. Fix the hook end of the clip to the brim of the
hard hat to secure the headlamp onto the hard hat. For the most
secure fit, distribute all four clips
12
evenly along the strap
7
as shown. Adjust as needed for the style of hard hat in use. For
best fit, adjust the strap
7
to minimize slippage.
MAINTENANCE
CLEANING: Be sure headlamp is turned off and wipe with a clean,
dry lint-free cloth.
Do not use abrasive cleaners or solvents.
STORAGE: If the headlamp is to be left unused for an extended
period of time, charge to approximately 70% (red, yellow, and
one green) before storing, and recharge periodically (every
3 months is recommended) during storage to maintain the
battery's charging capacity.
FCC & IC COMPLIANCE
See this product’s page at www.kleintools.com
for FCC compliance information.
Canada ICES-003 (B) / NMB-003 (B)
WARRANTY
www.kleintools.com/warranty
DISPOSAL / RECYCLE
Do not place equipment and its accessories in the trash. Items
must be properly disposed of in accordance with local regulations.
Please see www.epa.gov/recycle for additional information.
CUSTOMER SERVICE
KLEIN TOOLS, INC.
450 Bond Street, Lincolnshire, IL 60069 1-800-553-4676
customerservice@kleintools.com www.kleintools.com
OPERATING INSTRUCTIONS
CHARGING BATTERY
Fully charge headlamp before use. First-time charge should
be at least 6 hours. Connect the provided USB-C Charging
Cable
6
to the Charging Port
5
on the Battery Pack
4
,
then plug the other end of the cable into a USB port (2.0
or higher), or AC adapter (not included). The USB adapter/
power supply should not exceed the specified charging
voltage & current (Max. 5.0V DC, max. 2A). Normal
charging time is approximately 4 hours.
NOTE: When the battery is fully charged and still connected
to the charger, all LEDs on the Battery Level Indicator
2
will illuminate solid for one minute, then turn off. The
Battery Level Indicator
2
will again illuminate when
disconnected from the charger. To check the battery level
at any time, press and release Power Button
1
.
BATTERY LEVEL INDICATOR
Press the Power Button
1
to check battery level:
LEGEND
Not Illuminated Green LED Yellow LED Red LED Blinking
TABLE 1 - CHARGING STATUS TABLE 2 - CHARGE REMAINING
LED Status % Charged LED Status
Remaining Charge
Not illuminated
Not illuminated
Not illuminated
Not illuminated
0% charged
Solid green
Solid green
Solid yellow
Solid red
91% to 100%
charge remaining
Not illuminated
Not illuminated
Not illuminated
Blinking red
1% to 35%
charged
Not illuminated
Solid green
Solid yellow
Solid red
61% to 90%
charge remaining
Not illuminated
Not illuminated
Blinking yellow
Solid red
36% to 60%
charged
Not illuminated
Not illuminated
Solid yellow
Solid red
36% to 60%
charge remaining
Not illuminated
Blinking green
Solid yellow
Solid red
61% to 90%
charged
Not illuminated
Not illuminated
Not illuminated
Solid red
11% to 35%
charge remaining
Blinking green
Solid green
Solid yellow
Solid red
90% to 99%
charged
Not illuminated
Not illuminated
Not illuminated
Blinking red
1% to 10%
charge remaining
Solid green
Solid green
Solid yellow
Solid red
100% charged
(illuminates for
one minute)
Not illuminated
Not illuminated
Not illuminated
Not illuminated
0%
charge remaining
NOTE: When the battery is fully discharged, the Battery
Level Indicator
2
may not illuminate immediately when
charging cable is connected.
POWER ON/OFF
To turn on the headlamp, press and hold the Power Button
1
.
To cycle through available lighting modes (High Focus,
Low Focus, High All-On, Medium All-on, Low All-on),
repeatedly press and release the Power Button
1
.
To turn off the headlamp, press and hold the Power
Button
1
.
NOTE: The headlamp will power-on in the same mode that
was in use at the time of the previous power-off.
BATTERY INTERNAL TEMPERATURE PROTECTION INDICATION
When the temperature of the battery falls outside the ranges
defined in the GENERAL SPECIFICATIONS section, the
LEDs of the Battery Level Indicator
2
will blink alternately
(Green/Yellow Green/RED), and the battery will shut down
and stop charging. Functionality will resume when recovery
temperatures in Table 2 below are met.
Alternating blinking LEDs (Green/Yellow Green/RED)
TABLE 1
PROTECTION
TEMPERATURE
CHARGING
DISCHARGING
(IN USE)
High Temperature
Shut-Down:
Above
113°F (45°C)
Above
140°F (60°C)
Low Temperature
Shut-Down:
Below
32°F (0°C)
Below
-4°F (-20°C)
TABLE 2
RECOVERY
TEMPERATURE
CHARGING
DISCHARGING
(IN USE)
After a high- or low-temperature
shut-down, the battery's internal
temperature must return to
within these ranges to resume
normal operation:
41°F to 104°F
(5°C to 40°C)
14°F to 122°F
(-10°C to 50°C)


Produkt Specifikationer

Mærke: Klein Tools
Kategori: Lommelygte
Model: 56308

Har du brug for hjælp?

Hvis du har brug for hjælp til Klein Tools 56308 stil et spørgsmål nedenfor, og andre brugere vil svare dig