Lexibook Power Kitty KITTY01 Manual

Lexibook Legetøj Power Kitty KITTY01

Læs gratis den danske manual til Lexibook Power Kitty KITTY01 (3 sider) i kategorien Legetøj. Denne vejledning er vurderet som hjælpsom af 4 personer og har en gennemsnitlig bedømmelse på 4.0 stjerner ud af 2.5 anmeldelser. Har du et spørgsmål om Lexibook Power Kitty KITTY01, eller vil du spørge andre brugere om produktet?

Side 1/3
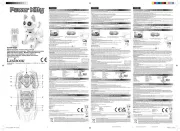
size: 420(W) x297(H)mm
Design code: 349
format: Leaflet (A3 size)
ENGLISH
Environmental Protection:
Unwanted electrical appliances can be recycled and should not be discarded along with regular household
waste! Please actively support the conservation of resources and help protect the environment by returning this
appliance to a collection centre (if available).
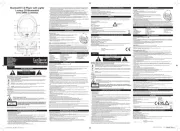
KITTY01
Mode d’emploi • Instruction manual
Manual de instrucciones • Manual de instruções
Manuale di istruzioni • Bedienungsanleitung
Gebruikershandleiding • Instruktioner
Instrukcja obslugi • Használati útmutató
Návod k pouzití
ESPAÑOL
©Lexibook®
Lexibook S.A., 6 avenue des Andes, Bâtiment 11, 91940 Les Ulis, France
Protección medioambiental
¡Los aparatos eléctricos pueden ser reciclados y no deben ser desechados junto con la basura doméstica habitual! Apoye
activamente el aprovechamiento racional de los recursos y ayude a proteger el medio ambiente enviando este producto a
un centro de recolección para reciclaje (en caso de estar disponible).
1
2*
3
4*
5*
6
7
8*
9*14
10
11
12
13
15
16*
17
18*
FRANÇAIS
INSTRUCTIONS RELATIVES À LA SÉCURITÉ
LIRE LES INSTRUCTIONS SUIVANTES AVANT TOUTE UTILISATION DE L’APPAREIL.
Lisez et suivez attentivement ces instructions an d’utiliser au mieux toutes les fonctions qu’offre cet appareil. Merci de noter qu’il s’agit de
précautions générales qui peuvent ne pas s’appliquer à votre unité.
1. Lisez ces instructions avant toute utilisation ou connexion de l’appareil.
2. Conservez ces instructions en bon état. Tenez bien compte des mises en garde. Suivez les instrutions.
3. N’utilisez pas cet appareil près de l’eau ou à proximité d’objets remplis d’eau tels que des vases. A conserver à l’abri de l’humidité.
4. Ne placez jamais d’objets enammés, tels que des bougies allumées, sur l’appareil.
5. L’aération ne doit pas être bloquée en obstruant les sorties d’aération.
6. Utilisez uniquement les attaches/accessoires recommandés par le fabricant.
7. Placez l’appareil dans un lieu aéré, sur une surface plate, dure et stable. Ne pas exposer à une température supérieure à 40°C /104°F.
L’appareil doit être positionné de sorte à laisser un espace de 10 cm / 4 pouces à l’avant et à l’arrière et de 5 cm / 2 pouces sur les côtés.
8. Les piles doivent être jetées de façon conforme. Déposez-les dans des bacs de collecte prévus an de protéger l’environnement.
9. Gardez une distance minimale autour de l’appareil pour une aération sufsante.
10. Il convient de ne pas obstruer les ouvertures d’aération par des objets tels que journaux, nappes, rideaux, etc.
11. L’appareil est destiné à être utilisé sous un climat tempéré.
Le robot fonctionne avec 1 pile rechargeable
DC 3.7V 600mAh (incluse)
La télécommande fonctionne avec 2 piles de
type 1.5V AA/LR6 (non incluses).
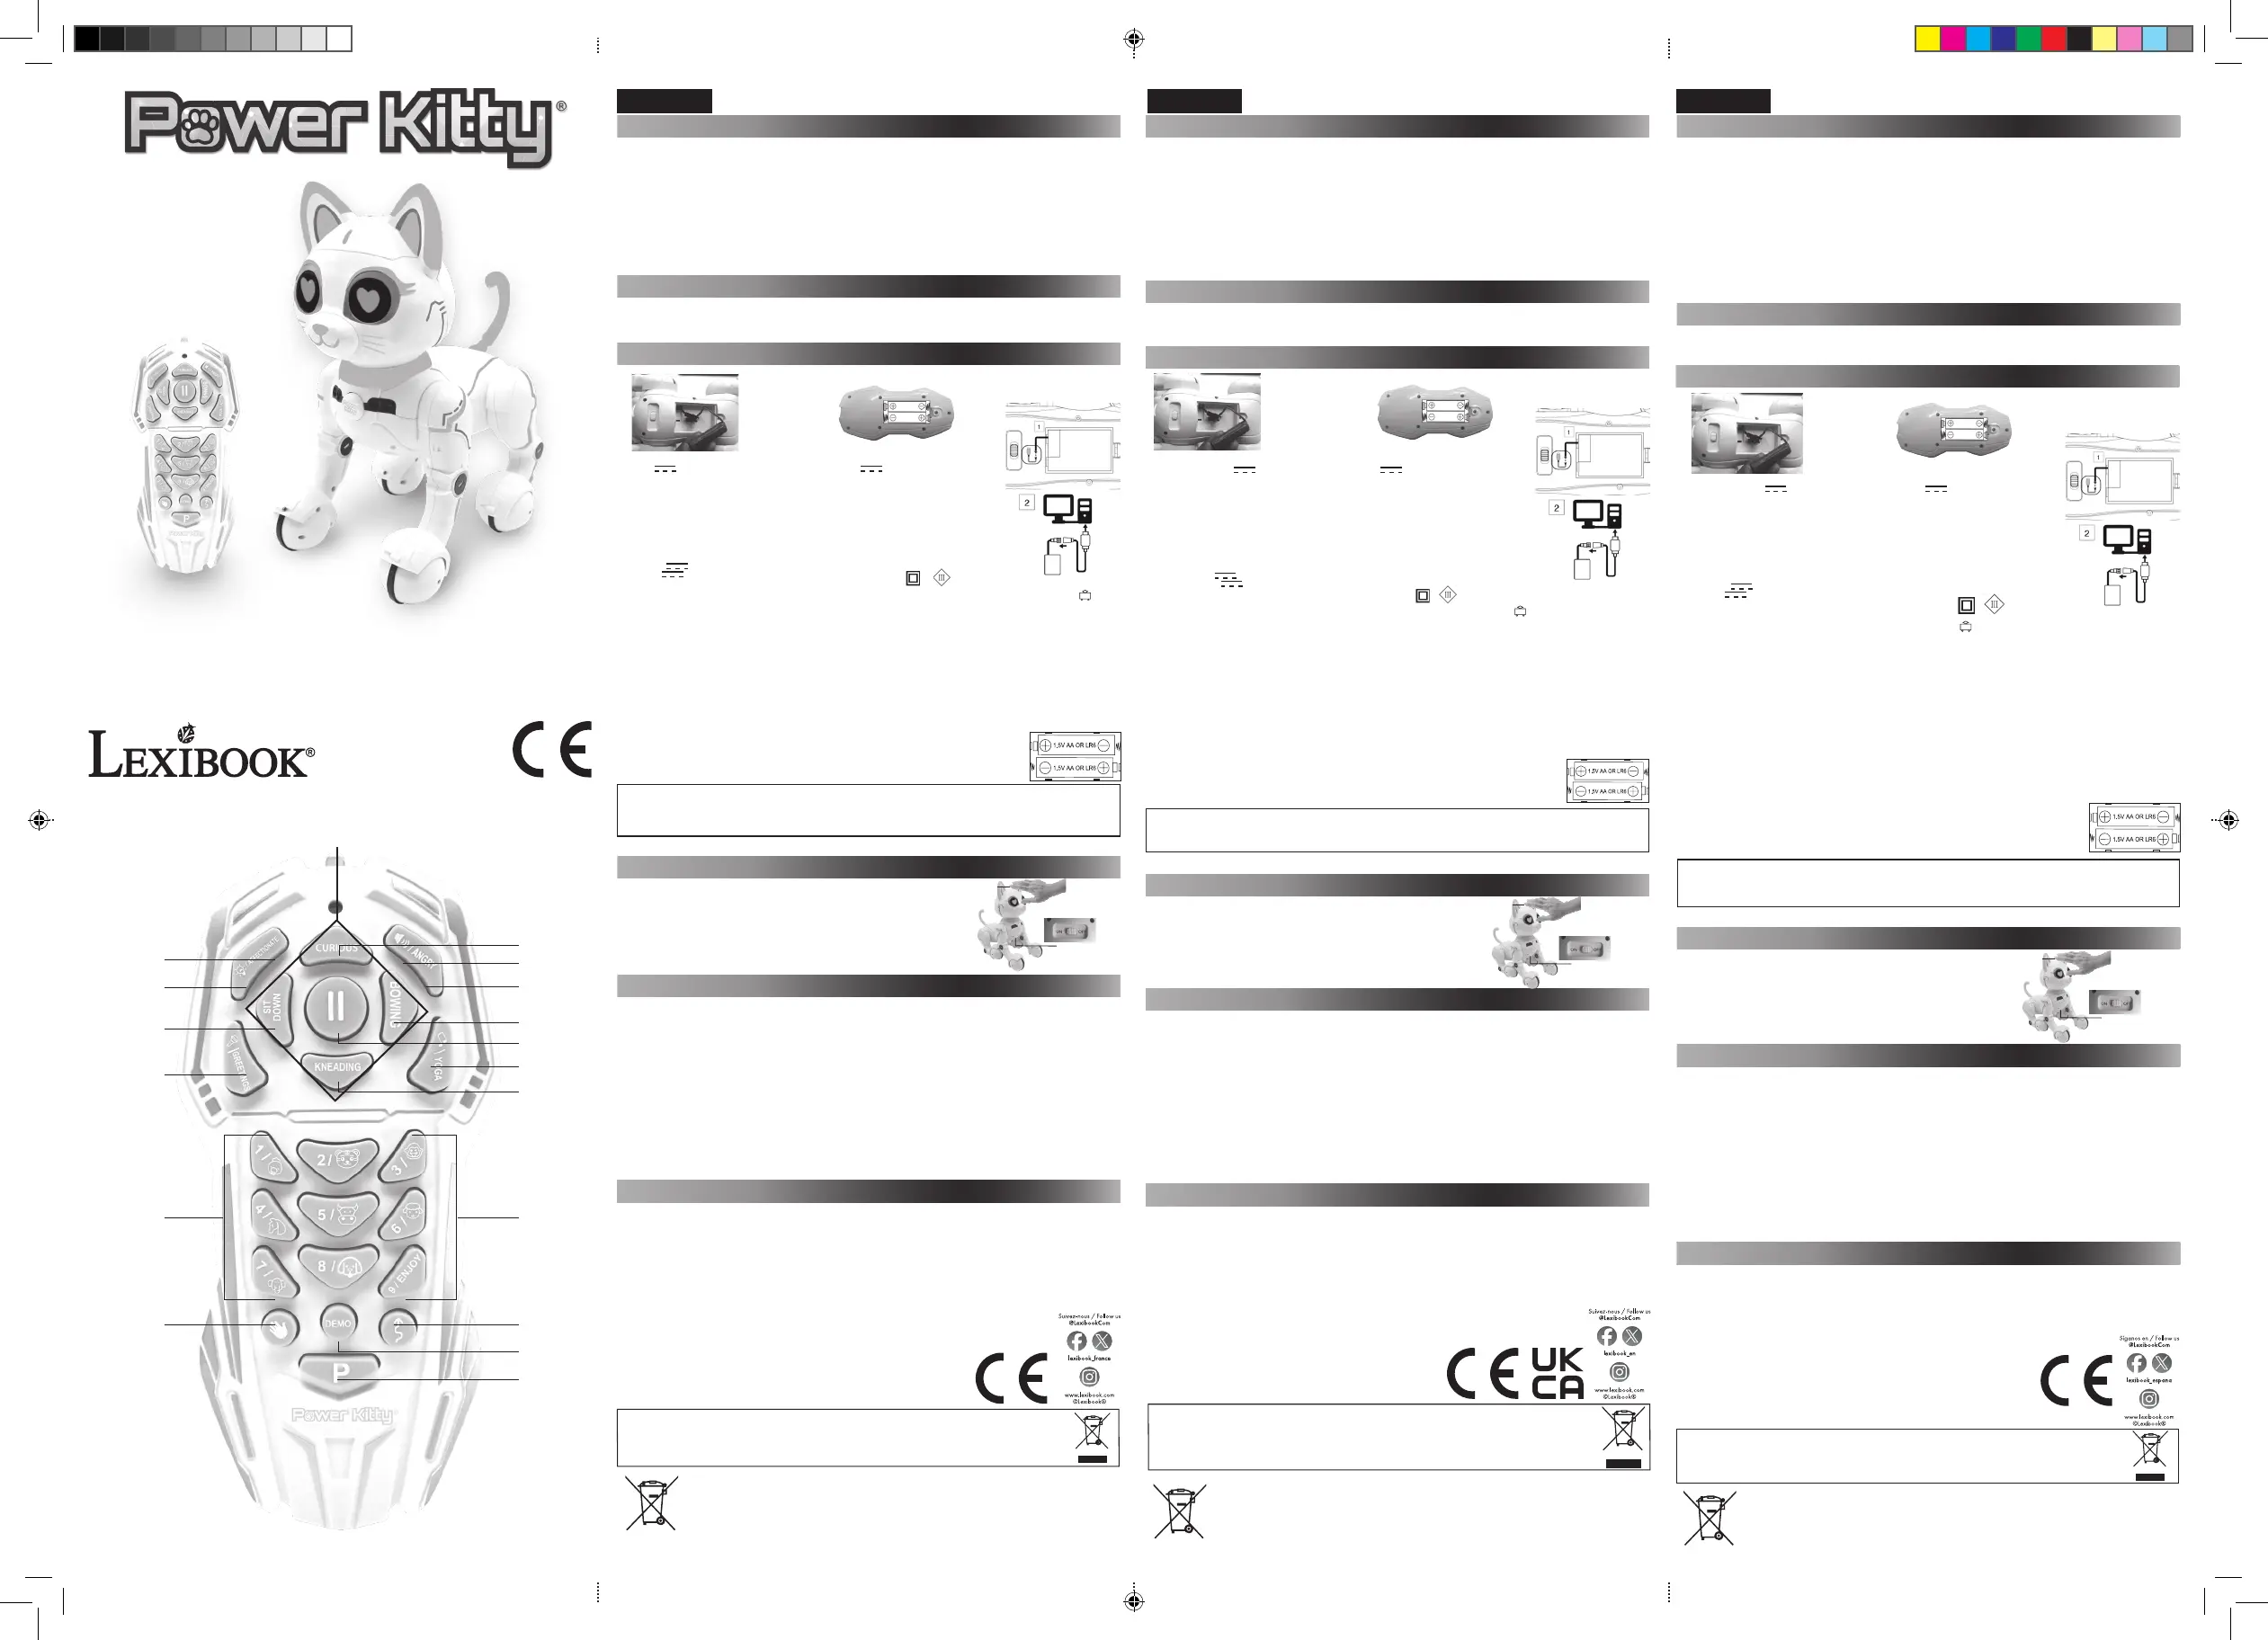
DÉCOUVREZ POWER KITTY®
DRESSEZ VOTRE POWER KITTY®!
1. Touches directionnelles
2. Renier*
3. Volume
4. Énervé*
5. En place*
6. STOP
7. Danse / Yoga*
8. Pompes*
9. Bruits d’animaux et joue*
10. Follow-me
11. Demonstration
12. Enregistre un programme
13. Contrôle gestuel
14. Nombres
15. Chansons / Dis bonjour !*
16. Assis!*
17. Effets lumineux
18. Affectueux*
Tactile, il réagit
aux caresses sur
sa tête et se met à
danser !
ON / OFF
CONTENU DE L’EMBALLAGE
Lors du déballage, assurez-vous que les pièces suivantes soient incluses :
1 x robot POWER KITTY® 1 x mode d’emploi 1 x télécommande 1 x câble USB de recharge
AVERTISSEMENT : Tous les matériaux d’emballage, comme le ruban adhésif, les feuilles en plastique, les celles et les étiquettes ne font
pas partie du produit et doivent être jetés.
ALIMENTATION
Charger le robot :
1. Assurez-vous que l’appareil soit éteint.
2. À l’aide d’un tournevis, ouvrir le compartiment des piles sur le ventre du robot.
3. Enlever délicatement la batterie rechargeable du compartiment. Débranchez-la en pinçant les deux
côtés du connecteur.
4. Insérez la petite extrémité du câble de chargement USB dans le connecteur de la batterie.
5. Branchez l’autre extrémité du câble au port USB d’un ordinateur (voir gure 2).
6. L’indicateur LED sur le port USB clignote lorsque la batterie charge.
Specications de l’adaptateur:
Entrée: 5.0V 2.0A
Sortie: 3.7V 0.5A
Le jouet ne doit être branché que sur un équipement portant le symbole suivant. ou .
Note : Si vous rechargez avec un adaptateur, veuillez utiliser uniquement un adaptateur pour jouets sur lequel gure ce symbole .
Note : Le câble USB sert uniquement à charger l’appareil et ne permet en aucun cas le transfert de données.
Attention : Débranchez l’adaptateur en cas de non-utilisation prolongée an d’éviter tout échauffement. Lorsque le jeu est alimenté par
un adaptateur, ne jouez pas à l’extérieur. Vériez régulièrement l’état de l’adaptateur et des ls de branchement. En cas de détérioration,
n’utilisez pas l’adaptateur jusqu’à réparation. Le jouet ne doit être utilisé qu’avec un adaptateur pour jouets. L’adaptateur n’est pas un jouet.
La console doit être déconnectée de l’alimentation pour être nettoyée si des liquides sont utilisés pour le nettoyage. Ce jouet n’est pas
destiné aux enfants de moins de 3 ans. Une mauvaise utilisation de l’adaptateur peut provoquer une électrocution.
Conseil aux parents : L’adaptateur n’est pas destiné à être utilisé comme un jouet. Il doit être utilisé sous la surveillance des parents.
AVERTISSEMENT :
- Danger d’explosion si la batterie est mal remplacée. Veillez à ne la remplacer qu’avec une batterie identique ou équivalente.
- La batterie ne doit pas être exposée à de fortes sources de chaleur, comme la lumière du soleil, le feu ou toute autre chose de semblable.
- D’importantes interférences électromagnétiques ou des décharges électrostatiques peuvent provoquer un dysfonctionnement ou une perte de
données. Si l’appareil ne fonctionne pas correctement, éteignez-le puis rallumez-le ou débranchez le câble USB.
- Le bon fonctionnement de l’appareil peut être perturbé par d’importantes interférences électro-magnétiques. Le cas échéant, réinitialisez
l’appareil pour reprendre un fonctionnement normal en suivant les instructions de ce mode d’emploi. Dans la mesure ou l’appareil ne
fonctionnerait pas, veuillez le changer de place.
- Le jouet ne doit pas être connecté à plus que le nombre recommandé de transformateurs ou d’alimentations.
- Pour recharger la batterie, utilisez uniquement l’unité d’alimentation détachable fournie avec ce jouet.
Installation des piles dans la télécommande :
1. À l’aide d’un tournevis, ouvrir le compartiment des piles.
2. Insérer 2 piles 1.5V AA/LR6, en respectant la polarité indiquée au fond du compartiment des piles.
3. Refermer le compartiment des piles et resserrer la vis.
Fonction follow-me (10)
Dressez votre chat pour qu’il vous suive ! Tenez la télécommande devant votre corps, face à la tête du chat.
Appuyez-sur le bouton follow-me (10) une fois, et commencez à vous déplacer, toujours en gardant la télécommande pointée vers
la tête du chat.
Power Kitty® vous suivra, il suft de rappuyer sur la touche follow-me (10) pour arrêter la fonctionnalité.
Contrôle gestuel (13)
Utilisez des gestes pour contrôler les mouvements de votre chat ! Appuyez sur le bouton de contrôle gestuel (13) une fois.
• Tourner à droite : Passez votre main de gauche à droite, juste en-dessous de la tête du chat - il tournera vers la droite.
• Tourner à gauche : Passez votre main de droite à gauche, juste en-dessous de la tête du chat - il tournera vers la gauche.
• Avancer : Passez votre main de haut en bas, jusqu’en-dessous de la tête du chat, puis éloigner la main du chat, et il avancera.
• Reculer : Placez votre main à environ 20cm du chat, sous sa tête, et rapprochez votre main du chat , maintenez là sous la tête du chat
jusqu’à ce qu’il recule.
Pour arrêter la fonction de contrôle gestuel, rappuyez sur le bouton (13).
Mode programmation (12)
Programmez votre chat pour qu’il répète les enchainements que vous lui apprenez ! Appuyez sur le bouton “ P” de programmation (12) une
fois. Puis, choisissez votre enchainement d’action à l’aide des différents boutons de la télécommande.
Appuyez de nouveau sur le bouton programmation (12) pour rejouer la séquence ou pour en créer une nouvelle en appuyant de nouveau
sur les différentes touches de la télecommande.
N.B. Dresser son chat n’est pas toujours facile ! La fonction de dressage ne fonctionnera peut-être pas à chaque fois, donc n’hésitez pas à
essayer plusieurs fois avant que le chat ne réponde à vos instructions !
Ne pas recharger les piles non rechargeables. Retirer les accumulateurs de l’appareil avant de les recharger. Ne charger les accumulateurs que sous
la surveillance d’un adulte. Ne pas mélanger différents types de piles ou accumulateurs, ou des piles et accumulateurs neufs et usagés. Les piles et
accumulateurs doivent être mis en place en respectant la polarité. Les piles et accumulateurs usagés doivent être enlevés de l’appareil. Les bornes d’une
pile ou d’un accumulateur ne doivent pas être mises en court-circuit. Ne pas jeter les piles au feu. Retirer les piles en cas de non utilisation prolongée. Ce
jeu doit être alimenté avec les piles spéciées seulement. Les batteries ne doivent jamais être exposées à une source de chaleur excessive, par exemple
la lumière du soleil ou un feu. N’utiliser que des piles de type identique ou équivalent à celles recommandées.
ATTENTION : D’importantes interférences électromagnétiques ou des décharges électrostatiques peuvent provoquer un dysfonctionnement
ou une perte de données. Si l’appareil ne fonctionne pas correctement, enlevez puis remettez les piles.
* Ces fonctions marchent en pressant longtemps sur le bouton correspondant (environ 3 secondes).
Informations sur la protection de l’environnement
Tout appareil électrique usé est une matière recyclable et ne devrait pas faire partie des ordures ménagères ! Nous vous
demandons de bien vouloir nous soutenir en contribuant activement au ménagement des ressources et à la protection de
l’environnement en déposant cet appareil dans des sites de collecte (si existants).
ENTRETIEN ET GARANTIE
Pour nettoyer l’appareil, utilisez un chiffon légèrement imbibé d’eau. N’utilisez pas de produit détergent. Ne laissez pas l’appareil en plein soleil et
ne l’exposez pas à une source de chaleur. Ne le faites pas tomber. Ne tentez pas de le démonter. Ne le tordez pas et ne le pliez pas.
REMARQUE : Conservez ce mode d’emploi car il contient des informations importantes.
Ce produit est couvert par notre garantie de deux ans. Pour tout service après-vente et pour toute plainte intervenant pendant la période de
garantie, adressez-vous à votre magasin de vente en présentant une preuve d’achat valide. Notre garantie couvre tous les défauts liés aux
matériaux et à la fabrication, mais exclut toute détérioration résultant du non-respect des instructions du mode d’emploi ou d’une negligence
de la part de l’utilisateur (démontage, exposition à la chaleur ou à l’humidité, etc.). Il est recommandé de
conserver l’emballage pour reference ultérieure. Dans un souci d’amélioration de nos services, nous procédons régulièrement à des
modications des couleurs et de certains détails du produit montré sur l’emballage.
ATTENTION ! Ce produit ne convient pas aux enfants de moins de 3 ans. Risque d’étouffement – petite pièces.
Référence : KITTY01
Conçu et développé en Europe – Fabriqué en Chine
Lexibook S.A.
6 avenue des Andes
Bâtiment 11
91940 Les Ulis
France
www.lexibook.com – © Lexibook®
Pour vos demandes concernant un problème SAV ou une réclamation,
écrivez à savcomfr@lexibook.com
SAFETY INSTRUCTIONS
PLEASE READ BEFORE OPERATING THIS EQUIPMENT.
Before using the unit, be sure to read all operating instructions carefully. Please note that these are general precautions and may not pertain
to your unit.
1. Read this Instruction Manual before you attempt to connect or operate the appliance.
2. Keep these instructions in good condition. Heed all warnings. Follow all instructions.
3. The apparatus shall not be exposed to dripping or splashing and no objects lled with liquids, such as vases, shall be placed on the product.
Dry location use only.
4. No naked ame source, such as candles, should be placed on the product.
5. Ventilation should not be impeded by covering the ventilation openings.
6. Only use accessories, which are specied by the manufacturer.
7. Place the unit where there is good ventilation. Place the system on a at, hard and stable surface. Do not expose to temperatures above
40°C /104°F. Allow at least 10 cm / 4 inches clearance from the rear and the top of the unit and 5 cm / 2 inches from each side
8. Batteries should be disposed of properly. Take them to the collection container in order to protect the environment.
9. Keep minimum distances around the apparatus for sufcient ventilation.
10. The ventilation should not be impeded by covering the ventilation openings with items, such as newspapers, table-cloths, curtains, etc.
11. The use of apparatus in moderate climates.
The robot operates with 1 x DC 3.7V
rechargeable battery 600mAh (included)
The remote control operates with 2 x 1.5V AA
/ LR6 batteries (not included).
DISCOVER POWER KITTY®
TRAIN YOUR POWER KITTY®!
1. Directional keys
2. Sniff*
3. Volume
4. Angry*
5. Get down*
6. Stop
7. Dances / Yoga*
8. Kneading*
9. Animal sounds and enjoy*
10. Follow-me function
11. Demo
12. Make a program
13. Gesture control function
14. Numbers
15. Sing / Say hello*
16. Sit down*
17. Light effects
18. Affectionate*
PACKAGING CONTENTS
When opening the product’s packaging, please ensure that the following elements are included:
1 x POWER KITTY® robot 1 x instruction manual 1 x remote control 1 x USB charging cable
WARNING: All packaging materials, such as tape, plastic sheets, wire ties and tags are not part of this toy and should be discarded for your
child’s safety.
BATTERY REQUIREMENTS
Charging the robot :
1. Check that the unit is switched off.
2. Using a screwdriver, open the battery door located at the rear of the unit.
3. Delicately remove the rechargeable battery from the compartment. Unplug it by pinching both sides of
the connector (see gure 1)
4. Insert the small end of the USB charging cable (included) into the battery connector.
5. Connect the other end of the USB cable into the USB port of your powered computer
(see gure 2).
6. The LED indicator on the USB cable turns red when charging, and turn off when fully charged.
USB cable specications:
Input Power: 5.0V 2.0A
Output Power: 3.7V 0.5A
The toy is only to be connected to equipment bearing the following symbol or .
Note: If connect with an adaptor, please only use the adaptor for toys and it should be with this symbol .
Note: Please note that the USB cable can be used for battery charging only and not for data transfer.
Warning: Disconnect the adapter if the game is not used for a long period of time to prevent overheating. When the game is powered by
an adapter, do not play outside. Check the state of the adapter and the connection cords regularly. If their condition is deteriorating, do not
use the adapter until it has been repaired. The toy shall only be used with a transformer for toys. The adapter is not a toy. The device should
be disconnected from the power supply to be cleaned if liquids are used for cleaning. The toy is not intended for children under 3 years old.
Misuse of transformer can cause electrical shock.
Parental advisory: transformer and adaptor for toys are not intended to be used as a toy. The usage must be under parental advice.
WARNING:
- Danger of explosion if battery is incorrectly replaced. Please only replace it with the same or equivalent battery.
- The battery should not be exposed to high temperatures, such as sunlight, re or anything similar.
- Signicant electromagnetic interference or electrostatic discharges may cause the device to malfunction or lose data. If the device is not functioning
correctly, switch it off and then on again, unplug the USB cable or remove the batteries and insert them again.
- The normal function of the product may be disturbed by strong electromagnetic interference. If so, simply reset the product to resume normal
operation by following the instruction manual. In case the function could not resume, please use the product in other location.
- The toy is not to be connected to more than the recommended number of transformers or power supplies.
- For the purposes of recharging the battery, only use the detachable supply unit provided with this toy.
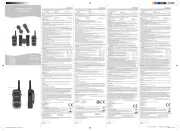
REMOTE CONTROL:
Battery installation or replacement
1. Use a screwdriver to loosen the screw on the battery compartment located at the back of the remote control.
2. Install or replace 2 x 1.5V AA / LR6 batteries, observing the polarity indicated at the bottom of the battery
compartment, and as per the diagram shown opposite.
3. Close the battery compartment and tighten the screw.
Non-rechargeable batteries are not to be recharged. Rechargeable batteries are to be removed from the toy before being charged. Rechargeable batteries
are only to be charged under adult supervision. Different types of batteries or new and used batteries are not to be mixed. Only batteries of the same or
equivalent type as recommended are to be used. Batteries are to be inserted with the correct polarity.
Exhausted batteries are to be removed from the toy. The supply terminals are not to be short-circuited. Do not throw batteries into a re. Remove the
batteries if you are not going to use the toy for a long period of time. Batteries shall not be exposed to excessive heat such as sunshine, re or the like.
WARNING: Malfunction or loss of memory may be caused by strong frequency interference or electrostatic discharge. Should any abnormal
function occur, remove the batteries and insert them again.
* Please long press (around 3 seconds) to access these functions.
MAINTENANCE AND WARRANTY
Only use a soft, slightly damp cloth to clean the unit. Do not use detergent. Do not to expose the unit to direct sunlight or any other heat
source. Do not immerse the unit in water. Do not dismantle or drop the unit. Do not try to twist or bend the unit.
This product is covered by our 2-year warranty.
For any claim under the warranty or after-sales service, please contact your distributor and present a valid proof of purchase. Our warranty
covers any manufacturing material and workmanship defect, with the exception of any deterioration arising from the non-observance of the
instruction manual or from any careless action implemented on this item (such as dismantling, exposing to heat and humidity, etc.). It is
recommended to keep the packaging for any further reference. In a bid to keep improving our services, we could implement modications on
the colours and the details of the product shown on the packaging.
WARNING! Not suitable for children under 3 years. Choking hazard – Small parts.
NOTE: Please keep this instruction manual, it contains important information.
Reference: KITTY01
Designed and developed in Europe – Made in China.
United Kingdom & Ireland
For after-sales service, please contact us at savcomfr@lexibook.com
Lexibook S.A.
6 avenue des Andes
Bâtiment 11
91940 Les Ulis
France
www.lexibook.com – © Lexibook®
Follow-me function (10)
Train your kitty to follow you! Hold the remote in front of your body. Point at the kitty’s head while it is facing you. Press the follow-me button
(10) once, and start moving, always keeping the remote control pointed towards the head of the kitty. The kitty will follow you. Press the
button (10) once more to stop the follow-me function.
Gesture Control (13)
Use gestures to train your kitty’s movements! Press the gesture control button (13) once.
• Turn right: Swipe your hand just below the kitty’s head, from left to right - the kitty will turn toward the right.
• Turn left: Swipe your hand just below the kitty’s head, from right to left - the kitty will turn toward the left.
• Move forward: Swipe your hand from top to bottom of kitty’s head and then away from the kitty - the kitty will go forward.
• Move backward: Place your hand around 20cm in front of the kitty, below the head, and bring your hand toward the kitty and hold there until
it starts to move backward.
To stop the gesture control function, simply press button (13) again.
Programming mode (12)
Program your kitty to repeat the sequences you teach him! Press the “P” programming button (12) once. Then choose your action sequence
using the different buttons on the remote control.
Press the programming button (12) again to replay the sequence or to create a new one by pressing the different buttons on the remote
control again.
N.B. Training your kitty is not always easy! The training functions might not work every time, so don’t be afraid to practice and try a few
times before the kitty follows your instructions!
Función sígueme (10)
¡Entrena a tu gatito para que te siga! Sujeta el mando a distancia delante de tu cuerpo de cara a la cabeza del gatito. Presiona el botón
sígueme (10) una vez y empieza a desplazarte manteniendo siempre el mando a distancia mirando hacia la cabeza del gatito. El gatito te
seguirá – presiona el botón (10) de nuevo para detener la función sígueme.
Control de gestos (13)
¡Haz gestos para entrenar los movimientos de tu gatito! Presiona el botón de control de gestos (13)
• Giro a la derecha: Pasa la mano justo por debajo de la cabeza del gatito, de izquierda a derecha y el gatito girará hacia la derecha.
• Giro a la izquierda: Pasa la mano justo por debajo de la cabeza del gatito, de derecha a izquierda y el gatito girará hacia la izquierda.
• Movimiento hacia delante: Pasa la mano de la parte superior a la inferior y luego aléjala del gatito – el gatito se desplazará hacia delante.
• Movimiento hacia atrás: Coloca la mano a unos 20 cm delante del gatito, detrás de la cabeza, acerca la mano hacia el gatito y mantenla
delante de él hasta que empiece a desplazarse hacia atrás.
Para detener la función de control de gestos, solo tienes que presionar el botón (13) de nuevo.
Modo programación (12)
¡Programa a tu gatito para que repita las secuencias que le enseñes! Pulsa una vez el botón de programación “P” (12). A continuación, elige
tu secuencia de acción utilizando los diferentes botones del mando a distancia.
Vuelve a pulsar el botón de programación (12) para repetir la secuencia o para crear una nueva pulsando de nuevo los diferentes botones
del mando a distancia.
N.B. ¡Entrenar a tu gatito no es siempre fácil! Las funciones de entrenamiento podrían no funcionar siempre. ¡No te preocupes, practica y
verás como al cabo de unas cuantas veces el gatito sigue tus instrucciones!
INSTRUCCIONES DE SEGURIDAD
LEA ESTA SECCIÓN ANTES DE UTILIZAR ESTE EQUIPO.
Antes de utilizar el equipo, asegúrese de leer con cuidado todas las instrucciones de funcionamiento. Tenga en cuenta que estas son
precauciones generales y puede que no tengan aplicación a su equipo.
1. Lea este Manual de instrucciones antes de intentar conectar o utilizar el aparato.
2. Mantenga estas instrucciones en perfectas condiciones. Preste atención a todas las advertencias. Respete todas las instrucciones.
3 . No deberá exponerse el aparato a goteos o salpicaduras, y no deberán colocarse sobre el pro¬ducto objetos que contengan líquidos, como
pueden ser jarrones de ores. Utilice únicamente en lugares secos.
4. No coloque fuentes de llamas vivas, como pueden ser velas, sobre el producto.
5. No deberá impedirse la ventilación cubriendo las ranuras de ventilación.
6. Utilice únicamente accesorios especicados por el fabricante.
7. Coloque la unidad donde exista una ventilación adecuada. Coloque el sistema sobre una super¬cie plana, dura y estable. No exponga el
aparato a temperaturas superiores a 40°C /104°F. Deje una separación mínima de 10 cm / 4” respecto a las partes trasera y superior de
la unidad y de 5 cm / 2” respecto a los laterales.
8. Guardar una distancia mínima alrededor del aparato, para que tenga una ventilación adecuada;
9. La ventilación no debe quedar impedida debido a la obstrucción de las aberturas de ventilación por objetos como periódicos, manteles,
cortinas, etc.;
10. El aparato p1-ha sido diseñado para su uso en un clima templado;
11. Las pilas deben desecharse de manera conforme. Deposítelas en contenedores selectivos previs¬tos a este efecto, para proteger el
medio ambiente..
El robot funciona con 1 x DC 3.7V
rechargeable battery 600mAh (includa)
El control remote funciona con 2 x 1.5V AA /
LR6 pilas (no incluidas).
DISCUBRIR A POWER KITTY®
¡ENTRENA A TU POWER KITTY®!
1. Teclas direccionales
2. Olfatear*
3. Volumen
4. Enojado*
5. Agáchate
6. Deténgase*
7. Baile / Yoga*
8. Flexión de brazos*
9. Sonidos de animales*
10. Función sígueme
11. Demo
12. Hacer un programa
13. Control de gestos
14. Números
15. Canciones / ¡Saluda!*!
16. Siéntate*
17. Efectos de luz
18. Afectuoso*
DESEMBALAJE DE SU DISPOSITIVO
Durante el desembalaje, asegúrese de que se incluyan los siguientes elementos:
1 x POWER KITTY® robot 1 x manual de instrucciones 1 x mando a distancia 1 x Cable de carga USB
ADVERTENCIA: Todos los materiales de embalaje, tales como cintas, láminas de plástico, ataduras de alambre y etiquetas, no forman parte
de este juguete y deben desecharse por la seguridad del niño.
REQUISITOS DE LA BATERIA
Modo de carga del auto:
1.Compruebe que la unidad está apagada.
2. Para colocar las pilas, abre el compartimento de las pilas, situado en la parte inferior de la unidad.
3. Retire delicadamente la batería recargable del compartimento. Desconéctelo pellizcando ambos
lados del conector.
4. Inserte el extremo pequeño del cable de carga USB (incluido) en el conector de la batería.
5. Conecte el otro extremo del cable USB al puerto USB de su computadora (consulte la gura 2).
6. El indicador LED en el puerto USB se ilumina cuando la batería se está cargando.
Especicaciones del adaptador:
Entrada: 5.0V 2.0A
Salida: 3.7V 0.5A
El juguete solo debe conectarse a equipos de clase II que lleven este símbolo o .
El juguete solo debe conectarse a equipos de clase II que lleven este símbolo .
Nota: Tenga en cuenta que el cable USB podrá utilizarse únicamente para la carga de la batería y no para la transferencia de datos.
ADVERTENCIA: Desconecte el adaptador si no va a utilizar la consola por un largo periodo de tiempo para evitar sobrecalentamientos.
Cuando la consola esté alimentada mediante el adaptador, no la use a la intemperie. Compruebe periódicamente el estado del adaptador
y de los cables de conexión. Si observa algún deterioro en el adaptador, no lo use hasta que haya sido reparado. El juguete solo debe
utilizarse con un transformador para juguetes. El adaptador no es un juguete. Si va a limpiar la consola con algún tipo de líquido,
desenchúfela antes de la toma de corriente. Este juguete no es apto para niños menores de 3 años. Un uso incorrecto del transformador
puede causar descargas eléctricas.
Advertencia a los padres: el adaptador para juguetes no está destinado a ser utilizado como juguetes. Su uso debe realizarse bajo
supervisión parental.
ADVERTENCIA:
- Existe peligro de explosión si la pila se coloca de forma incorrecta al reemplazarse. Sustituya la pila por una misma o equivalente únicamente.
- No exponga la pila a altas temperaturas, tales como la luz del sol, fuegos o similares.
- Cualquier interferencia electromagnética o descarga electrostática importante podrá hacer que el aparato no funcione correctamente o se pierdan
los datos almacenados en su memoria. En caso de que el aparato no funcione correctamente, apáguelo y vuelva a encenderlo, o bien desenchufe
el cable USB.
- El funcionamiento normal de este producto puede verse alterado por fuertes interferencias magnéticas. Si esto ocurriera, reinicie el producto para
que vuelva a su funcionamiento normal siguiendo las instrucciones del manual. Si aun así no funcionara, use el producto en otra ubicación.
- El juguete no debe conectarse a más de la cantidad recomendada de transformadores o fuentes de alimentación.
- A los efectos de recargar la batería, utilice únicamente la unidad de alimentación desmontable provista con este toy.
CONTROL REMOTO:
Instalación o reemplazo de las pilas.
1. Use un destornillador para aojar el tornillo del compartimiento de las pilas ubicado en la parte posterior del
mando a distancia.
2. Instale o sustituya las 2 pilas de tipo 1.5V AA / LR6 con las polaridades en la dirección indicada en el fondo de
su compartimento y conforme se indica en el diagrama que se muestra aquí al lado.
3. Cierre el compartimiento de las pilas y apriete el tornillo
No intente nunca recargar pilas no recargables. Para cargar las pilas recargables, antes retírelas del juguete. Las pilas recargables deben recargarse
siempre bajo la supervisión de un adulto. No mezcle pilas de distinto tipo, o pilas nuevas con pilas usadas. Utilice únicamente pilas del tipo recomendado
o equivalentes. Colocar siempre las pilas en la posición correcta, de acuerdo con la polaridad indicada en el compartimento. Retire del juguete las pilas
gastadas. No permita que entren en contacto eléctrico los terminales de la alimentación. Si prevé que el juguete no va a utilizarse durante un periodo largo
de tiempo, retire las pilas. Cuando el sonido se hace débil o el juego no responde adecuadamente es señal de que debe sustituir las pilas. Deberá evitarse
exponer las baterías a temperaturas excesivamente elevadas tales como las generadas por la acción de los rayos del sol o de las llamas.
ADVERTENCIA! Las descargas electrostáticas o interferencias de una frecuencia sucientementefuerte podrán provocar el funcionamiento anormal del
aparato o la pérdida de los datos almacenados en su memoria. En caso de observarse algún funcionamiento anormal, bien retire y vuelva a instalar las pilas.
* Estas funciones funcionarán con una pulsación larga (alrededor de 3 segundos).
MANTENIMIENTO Y GARANTÍA
Para limpiar el dispositivo, utilice únicamente un paño suave humedecido en agua. No utilice ningún producto detergente. No exponga
el dispositivo a la acción directa de los rayos del sol ni a ninguna otra fuente de calor. No mojar el producto. No desmonte o deje caer el
dispositivo.
Este produto está coberto pela nossa garantia de 2 anos.
Para a utilização da garantia ou do serviço pós-venda, deverá dirigir-se ao seu revendedor, levando consigo o talão da compra. A nossa
garantia cobre defeitos de material ou de montagem da responsabilidade do fabricante, excluindo qualquer deterioração proveniente do
não cumprimento do modo de utilização ou de qualquer intervenção inoportuna sobre a unidade (como a desmontagem, exposição ao
calor ou à humidade…). Recomenda-se que guarde a caixa para uma futura referência. Na procura de uma constante melhoria, poderemos
modicar as cores ou características do produto apresentadas na caixa.
ADVERTENCIA! No apto para niños menores de 3 años. Peligro de atragantamiento – Piezas pequeñas.
NOTA: Conserve este manual de instrucciones p1-ya que contiene información importante.
Referencia : KITTY01
Diseñado y desarrollado en Europa – Fabricado en China.
España
Para servicio postventa, entre en contacto con nuestros equipos:
savcomfr@lexibook.com
Lexibook S.A.
6 avenue des Andes
Bâtiment 11
91940 Les Ulis
France
www.lexibook.com – © Lexibook®
Lexibook
PO Box 423
UMBERLEIGH
EX32 2JW
United Kingdom
Élimination de la batterie de ce produit
(Applicable aux pays disposant de systèmes de collecte séparés) Ce symbole indique que la batterie rechargeable
contenue dans ce produit ne doit pas être mise au rebut avec les déchets ménagers comme stipulé dans la directive européenne 2013/56/
EU. Les piles usagées doivent être mises au rebut séparément des ordures ménagères, auprès de centres de récupération agréés par
le gouvernement ou les autorités locales. L’élimination correcte de vos piles et batteries usagées permet d’éviter toute conséquence
néfaste sur l’environnement et votre propre santé. Renseignez-vous sur le système de collecte des produits électriques et électroniques
et batteries. Ne jetez jamais le produit et batteries usagées avec les déchets ménagers et suivez les règles de votre collectivité. Pour plus
d’informations sur l’élimination de vos piles et batteries usagées contactez votre mairie ou le centre de collecte des déchets.
Correct disposal of batteries in this product
(Applicable in countries with separate collection systems) This symbol means that the product contains a rechargeable battery covered by
European Directive 2013/56/EU which cannot be disposed of with normal household waste. All batteries should be disposed separately
from the municipal waste stream via designated collection facilities appointed by the government or the local authorities. The correct
disposal of your old batteries will help to prevent potential negative consequences for the environment, animal and human health. Inform
yourself about the local separate collection system for electrical and electronic products and rechargeable batteries. Follow local rules and
never dispose of the product and rechargeable batteries with normal household waste. For more detailed information about disposal of
your old batteries, please contact your city office or waste disposal service center.
Eliminación apropiada de las baterías de este producto
(aplicable en países con sistemas de recogida selectiva) Este símbolo significa que el producto contiene una batería recargable cubierta
por la Directiva europea 2013/56/UE que no puede desecharse conjuntamente con la basura doméstica normal. Las baterías no
podrán eliminarse en los vertederos municipales sino que deberán depositarse en las instalaciones de recogida designadas por las
autoridades gubernamentales o locales. La eliminación correcta de sus baterías ayudará a evitar posibles consecuencias negativas para
el medio ambiente, los animales y la salud humana. Infórmese acerca del sistema de recogida selectiva local para productos eléctricos y
electrónicos y baterías recargables. Respete la normativa local y nunca deseche el producto ni las baterías recargables conjuntamente
con los residuos domésticos normales. Para obtener una información detallada sobre el desecho de sus baterías gastadas, póngase en
contacto con la oficina o el centro de servicio de eliminación de residuos municipales.
Touch-sensitive, p1-he
reacts when you pet
his head and starts
to dance!
ON / OFF
¡Táctil, reacciona
cuando le acaricias
la cabeza y
empieza a bailar!
ON / OFF
1.5V AA/LR6
1.5V AA/LR6
1.5V AA/LR6
1.5V AA/LR6
1.5V AA/LR6
1.5V AA/LR6
KITTY01_IM2254_349_V13.indd 1
19/6/2024 5:01 PM
19/6/2024 5:01 PM
Milieubescherming
Ongewenste elektrische apparaten dienen gerecycleerd te worden en niet weggegooid met het algemeen
huishoudelijk afval! Gelieve actief bij te dragen tot het behoud van middelen en het milieu te helpen beschermen
door dit apparaat terug te bezorgen aan een verzamelcentrum (indien beschikbaar).
NEDERLANDSITALIANO
Protezione Ambientale
Gli elettrodomestici da smaltire possono essere riciclati e non devono essere gettati con i riuti domestiti!
Sostenete attivamente la conservazione delle risorse e aiutate a proteggere l’ambiente riportando questo
apparecchio ad un centro di raccolta (se disponibile).
PORTUGUÊS
DEUTSCH
Umweltschutz:
Ausrangierte Elektrogeräte können recycelt werden und sollten nicht mit dem normalen Hausmüll entsorgt werden! Der Endverbraucher
ist gesetzlich verpichtet, gebrauchte Batterien zurückzugeben. Verbrauchte Batterien müssen vor der Entsorgung des Produkts entfernt
werden. Die Rückgabe der verbrauchten Batterien ist im Handel und in Sammelstellen kostenlos möglich. Die Batterien/Akkus können vom
Endverbraucher leicht und zerstörungsfrei entfernt werden. Der Endbenutzer kann den Abschnitt über die Installation der Batterien lesen,
um die Batterien zu entfernen. Bitte unterstützen Sie aktiv die Erhaltung natürlicher Ressourcen und helfen Sie die Umwelt zu schützen,
indem Sie dieses Gerät bei einer Sammelstelle
abgeben (sofern vorhanden).
Protecção Ambiental
Os aparelhos eléctricos indesejados podem ser reciclados e não deverão ser eliminados juntamente com o lixo
doméstico comum! Por favor, suporte activamente a conservação de recursos e ajude a proteger o ambiente,
devolvendo este aparelho num centro de recolha (se disponível).
ISTRUZIONI DI SICUREZZA
LEGGERE PRIMA DI UTILIZZARE L’APPARECCHIO.
Prima di utilizzare l’unità, leggere attentamente tutte le istruzioni operative. Notare che si tratta di precauzioni generiche che possono non
essere relative alla vostraunità.
1. Leggere questo manuale di istruzioni prima di collegare l’apparecchio alla presa di corrente e usarlo.
2. Mantenere queste istruzioni in buone condizioni. Rispettare tutte le avvertenze. Seguire tutte le istruzioni.
3. Non esporre l’apparecchio a schizzi o sgocciolii e non collocaren sull’apparecchio contenitori di liquido, ad esempio vasi. Usare
esclusivamente in ambienti asciutti
4. Non collocare sull’apparecchio fonti di amme libere, ad esempio candele accese.
5. Non impedire la ventilazione coprendo le aperture di ventilazione.
6. Utilizzare esclusivamente accessori raccomandati dal costruttore.
7. Posizionare il prodotto in un ambiente ben ventilato. Posizionare il prodotto su una supercie piana, dura e stabile. Non esporre a temperature
superiori a 40°C. Lasciare uno spazio libero di almeno 10 cm dalla parte posteriore e superiore del prodotto e almeno 5 cm da ogni lato.
8. Mantenere una distanza minima intorno all’apparecchio per garantire un’adeguata ventilazione.
9. Per garantire una corretta ventilazione, non ostruire le aperture di ventilazione con oggetti come giornali, tovaglie, tende, ecc.
10. L’apparecchio deve essere usato in climi temperati.
11. Smaltire le batterie in modo conforme. Portarle presso gli appositi punti di raccolta per salva guardare l’ambiente.
Il robot è alimentato da 1 x DC 3.7V batteria
ricaricabile 600mAh (incluse)
Il telecomando è alimentato da 2 x batterie
1.5V AA/LR6 (non incluse).
SCOPRI POWER KITTY ®
1. Tasti freccia
2. Annusare*
3. Volume
4. Arrabbiato*
5. A cuccia*
6. Stop
7. Coreograe / Yoga*
8. Piegamento*
9. Versi di animali*
10. Funzione Seguimi
11. Demo
12. Creare un programma
13. Controllo gestuale
14. Conta
15. Canzoni / Saluta*
16. Seduto*
17. Effetti luminosi
18. Affetto*
DISIMBALLAGGIO
Durante il disimballaggio, verica che siano inclusi i seguenti elementi:
1 x robot POWER KITTY® 1 x manuale di istruzioni 1 x telecomando 1 x cavo di ricarica USB
AVVERTENZA: Tutti i materiali della confezione come il nastro adesivo, i fogli di plastica, i li di metallo e le etichette, non fanno parte del
prodotto e devono essere rimossi per la sicurezza del bambino.
ALIMENTAZIONE
Ricarica del robot:
1. Assicurarsi che l’unità sia spenta.
2. Con un cacciavite aprire lo scomparto batterie.
3. Rimuovi delicatamente la batteria ricaricabile dal vano batteria. Scollegala pizzicando entrambi i lati
del connettore.
4. Collega l’estremità piccola del cavo USB di ricarica (incluso) al connettore della batteria.
5. Collega l’altra estremità del cavo USB alla presa USB di un computer acceso (Figura 2).
6. L’indicatore LED sulla presa USB si illuminerà quando la batteria è sotto carica.
Speciche dell’adattatore:
Ingresso: 5.0V 2.0A
Uscita: 3.7V 0.5A
Il giocattolo deve essere collegato esclusivamente a un or .
Nota: se il prodotto viene collegato a un adattatore, usare esclusivamente adattatori per giocattoli contrassegnati dal simbolo .
Nota: il cavo USB serve esclusivamente a ricaricare la batteria e non può essere usato per il trasferimento di dati.
Attenzione: rimuovere l’adattatore se il prodotto non viene usato per un lungo periodo di tempo, in modo da evitare il surriscaldamento. Se
il prodotto è alimentato dall’adattatore, non giocare all’aperto. Controllare con regolarità lo stato dell’adattatore e del cavo di alimentazione.
In caso di deterioramento delle condizioni, non usare l’adattatore senza averlo prima fatto riparare. Utilizzare il giocattolo solo con un
trasformatore per giocattoli. L’adattatore non è un giocattolo. Se si utilizzano dei liquidi per pulire la console, scollegarla prima dalla sorgente
di alimentazione. Questo giocattolo non è adatto ai bambini di età inferiore a 3 anni. L’utilizzo scorretto del trasformatore può causare
scosse elettriche.
Raccomandazione per i genitori: l’adattatore non é giocattolo. Utilizzare sempre sotto la supervisione di un adulto.
AVVERTENZA:
- Attenzione, la batteria può esplodere se inserita in maniera scorretta. Sostituire esclusivamente con una batteria uguale o equivalente.
- Non esporre le batterie a calore eccessivo, ad esempio luce solare diretta, amme ecc.
- Forti interferenze elettromagnetiche o scariche elettrostatiche possono provocare un malfunzionamento o una perdita di dati. Se
l’apparecchio non funziona correttamente, spegnerlo poi riaccenderlo o scollegarle il cavo USB.
- Il funzionamento normale del prodotto potrebbe essere disturbato da interferenze elettromagnetiche di forte entità. In tal caso, è sufciente
ripristinare il prodotto e riprendere il funzionamento normale seguendo le istruzioni contenute nel manuale. In caso il prodotto non riprenda
a funzionare correttamente, cambiare il luogo di utilizzo.
- Il giocattolo non deve essere collegato a un numero di trasformatori o alimentatori superiore a quello raccomandato.
- Ai ni della ricarica della batteria, utilizzare solo l’unità di alimentazione rimovibile fornita con questo toy.
TELECOMANDO:
Installazione o sostituzione delle batterie
1. Usa un cacciavite per allentare la vite del vano batterie situato sul retro del telecomando.
2. Inserisci 2 batterie 1.5V AA / LR6 rispettando la polarità indicata sul fondo del vano batterie e illustrata a anco.
3. Chiudi il coperchio e serra la vite.
Funzione Seguimi (10)
Addestra il tuo gattino a seguirti! Tieni il telecomando davanti a te, rivolto verso la testa del gattino. Premi una volta il pulsante Seguimi
(10) e inizia a muoverti, sempre tenendo il telecomando rivolto verso la testa del gattino. Il gattino ti seguirà! Premi nuovamente il pulsante
(10) per disattivare la funzione Seguimi.
Controllo gestuale (13)
Usa il controllo gestuale per far muovere il gattino! Premi una volta il pulsante Controllo gestuale (13).
• Destra: muovi la tua mano, appena sotto la testa del gattino, da sinistra a destra; il gattino si girerà verso destra.
• Sinistra: muovi la tua mano, appena sotto la testa del gattino, da destra a sinistra; il gattino si girerà verso sinistra.
• Avanti: muovi la tua mano dall’alto verso il basso, quindi allontanala dal gattino; il gattino avanzerà.
• Indietro: posiziona la tua mano a circa 20 cm dal robot, sotto la testa, avvicinala al gattino e tienila davanti a lui nché non inizia a
indietreggiare.
Per disattivare la funzione Controllo gestuale, premi nuovamente il pulsante (13).
Modalità di programmazione (12)
Programma il tuo gattino afnché ripeta le sequenze che gli insegni! Premi una volta il pulsante di programmazione “P” (12). Quindi imposta
la sequenza di azioni usando i diversi pulsanti del telecomando.
Premi nuovamente il pulsante di programmazione (12) per riprodurre la sequenza, o creane una nuova premendo nuovamente i diversi
pulsanti del telecomando.
Nota: addestrare il tuo gattino non sarà sempre facile! Le funzioni di addestramento potrebbero non dare sempre buoni risultati: non ti
arrendere e continua a fare pratica nché il tuo gattino non segue le tue istruzioni!
Folge-Mir-Funktion (10)
Trainieren Sie Ihr Kätzchen, Ihnen zu folgen! Zeigen Sie auf den Kopf des Kätzchens, während es Ihnen zugewandt ist. Drücken Sie einmal
auf die “Follow me”-Taste (10) und beginnen Sie sich zu bewegen, wobei Sie die Fernbedienung immer auf den Kopf des Kätzchens
gerichtet halten. Das Kätzchen wird Ihnen folgen. Der Welpe folgt Ihnen - drücken Sie die Taste (10) noch einmal, um die Folge-Mir-Funktion
zu beenden.
Gestensteuerung (13)
Trainiere die Bewegungen deines Kätzchens mit Gesten! Drücken Sie die Gestensteuerungstaste (13) einmal.
• Nach rechts drehen: Streichen Sie mit Ihrer Hand direkt unter dem Kopf des Kätzchens von links nach rechts - das Kätzchen wird sich
nach rechts drehen.
• Nach links drehen: Streichen Sie mit Ihrer Hand direkt unter dem Kopf des Kätzchens von rechts nach links - das Kätzchen dreht sich
nach links.
• Vorwärts bewegen: Streichen Sie mit Ihrer Hand von oben nach unten über den Kopf des Kätzchens und dann vom Kätzchen weg - das
Kätzchen geht vorwärts.
• Rückwärts bewegen: Legen Sie Ihre Hand etwa 20 cm vor das Kätzchen, unterhalb des Kopfes. Bringen Sie Ihre Hand zum Kätzchen und
halten Sie sie dort, bis es beginnt, sich rückwärts zu bewegen.
Um die Gestensteuerungsfunktion zu stoppen, drücken Sie einfach erneut die Taste (13).
Programmiermodus (12)
Programmieren Sie Ihr Kätzchen so, dass es die Sequenzen wiederholt, die Sie ihm beibringen! Drücke einmal die Programmiertaste „P”
(12). Wähle dann deine Aktionsfolge mithilfe der verschiedenen Tasten auf der Fernsteuerung.
Drücke die Programmiertaste (12) noch einmal, um die Folge zu wiederholen oder um eine neue Folge zu erstellen, indem du wieder die
verschiedenen Tasten auf der Fernsteuerung drückst.
N.B. Das Training Ihres Kätzchens ist nicht immer einfach! Es kann sein, dass die Trainingsfunktionen nicht immer funktionieren. Scheuen
Sie sich also nicht, ein paar Mal zu üben und zu probieren, bevor das Kätzchen Ihren Anweisungen folgt!
Volg me-functie (10)
Train je kitten om je te volgen! Richt naar het hoofd van de kitten terwijl hij naar jou is gericht.
Druk eenmaal op de volg me-knop (10) en start met bewegen. Houd de afstandsbediening altijd naar het hoofd van de kitten gericht. De
kitten zal je volgen. - druk opnieuw op de knop (10) om de volg me-functie te stoppen.
Besturing via handgebaren (13)
Gebruik handgebaren om de bewegingen van je kitten te trainen! Druk eenmaal op de handgebaren besturingsknop (13).
• Nach rechts drehen: Streichen Sie mit Ihrer Hand direkt unter dem Kopf des Kätzchens von links nach rechts - das Kätzchen wird sich
nach rechts drehen.
• Nach links drehen: Streichen Sie mit Ihrer Hand direkt unter dem Kopf des Kätzchens von rechts nach links - das Kätzchen dreht sich
nach links.
• Vorwärts bewegen: Streichen Sie mit Ihrer Hand von oben nach unten über den Kopf des Kätzchens und dann vom Kätzchen weg - das
Kätzchen geht vorwärts.
• Rückwärts bewegen: Legen Sie Ihre Hand etwa 20 cm vor das Kätzchen, unterhalb des Kopfes. Bringen Sie Ihre Hand zum Kätzchen und
halten Sie sie dort, bis es beginnt, sich rückwärts zu bewegen.
Om de besturing via handgebaren te stoppen, druk opnieuw op de knop (13).
Programmeringsmodus (12)
Programmieren Sie Ihr Kätzchen so, dass es die Sequenzen wiederholt, die Sie ihm beibringen! Druk eenmaal op de “P”
programmeringsknop (12). Kies vervolgens je
actiescène met behulp van de verschillende knoppen op de afstandsbediening.
Druk opnieuw op de programmeringsknop (12) om de scène opnieuw te spelen of maak een nieuwe door opnieuw op de verschillende
knoppen van de afstandsbediening te drukken.
N.B. Das Training Ihres Kätzchens ist nicht immer einfach! Es kann sein, dass die Trainingsfunktionen nicht immer funktionieren. Scheuen
Sie sich also nicht, ein paar Mal zu üben und zu probieren, bevor das Kätzchen Ihren Anweisungen folgt!
Função de seguir o dono (10)
Treina o teu gatinho para te seguir! Segura o transmissor à frente do corpo, de frente para a cabeça do gatinho. Prime uma vez o botão de
seguir o dono (10) e começa a mover-te, tendo sempre o transmissor apontado para a cabeça do gatinho. O gatinho segue-te. Prime
novamente o botão (10) para parares a função de seguir o dono.
Controlo gestual (13)
Usa gestos para treinares os movimentos do teu gatinho! Prima uma vez o botão de controlo gestual (13).
• Virar para a direita: Passa a tua mão mesmo por baixo da cabeça do gatinho, da esquerda para a direita. O gatinho vira para a direita.
• Virar para a esquerda: Passa a tua mão mesmo por baixo da cabeça do gatinho, da direita para a esquerda. O gatinho vira para a
esquerda.
• Avançar: Passa a tua mão de cima para baixo e depois para longe do gatinho. Este avança.
• Retroceder: Coloca a tua mão cerca de 20 cm à frente do gatinho, por baixo da cabeça, e aproxima-a do gatinho, mantendo-a à frente do
gatinho até que ele comece a andar para trás.
Para parar a função de controlo gestual, basta premir de novo o botão (13).
Modo de programação (12)
Programe o seu gatinho para que ele repita as sequências que lhe ensinar! Prima o botão “p” de programação (12). Depois, selecione a
sequência de ação com os diferentes botões do telecomando.
Prima novamente o botão de programação (12) para repetir a sequência ou para criar uma nova, premindo novamente os diferentes botões
do telecomando.
Atenção: Treinar o teu gatinho nem sempre é fácil! As funções de treino podem nem sempre funcionar, por isso, não tenhas medo de
praticar e tentar algumas vezes antes de veres o gatinho a seguir as tuas instruções!
Le batterie ricaricabili devono essere tolte dal giocattolo prima di essere ricaricate; le batterie ricaricabili devono essere caricate unicamente con la
supervisione di un adulto; non mischiare differenti tipi di batterie o batterie nuove e usate; utilizzare unicamente batterie del tipo raccomandato o equivalenti;
inserire le batterie rispettando le polarità; rimuovere le batterie esaurite dal giocattolo; non cortocircuitare i terminali di alimentazione. Non buttare le
batterie nel fuoco. Rimuovere le batterie se non si usa il giocattolo per molto tempo. Sostituire le batterie quando il suono diventa debole o il giocattolo non
funziona. Non esporre le batterie a un calore eccessivo, ad esempio la luce del sole o un fuoco. Le batterie non ricaricabili non devono essere ricaricate.
AVVERTENZA: Il cattivo funzionamento o la perdita di memoria può essere causato da una forte interferenza di frequenza o scariche elettrostatiche. In caso
di qualsiasi funzionamento anormale, rimuovere le batterie e inserirle di nuovo.
* Tieni premuto il pulsante (per 3 secondi circa) per attivare queste funzioni.
MANUTENZIONE E GARANZIA
ADDESTRA IL TUO POWER KITTY®!
Usare un panno morbido e leggermente umido per pulire il giocattolo. Non usare detergenti. Non esporre il giocattolo alla luce solare diretta
o ad altre fonti di calore. Non immergere il giocattolo nell’acqua. Non smontare o far cadere il giocattolo. Non piegare il giocattolo.
Questo prodotto è coperto dalla nostra garanzia di 2 anni.
Per eventuali reclami coperti da garanzia o dal servizio post-vendita, contattare il vostro distributore e presentare uno scontrino valido. La
nostra garanzia copre tutti i difetti costruttivi di componentistica e di manodopera, con l’eccezione di eventuali deterioramenti che derivano
dalla non osservanza del manuale di istruzioni o dall’uso poco attento del prodotto (ad es. smontaggio, esposizione a calore e umidità,
ecc.). Si consiglia di conservare l’imballo per eventuali riferimenti futuri. Allo scopo di continuare a migliorare il nostro servizio, potremmo
implementare modiche a colori e particolari del prodotto illustrato sull’imballo.
ATTENZIONE! Articolo non adatto a bambini di età inferiore ai 3 anni. Rischio di soffocamento – Presenza di pezzi picoli.
NOTA: Conservare il manuale di istruzioni, contiene informazioni importanti.
Riferimento: KITTY01
Progettato e sviluppato in Europa – Fabbricato in Cina
Lexibook S.A.
6 avenue des Andes
Bâtiment 11
91940 Les Ulis
France
www.lexibook.com – © Lexibook®
Per i servizi di assistenza post-vendita, contattare i nostri team: www.lexibook.com
INSTRUÇÕES DE SEGURANÇA
POR FAVOR, LEIA ANTES DE UTILIZAR ESTE EQUIPAMENTO.
Antes de usar a unidade, certique-se de que com atenção todas as instruções de funcionamento. Tenha em conta que estas são
precauções gerais e podem não abranger a sua unidade.
1.Leia este manual de instruções antes de tentar ligar ou utilizar o aparelho.
2. Guarde estas instruções em bom estado. Leve todos os avisos a sério. Siga todas as instruções.
3. O aparelho não deverá ser exposto a pingos ou salpicos e não deve colocar objetos cheios de líquidos, como vasos, em cima do produto.
Use apenas em locais secos.
4. Não coloque fontes de chamas sem proteção, como velas acesas, em cima do produto.
5. As entradas de ventilação não devem ser cobertas.
6 . Utilize apenas acessórios especicados pelo fabricante.
7. Coloque a unidade onde exista uma boa ventilação. Coloque o sistema numa superfície plana, dura e estável. Não exponha a temperaturas
acima dos 40 ºC. Deixe, pelo menos, 10 cm de espaço entre a parte traseira ou superior da unidade e 5 cm de cada lado.
8. Mantenha uma distância mínima em redor do aparelho, para uma ventilação suciente.
9. Convém que a ventilação não seja perturbada pela obstrução das aberturas de ventilação por objetos como jornais, toalhas, cortinas, etc.
10. O aparelho destina-se a ser utilizado num clima temperado.
11. As pilhas devem ser eliminadas de modo adequado. Coloque-as em contentores de recolha previstos para este efeito, de modo a proteger
o ambiente.
O robô funciona com a bateria recarregável
(incluída) de 3.7V DC 600mAh
O transmissor funciona com 2 pilhas de 1.5V
AA/LR6 (não incluídas).
DESCOBRE O POWER KITTY®
1. Teclas direcionais
2. Cheirar*
3. Volume
4. Chateado*
5. Deitado*
6. Stop
7. Coreograas / Yoga*
8. Push-up*
9. Sons de animais*
10. Função de seguir o dono
11. Demo
12. Make a program
13. Controlo gestual
14. Ensina os números
15. Música / Diz olá!*
16. Senta*
17. Light effects
18. Carinhoso*
CONTEÚDO DA EMBALAGEM
Quando retirar o aparelho da caixa, certique-se de que se encontramincluídos os seguintes elementos:
1 x POWER KITTY ® robô 1 x manual de instruções 1 x transmissor 1 x cabo de carregamento USB
AVISO: Todos os materiais de empacotamento, como ta, películas de plástico, arames etiquetas não fazem parte deste brinquedo e deverão
ser eliminados para segurança dacriança.
INFORMAÇÃO ACERCA DAS PILHAS
Carregar o robô:
1. Certique-se de que a unidade está desligada.
2. Com uma chave de fendas, abra a tampa do compartimento das pilhas na parte traseira da unidade.
3. Remova delicadamente a bateria recarregável do compartimento. Retire-a apertando os dois lados do
conector. (consulte a imagem 1).
4. Insira a extremidade pequena do cabo de carregamento USB (incluído) no conector da bateria.
5. Ligue a outra extremidade do cabo USB à porta USB do seu computador
(consulte a imagem 2).
6. O indicador LED na porta USB acende quando a bateria está a carregar.
USB cable specications:
Entrada: 5.0V 2.0A
Saída: 3.7V 0.5A
O brinquedo só pode ser ligado a equipamento com o seguinte símbolo ou
Nota: Se ligar com um adaptador, use apenas um adaptador para brinquedos, que deverá ter este símbolo .
Nota: Tenha em conta que o cabo USB só pode ser usado para carregar a bateria e não serve para a transferência de dados.
Aviso: Desligue o adaptador, se o jogo não for utilizado por um longo período de tempo, para evitar o seu sobreaquecimento. Quando
o jogo for alimentado por um adaptador, não o utilize no exterior. Verique o estado do adaptador e dos os de ligação regularmente.
Se o seu estado se deteriorar, não use o adaptador até que seja reparado. O brinquedo só deve ser usado com um transformador para
brinquedos. O adaptador não é um brinquedo. A consola deverá ser des¬ligada da alimentação para ser limpa, se usar líquidos para
proceder à limpeza. O brinquedo não foi criado para crianças com menos de 3 anos de idade. Uma má utilização do transformador pode
causar um choque eléctrico.
Aviso parental: O adaptador para os brinquedos nao foi criado para ser usado como brinquedo. A sua utilização deverá ser feita sob
supervisão de um adulto.
AVISO:
- Perigo de explosão se a bateria for colocada incorrectamente. Substitua-aapenas por uma mesma bateria ou equivalente.
- A bateria não deverá ser exposta a temperaturas elevadas, como luz directa do sol, fogo ou algo semelhante.
- A interferência eletromagnética signicativa ou as descargas eletrostáticas podem causar o mau funcionamento do dispositivo ou a perda
de dados. Se o dispositivo não funcionar cor¬retamente, desligue-o e volte a ligá-lo, ou desligue o cabo USB.
- A função normal do produto pode ser interrompida devido a interferência eletromagnética. Se ocorrer esta situação, reinicie o produto para
retomar o funcionamento normal seguindo o manual de instruções. Caso a função não possa ser retomada, utilize o produto noutro local.
- O brinquedo não deve ser conectado a mais do que o número recomendado de transformadores ou fontes de alimentação.
- Para recarregar a bateria, utilize apenas a unidade de alimentação destacável fornecida com este brinquedo.
TRANSMISSOR:
Colocação ou substituição das pilhas
1. Com uma chave de fendas, desaperte o parafuso no compartimento das pilhas, na parte traseira
do transmissor.
2. Insira 2 pilhas de 1.5V AA/LR6 , tendo em conta a polaridade indicada no fundo do compartimento das pilhas
e de acordo com a imagem apresentada ao lado.
3. Feche o compartimento das pilhas e aperte o parafuso.
As pilhas recarregáveis deverão ser retiradas do brinquedo antes de serem recarregadas e só deverão ser recarregadas sob a supervisão de um adulto. Não
misture diferentes tipos de pilhas ou pilhas novas com pilhas usadas. Só deverá utilizar pilhas do mesmo tipo ou de um tipo equivalente às recomendadas. As pilhas
deverão ser colocadas com a polaridade correcta. Deverá retirar as pilhas gastas do produto. Não coloque os terminais em curto-circuito. Não atire as pilhas para
o fogo. Retire as pilhas caso não utilize a unidade durante um longo período de tempo. Quando o som carfraco ou o produto não responder, pense em
substituir as pilhas. As pilhas não deverão ser expostas a calor em excesso, como luz directa do sol, fogo ou algo parecido. As pilhas não recarregáveis
não devem ser recarregadas.
AVISO: O mau funcionamento ou perda de memória podem ser causados por fortes interferências ou descargas electrostáticas. Caso ocorra algum
funcionamento anormal, retire e volte a colocar as pilhas.
* Mantenha premido (cerca de 3 segundos) para aceder a estas funções.
MANUTENÇÃO E GARANTIA
TREINA O TEU POWER KITTY® !
Para limpar o dispositivo, utilize apenas um pano suave humidicado na agua. Não utilize nenhumproduto detergente. Não exponha o
dispositivo direitamente em frente de raios do sol ou nenhuma fonte de calor. Não molhe o dispositivo. Não desmonte ou deixe cair o dispositivo.
Este produto é abrangido pela nossa garantia de 2 anos.
Para utilizar a sua garantia ou o serviço pós-venda, por favor, contacte o seu distribuidor e apresente uma prova de compra válida. A nossa
garantia abrange qualquer defeito de material ou de mão-de-obra, com a excepção de qualquer deterioração devido à não observância do
manual de instruções, ou de quaisquer acções sem cuidado implementadas neste aparelho (como desmontar, expor ao calor e à humidade,
etc.). Recomendamos que guarde a caixa para futuras referências. Num esforço constante para melhorar os nossos serviços, podemos
implementar modicações nascores e pormenores do produto apresentado na caixa.
ATENÇÃO! Não é adequado para crianças de idade inferior a 3 anos. Perigo de engasgamento –peças pequenas.
NOTA: Por favor, guarde este manual de instruções, pois contém informações importantes.
Referência: KITTY01
Criado e desenvolvido na Europa – Fabricado na China
Lexibook S.A.
6 avenue des Andes
Bâtiment 11
91940 Les Ulis
France
www.lexibook.com – © Lexibook®
Para qualquer serviço pós-venda, por favor, contacte as nossas equipas: www.lexibook.com
SICHERHEITSHINWEISE
BITTE VOR DER INBETRIEBNAHME DIESES GERÄTES LESEN.
Bevor Sie dieses Gerät benutzen, lesen Sie bitte alle Bedienungsanleitungen sorgfältig durch. Dies sind allgemeine Vorsichtsmaßnahmen
und betreffen eventuell nicht Ihr Gerät.
1.Vor dem Anschließen oder Bedienen des Geräts sollte die Bedienungsanleitung gelesen werden.
2. Heben Sie die vorliegende Anleitung gut auf. Beachten Sie alle Warnungen. Befolgen Sie alle Anweisungen.
3. Das Gerät darf keinen tropfenden oder spritzenden Flüssigkeiten ausgesetzt werden. Es dürfen keine mit Flüssigkeiten gefüllten
Gegenstände, wie z. B. Vasen, auf das Gerät gestellt werden. Nur für den Gebrauch an trockenen Orten.
4. Es sollten keine offenen Flammen, wie z.B. brennende Kerzen, auf das Gerät gestellt werden.
5. Die Belüftung darf durch Zudecken der Lüftungsschlitze nicht behindert werden.
6. Benutzen Sie nur Zubehör, das vom Hersteller angegeben wird.
7. Stellen Sie das Gerät an einem gut belüfteten Ort auf. Stellen Sie das System auf eine ache, harte und stabile Fläche. Nicht Temperaturen
über 40°C aussetzen. Hinten am Gerät sowie über dem Gerät mindestens 10 cm Sicherheitsabstand und auf jeder Seite 5 cm frei halten.
8. Halten Sie um das Gerät herum einen Mindestabstand ein, um eine ausreichende Luftzirkulation zu gewährleisten.
9. Die Luftzirkulation darf nicht durch Bedecken der Lüftungsöffnungen durch solche Gegenstände wie Zeitschriften, Tischdecken, Vorhängen
usw. behindert werden.
10. Das Gerät ist für den Gebrauch in einem moderaten Klima vorgesehen.
11. Batterien müssen auf sichere Weise entsorgt werden. Entsorgen Sie Batterien in den hierfür vorgesehenen Sammelbehältern, um die
Umwelt zu schützen.
Der Roboter wird mit einem 3.7V 600mAh
Akku (im Lieferumfang enthalten) betrieben
Die Fernbedienung benötigt zum Betrieb
2 x 1.5V AA / LR6 Batterien
(nicht inbegriffen).
ENTEDECKEN POWER KITTY®
1. Richtungstasten
2. Schnüffeln*
3. Lautstärke
4. Wütend*
5. Geh runter*
6. Anhalten
7. Choreograen / Yoga*
8. Liegestütze*
9. Tiergeräusche*
10. Folge-Mir-Funktion
11. Demo
12. Programmierung
13. Gestensteuerung
14. Zahlen lehren
15. Musik / Sag Hallo!
16. Sitz!*
17. Lichteffekte
18. Liebevoll*
AUSPACKEN IHRES GERÄTES
Achten Sie beim Auspacken darauf, dass die folgenden Elemente enthalten sind:
1 x POWER KITTY® Roboter 1 x Bedienungsanleitung 1 x Fernbedienung 1 x USB Ladekabel
WARNUNG: Entfernen Sie das Verpackungsmaterial, wie Plastikfolien, Klebebänder, Etiketten und Befestigungsbänder aus Metall. Diese sind
nicht Bestandteil des Spiels und müssen aus Sicherheitsgründen entfernt werden, bevor Ihr Kind das Spiel benutzt.
BATTERIEHINWEISE
Auaden des Roboter :
1. Versichern Sie sich, dass das Gerät ausgeschaltet ist.
2. Zum Einlegen der Batterien das Batteriefach an der Rückseite des Gerätes mithilfe eines
Schraubendrehers öffnen.
3. Nehmen Sie den Akku vorsichtig aus dem Fach. Ziehen Sie den Stecker heraus, indem Sie beide Seiten
des Steckers zusam¬mendrücken.
4. Stecken Sie das kleine Ende des USB-Ladekabels (im Lief¬erumfang enthalten) in die
Batterieanschlussbuchse.
5. Schließen Sie das andere Ende des USB-Kabels an den USB-Anschluss Ihres Computers
(siehe Abbildung 2).
6. Die LED-Anzeige am USB-Anschluss leuchtet auf, wenn der
Adapterspezikationen:
Eingangsleistung: 5.0V 2.0A
Ausgangsleistung: 3.7V 0.5A
Das Spielzeug darf nur mit Geräten verbunden oder .
Hinweis: Wenn Sie eine Verbindung mit einem Adapter herstellen, verwenden Sie bitte nur einen Spielzeugadapter. Dieser sollte mit diesem
Symbol versehen sein .
Anmerkung: Wir weisen darauf hin, dass das USB-Kabel nur zum Auaden, jedoch nicht zur Datenübertragung verwendet werden kann.
Warnung: Ziehen Sie den Stecker des Netzadapters, wenn das Spiel für längere Zeit nicht benutzt wird, um ein Überhitzen zu verhindern. Wenn
das Spiel über einen Adapter betrieben wird, spielen Sie nicht im Freien. Prüfen Sie den Zustand des Adapters und der Verbindungska¬bel regelmäßig.
Wenn Adapter oder Kabel nicht in einwandfreiem Zustand sind, benutzen Sie den Adapter nicht, bis er repariert worden ist. Das Spielzeug darf nur mit
einem Transformator für Spielzeuge benutzt werden. Der Adapter ist kein Spielzeug. Die Konsole sollte zum Reinigen vom Netzstrom getrennt werden,
falls Flüssigkeiten zum Reinigen verwendet werden. Das Spiel¬zeug ist nicht für Kinder unter 3 Jahren geeignet. Die unsachgemäße Benutzung des
Transfor¬mators kann einen Stromschlag verursachen.
Hinweis für Eltern: Netzgeräte für Spielzeuge sind nicht dazu geeignet, als Spielzeuge benutzt zu werden. Die Benutzung muss unter ständiger
Überwachung der Eltern erfolgen.
WARNUNG:
- Explosionsgefahr bei falsch ausgewechselter Batterie. Bitte wechseln Sie die Batterie nur mit einer identischen oder ähnlichen Batterie aus.
- Die Batterie sollte keinen hohen Temperaturen wie Sonnenlicht, Feuer oder ähnlichem ausge-setzt werden.
- Schwere elektromagnetische Interferenzen oder elektrostatische Entladungen können zu Fehlfunktionen oder Datenverlust führen. Falls
das Gerät nicht ordnungsgemäß funktioniert, schalten Sie es aus und wieder ein oder ziehen Sie das USB-Kabel.
- Die normale Funktion des Produktes kann durch starke elektromagnetische Störungen bee-inträchtigt werden. Setzen Sie in diesem Fall
das Produkt zurück, um die normale Funktion wiederherzustellen. Folgen Sie hierzu der Bedienungsanleitung. Falls die normale Funktion
nicht wiederhergestellt werden kann, stellen Sie das Produkt an einer anderen Stelle auf.
- Das Spielzeug darf nicht an mehr als die empfohlene Anzahl von Transformatoren oder Netzteilen angeschlossen werden.
- Verwenden Sie zum Auaden der Batterie nur die abnehmbare Versorgungseinheit, die mit diesem Spielzeug
geliefert wird.
FERNSTEUERUNG:
Batterien einlegen oder auswechseln
1. Löse mit einem Schraubendreher die Schraube am Batteriefach an der Rückseite der Fernbedienung.
2. Lege oder wechsle zwei 1.5V AA / LR6 Batterien ein bzw. aus und achte darauf, dass die Batteriepole richtig
herum ausgerichtet sind, so wie auf dem Boden des Batteriefachs markiert und wie in dem Schaubild rechts
gezeigt.
3. Schließe das auadbare Batterien und ziehe die Schraube fest.
Nicht wieder auadbare Batterien können nicht aufgeladen werden. Auadbare Batterien müssen vor der Auadung aus dem Spielzeug genommen werden. Batterien dürfen nur
unter Aufsicht eines Erwachsenen aufgeladen werden. Unterschiedliche Batterietypen bzw. alte und neue Batterien dürfen nicht gemischt werden. Es dürfen nur solche Batterien
verwendet werden, die gleichwertig zum empfohlenen Batterietyp sind. Die Batterien müssen korrekt entsprechend der Polaritätsmarkierungen eingelegt werden. Leere Batterien
müssen aus dem Spielzeug genommen werden. Die Anschlüsse dürfen nicht kurz geschlossen werden. Batterien niemals ins Feuer werfen. Entfernen Sie die Batterien, wenn Sie
das Spielzeug für längere Zeit nicht benutzen. Wenn der Ton schwächer wird oder das Spielzeug anfängt, nicht mehr direkt zu reagieren, deutet dieses ebenfalls darauf hin, dass
es Zeit wird, neue Batterien einzusetzen. Die Batterien dürfen keinen übermäßigen Hitzequellen ausgesetzt werden, zum Beispiel Sonnenschein oder Feuer.
WARNUNG: Funktionsstörungen oder Speicherverlust können möglicherweise durch starke Frequenzstörungen oder elektrostatische Entladung verursacht
werden. Sollte es zu unnormalen Funktionen kommen, entfernen Sie die Batterien und legen Sie die Batterien wieder ein.
* Bitte lange drücken (ca. 3 Sekunden), um auf diese Funktionen zuzugreifen.
Verwenden Sie zur Reinigung des Spielzeugs nur ein weiches, leicht angefeuchtetes Tuch und niemals Reinigungsmittel. Setzen Sie das
Spielzeug nicht direkter Sonnenbestrahlung oder anderen Hitzequellen aus. Bringen Sie es auf keinen Fall mit Nässe in Berührung. Nehmen
Sie es nicht auseinander und lassen Sie es nicht fallen.
2 Jahre Garantie.
Die gesetzlichen Gewährleistungsrechte bleiben neben der Garantie bestehen. Bei Beanstandungen, die unter diese Garantie fallen oder
sollten Sie den Kundendienst benötigen, wenden Sie sich bitte an Ihren Händler und legen Sie einen gültigen Kaufbeleg vor. Unsere
Garantie deckt alle Material- und Verarbeitungsmängel ab, mit Ausnahme jeglicher Verschleißerscheinungen, die aus der Nichtbeachtung
der Bedienungsanleitung resultieren oder durch jedwede fahrlässige Handlung an diesem Produkt verursacht wurden (wie demontieren,
Hitze oder Feuchtigkeit aussetzen, usw.). Es wird empfohlen, die Verpackung für etwaige zukünftige Bezugnahmen aufzubewahren.
In dem Bemühen unsere Leistungen kontinuierlich zu verbessern, könnte es sein, dass wir Veränderungen an den Farben oder der
Produktausführung, wie auf der Verpackung abgebildet, vornehmen.
ACHTUNG! Nicht für Kinder unter 3 Jahren geeignet. Erstickungsgefahr – Kleinteile.
HINWEIS: Bitte bewahren Sie diese Bedienungsanleitung auf, da sie wichtige Informationen enthält.
Referenznummer: KITTY01
Design und Entwicklung in Europa - Hergestellt in China
Deutschland & Österreich
Für den Kundendienst wenden Sie sich bitte an unsere Teams:
savcomfr@lexibook.comt
www.lexibook.com – © Lexibook®
Lexibook S.A.
6 avenue des Andes
Bâtiment 11
91940 Les Ulis
France
VEILIGHEIDSINSTRUCTIES
GELIEVE TE LEZEN ALVORENS DIT APPARAAT TE GEBRUIKEN.
Alvorens dit apparaat te gebruiken, dient u alle gebruiksinstructies grondig te lezen. Gelieve op te merken dat dit algemene voorzorgen zijn en
misschien geen betrekking hebben op uw apparaat.
1. Lees deze gebruiksaanwijzing voordat u poogt het apparaat aan te sluiten en in gebruik te nemen.
2. Behoud deze instructies in een goede staat van dienst. Houd rekening met alle waarschuwingen. Volg alle instructies op.
3. Stel het apparaat niet bloot aan gedruppel of gespetter en plaats geen voorwerpen gevuld met vloeistoffen, zoals vazen, op het product.
Alleen op een droge locatie gebruiken.
4. De ventilatie mag niet worden belemmerd door de ventilatieopeningen af te dekken.
5. Plaats geen open vuur, zoals van kaarsen, op het product.
6. Gebruik alleen accessoires die door de fabrikant worden aanbevolen.
7. Plaats het product op een goed geventileerde plek. Plaats het system op een vlak, hard en stabiel oppervlak. Stel het product niet bloot aan
temperaturen boven 40°C. Houd minstens 10 cm afstand aan de achterkant en bovenkant en 5 cm aan iedere zijkant vrij.
8. Verwijder verbruikte batterijen op een milieuvriendelijke manier.
9. Houd een minimale afstand rond het apparaat voor voldoende ventilatie.
10. De ventilatie dient niet belemmerd te worden door het afdekken van de ventilatieopeningen door voorwerpen zoals een krant, een
tafellaken, gordijnen, etc.
11. Het apparaat is ontworpen om te worden gebruikt in een gematigd klimaat.
Uw robot werkt op de 3.7V 600mAh
oplaadbare batterij (inbe grepen)
Uw afstandsbediening werkt op
2 x 1.5V AA/LR6 batterijen
(niet inbegrepen)
UITZICHT POWER KITTY®
1. Richtingstoetsen
2. Snuif*
3. Volume
4. Boos*
5. Ga liggen*
6. Stop
7. Dansjes / Yoga*
8. Push-up*
9. Dierengeluiden*
10. Volg me-functie
11. Demo
12. Make a program
13. Besturing via handgebaren
14. Leer tellen
15. Songs / Zeg hallo!*
16. Ga zitten*
17. Lampjes
18. Aanhankelijk*
INHOUD VAN DE VERPAKKING
Bij het uitpakken, dient u na te gaan of de volgende elementen inbegrepen zijn:
1 x POWER KITTY® Roboter 1 x gebruiksaanwijzing 1 x afstandsbediening 1 x USB-laadkabel
WAARSCHUWING: Alle verpakkingsmateriaal, zoals plakband, plastic vellen, draadklemmen en labels die niet deel uitmaken van dit
apparaat dienen weggegooid te worden.
STROOMBRONNEN
De robot opladen:
1. Zorg dat het apparaat is uitgeschakeld.
2. Om de batterijen te installeren, open het batterijvak aan de achterkant van het apparaat met behulp van
een schroeven draaier.
3. Verwijder de oplaadbare batterij voorzichtig uit het vak. Ont koppel de stekker door aan weerskanten van
de connector te knijpen.
4. Steek het kleine uiteinde van de USB-oplaadkabel (inbegrepen) in de batterijconnector.
5. Sluit het ander uiteinde van de micro-USB-kabel aan op de USB-poort van je ingeschakelde computer
(zie afbeelding 2).
6. Het LED-indicatielampje op de USB-poort brandt wanneer de batterij wordt opgeladen.
Specicaties van USB-laadkabel
Ingangsvermogen: 5.0V 2.0A
Uitgangsvermogen: 3.7V 0.5A
Het speelgoed mag alleen op uitrusting worden aangesloten die het volgend symbool or .
Opmerking: Als u een adapter aansluit, gebruik dan alleen een speelgoedadapter. Deze moet voorzien zijn van het symbool .
Opmerking: Let erop dat de USB-kabel alleen kan worden gebruikt voor het laden van de accu en niet voor datatransmissie.
Waarschuwing: Koppel de adapter los als het spel gedurende een lange periode niet gebruikt zal worden, om oververhitting te vermijden. Speel
niet buiten als de console door een adapter van stroom wordt voorzien. Controleer regelmatig de toestand van de adapter en de aanslui tkabels. Als
de toestand verslechtert, gebruik de adapter niet langer totdat deze is gerepareerd. Gebruik dit speelgoed alleen met een transformator die speciek
voor speelgoed is ontworpen. De adapter is geen speelgoed. Haal de stekker uit het stopcontact als de console met vloeistof fen wordt schoongemaakt.
Het speelgoed is niet geschikt voor kinderen jonger dan 3 jaar oud. De transformator verkeerd gebruiken kan een elektrische schok veroorzaken.
Mededeling voor ouders: De adapter voor het speelgoed zijn niet bestemd om als speelgoed te worden gebruikt. Het gebruik ervan dient onder het
toezicht van een ouder te gebeuren.
WAARSCHUWING:
- Explosiegevaar wanneer de batterij verkeerd wordt vervangen. Vervang de batterij alleen door een identieke of gelijksoortige batterij.
- Stel de batterij niet bloot aan hoge temperaturen, zoals zonlicht, vuur, etc.
- Sterke elektromagnetische velden of elektrostatische ontlading kunnen een storing of een verlies van de gegevens veroorzaken. Als het
apparaat niet naar behoren werkt, schakel het apparaat uit en vervolgens opnieuw in of koppel de USB-kabel los.
- De normale werking van het product kan worden verstoord door sterke elektromagnetische straling. Als dit het geval is, reset het product
zoals beschreven in de gebruiksaanwijzing om de normale werking te hervatten. Als de normale werking niet wordt hervat, gebruik het
product in een andere ruimte.
- Het speelgoed mag niet worden aangesloten op meer dan het aanbevolen aantal transformatoren of voedingen.
- Gebruik voor het opladen van de batterij alleen de afneembare voedingseenheid die bij dit speelgoed is geleverd.
Batterijen plaatsen:
1. Om de batterijen te installeren, open het batterijvak aan de achterkant van het apparaat met behulp
van een schroeven draaier.
2. Plaats 2 x 1,5V AA/LR6 batterijen en let hierbij op de juiste polarit eit zoals aangegeven binnenin het
batterijvak.
3. Sluit het batterijvak en draai de schroef vast.
Niet-heroplaadbare batterijen kunnen niet worden heropgeladen; oplaadbare batterijen moeten uit het speelgoed worden verwijderd alvorens deze op te
laden; heroplaadbare batterijen mogen alleen onder toezicht van een volwassene worden opgeladen; verschillende types batterijen of nieuwe en oude
batterijen mogen niet onderling gebruikt worden; gebruik al leen batterijen van hetzelfde of equivalente type zoals aangeraden door de fabrikant; batterijen
moeten volgens de juiste polariteit worden ingestoken; lege batterijen moeten uit het speelgoed worden verwijderd; de toevoerterminals mogen geen
kortsluiting ondervinden. Gelieve de verpakking te bewaren als referentie voor later daar het belangrijke informatie bevat. Gooi batterijen nooit in open vuur.
Indien je het spel voor langere tijd niet zal gebruiken, neem de batterijen uit het spel. Wanneer het geluid verzwakt of het spel niet reageert, vervang dan
de batterijen. Stel de batterijen nooit bloot aan een warmtebron, zoals zonlicht of vuur.
WAARSCHUWING: Een storing of geheugenverlies kan veroorzaakt worden door een sterke frequentie-interferentie of een elektrostatische ontlading. Indien
er zich een abnormale functie voordoet, verwijder en verbindt opnieuw de batterijen.
* Druk lang (ongeveer 3 seconden) om toegang te krijgen tot deze functies.
ONDERHOUD EN GARANTIE
TRAIN JE POWER KITTY®
Om het speelgoed te reinigen, gebruik je alleen een zachte, licht vochtige doek. Alle detergenten zijn verboden. Stel het spel niet bloot aan
direct zonlicht of eender welke hittebron. Maak het spel niet nat. Haal het niet uit elkaar en laat het niet vallen.
Het product is gedekt door onze 2 jaar garantie (Europa alleen). Voor alle herstellingen tijdens de garantie of naverkoopsdienst, moet je je
richten tot de verkoper met een aankoopbewijs. Onze ga rantie geldt voor al het materiaal en de montage van de fabrikant, exclusief alle
schade veroorzaakt door het niet repsecteren van onze gebruiksaanwijzing ( zoals uit elkaar halen, blootstellen aan hitte of vochtigheid….).
Wij raden aan de verpakking te bewaren voor enige referentie in de toekomst. In onze poging voor constante verbetering, is het mogelijk dat
kleuren en details van dit product lichtjes verschillen van deze op de verpakking.
WAARSCHUWING! Niet geschikt voor kinderen jonger dan 3 jaar. Verstikkingsgevaar door de aanwezigheid van klein onderdelen.
Opmerking: gelieve deze handleiding te bewaren aangezien het belangrijke informative bevat.
Referentie: KITTY01
Ontworpen en ontwikkeld in Europa - Gemaakt in China
Voor service na verkoop, neem contact op met onze teams:
www.lexibook.com
Lexibook S.A.
6 avenue des Andes
Bâtiment 11
91940 Les Ulis
France
www.lexibook.com – © Lexibook®
PFLEGE UND GARANTIE
TRAINIEREN SIE IHREN POWER KITTY®!
KITTY01_IM Design Code: 349
leaflet Size: A3 420(W) x 297(H)mm)
Juiste verwijdering van de batterijen in dit product
(Van toepassing in landen met afzonderlijke inzamelsystemen) Dit symbool geeft aan dat het product een oplaadbare batterij bevat die
onder de Europese Richtlijn 2013/56/EU valt en niet met het gewone huisvuil weggegooid mag worden. Alle batterijen mogen niet met
het gemeentelijk huisvuil worden weggegooid en moeten naar een erkend inzamelpunt in uw gemeente worden gebracht. Door te zorgen
voor een juiste verwijdering van uw gebruikte batterijen helpt u om mogelijke negatieve gevolgen voor het milieu, en de gezondheid van
mens en dier te voorkomen. Zoek naar informatie over het inzamelsysteem voor elektrische en elektronische producten, en oplaadbare
batterijen die in uw gemeente van kracht is. Volg de geldende voorschriften in uw gemeente en gooi het product en de oplaadbare
batterijen nooit weg met het gewone huisvuil. Voor meer informatie over het weggooien van uw gebruikte batterijen, neem contact op met
uw gemeente of plaatselijk inzamelpunt.
Umweltgerechte Entsorgung der Batterien in diesem Produkt
(Gültig in Ländern mit separatem Sammelsystem) Dieses Symbol bedeutet, dass das Produkt eine wiederaufladbare Batterie enthält, die
unter die EU-Richtlinie 2013/56/EU fällt und demnach nicht mit dem normalen Haushaltsmüll entsorgt werden kann. Alle Batterien müssen
getrennt vom Hausmüll entsorgt werden, indem sie an den dafür vorgesehenen Sammelstellen abgegeben werden. Die umweltgerechte
Entsorgung Ihrer Altbatterien trägt dazu bei, mögliche negative Auswirkungen auf die Umwelt oder die Gesundheit von Mensch und Tier
zu verhindern. Informieren Sie sich über Ihre örtlichen Sammelstellen für elektrische und elektronische Geräte und wiederaufladbare
Batterien. Befolgen Sie die örtlichen Vorschriften und entsorgen Sie das Produkt und wiederaufladbare Batterien niemals mit dem
normalen Hausmüll. Für weitere Informationen zur Entsorgung Ihrer Altbatterien wenden Sie sich bitte an Ihre Stadtverwaltung oder
einen Wertstoffhof.
Eliminação correta das baterias neste produto
(Aplicável em países com sistemas de recolha em separado) Este símbolo significa que o produto contém uma bateria recarregável
abrangida pela Diretiva Europeia 2013/56/EU que não pode ser eliminada juntamente com o lixo doméstico comum. Todas as baterias
deverão ser eliminadas em separado do lixo doméstico comum através de instalações de recolha nomeadas pelo governo ou pelas
autoridades locais. A eliminação correta das suas baterias antigas ajuda a evitar consequências potencialmente negativas para o
ambiente, animais e saúde humana. Informe-se sobre o sistema de recolha em separado para produtos elétricos e eletrónicos e baterias
recarregáveis. Siga as regras locais e nunca elimine o produto nem as baterias recarregáveis juntamente com o lixo doméstico comum.
Para informações mais detalhadas acerca da eliminação de baterias antigas, contacte as autoridades locais ou o centro de eliminação
de resíduos.
Smaltimento corretto delle batterie di questo prodotto
(Applicabile nei Paesi con sistemi di raccolta differenziata) Questo simbolo indica che il prodotto contiene una batteria ricaricabile coperta
dalla direttiva europea 2013/56/EU che non può essere smaltita insieme ai rifiuti domestici indifferenziati. Tutte le batterie devono essere
raccolte separatamente dai rifiuti domestici tramite gli appositi punti di raccolta messi a disposizione dalle autorità nazionali o locali. Lo
smaltimento corretto delle batterie contribuisce a evitare potenziali conseguenze negative per l’ambiente, gli animali e la salute umana.
Informarsi sui sistemi di raccolta differenziata locali per prodotti elettrici ed elettronici e batterie ricaricabili. Rispettare le normative locali
e non smaltire il prodotto e le batterie ricaricabili insieme ai rifiuti domestici indifferenziati. Per informazioni dettagliate sullo smaltimento
delle batterie, contattare le autorità locali o un centro di smaltimento dei rifiuti.
Interfaccia tattile:
reagisce e inizia a
ballare quando gli
accarezzi la testa!
ON / OFF
Tátil, ele reage
quando zer
festinhas na cabeça
e começa a dançar!
ON / OFF
Reagiert auf
Berührung, wenn
Sie seinen Kopf
streicheln und
anfangen zu
tanzen!
ON / OFF
Hij reageert als
je zijn kop aait en
begint te dansen!
ON / OFF
1.5V AA/LR6
1.5V AA/LR6
1.5V AA/LR6
1.5V AA/LR6
1.5V AA/LR6
1.5V AA/LR6
1.5V AA/LR6
1.5V AA/LR6
KITTY01_IM2254_349_V13.indd 2
19/6/2024 5:01 PM
19/6/2024 5:01 PM


Produkt Specifikationer

Mærke: Lexibook
Kategori: Legetøj
Model: Power Kitty KITTY01

Har du brug for hjælp?

Hvis du har brug for hjælp til Lexibook Power Kitty KITTY01 stil et spørgsmål nedenfor, og andre brugere vil svare dig