PL – METALOWY ROWER BIEGOWY – INSTRUKCJA OBSŁUGI
Rowerek biegowy przeznaczony jest do zabaw na świeżym powietrzu. Doskonale wpływa na
kondycję dziecka, rozwija koordynację ruchową, uczy równowagi, co ułatwi późniejszą
przesiadkę na 'prawdziwy' rower lub hulajnogę.
Przed rozpoczęciem użytkowania produktu zapoznaj się z treścią instrukcji, zachowaj ją do
późniejszego wykorzystania. Przestrzeganie jej zapewni bezpieczne korzystanie z rowerku
oraz wpłynie na jego żywotność. Pojazd jest rekomendowany dla dzieci powyżej 2 roku życia
aczkolwiek zaleca się zachowanie szczególnej ostrożności w stosunku do dzieci w wieku
poniżej 36 miesiąca życia z uwagi na ryzyka związane z obecnością narzędzi i drobnych części
wykorzystywanych podczas montażu, który winien być dokonywany przez osobę dorosłą.
Użytkowanie roweru jest dopuszczalne wyłącznie pod nadzorem osoby dorosłej. Korzystanie
z tego produktu wymaga posiadania określonych umiejętności i wiedzy. Z produktu należy
korzystać stosownie do wieku i wyłącznie zgodnie z jego przeznaczeniem.
Ważne informacje: Przeczytaj poniższą instrukcję przed przystąpieniem do montażu
i użytkowania rowerka. Rowerek należy użytkować na płaskich, pozbawionych przeszkód
powierzchniach. Siodełko powinno być ustawione w taki sposób aby dziecko miało styczność
z podłożem całą powierzchnią stopy.
OSTRZEŻENIA!: Nie używać w ruchu ulicznym, w pobliżu zbiorników wodnych, schodów,
stromych powierzchni i innych miejsc mogących stwarzać ryzyko wypadku. Podczas
korzystania z pojazdu konieczny jest stały nadzór osoby dorosłej. Podczas jazdy należy
korzystać z dodatkowych środków ochrony tj.: kask, rękawiczki, ochraniacze na łokcie
i kolana. Rowerek jest przeznaczony dla jednego użytkownika o wadze maksymalnej nie
przekraczającej 28 kg (nie należy przeciążać rowerka). Zestaw zawiera małe części. Występuje
ryzyko zadławienia. Podczas użytkowania pojazdu należy zachować szczególną ostrożność.
Aby uniknąć upadków lub zderzeń powodujących zranienie użytkownika lub osób trzecich,
niezbędna jest asekuracja przez osobę dorosłą, szczególnie w początkowych etapach
użytkowania. Rowerek nie posiada hamulca. Rowerek jest dostarczony w stanie rozłożonym.
Przed przystąpieniem do montażu rowerka sprawdź kompletność zestawu oraz czy
poszczególne części nie uległy uszkodzeniu w transporcie. Regularnie sprawdzaj spasowanie
wszystkich połączeń śrubowych przed jazdą. W przypadku pęknięć lub uszkodzeń części
rowerka – niezwłocznie wymień je na nowe.
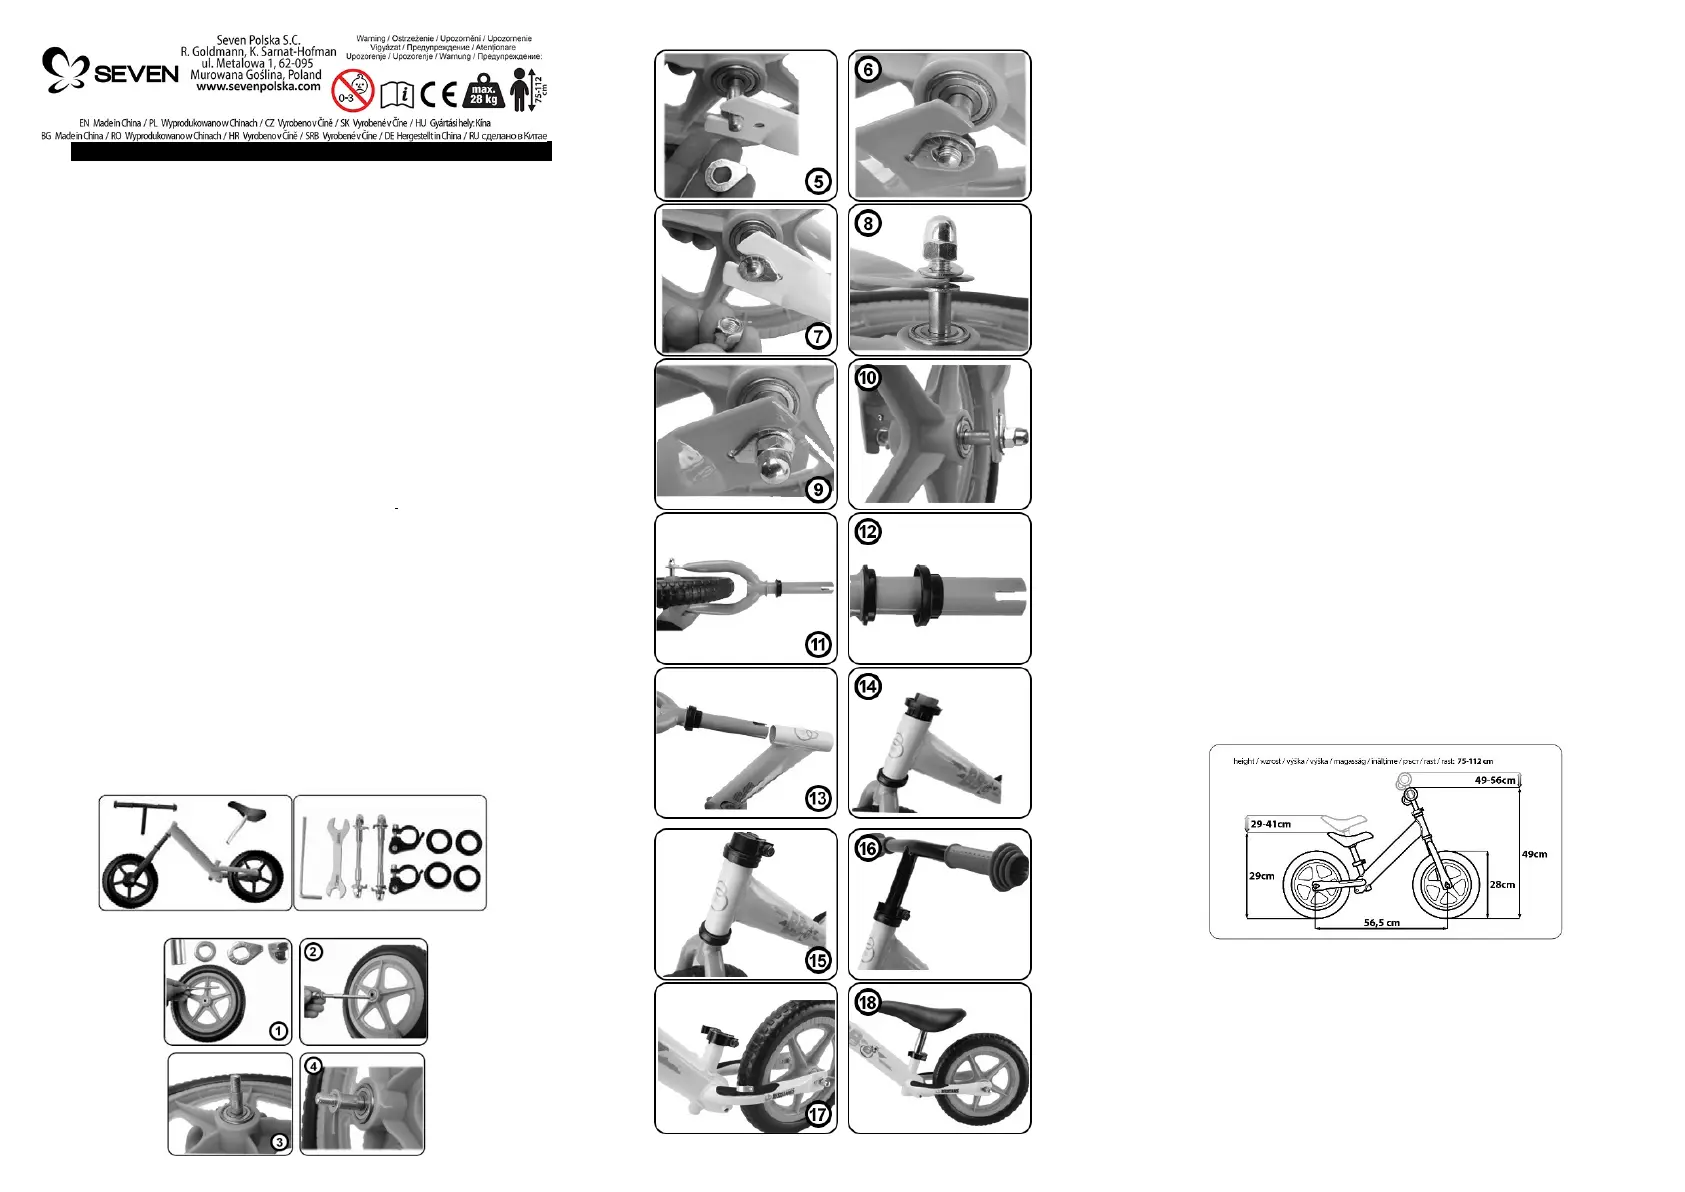
Zawartość zestawu:
Rama / Kierownica / Widelec / Obejmy sidełka i kierownicy (2 sztuki)
Koła (2 sztuki) / Plastikowe podkładki do kierownicy (2 x 2 sztuki) / Siodełko
Elementy osi przedniego i tylnego koła (oś – 2 sztuki, tulejki dystansowe – 4 sztuki, podkładki
– 4 sztuki, , podkładki blokujące – 4 sztuki, nakrętki – 4 sztuki)
Schemat montażu:
Instrukcja montażu:
W zestawie znajdują się niezbędne do montażu klucze.
Montaż kół (analogicznie przednie jak i tylne koło):
1.W otwór piasty koła należy włożyć oś tak aby po obu stronach wystawała w równej długości
(ZDJĘCIE NR 2),
2. Z obu stron osi umieść tulejki dystansowe (ZDJĘCIE NR.3) a następnie okrągłe podkładki
(ZDJĘCIE NR 4),
3. Wsuń koła wraz z umieszczonymi elementami osi w miejsca mocowania na widelcach
(ZDJĘCIE NR 5),
4. Umieść podkładkę blokującą po zewnętrznych stronach na widelcach tak aby element
blokujący podkładki znajdował się w otworze obok miejsca mocowania (ZDJĘCIE NR 6 i 7),
5.Nałóż nakrętki na gwinty osi obu kół i mocno dokręć (ZDJĘCIE NR 8,9,10),
Montaż widelca i siodełka do ramy:
1. Umieść plastikową podkładkę z niskim rantem na górnej części przedniego widelca – szerszą
stroną do dołu (ZDJĘCIE NR 11),
2. Umieść plastikową podkładkę z wysokim rantem na górnej części przedniego widelca, tak
aby obie podkładki na siebie nachodziły (ZDJĘCIE NR 12),
3. Włóż widelec w otwór ramy i maksymalnie dociśnij (ZDJĘCIE NR 13),
4. Umieść plastikową podkładkę z wysokim rantem na wystającej części widelca (węższą
średnicą do dołu) i maksymalnie dociśnij (ZDJĘCIE NR 14),
5. Umieść plastikową podkładkę z niskim rantem na wystającej części widelca tak aby obie
podkładki na siebie nachodziły (ZDJĘCIE NR 14),
6. Umieść obejmę na wystającej części widelca (ZDJĘCIE NR 15),
7. Włóż kierownicę w otwór widelca (zwróć uwagę na oznaczenia minimalnej głębokości
wsadu na kierownicy) i upewnij się że jest prosto ułożona w stosunku do przedniego koła.
Zaciśnij metalową obejmę tak aby uniemożliwić jej swobodne otwarcie (ZDJĘCIE NR 16),
8.Umieść obejmę na wystającej części ramy przeznaczonej do mocowania siodełka (ZDJĘCIE
NR 17),
9.Włóż sztycę siodełka w otwór ramy (zwróć uwagę na oznaczenia minimalnej głębokości
wsadu na sztycy) i upewnij się że siodełko jest prosto ułożone w stosunku do ramy. Zaciśnij
metalową obejmę tak aby uniemożliwić jej swobodne otwarcie (ZDJĘCIE NR 18),
Regulacja wysokości siodełka i kierownicy:
Rowerek posiada regulację wysokości siodełka w zakresie od 29 do 41 cm oraz kierownicy
w zakresie od 49 do 56 cm. Do regulacji siodełka i kierownicy służą metalowe obejmy. Aby
zmienić wysokość siodełka i kierownicy należy postępować według poniższej instrukcji:
1.Odblokuj metalową obejmę poprzez otworzenie zacisku,
2. Dopasuj odpowiednią wysokość siodełka i kierownicy do wzrostu dziecka. Zwróć uwagę na
oznaczenia minimalnej głębokości wsadu znajdujące się na sztycy siodełka i kierownicy.
Upewnij się że siodełko i kierownica są prosto ułożone w stosunku do ramy.
3. Zablokuj metalową obejmę poprzez zamknięcie zacisku tak aby uniemożliwić jej swobodne
otwarcie.
Czyszczenie i konserwacja: Rowerek należy czyścić lekko wilgotną szmatką lub gąbką. Nie
stosować detergentów i rozpuszczalników. Należy chronić produkt przed wilgocią oraz
wysokimi i bardzo niskimi temperaturami. Regularnie sprawdzaj stan ogumienia pojazdu.
Jeżeli występują pęknięcia, opony są zużyte, koniecznie wymień je na nowe aby nie zagrażały
bezpieczeństwu dziecka. Regularnie sprawdzaj stan połączeń śrubowych, wszystkie elementy
powinny być dobrze spasowane oraz dokręcone. Do transportu używaj oryginalnego kartonu.
Deklaracja: Seven Polska deklaruje że produkt jest zgodny z wymaganiami normy EN 71.