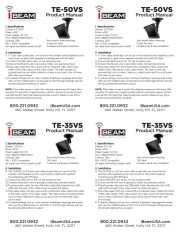
Metra TE-50VS Manual
| Mærke: | Metra |
| Kategori: | Bilradio |
| Model: | TE-50VS |
Har du brug for hjælp?
Hvis du har brug for hjælp til Metra TE-50VS stil et spørgsmål nedenfor, og andre brugere vil svare dig
Bilradio Metra Manualer
6 Oktober 2025
6 Oktober 2025
5 Oktober 2025
5 Oktober 2025
5 Oktober 2025
5 Oktober 2025
5 Oktober 2025
Bilradio Manualer
- Mercedes-Benz
- MTX Audio
- Kicker
- AKAI
- Impulse
- Xomax
- Marquant
- Dual
- RetroSound
- Autovision
- Nedis
- Mac Audio
- Caliber
- Ultimate
- Mini
Nyeste Bilradio Manualer

6 Januar 2026

3 Januar 2026

2 Januar 2026

29 December 2026

29 December 2026

29 December 2026

28 December 2025

28 December 2025

28 December 2025

28 December 2025