Different Control Methods - You may control with the following input
1.) Wired mouse and keyboard set
2.) 2.4GHz USB wireless mouse and keyboard set
MINIX NGC-1 MINIX NGC-1 是一款性能强大的超小型迷你台式电脑。 重新
定义了台式电脑,因为其小巧的外形使其成为世界上最小的台式电脑。
MINIX NGC-1 128GB 4GB DDR3L Windows 10内置 存储、 内存、 ,
这些应用保证了 强大的性能。MINIX NGC-1
更多的相关信息请访问官方论坛: 。MINIX www.minixforum.com
您可以通过以下输入设备操控 MINIX NGC-1 :
没有 明确的书面许可,禁止以任何形式或通过任何途径将此指南的 任何部分MINIX
包括产品和软件描述,复制、传播、转录、存储进检索系统或 翻译成任何语言;
MINIX MINIX MINIX和 的标识是 科技的商标。所有其他标志或商标均为它们各自
此指南内容在一些细节上可能与产品或它的软件不同。本文件中的所有 信息可做更改,
Vielen Dank für Ihren Kauf des MINIX NGC-1.
Bitte folgen Sie dieser Anleitung zur Einrichtung Ihres Geräts.
Der NGC-1 ist ein ultrakompakter lüfterlos Intel Braswell Mini Desktop PC mit einer Vielzahl
an Möglichkeiten. Der NGC-1 definiert den Desktop PC neu - mit seinem Minute-Formfaktor
ist er damit einer der weltweit kleinsten Desktop PCs.
Mit 128 GB eingebautem M2 SSD Massenspeicher, 4 GB DDR3L Arbeitsspeicher und
Windows 10 ist der NGC-1 Lüfterlos Mini PC sofort einsatzbereit.
Weitere Hinweise, Tipps und nützliche Informationen finden Sie im offiziellen
MINIX Forum: www.minixforum.com
Diverse Möglichkeiten der Bedienung
Sie können Ihren MINIX mit folgenden Eingabegeräten
2.) 2,4GHz USB Funktastatur- und -maus Set
Copyright © 2016 MINIX Tech. Alle Rechte vorbehalten.
Kein Teil dieses Handbuchs, einschließlich der darin beschriebenen Produkte
und Software, darf in irgendeiner Form oder mit irgendwelchen Mitteln
vervielfältigt, übertragen, überschrieben, in einem Daten- abfragesystem
gespeichert oder in irgendeine Sprache übersetzt werden, ohne die
ausdrückliche schriftliche Genehmigung von Minix, außer durch den
Käufer zum Zweck der Datensicherung.
MINIX und das MINIX Logo sind Warenzeichen von MINIX Tech.
Alle anderen Marken- und Warenzeichen sind Eigentum ihrer jeweiligen Inhaber.
Der Inhalt dieser Anleitung kann sich in einigen Details von dem
Produkt oder seiner Software unterscheiden. Alle Informationen in
diesem Dokument können sich ohne vorherige Ankündigung ändern.
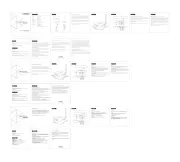
MINIX connects to your TV or PC monitor through an HDMI port
that delivers both audio and video. Before you setup NGC-1, look at the ports
on the side/back of your TV or PC monitor to ensure you have the right cable:
- HDMI cable: You can connect NGC-1 to a HDTV or home theater
receiver that has a HDMI port, using the HDMI cable for video and audio.
Step 1: Connecting the cable
1. Connect one end of the HDMI cable to the HDMI port of your TV or PC monitor.
2. Connect the other end of the cable to the HDMI port of NGC-1.
Step 2: Connecting the power
- Connect the 12V power adapter supplied in the package to the relevant port.
Press and hold the power button for 1-2 seconds to power on NGC-1, the
blue power LED should then glow.
Step 3: Turn on your TV / PC monitor and select the input
- Simply turn on your TV or PC monitor and select the corresponding HDMI port
High-Definition TV or PC monitor - That can display 720p, 1080p or 4k video with
HDMI Cable - To connect NGC-1 to your TV or PC monitor (HDMI cable included).
Wireless Network - A wired network cable or an 802.11 a, b, g, or ac Wi-Fi wireless
network (wireless video streaming requires 802.11n or ac), your wireless network
Die LED leuchtet bei eingeschaltetem MINIX NGC-1.
Um den MINIX NGC-1 einzuschalten, drücken Sie für 1-2 Sekunden den
EIN/AUS Schalter, bis die Power LED leuchtet. Um den MINIX NGC-1
auszuschalten, drücken Sie den EIN/AUS Schalter, bis Sie über das Display
aufgefordert werden, dies zu bestätigen. Bestätigen Sie dies nun ODER
halten Sie den EIN/AUS Schalter für 8 Sekunden gedrückt,
um das Ausschalten zu erzwingen, bis die LED erlischt.
Verbinden Sie ein externes Audiogerät, z.B. Kopfhörer oder Lautsprecher.
Erweitern Sie den Speicherplatz oder greifen Sie auf Dateien auf einer
SD/MMC Speicherkarte zu, unterstützt werden Karten bis max. 256GB.
Verbinden Sie den MINIX NGC-1 mit dem HDMI Port eines HD-fähigen
TV Geräts oder Monitors mittels eines HDMI Kabels.
Um den MINIX zu benutzen, brauchen Sie Folgendes:
High Definition TV / PC Monitor
Ein HD-fähiges TV Gerät oder PC Monitor, welches 720p , 1080p or 4K
Video wiedergeben kann mit einem freien HDMI Eingang.
Ein HDMI Kabel, um den MINIX NGC-1 mit Ihrem TV zu verbinden.
Ein Netzwerkkabel als Verbindung zu Ihrem Router oder
ein 802.11 a, b, Wi-Fi Netzwerk (Wireless Video Streaming
benötigt 802.11 n oder ac), den Namen und das Passwort Ihres WLANs.
Einrichten des MINIX NGC-1
Der MINIX wird über den HDMI Port mit Ihrem HDMI-fähigen
TV oder PC Monitor verbunden, wobei sowohl Bild als auch Ton mittels eines
HDMI Kabels übertragen werden. Bevor Sie den MINIX NGC-1 einrichten,
prüfen Sie bitte die seitlichen/hinteren Anschlüsse Ihres TV / PC Monitors,
um sicher zu gehen, dass Sie das richtige Kabel haben:
- HDMI Kabel: Sie können den MINIX NGC-1 damit mit einem HDTV
Gerät oder Home Theater Receiver mit HDMI Anschluss verbinden,
das HDMI Kabel überträgt sowohl Bild als auch Ton.
Schritt 1: Verbinden der Kabel
1. Verbinden Sie ein Ende des HDMI Kabels mit dem HDMI Anschluss
2. Verbinden Sie das andere Ende des HDMI Kabels mit dem HDMI Anschluss
Schritt 2: Anschließen der Stromquelle
Verbinden Sie das mitgelieferte 12V Netzteil mit dem MINIX NGC-1. Drücken
Sie für 1-2 Sekunden den EIN/AUS Schalter, um den MINIX NGC-1 zu starten,
bis die blaue Power LED leuchtet, .
Schritt 3: Anschalten des TV / Monitors und Wahl des Eingangs
Schalten Sie einfach Ihr TV Gerät oder Ihren PC Monitor an und wählen Sie den
entsprechenden HDMI Port aus, an dem Ihr MINIX NGC-1 angeschlossen ist.
MINIX NGC-1 1-2开机时按住电源键保持 秒直到电源指示灯亮起。关机
时按住电源键,显示器会提示出确认关闭对话框,选择 确认关闭,或OK
耳机接口 连接到一个外部音频输出设备如耳机或喇叭。
可增大存储容量或直接从 卡读取文件,支持扩充到的最大容量SD/MMC
用一根 线连接 到高清电视或电脑显示器的 接HDMI MINIX NGC-1 HDMI
连接外部设备,如闪存驱动器、无线键盘鼠标接收器、 鼠USB USB USB
将包装内提供的 电源适配器连接到此端口。 操作所需12 V MINIX NGC-1
电流低于 但是考虑到您需要连接其他牵引功率的外部设备(如外接硬1A,
要使用 以下是您需要准备的:MINIX NGC-1,
一个高清电视或电脑显示器,可以显示 或 视频和至少一个720p,1080p 4K
一根 排线用于 与电视连接。HDMI MINIX NGC-1
一个 或者 无线网络(无线视频流需要802.11 a, b, g,n ac Wi-Fi 802.11n or ac)
通过 端口将 与电视或电脑显示器相连接,传输音 频、视频。HDMI MINIX NGC-1
在设置 之前,查看您的电视或电脑显示器侧 面/背面的端口,MINIX NGC-1
- 排线: 用一根 排线将 与有 端口 的高清电视HDMI HDMI MINIX NGC-1 HDMI
1. HDMI HDMI将 排线的一端与电视/电脑显示器的 端口相连接。
2. MINIX NGC-1 HDMI将排线的另一端与 的 端口相连接。
步骤 连接电源 将包装中提供的 电源适配器与此端口相连,按住电源键秒,2: 12V 1-2
当电源 指示灯变亮时 开机完成。MINIX NGC-1
打开电视或电脑显示器,选择对应的 端口连接到HDMI MINIX NGC-1.
Verbinden Sie externe USB Geräte mit dem MINIX NGC-1, wie USB-
Speichersticks, Empfänger für kabellose Tastatur und Maus, USB Maus,
Empfänger von kabellosen Kopfhörern, etc ..
Verbinden Sie das im Lieferumfang enthaltene 12 V Netzteil mit diesem
Eingang. Der MINIX NGC-1 benötigt selbst weniger als 1A, dennoch haben
wir ein bis 3A ausgelegtes 12 Volt Netzteil beigefügt, um auch externe
stromhungrige Geräte, wie z.B. Festplatten, mit genügend Power zu versorgen..
Alternativ zum Wi-Fi Anschluss können Sie diesen LAN Anschluss mit
Ihrem Netzwerk per LAN-Kabel für den Zugang zum Internet verbinden.
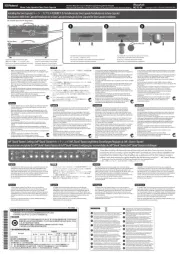
Multi-Language Setup Guide
Intel Braswell Fanless Mini PC
Quad Core Celeron N3150 Processor
802.11ac Dual Wi-Fi (2.4GHz/5.0GHz), Bluetooth 4.2
Mini DP + HDMI™ 1.4, up to 4K @30fps
Via HDMI™ 1.4, 3.5mm stereo jack, optical SPDIF
USB 3.0 port x 3, microphone & headphone jack (combined)
DC 12V, 3A adapter included (CE, FCC certified)
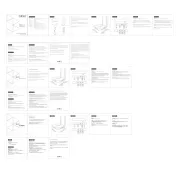
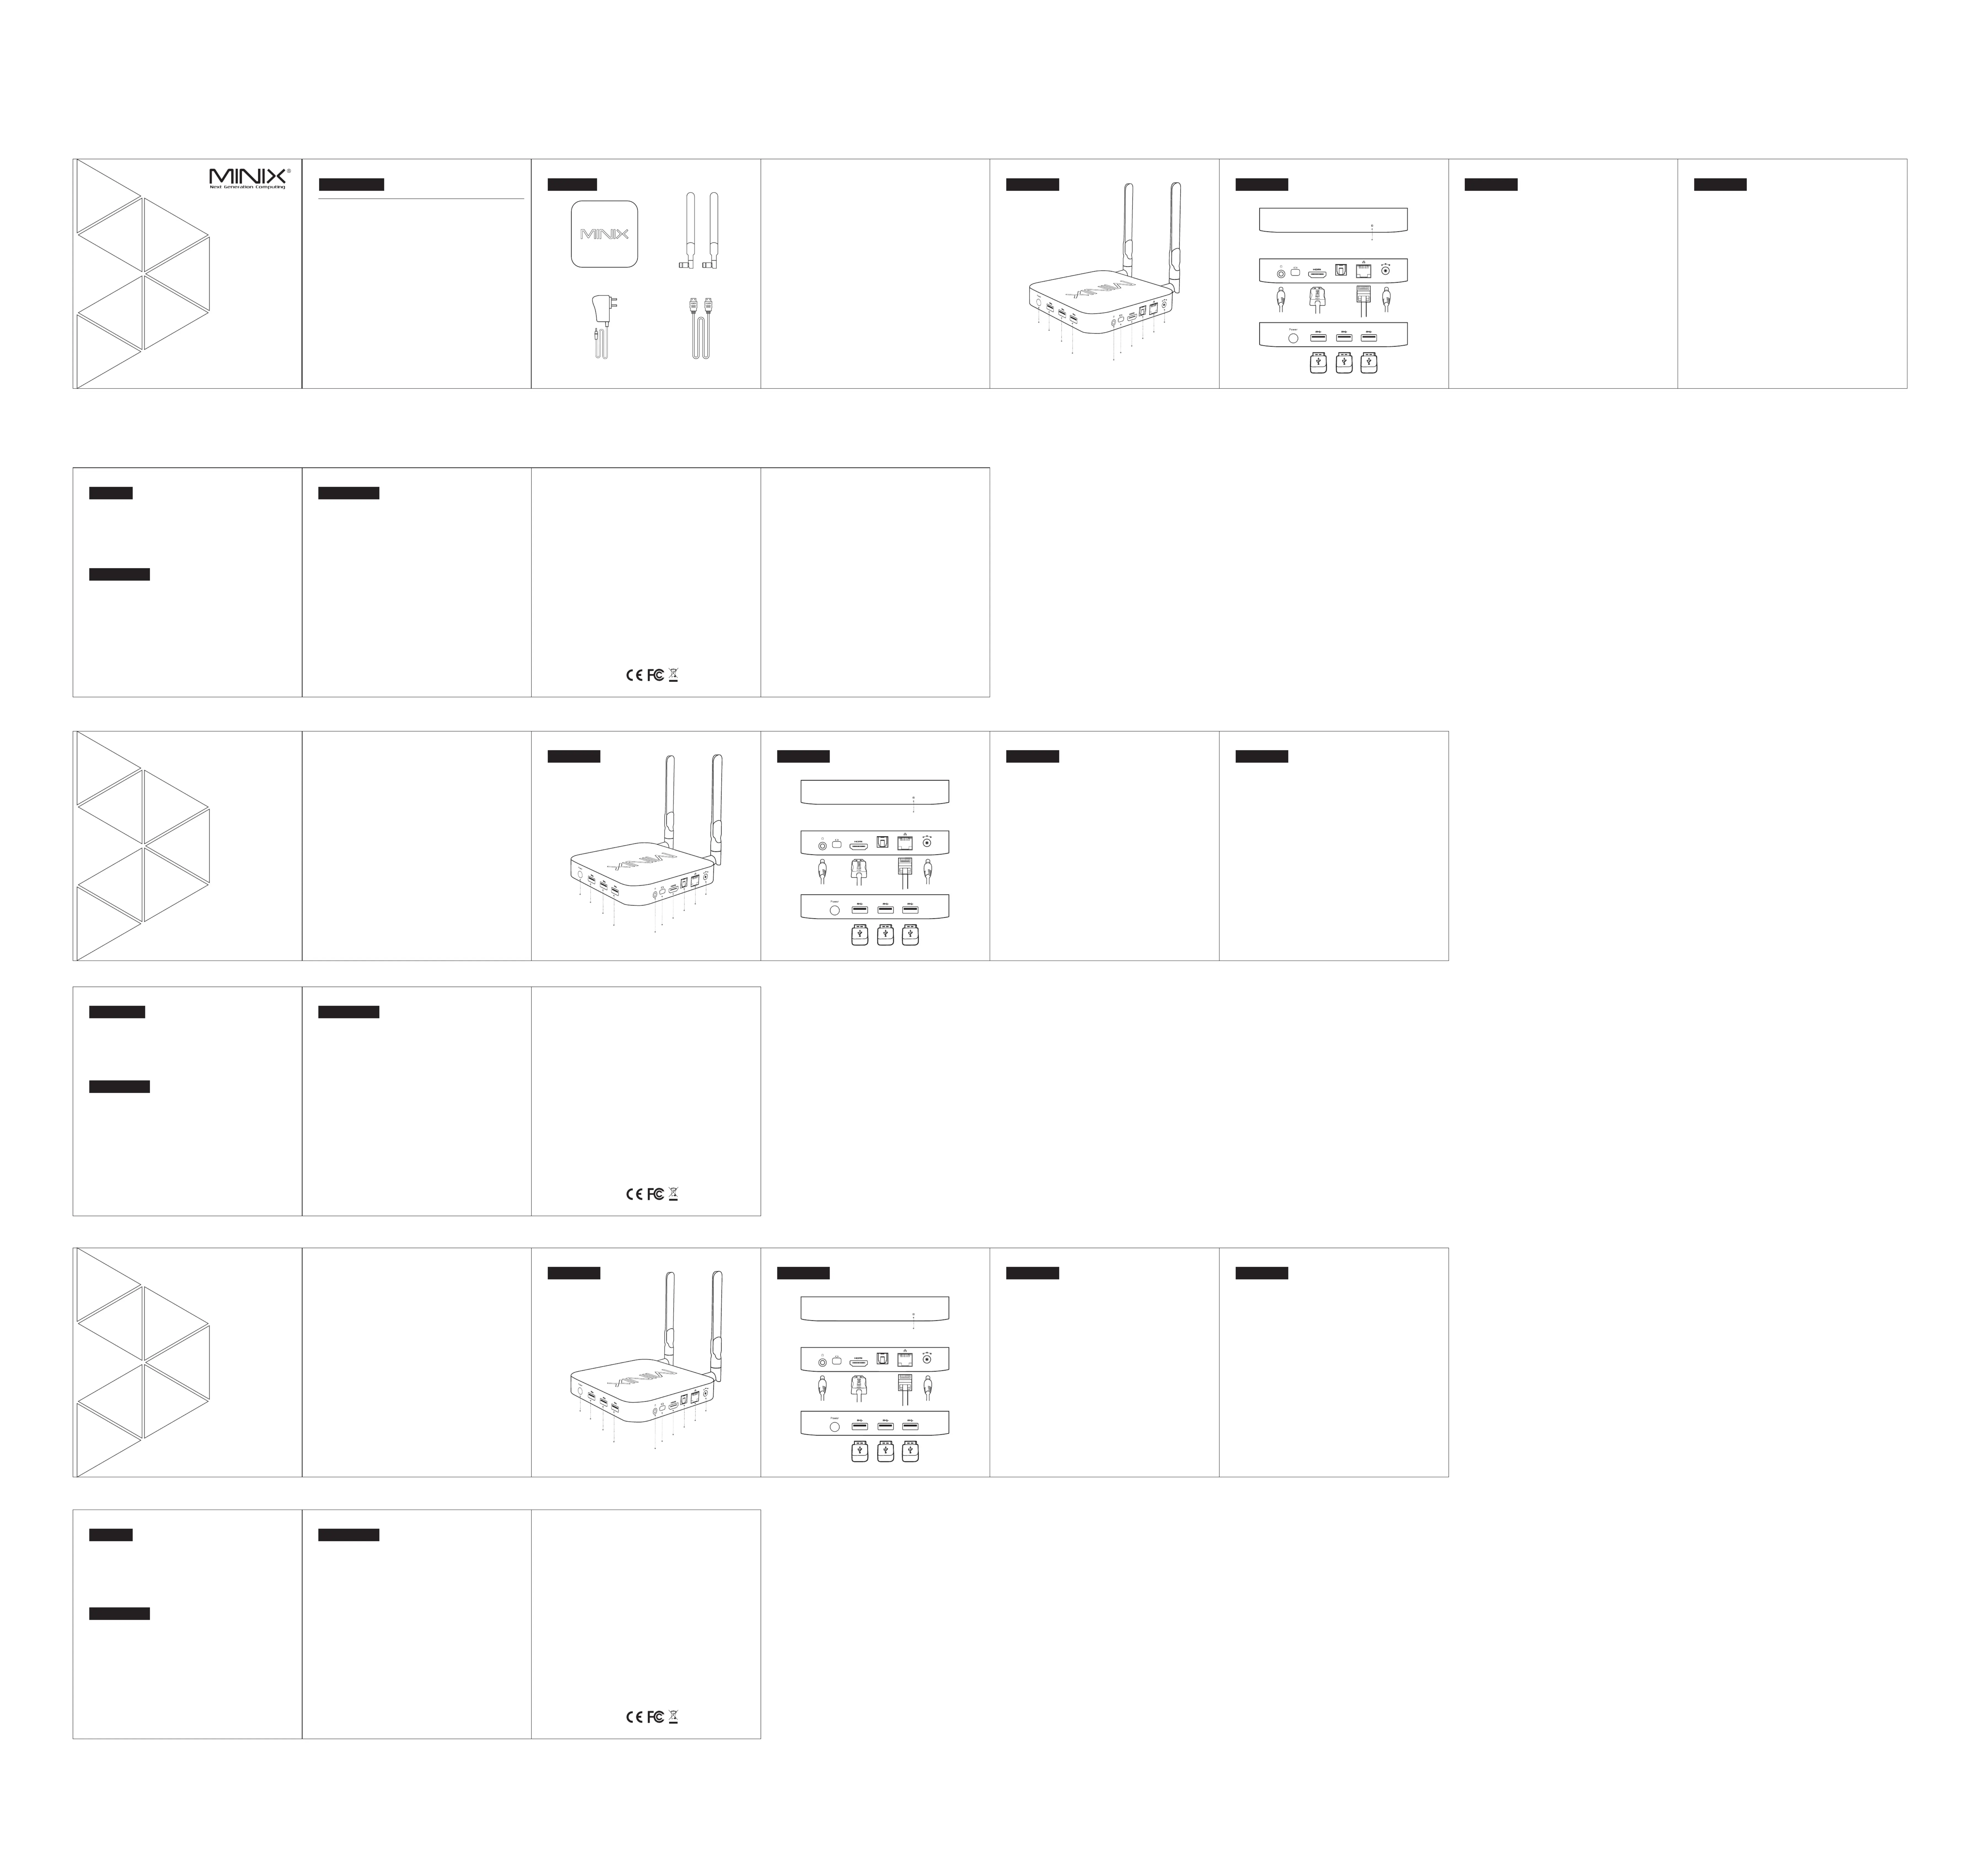
Ethernet Jack - Connect the Ethernet cable for internet access.
DC 12V Power-in Jack - Connect the 12V power adapter supplied in the package
to this port. NGC-1 requires less than 1A to operate, however the included
power adapter provides 3A, in consideration that you may require extra to
connect other power-drawing external devices such as an external hard drive.
USB 3.0 Ports - Connect an external USB device to NGC-1, such as USB flash drive,
receiver of wireless keyboard and mouse, USB wired mouse, receiver of wireless
HDMI port - Connect NGC-1 to the HDMI port of a high-definition TV or PC monitor
Thank you for purchasing the MINIX NGC-1.
NGC-1 Intel Braswell Fanless Mini PC is an ultra-compact mini desktop PC
that packs an incredible amount of power, delivering optimal performance
far beyond its small footprint.
Combining 128GB of M2 SSD built-in storage, 4GB of DDR3L memory and
Windows 10 ensures NGC-1 Intel Braswell Fanless Mini PC is ready to run out of
More hints, tips and useful information can be found on the official MINIX
Forum: www.minixforum.com
Power LED - The power LED glows blue when is on.
Power button - To power on NGC-1, press and hold the power button for
1-2 seconds until the power LED glows. To power off NGC-1, press and hold
the power button for 8 seconds to force power off or closed down the system
Micro SD card slot - Increase the storage size or read files directly from
a Micro SD card, supports up to 256GB max.
Earphone Jack - Connect to an external audio output device such as headphones etc...
Copyright © 2016 MINIX Tech. All rights reserved.
No part of this guide, including the products and software described in it, may be reproduced,
transmitted, transcribed, stored in a retrieval system, or translated into any language in any form
or by any means, except documentation kept by the purchaser for backup purposes, without
the express written permission of MINIX.
MINIX and the MINIX logo are trademarks of MINIX Technology Limited.
All other marks and trademarks are properties of their respective owners.
The content of this guide may differ in some details from the product or its software.
All information in this documentation is subject to change without notice.
Note: This equipment has been tested and found to comply with the limits for a Class B digital
device, pursuant to part 15 of the FCC Rules. These limits are designed to provide reasonable
protection against harmful interference in a residential installation. This equipment generates,
uses and can radiate radio frequency energy and, if not installed and used in accordance
with the instructions, may cause harmful interference to radio communications. However,
there is no guarantee that interference will not occur in a particular installation. If this equipment
does cause harmful interference to radio or television reception, which can be determined
by turning the equipment off and on, the user is encouraged to try to correct the interference
by one or more of the following measures:
- Reorient or relocate the receiving antenna.
- Increase the separation between the equipment and receiver.
- Connect the equipment into an outlet on a circuit different from that to which the receiver
- Consult the dealer or an experienced radio/TV technician for help. Modifications not expressly
approved by the manufacturer could void the user’s authority to operate the equipment under
MINIX NGC-1 2 x Dual-Band Antenna
Eingang Netzteilkabel 12V