ZRT-106
Radiatortermostat
TEKNISK DATA
Strömkälla, batteri 3V – 2 x AA
Frekvens Z-Wave (868,42 MHz)
Räckvidd upp till 30 m
Passar radiatorventil M30 x 1,5 (Danfoss RAV/RA/RAVL)
Temperatur inställningsområde 5–35 °C i steg om 0,5°C
IP klassicering Inomhusbruk
Mått (B x H x D) Ø 56 x 85 mm
SVENSKA
NEXA AB, DATAVÄGEN 37B, 436 32 ASKIM, SWEDEN
info@nexa.se | www.nexa.se
SÄKERHET OCH INFORMATION
Räckvidd inomhus: upp till 30 m (optimala förhållanden).
Räckvidden är starkt beroende av lokala förhållanden, till exempel
om det finns metaller i närheten. Exempelvis har den tunna
metallbeläggning i energiglas med låg emissivitet negativ inverkan
på radiosignalernas räckvidd. Det kan finnas begränsningar
för användningen av enheten utanför EU. Om tillämpligt bör du
kontrollera att enheten överensstämmer med lokala föreskrifter.
Livsuppehållande utrustning: Använd aldrig Nexas produkter
till livsuppehållande utrustning eller andra apparater där fel eller
störningar kan få livshotande följder.
Störningar: Alla trådlösa enheter kan drabbas av störningar som
kan påverka prestandan och räckvidden. Det minsta avståndet
mellan två mottagare bör därför vara åtminstone 50 cm
Reparation: Försök inte att reparera produkten. Den innehåller inga
reparerbara delar.
Vattentäthet: Produkten är inte vattentät. Se till att den alltid är
torr. Fukt gör att elektroniken inuti fräts sönder och kan leda till
kortslutning, fel och risk för elstötar.
Rengöring: Rengör produkten med en torr trasa. Använd inte
kemikalier, lösningsmedel eller starka rengöringsmedel.
Miljö: Utsätt inte produkten för stark värme eller kyla, eftersom det
kan skada eller förkorta de elektroniska kretsarnas livslängd.
ZRT-106 är en Z-Wave Plus termostat som automatiskt reglerar
temperaturen i en vattenradiator för optimal uppvärmning. Med
ZRT-106 kan rumstemperatur enkelt övervakas och styras med
Nexa Bridge eller annan styrenhet som är Z-Wave certifierad.
Z-Wave Plus tekniken ger en säker kommunikation mellan
enheterna.
SÄKERHET
Läs igenom hela instruktionen först. Anlita fackman vid behov. Nexa
kan ej hållas ansvarig om produkten används till annat än den är
konstruerad för eller om instruktionen inte följs.
Produkten innehåller inga reparerbara delar.
INSTALLATION
Sätt inte in batterierna ännu.
1. Ta bort befintlig ventil eller termostat från radiatorventilen.
2. Montera ZRT-106 på ventilen och dra åt den genom att vrida
ringen medurs. Du kan behöva använda en av de adapters som
medföljer för att passa din radiatorventil
3. ZRT-106 kan monteras i olika riktningar som visas nedan.
Obs: Det är nödvändigt med fritt luftflöde för att registrera
temperaturen, undvik att blockera luftcirkulation runt termostaten
ANSLUT TILL ETT Z-WAVE NÄTVERK
ZRT-106 har stöd för SmartStart-funktion, inkludering startar
automatiskt när enheten startas och upprepas med dynamiska
intervaller så länge enheten inte är inkluderad i ett Z-Wave-nätverk.
Om gateway inte stöder SmartStart-funktion kan den här enheten
läggas till Z-Wave nätverk med manuell inkludering, eller genom att
skanna DSK QR-koden eller ange en 5-siffrig Device Specific Key
(DSK) på begäran av Z-Wave controller.
Autoinkludering:
1. Sätt Z-Wave controllern i inkluderingsläge (se controllerns
manual)
2. Montera batterier i ZRT-106
Manuell inkludering:
1. Sätt Z-Wave controllern i inklusionsläge (se controllerns manual)
2. Montera batterier i ZRT-106
3. Tryck 3 ggr på knappen P inom 1,5 sekunder
Exklusion:
1. Sätt Z-Wave controllern i exklusionsläge (se controllerns manual)
2. Tryck 3 ggr på knappen P inom 1,5 sekunder
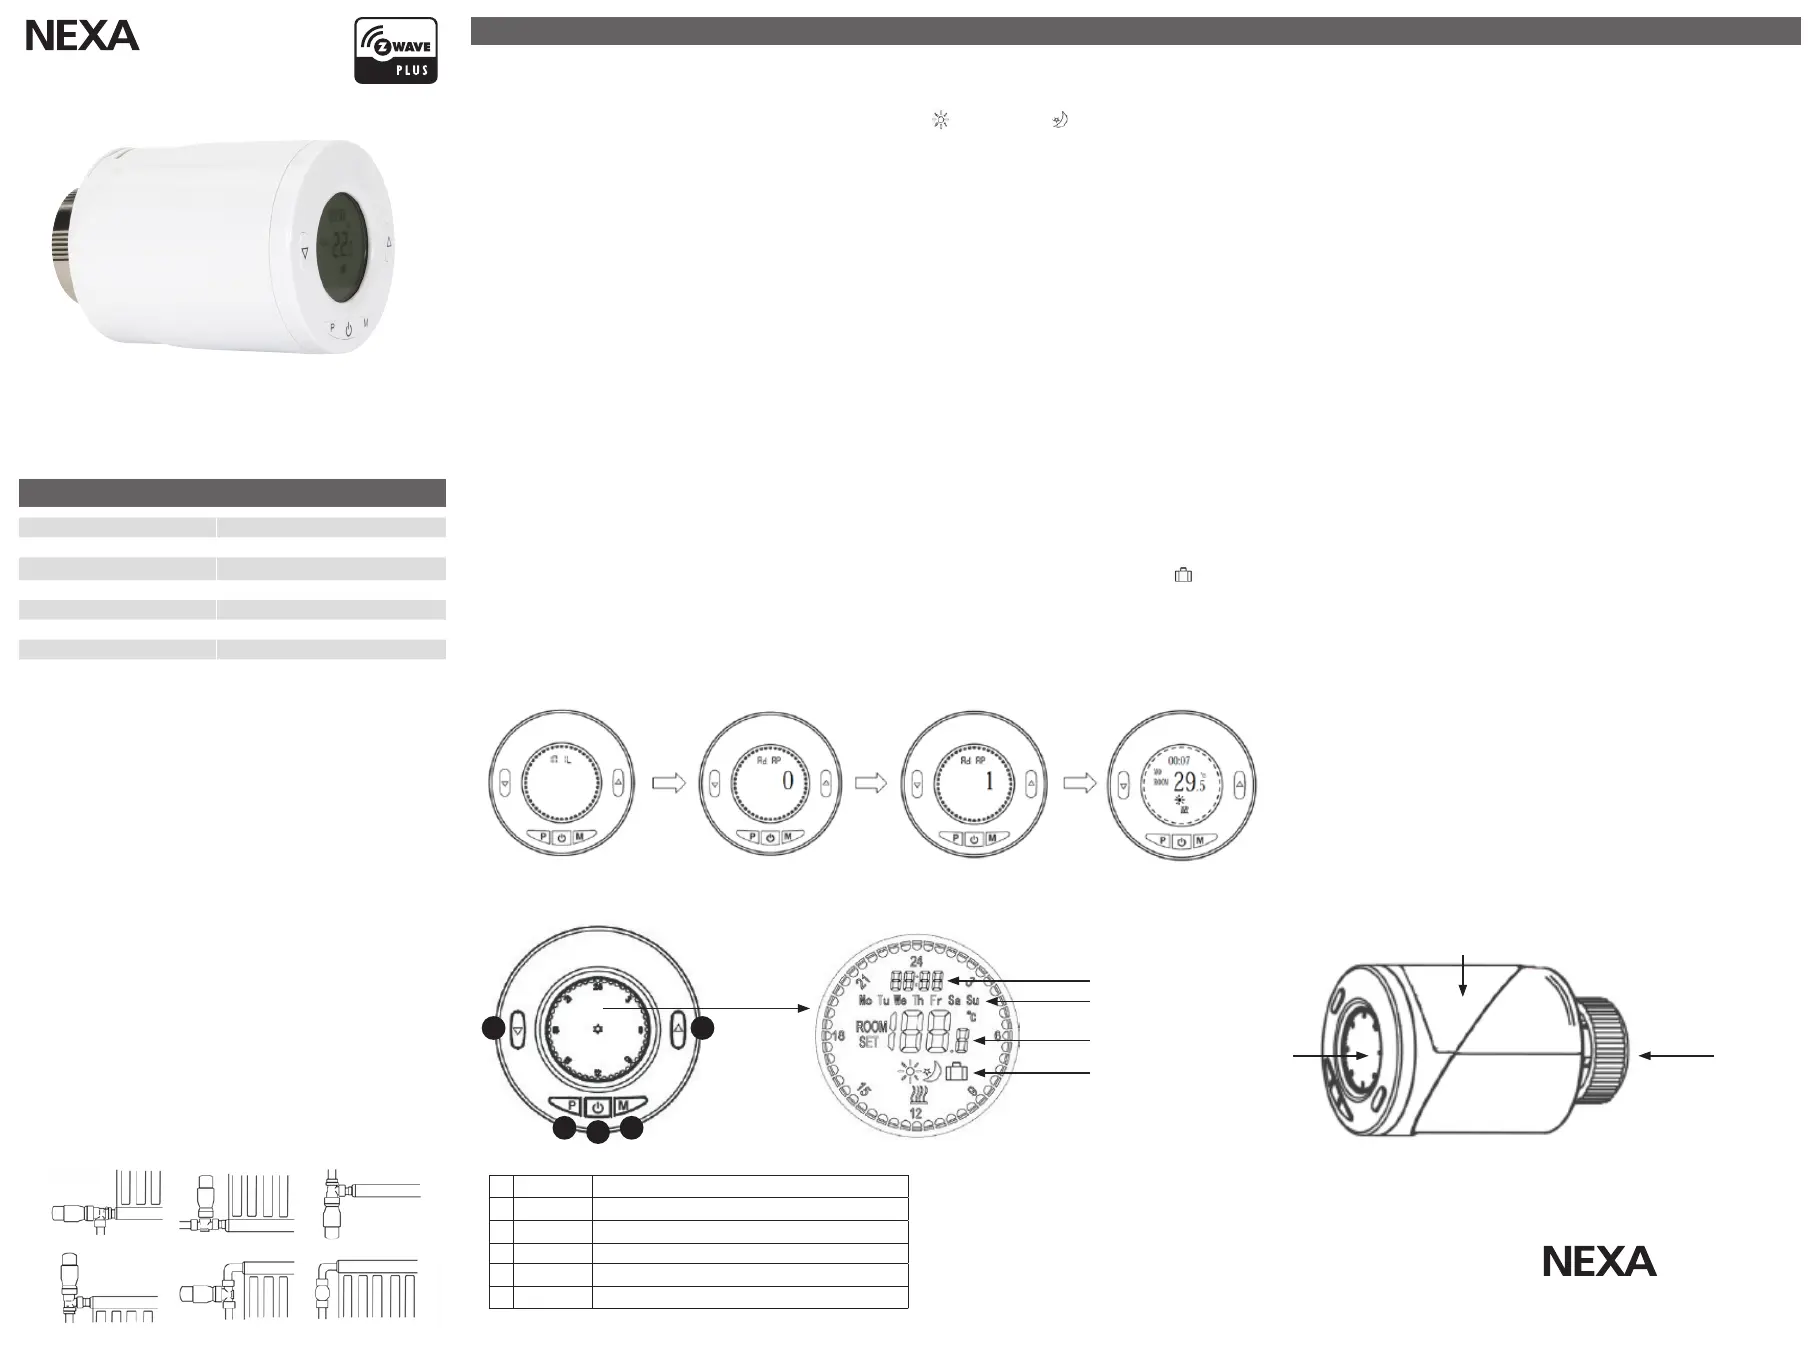
Kalibrering
1. Efter avslutad inkludering kommer enheten att initiera sig själv.
Under denna period kommer LCD-skärmen att visas INIL med
bakgrundsbelysning blinkande i 2 minuter.
2. När ZRT-106 visar AdAP trycker du på UPP-knappen för att starta
kalibreringen. Siffran 0 kommer att ändras till 1. Om det inte
ändras till 1, tryck på UPP-knappen igen.
3. ZRT-106 kommer att anpassa sig till ventilens reglerområde
genom att öppna och stänga ventilen två gånger för att lagra
inställning för ändlägen. Det kan ta upp till 1 minut.
4. Kalibreringen är klar när temperaturavläsningarna visas på LCD-
skärmen.
Obs! Temperaturavläsningarna blir korrekta ca: 10 minuter efter
installation av batterierna.
DRIFT
1. Automatisk temperaturreglering, Normal och Nattsänkning.
Val av driftläge sker med knappen M och indikeras i displayen med
för Normal och för Nattsänkning.
Börvärden för dessa två driftlägen ställs in genom Z-Wave
controllern, termostaten kommer att aktivera uppvärmning när
rumstemperaturen faller under respektive börvärde.
2. Schema- eller scenariofunktion.
Z-Wave controllern kan automatiskt växla mellan driftlägen baserat
på tid, närvaro etc. Se controllerns bruksanvisning.
3. Manuell temperaturinställning.
Förinställda börvärden kan temporärt åsidosättas genom att först
trycka på M-knappen och därefter reglera temperatur med Upp/Ned
knappar. ZRT-106 återgår till föregående driftläge med förinställda
börvärden efter 4 timmar. (Fabriksinställning, kan ändras med
parameter 10 i Z-Wave konfiguration)
4. Vädringsläge.
När Vädringsläge är aktiverad kommer ZRT-106 automatiskt
att stänga radiatorventilen när den upptäcker ett plötsligt fall i
rumstemperatur (standard: 2 °C på 15 minuter) och displayen visar
OP.
ZRT-106 återgår till föregående driftläge efter 30 minuter eller
vid tryck på valfri knapp. (Fabriksinställning, kan ändras med
parametrar 6-9 i Z-Wave konfiguration)
5. Knapplås.
Lås/lås upp genom att hålla P och M knapp nedtryckta under 5
sekunder, låsta knappar indikeras med i displayen.
6. Till/Från.
I läge Från stängs termostatstyrningen av och displayen visar
endast klockslag och veckodag. Observera att detta inte stänger av
enheten själv.
Kalibrering
UNDERHÅLL
Lågt batteri. Vid låg batterinivå skickas information till controllern
för att uppmärksamma användaren. Byt ut batterierna så snart som
möjligt.
Decalc. När ZRT-106 är inaktiv under långa perioder i användning,
t.ex. under sommaren, motionerar den automatiskt ventilen en
gång varannan vecka. Detta hjälper till att förhindra igensättning av
radiatorrören och kärvande ventil orsakad av kalk mm.
UTÖKAD Z-WAVE KONFIGURATION
Finns under produkten på www.nexa.se
Knapp Funktion
1 P Inkludering / Exkludering i Z-Wave nätverk
2 Till/Från
3 M Temperaturreglering Normal / Nattsänkning
4 Pil Ned Minska inställd rumstemperatur
5 Pil Upp Öka inställd rumstemperatur
1
2
3
4 5
Klocka
LCD display
Batterilucka
Radiatoranslutning
Veckodag
Temperatur
Status


