ODEON ASSEMBLY INSTRUCTIONS
Carefully unpack the xture, you should receive:
mounting hardware, fixture assembly, glass assembly.
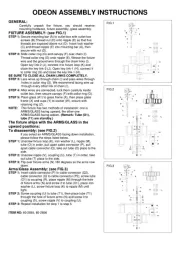
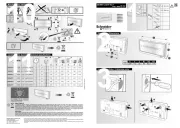
FIXTURE ASSEMBLY: (see FIG.1)
STEP 1: Secure mounting bar (A) to outlet box with outlet box
screws (B).Thread nut (D) onto nipple (E) so that five
threads are exposed above nut (D). Insert lock washer
(C) and thread nipple (E) into mounting bar (A), then
STEP 2: Slide collar ring (G) and canopy (F) over chain (I).
Thread collar ring (G) onto nipple (E). Weave the fixture
wire and the ground wire through the chain links (I).
Open key link-2 (J), connect it to xture loop (K) and
close the key link-2 (J). Open key link-1 (H), connect it
to collar ring (G) and close the key link-1 (H).
BE SURE TO CLOSE ALL CHAIN LINKS COMPLETELY.
STEP 3: Lace wires up through chain (I) and pass wires through
holes in collar ring (G). We recommend lacing wire up
through every other link of chain (I).
STEP 4: After wires are connected, tuck them carefully inside
outlet box, then secure canopy (F) with collar ring (G).
STEP 5: Place glass (A1) to glass frame (X), then place glass
frame (X) and cups (Y) to socket (W), secure with
NOTE: This fixture has two methods of installation: one is
ARMS/GLASS facing upward, the other one
ARMS/GLASS facing adown. (Remark: Tube (O1),
The xture ships with the ARMS/GLASS in the
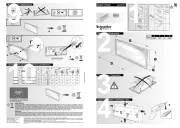
To disassembly: (see FIG.2)
If you select an ARMS/GLASS facing down installation,
please follow the steps listed below.
STEP 1: Unscrew fixture loop (K), iron washer (L), nipple (M),
tube (O) in order, pull apart cable connector (P), pull
apart cable connector (Q), take out tube (O) place to the
STEP 2: Unscrew nipple (V), coupling (U), tube (T) in order, take
out tube (T) place to the side.
STEP 3: Flip over fixture arms (N) 180 degrees so the arms now
Arms/Glass Assembly: (see FIG.3)
STEP 1: Insert cable connector (P) to cable connector (Q2),
cable connector (Q) to cable connector (P2), screw tube
(O1) to coupling (R), place nipple (M) through the hole
of fixture arms (N) and screw it to tube (O1), place iron
washer (L), screw fixture loop (K) to nipple (M) until
STEP 2: Screw coupling (U) to tube (T1), then place tube (T1)
through the hole of fixture arms (N) and screw it to
coupling (S), screw nipple (V) to coupling (U).
STEP 3: Repeat installation for step 1 to step 5.
ITEM NO: 60-2855, 60-2856