Optex CX-702RS Manual
Optex
Ikke kategoriseret
CX-702RS
Læs gratis den danske manual til Optex CX-702RS (4 sider) i kategorien Ikke kategoriseret. Denne vejledning er vurderet som hjælpsom af 6 personer og har en gennemsnitlig bedømmelse på 4.4 stjerner ud af 3.5 anmeldelser. Har du et spørgsmål om Optex CX-702RS, eller vil du spørge andre brugere om produktet?
Side 1/4

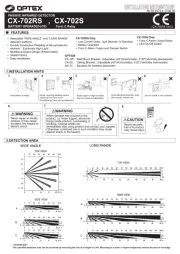
PASSIVE INFRARED DETECTOR
CX-702RS , CX-702S
No.59-0974-3 0708-30
BATTERY OPERATED (CE) Form C Relay
(CX-702RS Only)
FEATURES
Selectable ”WIDE ANGLE” and “LONG RANGE”
detection patterns.
Double Conductive Shielding of the pyroelectric
element - Extremely High Light.
Multifocus Optics Design (Patent listed)
Sealed Optics
Easy Installation
CX-702RS Only
Low Current Draw : 5µA (Normal. In Standby)
Battery Oparated
Form C Alarm Output and Tamper Switch
OPTION
CA-1W : Wall Mount Bracket ; Adjustable ±45°(Horizontally), 0-20°(Vertically downwards)
CA-2C : Ceiling Bracket ; Adjustable ±45°(Horizontally), 0-20°(Vertically downwards)
BA-70 : Backbox for wireless transmitter
CX-702S Only
Form C Alarm Output Relay
LED On/Off Switch
1.INSTALLATION HINTS
1
Avoid direct sunlight.
2
Avoid mounting detector where
movement of Fans or Air
Conditioning Fans can be detected.
3
Avoid vapor or high humidity
that can cause condensation.
4
Avoid blocking detection area
with curtain, screen, etc.
5
Do not install in the outdoors.
6
WARNING
Never repair or modify
product. It may cause
accident, fire hazard or
electric shock.
7
WARNING
When damage has occured to the
product, i.e. water logged, abnormal
things inside product, overheating or
smoking, strange smells etc.,
immediately stop using product and contact your supplier.
Otherwise, continued use in such condition may cause
electric shock or fire hazard.
8
CAUTION
Mount securely.
Fall of A product
may cause injury.
2.DETECTION AREA
●
●
●
●
●
●
●
●
●
**ATTENTION**
The specified detection area can be achieved by mounting the unit at a height of 2.4m. Mounting at a lower or higher height may reduce the area of coverage.
●

1
2 3
4
5
6
3.DESCRIPTION AND OPERATION
4.INSTALLATION
Loosen fastening screw
and remove cover.
For wiring, put the point of screw-
driver in wiring knockouts of base,
and hit the top of dirver to crack into
knockouts. Lead in wires through
knockouts along the wiring guide on
the rear side of base. Mount base
with supplied screws. When using a
bracket, check matching knockout
position before opening mounting
holes.Wire according to Section 5.
When you remove the PCB, push down
on the hook under PCB and remove it from
its base. Attachment of PCB is the reverse
of removal. Do not remove PCB from base
of CX-702RS.
Release hook at cover.
Then remove lens holder
from cover.
Remove lens holder carefully.
Select wide angle or long range
according to Section 6-2. (Note:
Factory default is wide area)
Check to confirm that the lens is in
the desires position.Press down the
lens holder until it clicks into place
along the guide of cover.
Conduct a walktest and
make adjustments
(Section 7). Fit cover
using fastening screw.
Guides of Cover
Guides of Lens Holder
TAMPER
(Form C)
ALARM OUTPUT
(Form C)
POWER INPUT
(Use 3 - 9V
Alkaline or
Lithium Battery)
ALARM OUTPUT
(Form C)
POWER INPUT
(9.5 - 16 VDC)
Power wires should not exceed
the following lengths.
When using two or more units on one wire, the
maximum length is obtained by dividing the
maximum wire length listed above by the
number of units used.
W IR ESIZE 12V 14V
990ft 2150ft
(300m ) (650m )
1560ft 3390ft
(470m ) (1030m )
2500ft 5410ft
(760m ) (1650m )
C X‑702S
A W G 22(0.33m m
2
)
A W G 20(0.52m m
2
)
A W G 18(0.83m m
2
)
Cover
LED Indicator
Lens
Cover Fastening Screw
Base
CX-702RS
CX-702S
Battery Space
Terminals
Tamper switch
Sensor
Do not touch.
Terminals
Sensor
Do not touch.
Wiring Knockout
Mounting Knockout
Pitch 3.29 inch (83.5mm)
Corner mount Knockout
Wiring Knockout
Mounting Knockout
Pitch 3.29 inch (83.5mm)
Corner mount Knockout
Double Conductive Shield
Do not touch.
Lens Holder
Connect tamper terminals to
a 24 hour supervisory loop.
[
]
CX-702RS CX-702S
− +
− +
5.WIRING
Produkt Specifikationer
Mærke: | Optex |
Kategori: | Ikke kategoriseret |
Model: | CX-702RS |
Har du brug for hjælp?
Hvis du har brug for hjælp til Optex CX-702RS stil et spørgsmål nedenfor, og andre brugere vil svare dig
Ikke kategoriseret Optex Manualer
19 Juni 2025
26 Januar 2025
14 December 2024
5 December 2024
5 December 2024
5 December 2024
5 December 2024
5 December 2024
5 December 2024
24 September 2024
Ikke kategoriseret Manualer
- Sound Machines
- ZKTeco
- Robust
- Trezor
- NOCH
- Spedal
- Total
- Tzumi
- YSI
- Golden Age Project
- Meccano
- Wegman
- TESLA Electronics
- Rane
- Alright Devices
Nyeste Ikke kategoriseret Manualer
6 Juli 2025
6 Juli 2025
6 Juli 2025
6 Juli 2025
6 Juli 2025
6 Juli 2025
6 Juli 2025
6 Juli 2025
6 Juli 2025
6 Juli 2025