8. To ensure secure mount, press the back edge of the arm
tips (not the front edge)
7. Press the phone cradle release button
Vielen Dank, dass Sie sich für die Auto-Handyhalterung HD-C77 entschieden
haben. Bitte lesen Sie sich diese Bedienungsanleitung aufmerksam durch und
bewahren Sie sie gut auf. Sollten Sie darüber hinaus Fragen oder Probleme
haben, hilft Ihnen unser freundlicher Kundenservice gerne weiter. Halten Sie
dann bitte die Produktmodellnummer und Ihre Amazon-Bestellnummer bereit.
Qifutan Technology Co., Ltd
support@qifutan.vip|www.qifutan.vip
Room 606, Building Lihuwan, Xihu Road, Leizhou City,
ZhanJiang, Guangdong, 524000, CN
- 01 - - 02 - - 03 - - 04 - - 05 - - 06 - - 07 -
5. Then fix the stabilizer in a suitable position on the extended
6. Press down firmly, hold while pushing back down, continue to
hold down to ensure tight adhesion
1. Unscrew the pivot locking nut, let the ball joint pass through
the fixed nut; then tighten the nut.
adhesive sheet on the base
Thank you for purchasing the HD-C77 Car Phone Mount. Please read this user
manual carefully and keep it for future reference. If you need any assistance,
please contact our support team with your product model number and
PC plastic, ABS plastic, Silicone
304.5×67.8×110.0mm/11.99''×2.67''×4.33''
• Don’t install the mount in front of the airbags.
• The temperature, pressure, cleanliness, and type of surface all affect the
amount of time the adhesive takes to develop the bond
Warranty & Customer Support
For questions, support, or warranty claims, contact us at the address below
that corresponds with your region. Please include your Amazon order number
and product model number.
Amazon US orders: support@qifutan.vip
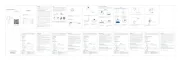
Unscrew the pivot locking nut, let the ball joint pass through the fixed nut;
Clean a preferably flat surface on your dashboard where you want to install
the mount with a mixture of equal parts (1:1) of isopropyl alcohol and water
then wait for the surface to dry
Carefully peel off the protective film of the 3M dashboard pad or 3M
double-sided tape and fix it on the dashboard. Carefully peel off the mount
base adhesive backing sheet and place the mount on the 3M dashboard
pad or 3M double-sided tape
Press down firmly, hold while pushing the mount locking lever back down
again, and continue to hold down for a few minutes to ensure firm adhesion.
For best results, allow 24 hours for the adhesive to securely bond with the
surface before using the mount
Carefully peel off the protective film of the stabilizer and then fix it in a
suitable position on the extended arm, then fix it on the dashboard
Press and hold the phone cradle release button until you can place your
Adjust the phone cradle so it grips your phone. To ensure secure mounting,
press the back edge of the clamp (not the front edge)
PC-Kunststoff, ABS-Kunststoff, Silikon
304.5×67.8×110.0mm/11.99''×2.67''×4.33''
1. Nettoyez une surface de préférence plane sur votre tableau de bord à l'endroit
où vous souhaitez installer le support avec un mélange à parts égales (1:1)
d’alcool isopropylique et d'eau. Attendez que la surface sèche.
2. Retirez soigneusement le film de protection de la ventouse, et fixez la
ventouse sur le tableau de bord.
3. Appuyez fermement, maintenez la pression tout en poussant à nouveau le
levier de verrouillage du support vers le bas, et continuez à maintenir la
pression pendant quelques minutes pour assurer une bonne adhérence. Pour
de meilleurs résultats, laissez 24 heures à l'adhésif pour adhérer solidement
à la surface avant d'utiliser le support.
4. Retirez soigneusement le film protecteur du stabilisateur, puis fixez-le dans
une position appropriée sur le bras allongé, et fixez-le sur le tableau de bord.
5. Appuyez et maintenez le bouton de libération du support du téléphone
jusqu'à ce que vous puissiez placer votre téléphone sur le support.
6. Ajustez le support du téléphone pour qu'il tienne correctement votre
téléphone. Pour garantir une fixation sécurisée, appuyez sur le bord arrière
de la pince (et non sur le bord avant).
• N'installez pas le support devant les airbags.
• La température, la pression, la propreté et le type de surface influent tous sur
le temps nécessaire à l'adhésif pour se coller.
Garantie et assistance à la clientèle
Pour toute question, assistance ou demande de garantie, contactez-nous à l’adresse
ci-dessous qui correspond à votre région. Veuillez fournir votre numéro de
commande Amazon ainsi que le numéro de modèle du produit.
Commandes sur Amazon USA: support@qifutan.vip
1. Reinigen Sie eine möglichst ebene Oberfläche auf Ihrem Armaturenbrett, wo
Sie die Halterung befestigen wollen, mit einer Mischung aus gleichen
Teilen (1:1) Isopropylalkohol und Wasser. Lassen Sie die Oberfläche
2. Ziehen Sie die Schutzfolie des Saugnapfes vorsichtig ab, und befestigen Sie
den Saugnapf am Armaturenbrett.
3. Drücken Sie die Halterung fest an und halten Sie sie fest, während Sie den
Verschlusshebel wieder nach unten drücken. Um optimalen Halt zu
gewährleisten, drücken Sie die Halterung noch einige Minuten fest an.
Idealerweise warten Sie 24 Stunden vor der ersten Verwendung, sodass
sich der Klebstoff mit der Oberfläche optimal verbinden kann.
4. Ziehen Sie die Schutzfolie des Stabilisators vorsichtig ab und befestigen Sie
ihn dann in einer geeigneten Position am verlängerten Arm, und befestigen
Sie ihn am Armaturenbrett.
5. Drücken und halten Sie die Verriegelungstaste für die Handyhalterung so,
dass Sie Ihr Smartphone in der Halterung positionieren können.
6. Richten Sie die Halterung so aus, dass Ihr Smartphone sicher befestigt ist.
Für eine sichere Befestigung drücken Sie auf die Hinterkante der Klemme
(nicht auf die Vorderkante).
• Montieren Sie die Halterung nicht vor Airbags.
• Die Temperatur, der Druck, die Sauberkeit und die Beschaffenheit der
Oberfläche beeinflussen die Zeit, die der Klebstoff benötigt, um die Bindung
Bei Fragen, Problemen oder Garantieansprüchen kontaktieren Sie uns bitte unter
der jeweiligen Adresse, die Ihrer Region entspricht. Bitte geben Sie Ihre
Amazon-Bestellnummer und die Produktmodellnummer an.
Amazon US orders: support@qifutan.vip
Merci d'avoir acheté le Support de téléphone pour voiture HD-C77. Veuillez lire
attentivement ce manuel d’utilisation et conservez-le pour toute référence
ultérieure. Si vous avez besoin d'assistance, veuillez contacter notre équipe en
vous munissant du numéro de modèle de votre produit et du numéro de
Support de téléphone pour voiture
Guide de démarrage rapide
Capacité de charge maximale
Plastique PC, plastique ABS, Silicone
304.5×67.8×110.0mm/11.99''×2.67''×4.33''
1. Pulire una superficie (preferibilmente liscia) sul cruscotto dove si vuole installare
il supporto utilizzando una miscela di alcool isopropilico e acqua (in dosi
uguali 1:1) e attendere che la superficie si asciughi.
2. Staccare con cura la pellicola protettiva della ventosa e fissare la ventosa sul
3. Premere fermamente verso il basso, tenere premuto mentre si spinge la leva
di bloccaggio del supporto di nuovo verso il basso e continuare a tenere
premuto per alcuni minuti per garantire una solida aderenza del prodotto. Per
dei risultati ottimali, lasciare che l’adesivo aderisca alla superficie per 24 ore
prima di usare il supporto.
4. Staccare con cura la pellicola protettiva dello stabilizzatore e poi fissarlo in
una posizione adatta sul braccio esteso, e fissarlo sul cruscotto.
5. Tenere premuto sul pulsante di rilascio finché non si riesce a posizionare il
proprio telefono sul supporto.
6. Regolare il supporto fino ad agganciare il telefono. Per assicurarsi che il
telefono sia ben agganciato, premere sul bordo posteriore (e non sul davanti)
• Non installare il supporto davanti agli airbag.
• Temperatura, pressione, pulizia e tipo di superficie influiscono sulla quantità
di tempo richiesto all’adesivo per aderire.
Garanzia e assistenza clienti
Per domande, assistenza o richieste legate alla garanzia, è possibile contattar-
ci all’indirizzo riportato di seguito in base alla propria regione corrispondente.
Si prega di includere il numero dell’ordine Amazon e il numero di modello del
Ordini Amazon USA: support@qifutan.vip
Grazie per aver acquistato il supporto per telefono da auto HD-C77. Si prega di
leggere con attenzione il presente manuale utente e di conservarlo per
riferimenti futuri. Per assistenza, è possibile contattare il nostro team di
supporto comunicando il numero di modello del prodotto e il numero dell’ordine
Contenuto della confezione
Supporto per telefono da auto
Gracias por la compra del soporte de móviles para automóvil HD-C77. Lea
atentamente este manual de usuario y consérvelo para futuras consultas. Si
necesita asistencia, por favor póngase en contacto con nuestro departamento
de atención al cliente, indicando el modelo de su producto y el número de
Soporte de teléfono para coche
1. Elija la superficie de su salpicadero donde desee instalar el soporte (que sea
preferiblemente plana) y límpiela con un paño con una mezcla de alcohol
isopropílico y agua a partes iguales (1: 1). Deje que la superficie se seque.
2. Retire con cuidado la película protectora de la ventosa, y fije la ventosa en
3. Presione hacia abajo con firmeza y mantenga presionada la palanca de
bloqueo del soporte a la vez que la empuja abajo nuevamente. Siga presionando
durante unos minutos para asegurar una adhesión firme. Para obtener los
mejores resultados, espere 24 horas antes de usar el soporte, para
asegurarse de que el adhesivo se haya quedado fijo en la superficie.
4. Retire con cuidado la película protectora del estabilizador y fíjelo en una
posición adecuada en el brazo extendido, y fíjelo en el salpicadero.
5. Mantenga presionado el botón de liberación de la base del teléfono hasta que
pueda colocar su teléfono en el soporte, después, suelte.
6. Ajuste la base del teléfono para que lo sujete. Para garantizar un montaje
seguro, presione el borde posterior de la abrazadera (no el borde frontal)
• No coloque el soporte delante de los airbags.
• La temperatura, la presión, la limpieza y el tipo de superficie afectan al tiempo
que necesita el adhesivo para quedarse completamente pegado.
Garantía y atención al cliente
Para preguntas, atención al cliente o reclamos de garantía, póngase en contacto
con nosotros a través de la dirección que se indica a continuación que
corresponda a su región. Incluya su número de pedido de Amazon y el modelo
Pedidos de Amazon EE.UU.: support@qifutan.vip
- ES - 16 - - ES - 17 - - IT - 18 - - IT - 19 -
Capacidad de carga máxima
Plástico PC, Plástico ABS, Silicona
304.5×67.8×110.0mm/11.99''×2.67''×4.33''
Capacità massima di carico
Plastica PC, plastica ABS, silicone
304.5×67.8×110.0mm/11.99''×2.67''×4.33''
Install the car mount to a flat surface directly
Install the 3M dashboard pad on the dashboard first, and
then install the car mount on the 3M dashboard pad
Install the car mount to a
flat surface directly. Press
it firmly for to fix 1 minute
Push the suction cup lock
2. Must press the silicone
Choosing a flat surface on the dashboard, and clean the
surface where you need to install the car mount with a wet
cloth. Wait it to dry, and then install the 3M dashboard pad.
Tear off the protective sticker of 3M dashboard pad and car
mount. Stick the pad to the position where you want to install
the car mount. Press it firmly for 1 minute to fix it. Let it sit for
the journey, do not operate and adjust the car mount while
2.Do not install the car mount in a position that interferes
with the operation of the airbag or hinders driving.
Please install the car mount in a suitable place
24 hours before installing the car mount.
The 3M dashboard pad is disposable. Once pasted, they are hard
to remove. Once applied, they can not be used again. Please
choose the appropriate position to install the 3M dashboard pad.
Tips for Using the Suction Cup
7.To ensure that the phone mount is securely mounted on the
dashboard, must press the silicone suction cup one circle to
exhaust the air inside the suction cups.
If the surface is flat and smooth, you can use the suction cup
on the dashboard directly; While the surface is flat but not
smooth, please use the suction cup on the dashboard pad.
Do not stick the suction cup to curved surfaces, plush fabric or
uneven surfaces. Otherwise it would not be attached securely.
It is not recommended to attach the suction cup to the surface
of leather, wall or glass film, because the suction cup with
strong viscosity and attractiveness, which may cause surface
If the suction cup is frequently used in high temperature, low
temperature or humid conditions, the suction force will
decrease; Please avoid direct exposure to the sun for a long
5.After using it for a while, if the suction is not sticky enough,
please take down the suction cup and wash it with warm soap
water. It will be sticky again after drying.
6.Please protect the suction cup with plastic wrap when not in
< 1 Hour < 6 Hours 24 Hours 72 Hours≥ ≥
Assembling the Suction Cup
There are to install the suction cup, which are listed as 2 ways
follows. Please choose among them according to your needs.
cup lock to secure the car
cup lock to secure the car
Press it firmly for 1 minute
to fix it. Let it sit for 24
To reuse Suction Cup, simply rinse under warm water and let air
dry to restore tacky suction