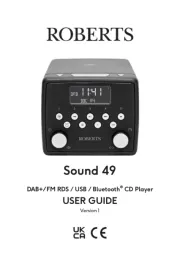
Roberts Stream 67L Manual

Roberts Radio Stream 67L

Læs nedenfor 📖 manual på dansk for Roberts Stream 67L (3 sider) i kategorien Radio. Denne guide var nyttig for 17 personer og blev bedømt med 4.5 stjerner i gennemsnit af 2 brugere

Side 1/3
Before you can use your smart audio system you need to have the following:
• For FM/DAB: A suitible location for good radio reception
For Streaming / Internet Radio : a good WiFi signal or ethernet connection (802.11b, g, n or a)
connected to your broadband Internet service provider. You will need the security details to connect
the Stream67L to your WiFi network. Password will not be required for a wired connection.
• For App control: An Android or Apple device with the UNDOK app installed.
AC In
100-240V ~
W66 zH06 / zH05
Aux In
WiFi
Antenna
DAB/FM
Antenna
Ethernet
5V 1A
2 3 5 6
7
89
101112
4
13 14
16 15
1
1718
1920
21
22
23
24
25
18
26 26
27 27
To stream music or listen to radio from the Internet you must connect your system to your WiFi or use
a wired network connection. The Network setup process allows you to do this:
1 Choose YES’ to keep the unit connected to the network when
in Standby. This will allow remote control software to switch on
your audio system when needed.
2 A list of the available WiFi networks will then be displayed. If no
networks are found then your audio system may be too far from
your router.
3 Rotate the Tuning control to navigate the list of available
networks and highlight your own Network Name. If your Network
Name is not found, then check the router is functioning and that
the audio system can in good signal range.
4 If your Network Name (sometimes called SSID) is displayed
with “[WPS] (WiFi Protected Setup), then press the Tuning
control and a WPS menu will be displayed, otherwise press the
Tuning control and proceed to step 6.
5 Choose one of the WPS menu options as required for your
router (WPS may be via push button, or using an identication
number):
‘Push Button’ - the display prompts you to press the WPS button
on your router and then the control on the unit. The two Tuning
devices should then connect automatically. Proceed to step 10.
‘PIN’ - the display shows an identication number which you
must enter into your router using a web browser (refer to your
router’s user documentation). You should then press the Tuning
control on the unit. Proceed to step 9.
‘Skip WPS’ if you wish to enter your password or if your
password was previously entered.
6 If you are prompted to enter a password (or key), enter each
character by rotating the control to highlight it, then Tuning
pressing the control. If you are not prompted for a Tuning
password then proceed to step 9.
7 The three controls on the right-hand side of the password key
screen have special functions. You can quickly access these by
pressing the button and then using the control as Info Tuning
needed:
Select ‘BKSP’ - Select to erase a character (long press to clear).
Select - When the complete password has been entered.‘OK’
Select CANCEL - To cancel and re-run the Network Wizard.
8 After the nal character of the password has been entered,
highlight the symbol and press the control. ‘OK’ Tuning
9 The screen will show Connecting..’ and then Setup wizard
completed’. Press the control to exit the setup wizard. Tuning
The audio system should now be able to connect to the network.
Your audio system will display the Main mode menu.
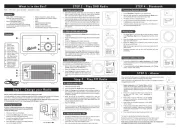
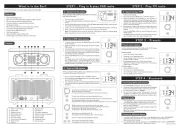
Smart Audio System, mains lead, remote control with 2 x AAA batteries, quick start guide, safety/warranty
guide. Please scan the QR code on the product for the FULL User Guide online.
Features
Controls
STEP 1 - Connect to the mains & setup your smart audio systemWhat is in the Box?
E - Connect to your network
F - Use the UNDOK app to setup your audio system
• Internet / DAB+ / FM radio
• Streaming: Spotify, Deezer, Amazon Prime music
• Bluetooth
• CD, CD MP3 / CD WMA compatibility
• Play MP3 or WMAles via USB
• Two mid-treble speakers, two bass speakers (with ported chambers)
• Control via the UNDOK smartphone app (for Apple iOS and Android)
• 10 DAB, 10 FM presets and 40 Internet radio presets
• WiFi and Ethernet connection (Dual-band WiFi and Ethernet)
• 5 equaliser proles plus User EQ mode
• Clock and dual alarm (wake to Radio / CD / buzzer)
• USB charging of smartphone, tablet or similar devices
Auxiliary input and headphone socket for private listening
A - Connect to the mains
Please read the safety leaet provided before connecting your smart audio system to the mains.
The mains plug is used as the disconnect device, The socket-outlet shall be installed near the equipment
and shall be easily accessible.
1 Place your audio system on a at surface.
2 Plug the mains lead into the on the back of the unit.mains socket
3 If you wish to use a wired connection, plug the Ethernet cable into
the socket at the back of the unit.
4 Plug the mains lead into a wall socket and switch on the socket.
5 The display on the audio system will show a start up screen for a
few seconds. If this is the rst time that you use your audio system
(or after a Factory Reset) the display will show the language menu.
AC In
100-240V ~
W66 zH06 / zH05
1 If you wish to setup your audio system using the UNDOK app
download and install the UNDOK app on to your Android
or iOS device.
2 Follow the on-screen instructions or see the full user guide
on-line (scan the QR code on this documnet with your phone).
If you already have the UNDOK app installed on your device
ensure that you have the latest version.
Volume1
2 Repeat / Shufe
Previous (RW)3
Play/Pause / BT Pair4
Next (FF)5
Stop / Eject6
Tuning / Select / Snooze7
Back 8
9 Menu
10 Preset
11 Info / Dimmer
12 Alarm
13 On / Standby / Sleep
14 Mode
15 IR sensor
16 Display
17 CD slot
18 Mid treble speakers
19 USB playback / charge
20 Auxiliary input
21 Headphone socket
22 Ethernet socket
23 Power input
24 DAB / FM telescopic aerial
25 WiFi antenna
26 Sub-bass speakers x 2
27 Bass reex ports x 2
28 Remote control
D - Select clock and time settings
1 The audio system will show a setup wizard. With highlighted ‘YES’
press the control to begin setting up your product.Tuning/Select
Note: If you wish to go back within a menu or if you make an error
at any time, please use the button.Back
2 Choose either the or clock display.12 24 hour
3 A menu allowing you to specify the auto-update option for the clock
will be shown. will be the best for most users.Update from network
4 Choose the for your region.timezone
5 Choose a option. This is also known as Summer/daylight saving
Winter time (or BST/GMT in the UK).
C - Select language
By default your audio system will display all menus and messages in
English.
1 Rotate the control to highlight the desired language.Tuning/Select
2 Press the control to enter the selection.Tuning/Select
Your audio system will display a privacy policy. Please read the
privacy policy and then press the control to accept Tuning/Select
the policy.
English
Dansk
Nederlands
Français
Deutsch
Italiano
Language
*
Your audio system may be congured using either the display and
buttons UNDOK app. First-time users are on the unit or using the
recommended to use the audio system’s controls.
1 If you wish to use to setup your unit, .UNDOK skip to step F now
2 If you would like to setup using the audio system’s controls follow
the setup procedure below and choose the desired language.
B - Setup using the audio system or the UNDOK app
Setup wizard
Start now?
Date/Time
12/24 hour format
Auto update
Update from DAB
Update from FM
Update from Network
No update *
Scan for full instructions.
Select
28
Jones family
[WPS] Paul’s network
Smith
Brown
[Rescan]
[Manual config]
SSID
*
Network settings
Keep network connected?
Network settings
Network wizard
Scanning...
Push Button
PIN
Skip WPS
WPS Menu
Key:
0 1 2 3 4 5 6
7 8 9 . _ - @
, a b c d e
f g h i j k l
m n o p q r s
123-jones
Setup wizard
Setup wizard
completed
Press ‘SELECT’ to exit
Network settings
Please wait
Connecting...


Produkt Specifikationer

Mærke: Roberts
Kategori: Radio
Model: Stream 67L

Har du brug for hjælp?

Hvis du har brug for hjælp til Roberts Stream 67L stil et spørgsmål nedenfor, og andre brugere vil svare dig


Radio Roberts Manualer
Roberts

Roberts Eco4 BT Manual

10 Marts 2024
Roberts

Roberts Ortus 2 Manual

14 Januar 2024
Roberts

Roberts Sound 24 Manual

26 December 2023
Roberts

Roberts SolarDAB 1 Manual

28 November 2023
Roberts

Roberts R986 Manual

20 November 2023

Radio Manualer

Nyeste Radio Manualer