For more tips on recording
and caring for your NTR
visit www.rode.com/ntr or
scan the QR code.
Weitere Tipps für Aufnahmen mit dem NTR und
die Wartung nden Sie unter www.rode.com/ntr.
Oder scannen Sie einfach den QR-Code.
Pour en savoir plus sur l’enregistrement et le
soin à apporter à votre NTR, rendez-vous sur
www.rode.com/ntr ou scannez le code QR.
Para obtener más consejos sobre la grabación y
el cuidado del NTR, visita www.rode.com/ntr o
escanea el código QR.
Per altri consigli riguardanti la registrazione e
la manutenzione del vostro NTR visitate il sito
www.rode.com/ntr oppure scansionate il codice
QR.
要了解有关您的NTR的录音和保养方面的更多提
示,请访问www.rode.com/ntr或扫描QR码。
NTRで録音する際のヒントやお手入れについての
詳細はwww.rode.com/ntr にアクセスする、あ
るいは QR コードを読み取ってご覧下さい。
녹음 및 귀하의 NTR을 관리하는 법에 대한 보다 많
은 팁을 원하시면 www.rode.com/ntr을 방문하시
거나 QR 코드를 스캔하십시오.
Like all ribbon micro-
phones, the RØDE NTR is
very fragile and must be
handled with extreme care.
The ribbon element is ex-
tremely sensitive to plo-
sives (hard “B”, “T” and
“P” sounds) and any air
directed towards the micro-
phone. When close-miking
your vocals always use a
pop lter, and protect the
microphone when not in
use.
Wie alle Bändchenmikrofone ist das RØDE NTR extrem
empndlich und muss demnach behutsam behandelt
werden.
Das Bändchenelement mag weder Plosivlaute (“B”, “T”
und “P”) noch merkliche Luftströme. Vor allem beim
“Close-Miking” einer Gesangsstimme muss unbedingt
ein Popplter benutzt werden. Bringen Sie nach dem
Gebrauch sofort den Staubschutz an.
Comme tous les microphones à ruban, le RØDE NTR
est très fragile et doit être manié avec beaucoup de
précautions.
Le ruban est extrêmement sensible aux plosives (les
sons durs “B”, “T” et “P”) et à toute projection d’air
vers le micro. Quand vous enregistrez le chant, utilisez
toujours un ltre anti-pop. Protégez le micro quand il
n’est pas utilisé.
Como todos los micrófonos de cinta, el RØDE NTR es
muy frágil y debe manejarse con sumo cuidado.
La cinta es extremadamente sensible a las consonantes
oclusivas (los intensos sonidos “B”, “T” y “P”) y al aire
dirigido al micrófono. Al hablar muy cerca del micró-
fono, utiliza siempre un ltro y protege el micrófono
cuando no lo utilices.
Come tutti i microfoni a nastro, il RØDE NTR è molto
fragile, e deve essere trattato con estrema cura.
Il nastro della capsula è estremamente sensibile ai suoni
esplosivi (“B”, “T” e “P”) e a qualsiasi spostamento d’a-
ria che colpisca direttamente il microfono. Quando
registrate le voci ravvicinate usate sempre un ltro anti-
pop e proteggete il microfono quando non lo usate.
与所有带式话筒一样,RØDE NTR非常脆弱,拿取时必
须极为小心。
带式极头对爆破音(用力发出“B”, “T” 和“P”的
音)以及朝向话筒的任何气流都非常灵敏。 近距离拾音
时,请始终用防扑罩。不用时请妥善保护好话筒。
他のリボンマイクと同様に、 RØDE NTR もまた非常
にデリケートなため、取り扱いには細心の注意が必要
です。
リボンエレメントはバ行、タ行、パ行等の破裂音(
「B」、「T」、「P」)等で発音する堅い音)やマイク
に直接吹きかかる空気に対して非常に敏感です。ボー
カルを録音する際にマイクを口元で使用する場合は、
必ずポップフィルターを装着してください。また使用
しない場合は、マイクを適切に保管することが必要で
す。
다른 리본 마이크와 마찬가지로 RØDE NTR은 매우 섬
세하기 때문에 다룰 때 깊은 주의가 필요합니다.
리본 요소는 파열음(강한 " ㅂ”, “ㅌ" 및 " ㅍ" 소리)을
비롯해 마이크를 직접 향하는 모든 종류의 공기 흐름에
매우 민감합니다. 보컬을 가까이 녹음할 경우에는 언제
나 팝 필터를 사용해야 하며, 미사용시에는 마이크를 보
호해야 합니다.
The travel screw supplied will secure the ribbon ele-
ment in place during transportation. This be inmust -
stalled when transporting or moving the microphone,
and be removed when recording.must
To remove, secure the microphone in an UPRIGHT po-
sition. Carefully unscrew the travel screw, removing it
from the microphone completely. Store the screw in a
secure location when not installed in the microphone.
To install, secure the microphone in an UPRIGHT po-
sition. Carefully screw the travel screw into the micro-
phone top, taking care not to over-tighten.
Die Transportschraube dient zum Arretieren des Bänd-
chenelements vor dem Transport. Vor dem Transport
muss sie angebracht und vor dem Einsatz wieder ent-
fernt werden.
Halten Sie das Mikrofon GERADE, während Sie die
Schraube lösen. Lösen Sie die Schraube behutsam und
ziehen Sie sie aus dem Mikrofon. Bewahren Sie sie an
einem sicheren Ort, um sie später schnell zu nden.
Halten Sie das Mikrofon GERADE, während Sie die
Schraube wieder anbringen. Drehen Sie die Schraube
so weit wie möglich –aber ohne Gewalt– in das Mik-
rofon.
La vis de transport fournie bloque le ruban durant les
déplacements. Cette vis être installée avant tout doit
transport ou déplacement du micro et être retirée doit
avant l’enregistrement.
Pour retirer la vis, bloquez le micro en position VERTI-
CALE. Dévissez la vis de transport avec précaution et
extrayez-la du micro. Conservez la vis dans un endroit
sûr quand elle n’est pas installée sur le micro.
Pour installer la vis, bloquez le micro en position VER-
TICALE. Vissez avec précaution la vis de transport dans
le haut du micro en évitant de la serrer excessivement.
1
NTR Blitzstart
NTR Prise en main
Guía de Inicio rápido de NTR
Guida Veloce del NTR
NTR 快速入门
NTR クイックスタート・ガイド
NTR 퀵스타트 가이드
Q U I C K S T A R T G U I D E
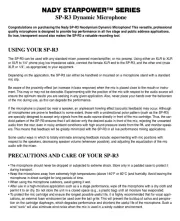
WHAT'S IN THE BOX
1. Capsula a nastro
2. Vite per il Trasporto
3. XLR di uscita
4. Supporto del Microfono
RM2
5. Protezione per la Polvere
(non illustrata)
1. 带式极头
2. 螺纹螺丝
3. XLR 输出
4. RM2 话筒支架
5. 防尘罩(未显示)
1. リボンカプセル
2. 固定ネジ
3. XLR 出力
4. RM2 マイクマウント
5. ダストカバー(イラス
ト無し)
1. 리본 캡슐
2. 트래블 스크류
3. XLR 출력
4. RM2 마이크 마운트
5. 먼지 커버(보이지 않음)
1. Ribbon Capsule
2. Travel Screw
3. XLR output
4. RM2
Microphone Mount
5. Dust Cover (not shown)
1. Bändchenkapsel
2. Transportschraube
3. XLR-Anschluss
4. RM2 Mikrofonhalterung
5. -Staubhaube (nicht ge
zeigt)
1. Capsule à ruban
2. Vis de transport
3. Sortie XLR
4. Fixation de microphone
RM2
5. Protection antipoussière
(non illustrée)
1. Cápsula de cinta
2. Tornillo de bloqueo para
transporte
3. Salida XLR
4. Soporte para micrófono
RM2
5. Cubierta antipolvo (no
visible)
CARE INSTRUCTIONS
Pege/Précautions/ Cuidado/Manutenzione/
保养说明/ /注意事項 관리 방법
Verwendung der Transportschraube/Vis de transport/Utilizar el tornillo de bloqueo para transporte/Utilizzo della vite per il trasporto/
使用螺纹螺丝/ /固定ネジを使用する 트래블 스크류 사용법
Speisung/Alimentation/Activar el micrófono/Alimentazione/
供电/ /電源を入れる 전원 공급
USING THE TRAVEL SCREW POWERING THE MICROPHONE
The RØDE NTR ribbon microphone features active
electronics, and therefore requires 48V phantom power
to operate.
Please ensure your recording device or mixing console
provides 48V phantom power. If not, an external dedi-
cated phantom power supply will be required.
Das RØDE NTR Bändchenmikrofon ist mit aktiver Elek-
tronik ausgestattet und benötigt daher 48V-Phantom-
speisung.
Eventuell liefert Ihr Mischpult oder Aufnahmegerät
48V-Phantomspeisung. Wenn nicht, benötigen Sie eine
externe Stromversorgung.
Le micro à ruban RØDE NTR est un dispositif électro-
nique actif nécessitant une alimentation fantôme de
48V.
Vériez donc si l’enregistreur ou la console de mixage
peut fournir une alimentation fantôme de 48V. Si ce
n’est pas le cas, utilisez une source d’alimentation fan-
tôme externe.
El micrófono de cinta RØDE NTR contiene electrónica
activa y, por lo tanto, requiere alimentación phantom
de 48V para funcionar.
Asegúrate de que tu dispositivo de grabación o con-
sola de mezclas proporcione alimentación phantom de
48V. De lo contrario, será necesaria una fuente de ali-
mentación phantom externa especíca.
Il microfono a nastro RØDE NTR è dotato di elettronica
attiva e quindi per il suo funzionamento richiede una
alimentazione phantom di 48V.
Per cui assicuratevi che il vostro registratore o la con-
sole di mixaggio fornisca l’alimentazione phantom
48V. Altrimenti, è necessario un alimentatore phantom
esterno dedicato.
RØDE NTR 带式话筒为有源电路设计,因此需要48V幻
象供电。
请确保您的录音设备或调音台提供48V幻象供电。 如果
没有,则需要使用外部专用幻象供电。
RØDE NTRリボンマイクには能動電子部品が使用さ
れているため、操作には48V ファンタム電源が必要
です。
使用する録音機器、またはミキサーから 48V ファン
タム電源が供給可能であることを確認してください。
そうでない場合には、外部から専用のファンタム電源
を供給する必要があります。
RØDE NTR 리본 마이크는 액티브 방식을 채택하고 있
으므로 작동을 위해 48V 팬텀 전원이 필요합니다.
RØDE NTR 리본 마이크는 액티브 방식을 채택하고 있
으므로 작동을 위해 48V 팬텀 전원이 필요합니다.
녹음 기기 또는 믹싱 콘솔이 48V 팬텀 전원을 공급하는
지 꼭 확인하십시오. 아닐 경우 외부 팬텀 전원 공급기
가 필요합니다.
3 PIN XLR
OUTPUT
WITH 48V
PHANTOM
POWER
2
3
4
90º
MUST BE
UPRIGHT
WHEN
TIGHTENING
SCREW
Lieferumfang/Contenu du carton/Contenido de la caja/
Cosa trovate nella scatola/ / /包装内容物 同梱品 제품 구성
GERADE ausrichten, bevor Sie die
Schraube anbringen.
Doit être en position VERTICALE
pour serrer la vis.
Debe estar en posición verical al
apretar el tornillo.
Quando stringete la vite deve
essere VERTICALE.
上紧螺丝时必须完全直立。
ネジを締める際は、必ず本体を直
立させた状態で上から締め付けて
ください。
스크류를 조일 때에는 위쪽 방향이
어야 합니다.
3-Pin XLR-Buchse mit 48V-Phantomspeisung
Prise XLR à 3 broches avec alimentation fantôme de 48V
Zócalo XLR de 3 patillas con alimentación phantom de 48V
Connettore XLR 3-Pin con alimentazione phantom 48V
3-针 XLR 槽,带48V幻象电源
3-ピン XLR 端子付き 48V 電源
3-핀 XLR 소켓 및 48V 팬텀 전원
El tornillo de bloqueo para transporte suministrado
jará la cinta en su sitio durante el transporte. Debe
instalarse al transportar o mover el micrófono y debe
retirarse durante la grabación.
Para retirarlo, ja el micrófono en posición VERTICAL.
Desenrosca con cuidado el tornillo de bloqueo para
transporte y retíralo completamente del micrófono.
Guarda el tornillo en un lugar seguro cuando no esté
colocado en el micrófono.
Para colocarlo, ja el micrófono en posición VERTICAL.
Atornilla con cuidado el tornillo de bloqueo para trans-
porte en la parte superior del micrófono, sin apretarlo
demasiado.
La vite per il trasporto fornita in dotazione manterrà
ferma la capsula a nastro durante il trasporto. Questa
vite -deve essere installata quando trasportate o spo
state il microfono e deve essere tolta quando regi-
strate.
Per toglierla, ssante il microfono in posizione VER-
TICALE. Con cautela svitate la vite per il trasporto,
togliendola completamente dal microfono. Quando
non è inserita nel microfono conservate la vite in un
posto sicuro.
Per metterla, ssante il microfono in posizione VERTI-
CALE. Con cautela avvitate la vite per il trasporto sopra
il microfono, avendo cura di non stringerla troppo.
随附的螺纹螺丝可在运输过程中固定带式极头。 在运输
或移动话筒时 安装螺丝,录音时必须卸除。必必
卸除螺丝时,将话筒固定在直立位置。 小心地拧开螺
丝,将其从话筒上完全卸除。 螺丝没有安装在话筒上
时,请将其存放在安全的位置。
安装螺丝时,请将话筒固定在直立位置。 小心地将螺丝
拧入话筒顶部,注意不要拧得过紧。
同梱の固定ネジを使用することにより、移動中に生じ
る振動からリボンエレメントを保護することができま
す。マイクを搬送する、または移動する際は、必ず こ
のネジで固定し、録音する際には 取り外してく必ず
ださい。
ネジを取り外す際は、マイクを直立させた状態に保っ
てから行なってください。慎重に固定ネジを緩め、マ
イクから完全に取り外してください。マイクに固定ネ
ジを使用しない場合は、安全な場所に保管してくださ
い。
ネジを装着する際は、マイクを直立させた状態に保っ
てから行なってください。マイク上部に固定ネジをあ
て、締め付けすぎないように注意してネジを締め付け
てください。
함께 제공되는 트래블 스크류는 이동 시 리본 요소를 제
자리에 고정시켜 줍니다. 이것은 마이크를 이동하거나
운반할 때 설치해야 하며, 또한 녹음 시에는 반드시 반
드시 제거해야 합니다.
제거를 위해서는 마이크를 반드시 위쪽 방향으로 고정
하십시오. 트래블 스크류를 조심스럽게 풀어낸 후, 마
이크에서 완전히 떼어냅니다. 스크류가 마이크에 설치
되어 있지 않을 때에는 안전한 곳에 보관해 주십시오.
설치를 위해서는 마이크를 반드시 위쪽 방향으로 고정
하십시오. 너무 심하게 죄지 않도록 하면서 트래블 스크
류를 조심스럽게 마이크 위쪽으로 돌려 넣습니다.