SKS Airspy TL Manual
SKS
Ikke kategoriseret
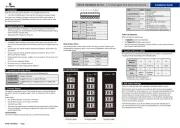
Airspy TL

| Mærke: | SKS |
| Kategori: | Ikke kategoriseret |
| Model: | Airspy TL |
Har du brug for hjælp?
Hvis du har brug for hjælp til SKS Airspy TL stil et spørgsmål nedenfor, og andre brugere vil svare dig
Ikke kategoriseret SKS Manualer
5 Juli 2025
5 Juli 2025
5 Juli 2025

1 Juli 2025
1 Juli 2025

1 Juli 2025
1 Juli 2025
24 Juni 2025
24 Juni 2025

7 April 2025
Ikke kategoriseret Manualer
- Gurari
- V7
- Viking
- CaterCool
- Busch + Müller
- Zephyr
- AV Tool
- Keeley
- Joovy
- Xiaomi
- Termozeta
- Amstrad
- Hasselblad
- Glock
- Boso
Nyeste Ikke kategoriseret Manualer

5 November 2025
5 November 2025
5 November 2025

5 November 2025
5 November 2025
5 November 2025

5 November 2025

5 November 2025
5 November 2025
5 November 2025