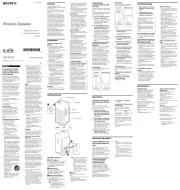
Sound Bar
Operating Instructions
HT-SD40
5-034-824-11 (2)
WARNING
Do not install the speaker system in a
confined space, such as a bookcase or
built-in cabinet.
To reduce the risk of fire, do not cover the
ventilation opening of the speaker system
with newspapers, tablecloths, curtains, etc.
Do not expose the speaker system to naked
flame sources (for example, lighted candles).
To reduce the risk of fire or electric shock, do
not expose this speaker system to dripping
or splashing, and do not place objects filled
with liquids, such as vases, on the speaker
system.
The speaker system is not disconnected
from the mains as long as it is connected to
the AC outlet, even if the speaker system
itself has been turned off.
As the mains plug is used to disconnect the
speaker system from the mains, connect the
speaker system to an easily accessible AC
outlet. Should you notice an abnormality in
the speaker system, disconnect the mains
plug from the AC outlet immediately.
CAUTION
Risk of explosion if the battery is replaced by
an incorrect type.
Do not expose batteries or appliances with
battery-installed to excessive heat, such as
sunshine and fire.
Do not place this product close to
medical devices.
This product (including accessories) has
magnet(s) which may interfere with
pacemakers, programmable shunt valves for
hydrocephalus treatment, or other medical
devices. Do not place this product close to
persons who use such medical devices.
Consult your doctor before using this
product if you use any such medical device.
Indoor use only.
Recommended cables
Properly shielded and grounded cables and
connectors must be used for connection to
host computers and/or peripherals.
For the bar speaker
The nameplate is located on the bottom
of the bar speaker.
This equipment has been tested and found
to comply with the limits set out in the EMC
regulation using a connection cable shorter
than 3 meters.
For customers in Europe
Notice for customers: the
following information is only
applicable to equipment sold in
countries applying EU directives
and/or UK applying relevant
statutory requirements
This product has been manufactured by or
on behalf of Sony Corporation.
EU and UK Importer: Sony Europe B.V.
Inquiries to the EU Importer or related to
product compliance in Europe should be
sent to the manufacturer’s authorized
representative, Sony Belgium, bijkantoor van
Sony Europe B.V., Da Vincilaan 7-D1, 1930
Zaventem, Belgium.
Inquiries to the UK Importer or related to
product compliance in the UK should be sent
to the manufacturer’s authorized
representative, Sony Europe B.V., The
Heights, Brooklands, Weybridge, Surrey KT13
0XW, United Kingdom.
Hereby, Sony Corporation declares that this
equipment is in compliance with Directive
2014/53/EU.
The full text of the EU declaration of
conformity is available at the following
internet address:
https://compliance.sony.eu
Hereby, Sony Corporation declares that this
equipment is in compliance with the UK
relevant statutory requirements.
The full text of the declaration of conformity
is available at the following internet address:
https://compliance.sony.co.uk
This radio equipment is intended to be used
with the approved version(s) of software that
are indicated in the Declaration of
Conformity. The software loaded on this
radio equipment is verified to comply with
the essential requirements of the Radio
Equipment Regulations.
The software version can be found by
following procedure.
1 Press and hold SOUND FIELD on the remote
control for more than 5 seconds.
The stream information appears in the front
panel display.
2 Press (volume) +/– on the remote control
to display the software version in the front
panel display.
Disposal of waste
batteries and electrical
and electronic equipment
(applicable in the
European Union and
other countries with
separate collection systems)
This symbol on the product, the battery or on the
packaging indicates that the product and the
battery shall not be treated as household waste.
On certain batteries this symbol might be used in
combination with a chemical symbol. The
chemical symbol for lead (Pb) is added if the
battery contains more than 0.004% lead. By
ensuring that these products and batteries are
disposed of correctly, you will help to prevent
potentially negative consequences for the
environment and human health which could be
caused by inappropriate waste handling. The
recycling of the materials will help to conserve
natural resources. In case of products that for
safety, performance or data integrity reasons
require a permanent connection with an
incorporated battery, this battery should be
replaced by qualified service staff only. To ensure
that the battery and the electrical and electronic
equipment will be treated properly, hand over
these products at end-of-life to the appropriate
collection point for the recycling of electrical and
electronic equipment. For all other batteries,
please view the section on how to remove the
battery from the product safely. Hand the battery
over to the appropriate collection point for the
recycling of waste batteries. For more detailed
information about recycling of this product or
battery, please contact your local Civic Office, your
household waste disposal service or the shop
where you purchased the product or battery.
This equipment should be installed and operated
keeping the radiator over 20 cm away from
person’s body.
Precautions
On safety
• Should any solid object or liquid fall into the
speaker system, unplug the speaker system and
have it checked by qualified personnel before
operating it any further.
• Do not climb on the speaker system, as you may
fall down and injure yourself, or speaker system
damage may result.
On power sources
• Before operating the speaker system, check that
the operating voltage is identical to your local
power supply. The operating voltage is indicated
on the nameplate on the bottom of the bar
speaker.
• If you are not going to use the speaker system
for a long time, be sure to disconnect the
speaker system from the wall outlet (mains). To
disconnect the AC power cord (mains lead),
grasp the plug itself; never pull the cord.
• One blade of the plug is wider than the other for
the purpose of safety and will fit into the wall
outlet (mains) only one way. If you are unable to
insert the plug fully into the outlet, contact your
dealer.
• The AC power cord (mains lead) must be
changed only at a qualified service shop.
On heat buildup
Although the speaker system heats up during
operation, this is not a malfunction.
If you continuously use this speaker system at
high volume, the speaker system temperature at
the rear and bottom rises considerably. To avoid
burning yourself, do not touch the speaker
system.
On placement
• Place the speaker system in a location with
adequate ventilation to prevent heat buildup
and prolong the life of the speaker system.
• Do not place the speaker system near heat
sources or in a place subject to direct sunlight,
excessive dust, or mechanical shock.
• Do not place anything on the top of the bar
speaker.
• If the speaker system is being used in
combination with a TV, VCR, or tape deck, noise
may result and picture quality may suffer. In
such a case, place the speaker system away
from the TV, VCR, or tape deck.
• Use caution when placing the speaker system
on a surface that has been specially treated
(with wax, oil, polish, etc.), as staining or
discoloration of the surface may result.
• Take care to avoid any possible injury from the
corners of the bar speaker.
On operation
Before connecting other equipment, be sure to
turn off and unplug the speaker system.
If you encounter color irregularity on a
nearby TV screen
Color irregularities may be observed on certain
types of TV.
• If color irregularity is observed...
Turn off the TV, then turn it on again after 15 to
30 minutes.
• If color irregularity is observed again...
Place the speaker system further away from the
TV.
On cleaning
• Clean the speaker system with a soft, dry cloth.
Do not use any type of abrasive pad, scouring
powder, or solvent such as alcohol or benzine.
If you have any questions or problems concerning
your speaker system, please consult your nearest
Sony dealer.
About These Operating
Instructions
• The instructions in these Operating Instructions
describe the controls on the remote control.
• Some illustrations are presented as conceptual
drawings, and may be different from the actual
products.
• Characters in brackets [ ] appear in the front
panel display.
Installation and
Connection
Connecting a TV with an HDMI
Cable and/or Optical Cable
Refer to Startup Guide (separate document).
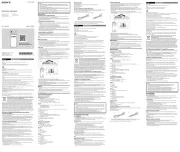
Mounting the Bar Speaker on a
Wall
You can mount the bar speaker on a wall.
Notes
• Prepare screws (not supplied) that are suitable for the wall
material and strength. As a plasterboard wall is especially
fragile, attach the screws securely in the wall beam. Install
the bar speaker horizontally, hung by screws in studs in a
continuous flat section of the wall.
• Have the installation done by a Sony dealer or licensed
contractor and pay special attention to safety during the
installation.
• If using a cable with a large plug, it may not be possible to
mount the bar speaker on a wall.
• Sony shall not be held responsible for accidents or damage
caused by improper installation, insufficient wall strength,
improper screw installation, natural disasters, etc.
1 Prepare two screws (not supplied) that are
suitable for the wall mount holes on the rear
of the bar speaker.
4 mm
30 mm or more
5.1 mm
10 mm
Hole on the rear of
the bar speaker
2 Align the vertical line above the “ TV
CENTER LINE” printed on the WALL MOUNT
TEMPLATE (supplied) with the center of the
width of your TV.
Center of the TV
WALL MOUNT
TEMPLATE
3 Align the “ TV BOTTOM LINE” printed on
the WALL MOUNT TEMPLATE with the bottom
of your TV, then adhere the WALL MOUNT
TEMPLATE on the wall with a commercially
available adhesive tape, etc.
Adhesive
tape, etc.
WALL MOUNT
TEMPLATE
4 Fasten the screws prepared in step 1 securely
into the screw marks ( ) on the “ SCREW
LINE” printed on the WALL MOUNT TEMPLATE.
368.5 mm 368.5 mm
10.5 mm to
11.5 mm
Screws
Marks ( )
737 mm
5 Remove the WALL MOUNT TEMPLATE.
6 Hang the bar speaker on the screws.
Align the holes on the rear of the bar speaker
with the screws, then hang the bar speaker on
the two screws.
Note
When sticking WALL MOUNT TEMPLATE, smooth it out fully.
Connecting the Subwoofer
Manually
If you cannot connect the subwoofer to the
speaker system, or you use multiple wireless
products and want to specify the wireless
connection to link the speaker system to the
subwoofer, perform the manual connection.
Power indicator
LINK
(BLUETOOTH) button
+ (volume) button
1 Press and hold (BLUETOOTH) and + (volume)
on the bar speaker for more than 5 seconds.
[SECURE LINK] appears, then[LINK] flashes in
the front panel display.
To cancel the manual connection, press and
hold (BLUETOOTH) and + (volume) on the bar
speaker for more than 5 seconds again.
2 Press LINK on the subwoofer.
The manual connection starts.
The power indicator of the subwoofer flashes
in amber.
3 Make sure that [DONE] appears in the front
panel display.
The manual connection is established and the
power indicator of the subwoofer lights in
amber.
Note
If [ERROR] appears in the front panel display, the connection
of the subwoofer has not been established. Perform the
manual connection again.
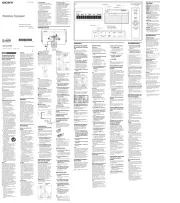
Parts and Controls
Bar Speaker
Front
(power) button
Turns on the speaker system or sets it to
standby mode.
(TV) button
(BLUETOOTH) button
+/– (volume) buttons
BLUETOOTH indicator
— Flashes twice in blue: During pairing
standby status
— Flashes in blue: BLUETOOTH connection is
being attempted.
— Lights in blue: BLUETOOTH connection has
been established.
Front panel display
Remote control sensor
Point the remote control at the remote control
sensor to operate the speaker system.
Rear
AC inlet
HDMI OUT (TV (ARC)) jack
Connect a TV that has an HDMI input jack with
an HDMI cable. The speaker system is
compatible with Audio Return Channel (ARC).
ARC is the function that sends TV sound to an
AV device such as the speaker system from
the TV’s HDMI jack.
TV IN (OPTICAL) jack
IR repeater
Transmits the remote signal of the TV remote
control to the TV.
UPDATE port
Connect the USB memory when updating the
speaker system.
Subwoofer
Power indicator
— Lights in green: The subwoofer is connected
to the speaker system.
— Lights in red: The subwoofer is in standby
mode.
— Lights in amber: The subwoofer is
connected to the speaker system with the
manual connection.
— Flashes slowly in green: The subwoofer is
attempting to connect to the speaker
system.
— Flashes slowly in amber: The subwoofer is
attempting to connect to the speaker
system with the manual connection.
— Flashes twice in amber: The subwoofer is in
pairing standby status with the manual
connection.
— Flashes quickly in amber: The software is
updating.
— Turns off: The subwoofer is turned off.
(power) button
Turns on or off the subwoofer.
LINK button
AC inlet
Remote Control
Some buttons function differently depending on
how long the button is pressed. This section
explains the functions when pressed shortly.
For details about other functions, refer to
“Changing the Settings” on the back page.
INPUT
Selects the input for playback on the speaker
system.
Each time you press INPUT, the input source
toggles between the TV and BLUETOOTH
input.
SOUND FIELD
Turns on/off the surround effect.
(volume) +*/–
Adjusts the volume.
BASS +/–
Adjusts the subwoofer volume.
(power)
Turns on the speaker system or sets it to
standby mode.
VOICE
Turns on/off the voice mode.
NIGHT
Turns on/off the night mode.
(muting)
Mutes the sound temporarily.
* The (volume) + button has a tactile dot. Use it as a
guide during operation.
About the replacement of batteries for the
remote control
When the speaker system does not respond by
operating with the remote control, replace two
batteries with new batteries.
Use R03 (size AAA) manganese batteries for
replacement.
Listening to Music/Sound
Listening to a TV Connected with
an HDMI Cable (ARC) or Optical
Digital Cable
You can listen to TV sound on the speaker system.
INPUT
(volume) +/–
BASS +/–
1 Press INPUT repeatedly to select [TV] in the
front panel display.
2 Adjust the volume.
• Adjust the volume by pressing (volume)
+/– on the remote control.
• Adjust the subwoofer volume by pressing
BASS +/– on the remote control.
Note
When you connect the TV to both the HDMI OUT (TV (ARC))
and TV IN (OPTICAL) jacks, the jack for audio input is selected
depending on which audio signal is input first.
Tip
You can also select the input by pressing (TV) on the bar
speaker.
Listening to Music from a Mobile
Device with the BLUETOOTH®
Function
You can listen to music stored on a mobile device
such as a smartphone or tablet via wireless
connection by connecting the speaker system and
the mobile device with the BLUETOOTH function.
When connecting to the mobile device with the
BLUETOOTH function, you can perform operations
simply through the speaker system without
turning the TV on.
Listening to Music by Pairing with a
Mobile Device
You need to perform pairing of the speaker
system and mobile device by using the
BLUETOOTH function.
Pairing is the process required to mutually register
the information on BLUETOOTH devices to be
connected wirelessly in advance.
(volume) +/–
BASS +/–
1 Press and hold (BLUETOOTH) on the bar
speaker for 2 seconds.
(BLUETOOTH)
button
2 Make sure that the BLUETOOTH indicator on
the bar speaker flashes twice repeatedly in
blue and [PAIRING] appears in the front panel
display.
The speaker system enters the pairing mode.
3 On the mobile device, search for the speaker
system by performing the pairing operation.
The list of the BLUETOOTH devices that are
detected appears on the screen of the mobile
device.
For the operation method to pair the
BLUETOOTH device to the mobile device, refer
to the operating instructions of the mobile
device.
4 Pair the speaker system and mobile device by
selecting “HT-SD40” from the list on the screen
of the mobile device.
If a passkey is requested, enter “0000.”
5 Make sure that the BLUETOOTH indicator on
the bar speaker lights in blue and [BT] appears
in the front panel display.
A connection between the speaker system and
mobile device has been established.
6 Start audio playback with the music app on
the connected mobile device.
Sound is output from the speaker system.
7 Adjust the volume.
• Adjust the volume by pressing (volume)
+/– on the remote control.
• Adjust the subwoofer volume by pressing
BASS +/– on the remote control.
Notes
• You can pair up to 9 BLUETOOTH devices. If a 10th
BLUETOOTH device is paired, the oldest connected device
will be replaced by the new one.
• Perform pairing for the second and subsequent mobile
devices.
Tips
• You can check the connection status of the BLUETOOTH
function by checking the BLUETOOTH indicator status.
• While the BLUETOOTH input is being selected, the speaker
system enters the pairing mode by pressing (BLUETOOTH)
on the bar speaker shortly.
Listening to Music from the Paired
Mobile Device
INPUT
(volume) +/–
BASS +/–
1 Turn the BLUETOOTH function of the mobile
device on.
2 Press INPUT repeatedly to select [BT] or press
(BLUETOOTH) on the bar speaker shortly.
The BLUETOOTH indicator flashes and the
speaker system automatically reconnects to the
BLUETOOTH device it was most recently
connected to.
3 Make sure that the BLUETOOTH indicator on
the bar speaker lights in blue and [BT] appears
in the front panel display.
A connection between the speaker system and
mobile device has been established.
4 Start audio playback with the music app on
the connected mobile device.
Sound is output from the speaker system.
5 Adjust the volume.
• Adjust the volume by pressing (volume)
+/– on the remote control.
• Adjust the subwoofer volume by pressing
BASS +/– on the remote control.
Adjusting the Sound
Enjoying Surround Effect (SOUND
FIELD)
You can turn the surround effect on or off to suit
sound sources.
SOUND FIELD
1 Press SOUND FIELD to select the setting.
The setting appears in the front panel display.
Setting Explanation
[SF.ON] The sound is output with the
surround effect.
This setting is suitable for
experiencing the surround
sound with presence.
[SF.OFF] The sound is output without
the surround effect.
This setting is suitable for
listening to music or news.
Making Dialogs Clearer (VOICE)
VOICE
1 Press VOICE to select the setting.
The setting appears in the front panel display.
Setting Explanation
[Vo.ON] Dialog is easily heard by
enhancing dialog range.
[Vo.OFF] Deactivates the voice mode
function.
Enjoying Clear Sound with Low
Volume at Midnight (NIGHT)
NIGHT
1 Press NIGHT to select the setting.
The setting appears in the front panel display.
Setting Explanation
[N.ON] Sound is output at low volume
with minimum loss of fidelity
and clarity of dialog.
[N.OFF] Deactivates the night mode
function.
Note
When you turn the speaker system off, this setting is set to
[N.OFF] automatically.
Using the Speaker System
by Interlocking with a TV
Operating the Speaker System
by Interlocking with a TV
(Control for HDMI Function)
Connecting a TV compatible with the Control for
HDMI function using an HDMI cable enables you
to interlock the speaker system operation such as
power on/off or volume adjustment with a TV.
About the Control for HDMI function
The Control for HDMI function is a function that
enables operation of devices connected with an
HDMI (High-Definition Multimedia Interface) cable
by interlocking them.
Although this function works for devices
compatible with the Control for HDMI function, it
may not work if connecting devices other than
those manufactured by Sony.
Preparing to Operate by Interlocking
with a TV
Enable the Control for HDMI function settings of
the TV connected to the speaker system with an
HDMI cable.
The default setting of the Control for HDMI
function of the speaker system is [ON].
Tips
• When connecting a device such as a Blu-ray Disc player to a
TV with an HDMI cable, enable its Control for HDMI function.
• To enable the Control for HDMI function of a TV or Blu-ray
Disc player, refer to their operating instructions.
• If you enable the Control for HDMI (“BRAVIA” sync) function
when using a TV manufactured by Sony, the Control for
HDMI function of the speaker system is also enabled
automatically. When the setting is complete, [DONE]
appears in the front panel display.
Performing Power Operation or
Volume Adjustment by a TV Remote
Control
When turning the TV on/off or adjusting the
volume using the TV remote control, the speaker
system power operation or volume adjustment is
interlocked.
Power interlocking
When you turn on or off the TV, the speaker
system will turn on or off automatically.
Note
If you turn off the speaker system before turning off the TV,
the speaker system may not turn on automatically even
though you turn on the TV next time. In this case, perform
the following operation.
— Select the speaker system for the sound output device in
the TV menu.
— When using Sony TV, turn on the speaker system while the
TV is turned on.
Volume adjustment
The sound of the TV you are watching is output
from the speaker system automatically. You can
adjust the speaker system volume by the TV
remote control.
Tip
You can change the Control for HDMI settings by following
procedure.
1 Press and hold VOICE on the remote control for more
than 5 seconds.
[CONTROL FOR HDMI] appears in the front panel display.
2 Press (volume) +/– on the remote control to display
the desired setting in the front panel display.
3 Wait until the displayed setting disappears from the front
panel display.
The setting is fixed.
Operating the Speaker System
by Interlocking with a TV
Compatible with the “BRAVIA”
Sync Function
“BRAVIA” Sync is an extended function developed
by Sony based on the Control for HDMI function.
By connecting “BRAVIA” Sync-compatible devices
such as a TV using an HDMI cable, you can control
the devices by interlocking them with each other.
To use “BRAVIA” Sync
“BRAVIA” Sync is enabled by enabling the Control
for HDMI function of the Sony device. For the
operation to enable the Control for HDMI function,
see “Preparing to Operate by Interlocking with a
TV.”
What You Can Do with “BRAVIA” Sync
Control for HDMI function
• Power interlocking
• Volume adjustment
Saving Power
Consumption
To use the speaker system with saving power
consumption, change the following settings.
Turning the Speaker System Off
by Detecting the Using State
When you set the auto standby function to on,
the speaker system enters standby mode
automatically when you do not operate the
speaker system for about 20 minutes and the
speaker system is not receiving an input signal.
1 Press and hold (power) and (TV) on the
bar speaker for more than 5 seconds.
[AUTO STANDBY] and the current setting
appear in the front panel display.
2 Press (volume) +/– on the remote control
to display the desired setting in the front
panel display.
3 Wait until the displayed setting disappears
from the front panel display.
The setting is fixed.
Saving Power in Standby Mode
To save power consumption during the standby
mode, set the BLUETOOTH standby mode and
Control for HDMI function to off.
To change the BLUETOOTH standby mode setting,
press and hold (power), (BLUETOOTH), and
–(volume) on the bar speaker for more than 5
seconds (the changed setting appears in the front
panel display).
To change the Control for HDMI function setting,
press and hold VOICE on the remote control for
more than 5 seconds to display the setting in the
front panel display, then press (volume) +/– on
the remote control to select the desired setting.
Continued on back page