ソニー製品は安全に充分に配慮して設計されています。しかし、まちがっ
た使いかたをすると、火災や感電などにより死亡や大けがなど人身事故に
破損したら使わずに、お買い上げ店またはソニーのサービス窓口に相談
分にランプが冷えてから行ってください。電源を切った直
後はランプが高温になっており、さわるとやけどの原因と
ランプを持ち運んだり廃棄する際は、必ず付属の専用ケー
スに入れてください。ケースに入れずに持ち運ぶとランプ
SRX-R110/S110/T110/R105/S105/T105
ランプとランプハウスです。他の製品に絶対にお使いにな
らないでください。火災や故障などの原因となります。
お使いください。分解・改造して使用すると火災や感電、ラ
ランプハウスの交換作業時には電源ケーブルを外すか、ブ
ランプを抜いたあとのランプの収納部に金属類や燃えやす
い物などの異物を入れないでください。火災や感電の原因
ランプハウスの交換はサービスマンが、ランプの交換はト
レーニングを受けた方が行ってください。他の方が行うと、
寿命がきたら、ランプが正常に点灯している場合でも速や
かに新しいランプと交換してください。寿命が過ぎたラン
ランプを交換する際は、ランプハウスの吸気・排気部の清掃
を行ってください。吸気・排気部が汚れていると、ランプの
ランプに衝撃を与えたり、ランプ表面に傷を付けないでく
ださい。ランプには、高圧のキセノンガスが封入されてお
ランプ交換の際は、厚手の長袖着、長ズボンを着用し、必ず
プロテクションスーツキットを着用してください。また、
靴は足の甲が完全に覆われているタイプの靴を履いてくだ
さい。万一ランプが破裂した場合、けがの原因となります。
ランプを廃棄する際は、本取扱説明書に従い、ランプを
割ってから廃棄してください。割らずに廃棄すると、けが
下記の注意を守らないと、火災や感電 死亡により や大けがに
安全のための注意事項を守らないと、火災や人身事故になる
この取扱説明書には、事故を防ぐための重要な注意事項と製品の取り扱い
かたを示しています。 、製品を安全にこの取扱説明書をよくお読みのうえ
お使いください。お読みになったあとは、いつでも見られるところに必ず
Operating Instructions Mode d’emploi
Sony Corporation 2005 Printed in Japan
A - 3 (SRX-R110/S110/R105/S105)
Before operating the unit, please read this manual thoroughly and
retain it for future reference.
The projection lamps and projection lamp houses should be used with
the following models only. Never use them for any other projector as
doing so may lead to breakdown, fire or explosion.
For the Sony SRX-R110/S110/T110 SRX projector: LKRX-110 lamp/
For the Sony SRX-R105/S105/T105 SRX projector: LKRX-105 lamp/
• Be sure to ask a qualified service personnel to replace a lamp house
to avoid explosion or injury.
• When replacing the lamp house with a new one, wait for at least one
hour for the lamp to cool.
Wear protective glasses, commercially available, when you replace the
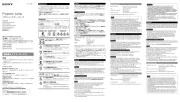
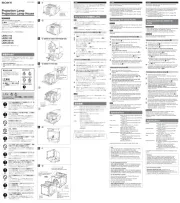
Removing the Lamp House from the Projector A
1Remove the three screws on the cooling unit at the rear of the
projector. (See Fig. A-1.)
2Pull the cooling unit toward you, then lift it up to remove.
3When using an SRX-R110/S110/R105/S105
Release the two screws at the rear of the cooling fan located
between the two lamp houses, then pull down the fan toward you.
When using an SRX-T110/T105
1Release the remote control detector bracket. (See Fig. A-3-
2Loosen the two screws on the fan cover. Lift up the fan cover,
then pull it toward you to remove. (See Fig. A-3- .)2
3Pull the fan(s) at the front of the lamp house. (See Fig. A-3-
4Release one lamp house attachment screw on the front of a lamp
house and the two special screws for connecting the electrodes at
the inner bottom of the lamp house, then pull the lamp house
straight out. (See Fig. A-4.)
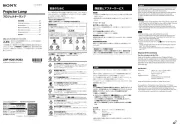
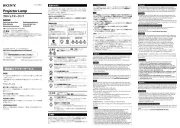
Replacing the Lamp House B
1Remove the lamp house from the projector.
Perform steps 1 to 4 in “Removing the Lamp House from the
2Attach the supplied two special screws for connecting the
electrodes to the two electrodes at the bottom of the new lamp
house in the correct direction, as illustrated. (See Fig. -1. TheB
figure indicates the case of replacing “Lamp A.”)
3This procedure is necessary only when you use the LKRX-
B110. If you use the LKRX-B105, go to step 4.
Attach the supplied lamp house cushion (A) in the position shown
Remove the double-faced tape from the lamp house cushion (A)
and attach it to a position 8-10 mm from the edge, as illustrated.
The end of the lamp house cushion (A) should touch the lamp
house cushion (B) attached at the factory. (See Fig. B-2.)
The lamp houses are referred to as “Lamp A” and “Lamp B”
according to the position of the lamp house cushion (A), as
4Insert the new lamp house straight into the projector so that the
side from which you can see the lamp is positioned inward, then
tighten the two special screws with 5N•m.
5Fix the lamp house to the projector with the supplied lamp house
attachment screw, and replace the cooling fan and cooling unit.
Perform steps 1 to 3 in “Removing the Lamp House from the
Projector” in reverse order.
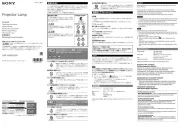
Install the lamp houses with the side where the lamp is visible located
inside and the gray rear cover located outside.
The lamp house installed on the left from the rear of the projector is
referred to as “Lamp A,” and that on the right as “Lamp B.”
Lamp LKRX-110: 2kW Xenon lamp for the SRX-R110/
LKRX-105: 1kW Xenon lamp for the SRX-R105/
Lamp house LKRX-B110: Lamp house for the SRX-R110/
LKRX-B105: Lamp house for the SRX-R105/
Dimensions (w/h/d) LKRX-B110/B105: 156 × 171 × 210 mm
Mass LKRX-110: Approx. 450 g (14 oz)
LKRX-105: Approx. 300 g (11 oz)
LKRX-B110: Approx. 2.6 kg (5 lb 12 oz)
LKRX-B105: Approx. 2.5 kg (5 lb 8 oz)
Supplied accessories Case (LKRX-110/105) (1)
Lamp house attachment screw (LKRX-B110/
Special screw for connecting the electrodes
Lamp house cushion (A) (for LKRX-B110 only)
Operating Instructions (1)
Design and specifications are subject to change without notice.
Always verify that the unit is operating properly before use. SONY
WILL NOT BE LIABLE FOR DAMAGES OF ANY KIND
INCLUDING, BUT NOT LIMITED TO, COMPENSATION OR
REIMBURSEMENT ON ACCOUNT OF THE LOSS OF PRESENT
OR PROSPECTIVE PROFITS DUE TO FAILURE OF THIS UNIT,
THE WARRANTY PERIOD OR AFTER EXPIRATION OF THE
WARRANTY, OR FOR ANY OTHER REASON WHATSOEVER.
For the customers in the U.S.A.
SONY LIMITED WARRANTY - Please visit http://www.sony.com/
psa/warranty for important information and complete terms and
conditions of Sony’s limited warranty applicable to this product.
For the customers in Canada
SONY LIMITED WARRANTY - Please visit http://www.sonybiz.ca/
solutions/Support.do for important information and complete terms
and conditions of Sony’s limited warranty applicable to this product.
For the customers in Europe
Sony Professional Solutions Europe - Standard Warranty and
Exceptions on Standard Warranty.
http://www.pro.sony.eu/warranty for important
information and complete terms and conditions.
For the customers in Korea
SONY LIMITED WARRANTY - Please visit http://bpeng.sony.co.kr/
handler/BPAS-Start for important information and complete terms
and conditions of Sony’s limited warranty applicable to this product.
Coussinet (B) du boîtier de lampe
Coussinet (A) du boîtier de
Direction of lamp attachment
Sens d’installation de la
それぞれのプロジェクションランプとランプハウスは下記の製品用です。
他の製品にお使いになると、火災、破裂や故障などの原因になりますので
ランプハウスの交換は、サービス担当者が行ってください。
ランプハウス交換の際は、市販の保護メガネを着用してください。
2クーリングユニットを手前に引き、持ち上げて取り外す。(図A
灯のランプハウス間にあるランプ用冷却ファン裏側のネジ
本をゆるめる。ファンカバーを持ち上げて、手前に引いて取
本をゆるめ、ランプハウスを手前にまっすぐ引き出す。
1「プロジェクターからランプハウスを取り外す」の手順
に合わせて、図のように底面の電極に取り付ける。(図B
灯のランプハウスは、図のようにランプハウスクッション
4ランプの見える側が内側になるように、新しいランプハウスをプロ
ジェクター本体にまっすぐ押し込み、取り付けた電極固定用の特殊ネ
に固定し、冷却ファン、クーリングユニットを元どおり取り付ける。
「プロジェクターからランプハウスを取り外す」の手順
ランプの見える側が内側に、灰色のリアカバーのある側が外側にくるよう
本機の仕様および外観は、改良のため予告なく変更することがあります
お使いになる前に、必ず動作碓認を行ってください。故障その他に伴
う営業上の機会損失等は保証期間中および保証期間経過後にかかわら
Avant d’utiliser l’appareil, veuillez lire attentivement ce manuel et le
conserver pour future référence.
Les lampes de projection et les boîtiers de lampe doivent être utilisés
avec les modèles suivants uniquement. Ne les utilisez jamais pour un
autre projecteur car ceci risquerait de provoquer une panne, un
incendie ou une explosion.
Pour le projecteur SRX Sony SRX-R110/S110/T110 : lampe LKRX-
110/boîtier de lampe LKRX-B110
Pour le projecteur SRX Sony SRX-R105/S105/T105 : lampe LKRX-
105/boîtier de lampe LKRX-B105
Remplacement du boîtier de
• Veillez à faire remplacer la lampe par un personnel de service après-
vente qualifié afin d’éviter toute explosion ou blessure.
• Lorsque vous remplacez le boîtier de lampe par un boîtier neuf,
attendez au moins une heure pour que la lampe refroidisse.
Portez des lunettes de protection disponibles dans le commerce
lorsque vous remplacez le boîtier de lampe.
Retrait du boîtier de lampe du projecteur A
1Retirez les trois vis du dispositif de refroidissement situé à l’arrière
du projecteur. (Voir Fig. -1)A
2Tirez le dispositif de refroidissement vers vous, puis soulevez-le
pour le retirer. (Voir Fig. A-2)
3Lors de l’utilisation d’un SRX-R110/S110/R105/S105
Desserrez les deux vis à l’arrière du dispositif de refroidissement
situées entre les deux lampes boîte du projecteur, puis tirez le
ventilateur vers vous. (Voir Fig. A-3)
Lors de l’utilisation d’un SRX-T110/T105
1Dégagez le support du capteur de télécommande. (Voir
2Desserrez les deux vis qui se trouvent sur le couvercle du
ventilateur. Soulevez le couvercle du ventilateur, puis tirez-le
vers vous pour le retirer. (Voir Fig. A-3- )2
3Tirez le(s) ventilateur(s) à l’avant de la lampe boîte. (Voir
4Retirez une vis de fixation à l’avant du boîtier de lampe et les deux
vis spéciales, permettant de raccorder les électrodes, sur la face
inférieure interne du boîtier de lampe, puis tirez celui-ci en le
maintenant bien droit. (Voir Fig. -4)A
Remplacement du boîtier de lampe B
1Retirez le boîtier de lampe du projecteur.
Exécutez les étapes 1 à 4 de la section « Retrait du boîtier de
2Fixez les deux vis spéciales fournies, permettant de raccorder les
électrodes, aux deux électrodes situées sous le nouveau boîtier de
lampe dans le bon sens, comme illustré. (Voir Fig. -1)B
L’illustration concerne le remplacement de la « Lampe A ».)
3Cette procédure est nécessaire uniquement lorsque vous
utilisez le boîtier de lampe LKRX-B110. Si vous utilisez le
modèle LKRX-B105, passez à l’étape 4.
Fixez le coussinet (A) du boîtier de lampe fourni à l’emplacement
Retirez le ruban adhésif double face du coussinet (A) du boîtier de
lampe puis fixez-le à environ 8 à 10 mm du bord, ainsi qu’il est.
L’extrémité du coussinet (A) du boîtier de lampe doit toucher le
coussinet (B) de boîtier de lampe fixé en usine. (Voir Fig. B-2)
Les boîtiers de lampes sont désignés par « Lampe A » et « Lampe
B » en fonction de la position du coussinet (A) du boîtier de lampe,
4Insérez le nouveau boîtier de lampe bien droit dans le projecteur
de sorte que le côté visible de la lampe soit orienté vers l’intérieur,
puis vissez les deux vis spéciales avec un couple de 5N•m.
5Fixez le boîtier de lampe sur le projecteur à l’aide de la vis de
fixation fournie à cet effet, puis remettez l’ailette de ventilation et le
dispositif de refroidissement en place.
Exécutez les étapes 1 à 3 de la section « Retrait du boîtier de
lampe du projecteur » en sens inverse.
Installez les boîtiers de lampe du côté où la lampe est visible à
l’intérieur et avec le capot gris arrière à l’extérieur.
Le boîtier de lampe installé à gauche par rapport à l’arrière du
projecteur est appelé « Lampe A » et celui situé à droite est appelé
Lampe LKRX-110 : lampe au xénon 2 kW pour le SRX-
LKRX-105 : lampe au xénon 1 kW pour le SRX-
Boîtier de lampe LKRX-B110 : boîtier de lampe pour le SRX-
LKRX-B105 : boîtier de lampe pour le SRX-
Dimensions (l/h/p) LKRX-B110/B105 : 156 × 171 210 mm×
Poids LKRX-110 : environ 450 g (14 oz)
LKRX-105 : environ 300 g (11 oz)
LKRX-B110 : environ 2,6 kg (5 lb 12 oz)
LKRX-B105 : environ 2,5 kg (5 lb 8 oz)
Accessoires fournis Etui (LKRX-110/105) (1)
Vis de fixation du boîtier de lampe (LKRX-B110/
Vis spéciale permettant de raccorder les
électrodes (LKRX-B110/B105) (2)
Coussinet (A) du boîtier de lampe (pour le
LKRX-B110 uniquement) (3-991-820-01) (1)
La conception et les spécifications sont sujettes à modifications sans
Vérifiez toujours que l’appareil fonctionne correctement avant
l’utilisation. Sony n’assumera pas de responsabilité pour les
dommages de quelque sorte qu’ils soient, incluant mais ne se
limitant pas à la compensation ou au remboursement, à cause de
la perte de profits actuels ou futurs suite à la défaillance de cet
appareil, que ce soit pendant la période de garantie ou après son
expiration, ou pour toute autre raison quelle qu’elle soit.
Pour les clients au Canada
GARANTIE LIMITÉE DE SONY - Rendez-vous sur
http://www.sonybiz.ca/solutions/Support.do pour obtenir les
informations importantes et l’ensemble des termes et conditions de
la garantie limitée de Sony applicable à ce produit.