SONY.
7 - :J
Cage
Cage
KapKac
KapKac
{liHP~
4-697-598-
01
(2)
QYt&.
IDl
BJ3:@t/Operating
instructions/Mode d'empl
oil
Manual
de
instrucciones/Bedienungsanleitung/
Gebruiksaanwijzing/Bruksanvisning/
ls
truzioni
per
l
'uso/lnstru~6es
de
opera~ao/OOrwiE<;
AELtoupyla<J
lnstrukcja obslugi/Ntlvod
na
obs
luhu/Kezelesi
Utmutat6/lnstructi uni de utilizare/
Betjeningsvejledriing/N.3vod k pouZiti/K.3yttOohjeet/
~HCTPYKU,Ir1s:!
no 3Kcnnyaral.J,Ir1VIIIH
CTpyKu,i"l
3
eKCnnyara~i'i/fj!llJil!lllllli
fi!"l!li$!11Jl'l';
i
Af§~~Al
i~l
ul.,W
_
.\ICT-CGR1
© 2017 Sony
Corporation
Printed
in China
http://www.so
ny.neV
11111111111111111111111111111
4697598010
OK
~:;
~
~~
4
~
t::.-~
[Elmil
'illll!OFF;
O:
tl!'
]
~[i<>i
]
IC!\tiE90
<::
1::
c
\illl
!il
l
iii~.lD1ir"j
~li!l<l9<::1::b'c~*'
·
;1'1llll;t
.
i:J:<70)11liJ&;;liB~fihc·!i.<
tczc'.
ifiJ.I..tO)
<::')!~
•
::$:~
1;::i.J
;:,I,
7~
Y
'7/
t--tJC1J1Pfi:
~
C~~J11176t1T\.,\
~L..t~liiml
-z:-tJ
,
<;J:;
~
t..\<
tC.~l\"
~U!:t:>l-tt;iO)!Jf{
E!JC:.f,i~L
C:.t.JIJ5~J
*"t
o
•
i;@IJ)j
~Ji:
;IJ;Ji]Oi;@
I
CI!li
1
J
fili
3
7-?t
':'
') - IC J;
e>
""[
ld:
,i::trf:l
;:~
~
J
f:tlttc7J
'J..
"50)#
5'
/1£:-:f!ll
tt
fJl,i:lg!§l
1J\(17j~J
:t
9.
•
;:f;
f!I
:
7J
'J..
71J'i~'
J#
1
7S
tlT
l-
i!J"l-i1*~L\
@
0)1Jio:J
!:9'.-i-\7
JLJ~
@l
L
.m
l
7~
C:.i51l~t.M
i-
tL*
9
o
-t-O)ti.\13-l;t,
·5f-{
'\'Jc~;J'(o)z
( ) Q) I
C@l
~
cllli
1
JitliT<
tcZC'
.
•
i"U'MO)Bl\~tJiJPHm~tlTl-'~$:90)C\
1!f%'
L T <
tC.'~l-'
"
•
i::
t!I:1J::ffffl
Ltdti
t
Bluetoothi.ffi~t.Fl'Y:':lE.I
~
fJ~J..g"§
tJi
i!?J
~
J
*
9"
-t-O)~tJ'
I:i,::i:J'j..
"517)Jli<c
·
;z?-
l--7;t
:.-~~ilm<
r.:~l-'
.
• Wi·Fi0)7
JLa=-~
,m~
,
1J
J..
70)rtl~t"J
t~**1
3.'Unl:
J:
~T
1;1.
1;11!~
i:J
:<
'51cllll 1
!
fili01::lli1ail'T'liiEic
'-
0
<::
l::b
la
PH
9,
?
JL7l£~1~~l-'T
l
d:1JJ..
"50)~ID~BJl~1£:-13-:bitT
~
t:J.<
t.:~l,\0
·
~
~~
U~#
I7~C:.~
I
;t,~Y0)~~~5
.
5mmY~~
::::~~J:>Jl'l>(
tO::~ll
.
::f.'V'O)ffi;li~I!WC·(j:
l.,:>tJI~JI!!ll
iEc~9,
i;!i'l
~il!c::>li-<><::
1::
"'"
'!
*''
•
*ll'f~~li
~~
l::m~
~
b
ttc
~
ffl~k~O)tt~t>.~
tL!cJoe>c~no'!'illUI<~Icc::>z
t
~
cloli'i:!iEC'tc
'-"
1J1:t"J*=90)T.
®Si'J'l.::~L'77Jl:<
ti:.'~l-'"
~~i±ti
all! :
18160
g
llli 1
J
itiH.'J1i:(1/4
-2
0UNCI
351l!!Pii
EIX'J#I7::7-Y1\(J)f:';;7 10
mm
~il!ll@
-?
-')(
1).
i:J
"7
1li11E+
')
(2
)
(.l<
'l'i
J\
~
1,
'fll>l11
.
E/l~
l
j
l@-rt
u;mm;w
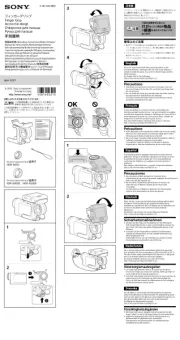
Tip
You can extend
the
continuous
shooting
time
by
setting
[Auto
Pwr
OFF
Temp.]
to
[
Hi
gh]
.
For
mo
re
informat
ion ,
ref
er to
the
operating
instructions
supplied
with
your
camera.
Notes
on
use
• re Make su
that
a came
ra
or
mounts
are firm ly
attached
to
this
unit
.
If
any
of
them
is
loose,
it
may
fall
off
the
unit
and
cause an
accident
or
inju ries.
• The accessory in use
or
the
way
th
e accessory
is
attached
may
impede
your
operation
of
button(s)
on
the
camera.
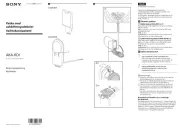
•
Wh
ile
a camera
is
not
attached
to
this
unit,
turning
the
dial in
the
direction
i
nd
ica
ted
by@
will
eventually
disengage
the·pa rt
that
ho
ld s
the
camera.
If
it
comes
o
ff
,
put
it back in· place
and
turn
the
dial
in
th
e
direction
indicated
by
<D.
• This
unit
is
s
upplied
wit
h a spare
component
f
or
replacement. Make sure
you
keep
it
in a safe place.
• While a camera
is
attached
to
th
is
unit,
Bluetooth
communications
to/from
the
camera are
disturbed
.
In such a case,
bring
your
smart
phone
closer
to
the
~
camera.
•
When
multiple
con
nections
between
came
ra
s
and
a
smartphone
have
been
established via Wi-Fi.
attaching
this
product
to
one
of
th
e cameras
may
cause
the
communication
to
become
unstable
d
epe
nding
on
the
directions
of
the
cameras
and
the
connection
envir
onment
.
For
details
on
the
multiple
connections, r
efer
to
the
operating
i
nstructions
supplied
wi
th
the
cameras.
•
When
attach
ing
a
tripod
to
this
unit
, use
one
w
ith
a
screw
th
at
is
no l
onge
r
th
an 5.5
mm
(7132 in.). This
unit
cannot
be
firmly
fastened
on
a
tr
ipod
using
a
longer
screw.
Attempting
to
do
so
will
damage
this
unit.
• Using
this
unit
with
products
from
other
manufact
u
re
rs
may
affect its performance,
leading
to
accidents
or
malfunction.
Specifications
Mass: Approx. 160 g (5.7 oz)
Mount
ing screw
holes
(1/4-20UNC) 35 holes
Mounting
hole
pitch: 10
mm
(13/32 in.)
Included items:
Cage
(1),
Camera
fixing
sc
r
ew
(2)
(one
attached
,
one
1
if"
1
W
Conseil
Vous
pouvez
prolonger
Ia duree
de
Ia prise
de
vue
en
rafa le en
r€glant
[Tmp
HORS
tens.
aut.
] [ . sur Eieve]
Pour plus
d'informations,
reportez-vous au
mode
d'emplo
i
fourni
avec
votre
appareil
photo
.
Remarque
sur
l'emploi
• Assurez-voi.Js
qu'un
appareil
photo
ou
une
monture
est
correctement
fixe
ace
produit.
Dans le cas
contraire, le
produit
risque de
tomber
et de
provoquer
un
accident
ou
des blessu res.
•
l'accesso
i
re
utilise
ou Ia
maniere
don
t il est fixe risque
de
perturber
le
fonctionneme
nt
du
ou
des touches de
l'appare
il
photo.
•
Lorsqu'un
appareil
photo
n' a est pas fixe
ce
produ
it
,
tourner
le
di
sque dans
Je
sens
indique
par®
lib
€rera
eventuellement
Ia piece
qui
fix
e l'
appareil
photo
.
Si
cette piece se
deta
ch
e,
remettez-la en p lace et
tournez
le
disque
dans
le sens
indique
par
<D.
• l Cet apparei est
fourn
i avec
une
piece de rechange.
Assurez-v
ous
de
Ia garder en lieu
sUr.
• 'Lorsqu un appareil
photo
est fixe a ce
produ
i lt, es
c
ommunications
Bluetooth
avec l'appareil
photo
sont
perturbees
. Dans ce cas,
ra
pprochez le sma
rtphone
de
l'appareil
photo
.
•
En
presence
de
plusieurs connexions etablies entre
les appareils
photo
et run sma
tphone
via un reseau
sans fil,
Ia
fixation
de
ce
produit
a
l'un
de ces appare ils
photo
risque de pert
urber
Ia
commun
ication selon
leur
position
et
l'
environnement
de
connexion.
Pour plus
d'informations
sur
un
environnement
a urs rplusie connexions,
eportez
-vous au
mod
e
d'emploi
des appareils
photo.
•
lorsque
vous fixez un
trep
i
ed
sur ce
produit,
utilisez
un
tr€pi
ed avec
une
vis
qui
n'est pas plus
longue
que
5,5
mm
(
7132
po.). e Cett
unite
ne
peut
pa se
fixer
correctement
sur un
trepied
dont
Ia
vis est plus
longue
. Toute
tentati
ve
de
ce type
endommagera
ce
produit.
• tL'utilisa
ion
de cet appareil avec des
produits
d'autres
fabrican ts risque
de
nuire
a ses performances,
entralnant
des accident s
ou
des
dysfonctionnements.
Specifications
Poids:
environ
160 g
(5
,7 oz)
Orifices
de
Ia
vis de fixation
(114
-20UNC) 35 orifices
Distance
ent
re l
es
orific
es de
montage:
10
mm
(13/32 po.)
Articles i
ndus
:
Cage (1
),
vis
de
fixation
de
l'appareil
photo
(2)
(une
fix€e,
une
de
rechange),
jeu
de
documents
imprimes
iiJefihi.il
Sugerencia
Puede prolan
gar
el
tiempo
de
toma
continua
ajustando
[Temp. APAGA
auto]
a [Alto).
Para
mas informaciOn, consulte el
manua
l
de
i
nstru
cciones suministrado con
Ia
camara.
Notas sobre
Ia
utilizaci6n
•
As
egUrese
de
que
Ia o camara las
monturas
esten
firmemente
fijadas a iesta un
dad
.
Si
cualquiera
de
elias estuv , iese floja
podria
caerse
de
Ia iun
dad
y
causar
un
accidente o lesiones.
• El o accesorio en usa
Ia
.f
orma
en
Ia
que
el accesorio
este
fijado
puede
impedir
Ia opera
ciOn
de
botones
de
Ia . camara
• M a ientras no haya una ctlmara fijada esta unidad,
si
gira el el dial en
sentido
indicado
por
@. con el
tiempo
se
desenganchara
Ia
parte
que
sujeta
Ia
camara.
Si
se
desprende, vuelva a el colocarla en su Iugar y gire dial
en el senti
do
indicado
por
CD.
• Esta
unidad
se
suministra con u n
componente
de
repuesto para reemplazo.
Ce
rci6rese de
guardarlo
en
un Iugar seguro.
• a Mientras haya una camara fijada esta
unidad,
l
as
comunicaciones
Bluetooth
a/desde
Ia
c a amar sufriran
pe
rturba
ciones.
En
ta l caso, acerque su
smartphone
a
Ia
camara.
• Cuando se hayan
establecido
varias conexi ones entre
camaras y
smartphone
a s trave de Wi-Fi,
Ia
fijaci6n
de
est e
producto
a una
de
las cilmaras
puede
provocar
que
Ia c
omunicaci6n
se
vue
lva
in
estable
dependiendo
de
l
as
d y irecciones de las cilmaras del
entorno
de
conexi6n.
Con respecto a los detalles sabre mUltiples
conexiones, consulte los manuales de instrucc
io
nes
suministrados con las
dimaras.
• Cuando fije un
tripode
a a est
unidad
, utilice
sola
mente
uno
con
tornillo
no
mas largo de 5,5
mm
.
Esta
unidad
no
podra
fijarse
firmemente
a un
trfpode
utilizando
un
tornillo
mils
la
rgo
.
Si
lo
intentase
, podrfa
dafiar
esta
unidad
.
•
El
usa
de
esta uni
dad
con
productos
de
otros
fabricantes
puede
afectar
a su
rendimiento,
provocando
accidentes o l ma
fun
cionam
i
ento
.
Especificaciones
Peso:
Aprox
. 160 g
Orificios para
tornillos
de
montaje
(114·20UNC) 35
orificios
Paso de
orific
io de
montaje:
10
mm
Elementos inclui : dos
Jaula (
1)
, Tornillo
de
fi
jaci6n
de cilmara ( (2)
uno
fijado
y
olio
s
um
inistrado para reemplazo),
Juego de
docum
entaci6n
imp
resa
•·mnm;w
Tipp
Sie
k6nnen
die
Serienaufnahmezeit verlangern,
indem
Sie
[Autom
.
AUS
Temp.]
auf[Hoch]
stellen.
Weitere
lnformationen
find
en
Sie
in
der
mit
lhrer
Kamera
mitgeli~ferten
Bedienungsan l
eitung.
Hinweise
zur
Verwendung
• Stellen
Sie
sicher, dass
eine
Kamera
oder
Befest
igungen
fest an diesem Gerat
angebracht
sind .
Wenn sole he Teile locker sind,
k6nnen
sie
vom
Gerat
he
runterfa
llen
und
einen
Unfall
oder
Verletzu
ngen
verursachen.
• Das
verwendete
Zubeh6rteil
ode
r d ie
Art
und
Wei
se
,
in
der
das
Zubeh6rteil
angeschlossen ist, kann die
Bed
ienung
der Tasten
auf
der
Kamera
behindern
.
•
wah
rend
eine
Kamer a n icht an
diesem
Gerat
angebracht
ist,
wird
durch Drehen des Drehknopfs in
der
mit@
gekennzeichneten
Richtung das Teil, das
die Kamera
hii
lt, schlief31ich
abgetrennt
. Wenn
es
sich
gel6st hat, setzen
Sie
es
wiede
r ein
und
drehen
Sie
den
Drehknopf
in
die
mit
CD
angegebene
Richtung.
• Eine Ersatzkomponente
zum
Austausch w ird
mit
diesem
Gerat
mitgeliefe
rt. Stellen
Sie
sic
he
r,
dass
diese
an sicherer e Stell
aufbewahrt
wird.
•
wah
rend an e e in Kamera
diesem
Gerat
angebracht
ist, ist
die
Bl
uetooth-Kommunikation
zur/von
der
Kamera
gest6rt
. Bringen
Sie
in diesem
Falll
hr
Smart
phone
naher an die Kamer a.