WARNING: Read the ENTIRE instruction manual to become familiar with the features of the
product before operating. Failure to operate the product correctly can result in damage to
the product, personal property and cause serious injury.
This is a sophisticated hobby product. It must be operated with caution and common sense and
requires some basic mechanical ability. Failure to operate this Product in a safe and responsible
manner could result in injury or damage to the product or other property. This product is not
intended for use by children without direct adult supervision. Do not attempt disassembly, use with
incompatible components or augment product in any way without the approval of Horizon Hobby,
LLC. This manual contains instructions for safety, operation and maintenance. It is essential to
read and follow all the instructions and warnings in the manual, prior to assembly, setup or use, in
order to operate correctly and avoid damage or serious injury.
Age Recommendation: Not for children under 14 years. This is not a toy.
NOTICE: This product is only intended for use with unmanned, hobby-grade, remote-controlled
vehicles and aircraft. Horizon Hobby disclaims all liability outside of the intended purpose and will not
provide warranty service related thereto.
Nicht geeignet für Kinder unter 14 Jahren. Dies ist kein Spielzeug.
HINWEIS: Dieses Produkt ist ausschließlich für die Verwendung in unbemanten, ferngesteuerten
Fahrzeugen und Fluggeräten im Hobbybereich vorgese-hen. Horizon Hobby lehnt jede Haftung und
Garantieleistung ausserhalb der vorgesehen Verwendung ab.
F400 Quad Racing
Flight Controller
Instruction Manual
Bedienungsanleitung
Manuel d’utilisation
Manuale di istruzioni
EN DE
IMPORTANT: Consult local laws and
ordinances before operating FPV (first
person view) equipment. In some areas, FPV
operation may be limited or prohibited. You
are responsible for operating this product in a
legal and responsible manner.
WICHTIG: Bitte beachten Sie lokale Vorschriften und Gesetze bevor Sie FPV Ausrüstung in Betrieb nehmen.
Sie sind alleine dafür verantwortlich das Produkt in legaler und verantwortlicher Weise zu nutzen.
SPMFCF400
NOTICE
All instructions, warranties and other collateral
documents are subject to change at the sole
discretion of Horizon Hobby, LLC. For up-to-date
product literature, visit horizonhobby.com and
click on the support tab for this product.
HINWEIS
Alle Anweisungen, Garantien und anderen zugehörigen Dokumente können im eigenen Ermessen
von Horizon Hobby, LLC jederzeit geändert werden. Die aktuelle Produktliteratur finden Sie auf
horizonhobby.com unter der Registerkarte „Support“ für das betreffende Produkt.
Meaning of Special Language
The following terms are used throughout the
product literature to indicate various levels of
potential harm when operating this product:
NOTICE: Procedures, which if not properly
followed, create a possibility of physical property
damage AND a little or no possibility of injury.
CAUTION: Procedures, which if not properly
followed, create the probability of physical property
damage AND a possibility of serious injury.
WARNING: Procedures, which if not properly
followed, create the probability of property
damage, collateral damage, and serious injury OR
create a high probability of superficial injury.
Spezielle Bedeutungen
Die folgenden Begriffe werden in der gesamten Produktliteratur verwendet, um auf unterschiedlich
hohe Gefahrenrisiken beim Betrieb dieses Produkts hinzuweisen:
HINWEIS: Wenn diese Verfahren nicht korrekt befolgt werden, können sich möglicherweise
Sachschäden UND geringe oder keine Gefahr von Verletzungen ergeben.
ACHTUNG: Wenn diese Verfahren nicht korrekt befolgt werden, ergeben sich wahrscheinlich
Sachschäden UND die Gefahr von schweren Verletzungen.
WARNUNG: Wenn diese Verfahren nicht korrekt befolgt werden, ergeben sich wahrscheinlich
Sachschäden, Kollateralschäden und schwere Verletzungen ODER mit hoher Wahrscheinlichkeit
oberflächliche Verletzungen.
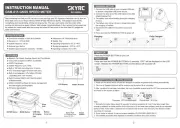
SPECIFICATION
Input Voltage 2-6S
Output Voltage 5V
Weight 8g
Size 36 x 36mm
(30.5 x 30.5mm mounting)
Memory 16mbit Flash
The Spektrum F400 Quad Racing Flight Controller comes pre loaded with RaceFlight configured to
use the Spektrum SPM4648 or SPM4649T Remote Receivers.
IMPORTANT: The header pins are not installed and require basic soldering skills.
IMPORTANT: The warranty does not cover damage from soldering, static or from reverse
polarity. Test the functionality of the flight controller first, before soldering by plugging the Flight
Control Board into the configurator using the micro USB cord. Confirm the board shows up in the
configurator and that the image of a quadcopter image moves with the board (confirms gyros are
working).
Die Spektrum F400 Quad Racing Flugsteuerung wird mit RaceFlight geliefert und ist für die
Verwendung mit den Spektrum SPM4648 oder SPM4649T Funkempfängern bereits konfiguriert.
WICHTIG: Die Stiftstecker sind nicht montiert und erfordern einfache Lötfähigkeiten.
WICHTIG: Die Garantie deckt keine Schäden durch Löten, Statik oder umgekehrter Polarität ab.
Vor dem Löten zuerst die Funktionalität der Flugsteuerung durch Einstecken der Flugsteuertafel in
den Konfigurator mit dem Micro-USB-Kabel testen. Bestätigen, dass die Steuertafel im Konfigurator
erscheint und dass das Abbild einer Quadcopter-Darstellung sich mit der Steuertafel bewegt
(bestätigt, dass Kreisel funktionieren).
WARNING: All motors should have the propellers removed before any power is fed to
the board. All propellers should remain off during installation and programming.
WARNUNG: Bevor Sie die Platine mit Strom versorgen, sollten alle Propeller von den
Motoren entfernt worden sein. Ebenfalls sollten bei der Einstellung und Programmierung
keine Propeller montiert sein.
SPEKTRUM™ F400 QUAD RACING FLIGHT CONTROLLER SPEKTRUM F400 QUAD RACING FLUGSTEUERUNG
RACEFLIGHT ONE INSTALLATION MONTAGE VON RACEFLIGHT ONE
LAP TIMER RUNDENZÄHLER
WARNING: This board does not have reverse polarity protection. Any reverse polarity will
destroy the board and any connected peripherals.
WARNUNG: Diese Platine ist nicht mit einem Verpolungsschutz ausgestattet. Jede
Verpolung wird die Platine und die angeschlossenen Bauteile zerstören.
WARNING: This board is a static sensitive device. Use caution when handling and make
sure to follow proper anti static procedures.
WARNUNG: Diese Platine ist empfindlich gegenüber statischer Aufladung. Bitte sein Sie
bei der Handhabung vorsichtig und folgen den Anweisungen und Vorkehrungen gegen
statischer Aufladung.
IMPORTANT: Note the polarity of all pins before
connecting to power. WICHTIG: Bitte überprüfen Sie vor dem Anschluss
die Polarität
Installation:
1. Go to www.raceflight.net/register/ to first register for RaceFlight One.
2. Once registered with RaceFlight you will be directed to the downloads page. Find the Race-
Flight One download and install on your computer.
3. Connect the Spektrum F400 Quad Racing Flight Controller to a micro USB Charge/DATA cord
and then connect to the computer.
IMPORTANT: A USB charge only cord will not work. It must be capable of transferring DATA.
4. Read all documentation provided by RaceFlight on the product page to get started.
Montage:
1. Auf www.raceflight.net/register/ gehen, um zuerst RaceFlight One zu registrieren.
2. Nach der Registrierung bei RaceFlight erfolgt die Weiterleitung zur Download-Seite. Den
Download für RaceFlight One finden und auf dem Computer installieren.
3. Die Spektrum F400 Quad Racing Flugsteuerung mit einem Micro-USB-Lade-/DATEN-Kabel
verbinden und dann am Computer anschließen.
WICHTIG: Ein USB-Kabel, das nur für das Laden gedacht ist, wird nicht funktionieren. Es muss zur
Übertragung von DATEN fähig sein.
4. Die gesamte durch RaceFlight auf der Produktseite bereitgestellte Dokumentation lesen, um
anzufangen.
WARNING: All motors should have the propellers removed. Moving the sliders in this
screen will cause the motors to spin up. WARNUNG: Die Propeller sollten bei Einstellarbeiten grundsätzlich entfernt sein. Das
Ändern der Schieber kann die Motoren zum Starten bringen.
TEST FLIGHT TESTFLUG
Once all programing is complete and the model is assembled, it is important to test fly the aircraft.
If you have not calibrated the Accelerometer, now is a good time. With the board connected to
Raceflight and the aircraft sitting on a level surface, go to the setup tab and click the “Calibrate
Accelerometer” button.
• Test the aircraft in a safe environment away from people or animals.
• After confirming the rotor blades rotate in the correct direction, test the motor response
controls.
• Adjust the throttle to a low level of power where the aircraft begins to get “light” on its landing
skids.
• Move the rudder stick a small amount to the right. The nose of the quadcopter should start to
rotate to the right (clockwise).
• Move the rudder stick a small amount to the left. The nose of the quadcopter should start to
rotate to the left (counter-clockwise).
• Move the elevator control stick forward. The REAR should lift from the floor.
• Move the elevator control stick backward. The FRONT should lift from the floor.
• Move the aileron stick right. The LEFT side should lift from the floor.
• Move the aileron stick left. The RIGHT side should lift from the floor.
• Keep note of any changes that need to be made to the programming.
• ALWAYS REMOVE THE PROPELLERS WHEN MAKING CHANGES TO THE PROGRAMMING.
• When rotors turn correctly and respond correctly to controls, the aircraft is ready for its first flight!
Habe Sie das Modell zusammengebaut und die Programmierungen durchgeführt ist es wichtig
einen Testflug durch zu führen.
Sollten Sie die Accelerometer (Beschleunigungssensoren) noch nicht kalibriert haben ist jetzt eine
gute Gelegenheit.
• Der Copter sollte dazu mit an Cleanflight angeschlossener Platine auf einer ebenen Fläche
stehen. Klicken Sie auf den Calibrate Accelerometer Button.
• Testen Sie den Copter in einer sicheren Umgebung weit weg von Menschen und Tieren.
• Testen Sie zuerst die Motordrehrichtung und dann die Reaktion.
• Geben Sie etwas Gas bis der Copter leicht auf den Kufen wird.
• Bewegen Sie den Gier (Seitenruder) Stick etwas nach rechts. Die Nase des Copters sollte
dabei nach rechts (im Uhrzeigersinn) drehen.
• Bewegen Sie den Gier (Seitenruder) Stick etwas nach links. Die Nase des Copters sollte dabei
nach links( gegen den Uhrzeigersinn) drehen.
• Bewegen Sie den Höhenruder/Nicken Stick nach vorne. Das Heck des Copters sollte etwas
abheben.
• Bewegen Sie den Höhenruder/Nicken Stick nach hinten. Die Front des Copters sollte etwas abheben.
• Bewegen Sie den Roll/Querruder Stick etwas nach rechts. Die linke Seite des Copters sollte abheben.
• Bewegen Sie den Roll/Querruder Stick etwas nach links. Die rechte Seite des Copters sollte abheben.
• NEHMEN SIE IMMER DIE PROPELLER AB WENN SIE ÄNDERUNGEN IN DER
PROGRAMMIERUNG DURCHFÜHREN.
• Machen Sie sich Notizen über alle Änderungen in der Programmierung.
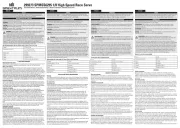
FRONT
GNDGND
BUZ
5V5V
TX2TX4
RX2RX4REMPTE RX
BOOT
XBUS/12CGNDLED5VGND
ADDR ESSABLE LED RECE IVER
SIG
5V
GND
MOTORS
IR Sensor
+
CURR ENT BAT T
2S–6S
1 2 3 4
VRX RX5
–IR
+IR
FRONT
GNDGND
BUZ
5V5V
TX2TX4
RX2RX4REMPTE RX
BOOT
XBUS/12CGNDLED5VGND
ADDR ESSABLE LED RECE IVER
SIG
5V
GND
MOTORS
IR Sensor
+
CURR ENT BAT T
2S–6S
1 2 3 4
VRX RX5
–IR
+IR
FRONT
GNDGND
BUZ
5V5V
TX2TX4
CURR ENT BAT T
2S–6S
4
FRONT
GNDGND
BUZ
5V5V
TX2TX4
CURR ENT BAT T
2S–6S
4 x ESC Rail
4 x Geschwindigkeitsregler-Schiene
Micro USB
Micro-USB
Bootloader Pins
Bootloader-Stifte
Laptimer LED
Rundenzähler-LED
IR Sensor
Oberer IR-Sensor
Buzzer
Summer
V Battery
V-Akku
V Current
V-Strom
3.3v serial receiver
(SPM4648)
3,3V serieller Empfänger
(SPM4648)
LED
Blinksignale
5v serial receiver connection
(SPM4649T, SPMAR7700*)
5V serieller Empfän-
geranschluss (SPM4649T,
SPMAR7700*)
1. Install right angle header pins down through the top of board on the ESC Rail and carefully
solder from the bottom.
2. Connect the plugs from the ESCs onto the
pins (A) noting the order from the graph (B).
3. Do not use a BEC power supply from the
ESC. If your ESCs have a BEC, remove all
the Red ( ) wires from the 3 pin plugs ( ).+ C
1. Die Winkelstiftstecker durch die Oberseite der Steuertafel auf der Geschwindigkeitsregler-
Schiene montieren und von unten vorsichtig löten.
2. Die Stecker von den Geschwindig-
keitsreglern mit den Stiften ( ) verbinden A
und die Anordnung der Abbildung (B)
beachten.
3. Die BEC-Stromzufuhr vom Geschwindig-
keitsregler nicht verwenden. Verfügen die
Geschwindigkeitsregler über einen BEC,
alle roten ( ) Kabel von den 3-poligen +
Steckern ( ) entfernen.C
1. Install the top mounted IR sensor by inserting from the top of the board and carefully solder-
ing from the bottom.
2. Install the bottom mounted IR sensor by inserting from the bottom of the board and carefully
soldering from the top.
3. Install the sensors on the top and bottom of the quad in an open area.
1. Den oben befestigten IR-Sensor durch Einführen von oben durch die Steuertafel montieren
und vorsichtig von unten löten.
2. Den unten befestigten IR-Sensor durch Einführen von unten durch die Steuertafel montieren
und vorsichtig von oben löten.
3. Install the sensors on the top and bottom of the quad in an open area.
ESC RAIL GESCHWINDIGKEITSREGLER-SCHIENE
A C
B
A C
B
1. The board comes pre configured for the Spektrum SPM4648 or SPM4649T
Remote Receivers.
2. Plug either receiver into the pre-installed Remote-RX pins.
1. Die Steuertafel ist für die Spektrum SPM4648 oder SPM4649T Funkempfänger vorkonfiguriert.
2. Einen der Empfänger in die vormontierten Funk-RX-Stifte einstecken.
RECEIVER INSTALLATION EMPFÄNGERMONTAGE
POWERING THE RECEIVER BETRIEB DES EMPFÄNGERS
Power for the Spektrum F400 Quad Racing Flight Controller can
come directly from the flight battery pack. Connect the and leads + –
to the V Battery port. If you have a current sensor, connect the sensor
to the V Current sensor.
Die Stromzufuhr für die Spektrum F400 Quad Racing Flugsteuerung
kann direkt aus dem Flug-Akkupack kommen. Die Plus- und
Minuskabel mit dem V-Akkuanschluss verbinden. Ist ein Stromsensor
vorhanden, den Sensor mit dem V-Stromsensor verbinden.
WARNING: Never connect the battery directly to the
V current sensor.
WARNUNG: Den Akku niemals mit dem V-Stromsensor
verbinden.
WARNUNG: Lesen Sie die GESAMTE Bedienungsanleitung, um sich vor dem Betrieb mit
den Produktfunktionen vertraut zu machen. Wird das Produkt nicht korrekt betrieben, kann
dies zu Schäden am Produkt oder persönlichem Eigentum führen oder schwere Verletzungen
verursachen.
Dies ist ein hochentwickeltes Hobby-Produkt. Es muss mit Vorsicht und gesundem Menschenver-
stand betrieben werden und benötigt gewisse mechanische Grundfähigkeiten. Wird dieses
Produkt nicht auf eine sichere und verantwortungsvolle Weise betrieben, kann dies zu Verletzun-
gen oder Schäden am Produkt oder anderen Sachwerten führen. Dieses Produkt eignet sich nicht
für die Verwendung durch Kinder ohne direkte Überwachung eines Erwachsenen. Versuchen Sie
nicht ohne Genehmigung durch Horizon Hobby, LLC, das Produkt zu zerlegen, es mit inkompati-
blen Komponenten zu verwenden oder auf jegliche Weise zu erweitern. Diese Bedienungsanlei-
tung enthält Anweisungen für Sicherheit, Betrieb und Wartung. Es ist unbedingt notwendig, vor
Zusammenbau, Einrichtung oder Verwendung alle Anweisungen und Warnhinweise im Handbuch
zu lesen und zu befolgen, damit es bestimmungsgemäß betrieben werden kann und Schäden
oder schwere Verletzungen vermieden werden.
SPEZIFIKATION
Eingangsspannung 2-6S
Ausgangsspan-
nung 5V
Gewicht 8g
Abmessungen 36 x 36mm
(30.5 x 30.5mm mounting)
Speicher 16mbit Flash