StarTech.com 161LM-PRIVACY-SCREEN Manual

StarTech.com Skærmfilter 161LM-PRIVACY-SCREEN

Læs gratis den danske manual til StarTech.com 161LM-PRIVACY-SCREEN (2 sider) i kategorien Skærmfilter. Denne vejledning er vurderet som hjælpsom af 15 personer og har en gennemsnitlig bedømmelse på 4.5 stjerner ud af 8 anmeldelser. Har du et spørgsmål om StarTech.com 161LM-PRIVACY-SCREEN, eller vil du spørge andre brugere om produktet?

Side 1/2
Quick-Start Guide
To view manuals, FAQs, videos, drivers, downloads, technical drawings, and more, visit www.startech.com/support.
Manual Revision: November 23, 2023 2:36 PM
To view manuals, FAQs, videos, drivers, downloads, technical drawings, and more, visit www.startech.com/support
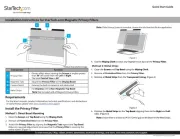
Component Function
1 Privacy Filter
Privacy eect when viewing the Screen at angles greater
than 30° o-center from the Left or Right
The total Field of View is 60°
2 Magnetic Tabs Secure the Privacy Filter to the Display Bezel
3 Camera Notch Ensures the built-in camera is not obstructed
4 Metal Strips
For Displays with a Non-Magnetic Top Bezel
Note: Not included with all Magnetic Privacy Filters
Requirements
For the latest manuals, product information, technical specications, and declarations
of conformance, please visit: www.startech.com/support
Install the Privacy Filter
Method 1: Direct Bezel Mounting
1. Clean the Screen and Top Bezel using the Wiping Cloth.
2. Remove all Protective Films from the Privacy Filter.
3. Attach the Privacy Filter by aligning the Magnetic Tabs against the Top Bezel.
Make any required adjustments to ensure that the Privacy Filter is covering the
entire screen. (Figure 1)
Note: If the Privacy Screen is reversible, choose the side that best ts the application.
Figure 1
4. Use the Wiping Cloth to clean any ngerprints or dust on the Privacy Filter.
Method 2: Metal Strips
1. Clean the Screen and Top Bezel using the Wiping Cloth.
2. Remove all Protective Films from the Privacy Filter.
3. Remove all Metal Strips from the Transparent Lining. (Figure 2)
Figure 2
4. Position the Metal Strips on the Top Bezel, aligning them to the Right and Left
sides. (Figure 3)
Note: Ensure there is at least a 0.47in (12mm) gap on the Bezel for the Metal Strips.
Installation Instructions for StarTech.com Magnetic Privacy Filters
*Product may vary from image
3
2
1
4


Produkt Specifikationer

Mærke: StarTech.com
Kategori: Skærmfilter
Model: 161LM-PRIVACY-SCREEN

Har du brug for hjælp?

Hvis du har brug for hjælp til StarTech.com 161LM-PRIVACY-SCREEN stil et spørgsmål nedenfor, og andre brugere vil svare dig