Please read these instructions completely before operating this product.
14. Bass Boost System (BBS)
S
S
S
SSA
A
A
AAF
F
F
FFE
E
E
EET
T
T
TT Y
Y
Y
Y Y P
P
P
PPR
R
R
RRE
E
E
EEC
C
C
CCA
A
A
AAU
U
U
UUT
T
T
TTI
I
I
IIO
O
O
OON
N
N
NN
device from an electrical
The symbol above means that according to local laws and
regulations your product and/or its battery shall be disposed
of separately from household waste. When this product
reaches its end of life, take it to a collection point
designated by local authorities. The separate collection
and recycling of your product and/or its battery at the time
of disposal will help conserve natural resources and ensure
that it is recycled in a manner that protects human health
E
E
E
EEu
u
u
uur
r
r
rro
o
o
oop
p
p
ppe
e
e
eea
a
a
aan U
n U
n U
n Un Un
n
n
nni
i
i
iio
o
o
oon
n
n
nn: D
: D
: D
: D: Di
i
i
iis
s
s
ssp
p
p
ppo
o
o
oos
s
s
ssa
a
a
aal I
l I
l I
l Il In
n
n
nnfo
fo
fo
fofor
r
r
rrm
m
m
mma
a
a
aat
t
t
tti
i
i
iio
o
o
oon
n
n
n n
B
B
B
BBAT
AT
AT
ATATT
T
T
TTE
E
E
EER
R
R
RRY
Y
Y
YY I
I
I
I IN
N
N
NNS
S
S
SSTA
TA
TA
TATAL
L
L
LLL
L
L
LLAT
AT
AT
ATATI
I
I
IIO
O
O
OON
N
N
NN
1. Open the Battery Compartment by sliding the Battery Compartment
Cover in the direction of the arrow and lifting it up.
2. Place two new “AA” size batteries (not included) into the Battery
Compartment, observing the polarity ( + / – ) as indicated inside the
3. Replace the Battery Compartment Cover .
Replace batteries when
N
N
N
NNOT
OT
OT
OTOTE
E
E
EE:
:
:
::
the Low Battery is indicated on
C
C
C
CCAU
AU
AU
AUAUT
T
T
TTI
I
I
IIO
O
O
OON
N
N
NN:
:
:
:: Failure to properly
align the battery polarity can
cause personal injury and/or
C
C
C
CCD
D
D
D D O
O
O
OOP
P
P
PPE
E
E
EER
R
R
RRAT
AT
AT
ATATI
I
I
IIO
O
O
OON
N
N
NN
B
B
B
BBa
a
a
aas
s
s
ssi
i
i
iic C
c C
c C
c Cc CD O
D O
D O
D OD Op
p
p
ppe
e
e
eer
r
r
rra
a
a
aat
t
t
tti
i
i
iio
o
o
oon (
n (
n (
n (n (N
N
N
NNo
o
o
oot
t
t
tte
e
e
ee:
:
:
: : T
T
T
TTh
h
h
hhi
i
i
iis u
s u
s u
s us un
n
n
nni
i
i
iit i
t i
t i
t it is c
s c
s c
s cs co
o
o
oom
m
m
mmp
p
p
ppa
a
a
aat
t
t
tti
i
i
iib
b
b
bbl
l
l
lle w
e w
e w
e we wi
i
i
iit
t
t
tth M
h M
h M
h Mh MP
P
P
PP3
3
3
33)
)
)
))
1. Open the Unit Door by pushing the Open Door Button .
2. Place the CD Disc label side up, onto the spindle until it snaps into place,
and then close the Unit Door.
3. Connect your earbuds or headphones to the Headphones Jack located
4. To turn the unit on and begin playback from the rst track, press the PLAY/
PAUSE button . To Stop or Turn off unit, press STOP button .
5. Once the CD Disc is playing, adjust the volume by pressing the (–) and (+)
buttons on side of unit .
6. Press SKIP/SEARCH – button or SKIP/SEARCH + button to restart a
current track or skip forward to another track. Press and hold to scan for an
individual track on the CD.
CAU
CAU
CAU
CAUCAUTI
TI
TI
TITION:
ON:
ON:
ON: ON: Avoid prolonged exposure to high sound levels, as this may cause
permanent hearing damage.
Do not use discs that have been scratched or damaged in this product, as they
may cause the product to skip or stop.
P
P
P
PPL
L
L
LLAY
AY
AY
AYAYB
B
B
BBA
A
A
AAC
C
C
CCK
K
K
K K M
M
M
MMO
O
O
OOD
D
D
DDE
E
E
EES
S
S
SS
A
A
A
AAD
D
D
DDD
D
D
DDI
I
I
IIT
T
T
TTI
I
I
IIO
O
O
OON
N
N
NNA
A
A
AAL
L
L
L L F
F
F
FFE
E
E
EEAT
AT
AT
ATATU
U
U
UUR
R
R
RRE
E
E
EES
S
S
SS
Bass Boost
Bass Boost
Bass Boost
Bass Boost Bass Boost (BB
(BB
(BB
(BB(BBS) F
S) F
S) F
S) FS) Function
unction
unction
unctionunction
The bass boost function enhances the low frequency Bass response to output
of the audio. To enable or disable this feature, slide the BBS function switch
located on side of the unit to the desired position.
Caution
Caution
Caution
CautionCaution
Do not play high volume with BBS function ON as it can damage our hearing
60-Second Anti-Shock
60-Second Anti-Shock
60-Second Anti-Shock
60-Second Anti-Shock 60-Second Anti-Shock S
S
S
SSystem
ystem
ystem
ystemystem
This CD player has a built-in Anti-shock system that cuts down on the CD
skipping, which is useful when using the CD player in a car or while jogging/
walking. Anti-shock is automatically activated when the unit is turned on and
The Anti-shock System will start automatically, the sound will mute for a
moment and the display with blink” ESP”.
If the CD player is subjected to vibration during playback, “ ESP” will blink
again. During the vibration, the music should continue to play the signals
stored in the memory until the CD player can read the music data properly
Headphone Jack
Headphone Jack
Headphone Jack
Headphone JackHeadphone Jack
Plug headphones or ear buds into the PHONES jack to private listening.
C
C
C
CCL
L
L
LLE
E
E
EEA
A
A
AAN
N
N
NNI
I
I
IIN
N
N
NNG &
G &
G &
G & G & M
M
M
MMA
A
A
AAI
I
I
IIN
N
N
NNT
T
T
TTE
E
E
EEN
N
N
NNA
A
A
AAN
N
N
NNC
C
C
CCE
E
E
EE
1. CLEANING THE CD LENS: if the CD lens is dusty, clean it with a brush blower.
Blow several times on the lens and remove the dust with the brush.
Finger prints may be removed with a cotton swab moistened with alcohol.
2. CLEANING THE UNIT: do not use volatile chemicals on this unit.
Clean by lightly wiping with a soft cloth.
T
T
T
TTR
R
R
RRO
O
O
OOU
U
U
UUB
B
B
BBL
L
L
LLE
E
E
EES
S
S
SSH
H
H
HHO
O
O
OOO
O
O
OOT
T
T
TTI
I
I
IIN
N
N
NNG
G
G
GG
PL
PL
PL
PLPLA
A
A
AAYER NOT WOR
YER NOT WOR
YER NOT WOR
YER NOT WORYER NOT WORKI
KI
KI
KIKING
NG
NG
NGNG:
:
:
::
1. Check the batteries and installed properly
SO
SO
SO
SOSOUN
UN
UN
UNUND NOT C
D NOT C
D NOT C
D NOT CD NOT CLE
LE
LE
LELEAR O
AR O
AR O
AR OAR OR NO SO
R NO SO
R NO SO
R NO SOR NO SOU
U
U
UUND
ND
ND
NDND
2. Check to make sure ear buds/headphones are plugged in all the way.
NO C
NO C
NO C
NO CNO CD PL
D PL
D PL
D PLD PLA
A
A
AAYBACK
YBACK
YBACK
YBACKYBACK:
:
:
::
1. Disc is not inserted correctly
2. Disc is not compatible.
L
L
L
LLO
O
O
OOC
C
C
CCAT
AT
AT
ATATI
I
I
IIO
O
O
OON
N
N
NN O
O
O
O OF
F
F
FF C
C
C
C CO
O
O
OON
N
N
NNT
T
T
TTR
R
R
RRO
O
O
OOL
L
L
LLS
S
S
SS
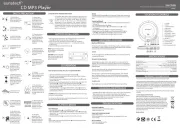
10
10
10
1010 11
11
11
1111 12
12
12
1212 13
13
13
1313 14
14
14
1414
S
S
S
S SP
P
P
PPE
E
E
EEC
C
C
CCI
I
I
IIF
F
F
FFI
I
I
IIC
C
C
CCAT
AT
AT
ATATI
I
I
IIO
O
O
OON
N
N
NNS
S
S
SS
Power source............................................................................................ X2 “AA” SIZE BATTERY
Compact Disc format......................................................................................CD/CD-R/CD-RW
Earphone Jack..............................................................................1/8” (3.5mm) diameter plug
Pickup..............................................................................optical 1-beam semiconductor laser
Error Correction Method....................................................Cross-interleave Reed-Solomon
D/A Converter.................................................................................................................16-bit DAC
Sampling Frequency.........................................................................................................44.1 KHz
CD Frequency Response........................................................................................20Hz-20KHze
WA
WA
WA
WAWAR
R
R
RRR
R
R
RRA
A
A
AAN
N
N
NNT
T
T
TTY
Y
Y
YY C
C
C
C CO
O
O
OON
N
N
NND
D
D
DDI
I
I
IIT
T
T
TTI
I
I
IIO
O
O
OON
N
N
NNS
S
S
SS
(Waste Electrical & Electronic Equipment(WEEE)
Your product is designed and manufactured with high quality
materials and components which can be recycled and reused.
This symbol means that electrical and electronic equipment,
at their end of-life should be disposed of separately from your
household waste. Please dispose of this equipment at your local
community waste collection/recycling centre. In the European
Union there are separate collection systems for used electrical
and electronic products. Please help us to conserve the
Random
Random
Random
RandomRandom
Pressing the MODE button a fourth time while in Stop mode will switch to
random setting. Press play to begin playback of the tracks on CD in a random
Prog
Prog
Prog
ProgProgrammed Pla
rammed Pla
rammed Pla
rammed Plarammed Playback
yback
yback
ybackyback
1. Press PROGRAM button to create a custom playback order for up to 20
Repeat/Repeat All
Repeat/Repeat All
Repeat/Repeat All
Repeat/Repeat AllRepeat/Repeat All
1. Press the MODE button once to REPEAT a single track.
2. Press SKIP/SEARCH – button or SKIP/SEARCH + button to select the
desired track. The unit will play the same track over and over until the STOP
3. Press the MODE button a second time to repeat the entire CD.
Intro
Intro
Intro
Intro Intro
While in Stop mode, press the MODE button a third time to play the rst
10 seconds of each track.
2. “01” will begin to blink on the display.
3. Press SKIP/SEARCH-button or SKIP/SEARCH+button to select
4. Press PROGRAM button again to save the selected track.
5. Repeat steps 3 and 4 to program up to 20 tracks using SKIP/SEARCH-
button or SKIP/SEARCH+ button to assign each track number.
6. Press PLAY/PAUSE to begin playing programmed tracks.
The warranty of this product is for 2 years since the purchase date.
The warranty will exclude breakdowns caused by bad use of the product, wrong
Installation or installation in not desirable places for a proper maintenance of the
product, rips, updates of the products that are not the supplied by the brand,
pieces wore away for its use or for not domestic or inappropriate use. Also are
excluded breakdowns caused for manipulations of the products by people or
companies alien to our company.
For any request regarding the warranty terms, the purchase receipt must be
Correct disposal of this Product