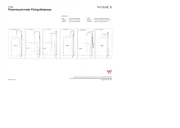
HO T/ COLD
FE E
D CH AN
NEL
Ap p rox.
400m m
Ap pro x.
400m m
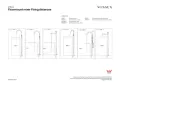
CONCRETE RECES REQUIREMENTS
FIXED AND CONNECTED VALVE BACK FILLED RECESS
Fixing and connections (Fig. 2 & 3)
Back-filled recess (Fig. 4)
New concrete floor (pre-pour)
*To install the Floormount Fixing Valve a 50mm step down (recess) is required in the concrete surface where
the floormount is to be located.
- The recess area is to be a minimum of 200 x 300mm to allow enough room for the fixing valve to be fitted.
NOTE: This can be a larger area if unsure of exact mounting position.
Important: the recess area is required to be 50mm deep and must be flat and level.
- Connect 1/2” elbows (or male/female nipples) to Fixing Valve in preparation for the hot/cold water lines.
- Postion fixing valve into concreted recess area.
NOTE: Align “Front” to face bath or wash vessel.
- Mark and drill for 8mm “dyna bolt” or other appropriate anchoring bolts (not supplied).
- Fix Floormount Fixing Valve and complete hot and cold water line connections.
- Ensure the valve is level and well anchored.
- Tighten “end caps” and perform water testing, and ensure there are no water leaks.
- Leave end caps, pressure plate and fixing bolts in the valve to protect the threads until final fit-off.
- Once all water connections are made and tested, fill in the recessed area and channelling up to the
Fixing Valve with a mortar mix.
- After mortar has set, seal the area between mortar and the Fixing Valve.
- Cut 400 x 400mm section through concrete slab where the floormount mixer is to be located (Fig. 1).
- Remove cut section and drill for the appropriate concrete ‘tie-rods’ into side walls of cavity.
- Fit ‘tie-rods’ and pour concrete to create a 50mm step down (recess) from the original concrete
NOTE: Recess area must be flat and level.
- Hot and cold lines can be chased into the recessed area by cutting a minimum 50 x 50mm channel (Fig. 1).
*To install this floormount fixing valve, a 50mm step down (recess) is required in the concrete slab. The floormount fixing
valve is supplied with end caps, pressure plate and fixing bolts. Leave intact until final fit off with the floormount mixer.
Floormount mixer Concrete floor Rough-in