KA5866/KA5867/KA5868/KA5869
PT | Manual de utilizador
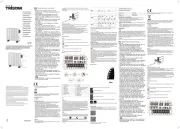
PARTS DESCRIPTION / ONDERDELENBESCHRIJVING / DESCRIPTION DES PIÈCES / TEILEBESCHREIBUNG /
DESCRIPCIÓN DE LAS PIEZAS / DESCRIÇÃO DOS COMPONENTES / DESCRIZIONE DELLE PARTI /
BESKRIVNING AV DELAR / OPIS CZĘŚCI / POPIS SOUČÁSTÍ / POPIS SÚČASTÍ / BESKRIVELSE AF
BESTANDDELE / OSIEN KUVAUKSET / BESKRIVELSE AV DELER
This product is only suitable for well insulated spaces or occasional use.
Dit product is uitsluitend geschikt voor goed geïsoleerde plaatsen of voor incidenteel gebruik.
Ce produit ne peut être utilisé que dans des locaux bien isolés ou de manière occasionnelle.
Dieses Produkt ist nur für gut isolierte Räume oder für den gelegentlichen Gebrauch geeignet.
Este producto está indicado únicamente en lugares abrigados o para una utilización puntual.
Este produto é adequado apenas para espaços bem isolados espaços ou utilização ocasional.
Il presente prodotto è adatto solo a ambienti correttamente isolati o ad un uso occasionale.
Denna produkt är endast lämpad för välisolerade utrymmen eller sporadisk användning.
Ten produkt jest odpowiedni tylko do sporadycznego użytku lub do stosowania w dobrze
izolowanych pomieszczeniach.
Tento výrobek je vhodný pouze pro dobňe izolované prostory nebo obĀasné používání.
Tento výrobok je určený iba do dobre izolovaných priestorov alebo na príležitostné použitie.
Это товар подходит только для использования в хорошо изолированных помещениях
или для нерегулярного использования.
Dette produkt er kun egnet til godt isolerede rum eller lejlighedsvis brug.
Tämä tuote soveltuu ainoastaan hyvin tuuletettuihin tiloihin tai satunnaiseen käyttöön.
Dette produktet er bare egnet for godt ventilerte steder og sporadisk bruk.
Tristar Europe B.V. | Jules Verneweg 87
5015 BH Tilburg | The Netherlands
• By ignoring the safety instructions the
manufacturer cannot be held responsible for
• If the supply cord is damaged, it must be
replaced by the manufacturer, its service
agent or similarly qualified persons in order to
• Never move the appliance by pulling the cord
and make sure the cord cannot become
• The appliance must be placed on a stable,
• The user must not leave the device
unattended while it is connected to the supply.
• This appliance is only to be used for
household purposes and only for the purpose
• This appliance shall not be used by children
aged less than 8 years. This appliance can be
used by children aged from 8 years and above
and persons with reduced physical, sensory or
mental capabilities or lack of experience and
knowledge if they have been given
supervision or instruction concerning use of
the appliance in a safe way and understand
the hazards involved. Children shall not play
with the appliance. Keep the appliance and its
cord out of reach of children aged less than 8
years. Cleaning and user maintenance shall
not be made by children unless older than 8
• To protect yourself against an electric shock,
do not immerse the cord, plug or appliance in
the water or any other liquid.
• WARNING: Some parts of this product can
become very hot and cause burns. Particular
attention has to be given where children and
vulnerable people are present.
• Children of less than 3 years should be kept
away unless continuously supervised.
• Do not use the appliance with a programmer,
timer, separate remote-control system or any
other device that switches the heater on
automatically, since a fire risk exists if the
heater is covered or positioned incorrectly.
• Do not use this heater in the immediate
surroundings of a bath, a shower or a
• Please do not install the appliance close to
curtains and other combustible materials. This
• The heater must not be located immediately
• WARNING: In order to avoid overheating,
This product complies with conformity requirements of the applicable
European regulations or directives.
Waste electrical products should not be disposed of with household
waste. Please recycle where facilities exist. Check with your local
Authority or local store for recycling advice.
• Place the device on a flat stable surface and ensure a minimum of 30
cm. free space around the device. This device is not suitable for
installation in a cabinet or for outside use.
• Putthepower cable intothe socket.(Note: Make surethe
voltagewhich is indicated on the devicematchesthe localvoltage
beforeconnecting the device.Voltage220V-240V 50-60Hz).
• Make sure the power switch on the back of the device is set to the “on”
• When the device is turned on for the first time, a slight odour will
occur. This is normal, ensure adequate ventilation. This smell is only
temporary and will soon fade.
• After first time power on, please set the current time and week. Press
– button for 3 seconds, and set the number in the week's column, after
it starts flashing, select the week corresponding to the current date by
+ or - buttons, and then press - again for 3 seconds. The hour
numbers in the time display column begin to blink, and the hour
corresponding to the current time can be set by + button or - button,
and then press – button again for 3 seconds to set the corresponding
minutes for the current time by + or - button. After completing the
above operation, wait 10 seconds or press Power button to save the
settings. The time displayed on the heater is consistent with the actual
• Before using the heater, the feet (supplied separately in the carton), must
• These are to be attached to the base of the heater using the 4 screws
• Take care to ensure that the feet are located correctly on the bottom end
• Please note that the product must be installed at least 15 cm from the
floor and 50 cm from the ceiling.
• The heater must be mounted at 4 points, ensure there is a 300mm
clearance on all sides of the heater.
• Measure the distance between the centre of each bracket both
horizontally and vertically to ensure drilling holes in the correct place.
Mark the positions of the 4 holes to be drilled on the wall.
• Drill the holes in the wall, then insert the plastic expanded plugs and
screw the 4 supplied screws into the plastic expanded plugs.
• Attached the panel heater onto the screws and move the heater to the
right so that the screws drop into the securing slots.
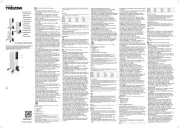
Button/Display description
Use to control the heater on / off, save, or exit.
Use to select the heating power, and set the weekly timer mode.
Use to turn on or off the 24 hours timer, and turn on or off the open
Use to increase the target temperature or time.
Use to decrease the target temperature or time.
1 Time setting 10 + Button
3 Weekly 12 Timer/ open window setting
4 High-Temp 13 Power selection/program
5 Low-Temp 14 Power switch/exit
7 Temperature 16 High mode
• Power on; when the main power is turned on, press the power button,
the buzzer will beep once, the temperature bar will show the current
room temperature, the heating power level bar will display the low-level
symbol, and the machine will start heating on low level heating power.
The default target temperature for the temperature bar is 25 degrees
Celsius. At the same time, the LCD backlight is on and the unit enters
the power-on setting mode. After 1 minute, if there is no button
operation, the backlight will be off; if there is any button operation after
the backlight is off, the backlight will be on again.
• Shut down; press power button at any time when the unit is powered on
without screen lock, the buzzer will beep for a short sounding, the
machine will stop running.
• The machine has 3 power levels, Low-temp, High-temp and Anti-frost
Sequentially. Press the Mode button to enter the heating-level selection
mode, the level bar symbol starts flashing. The power is divided into 3
levels (High-temp , Low-temp and Anti-frost
). After the desired heating power is chosen, it starts running at the
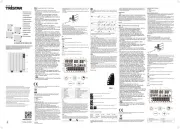
• Long press the Mode button 3 seconds to enter the weekly timer setting
• P1/P2/P3 are fixed mode and the corresponding heater operation
programs are determined as shown in the above figure.
• In the normal heating mode, press - or + button to set the target heating
temperature. The range is 5⁰C -50⁰C.
• Press + button to increase the temperature by 1 degree for each press.
Press - button to decrease the temperature by 1 degree for each press.
When the temperature increases to 50 degrees Celsius, the target will
revert to 05/50 degrees Celsius; when the temperature decreases to 05
degrees Celsius, it will revert to 50 degrees Celsius. When the target
temperature is selected and there is no operation on the temperature
buttons, within 5 seconds the digital light stops flashing and returns to
the room temperature display. (specified in the program; stop heating
when the ambient temperature is higher than 1 degree above the set
• Press - and + at the same time for 3 seconds, the buzzer will send out a
short sound, which means the buttons are locked. The “lock” symbol is
displayed. Than press - and + at the same time for 3 seconds again, the
buzzer will send out a short sound, which means the buttons are
unlocked, all buttons will be available again. The “lock” symbol is hidden,
the backlight is on and the unit goes into unlock state.
• press the Timer button to turn on the timer function. "00:00" is displayed.
Press the Timer button once again, the display will change to “01:00” to
indicate the timer is set to 1 hour. Continue to press to set the timer at
the desired time. The timer can be set to a maximum of 24 hours.
• Press and hold the Timer button for 3 seconds to turn the open window
detection function on or off. By a sudden room temperature drop of 5
degrees (within 10 minutes), the product heating function will be turned
off, the product enters standby mode.
• The temperature bar is displayed as room temperature during the whole
• When you pull the plug, the machine will memory your last settings,
except the time and week. When you insert the plug, the machine will
restore your previous settings, but you need to set the current time and
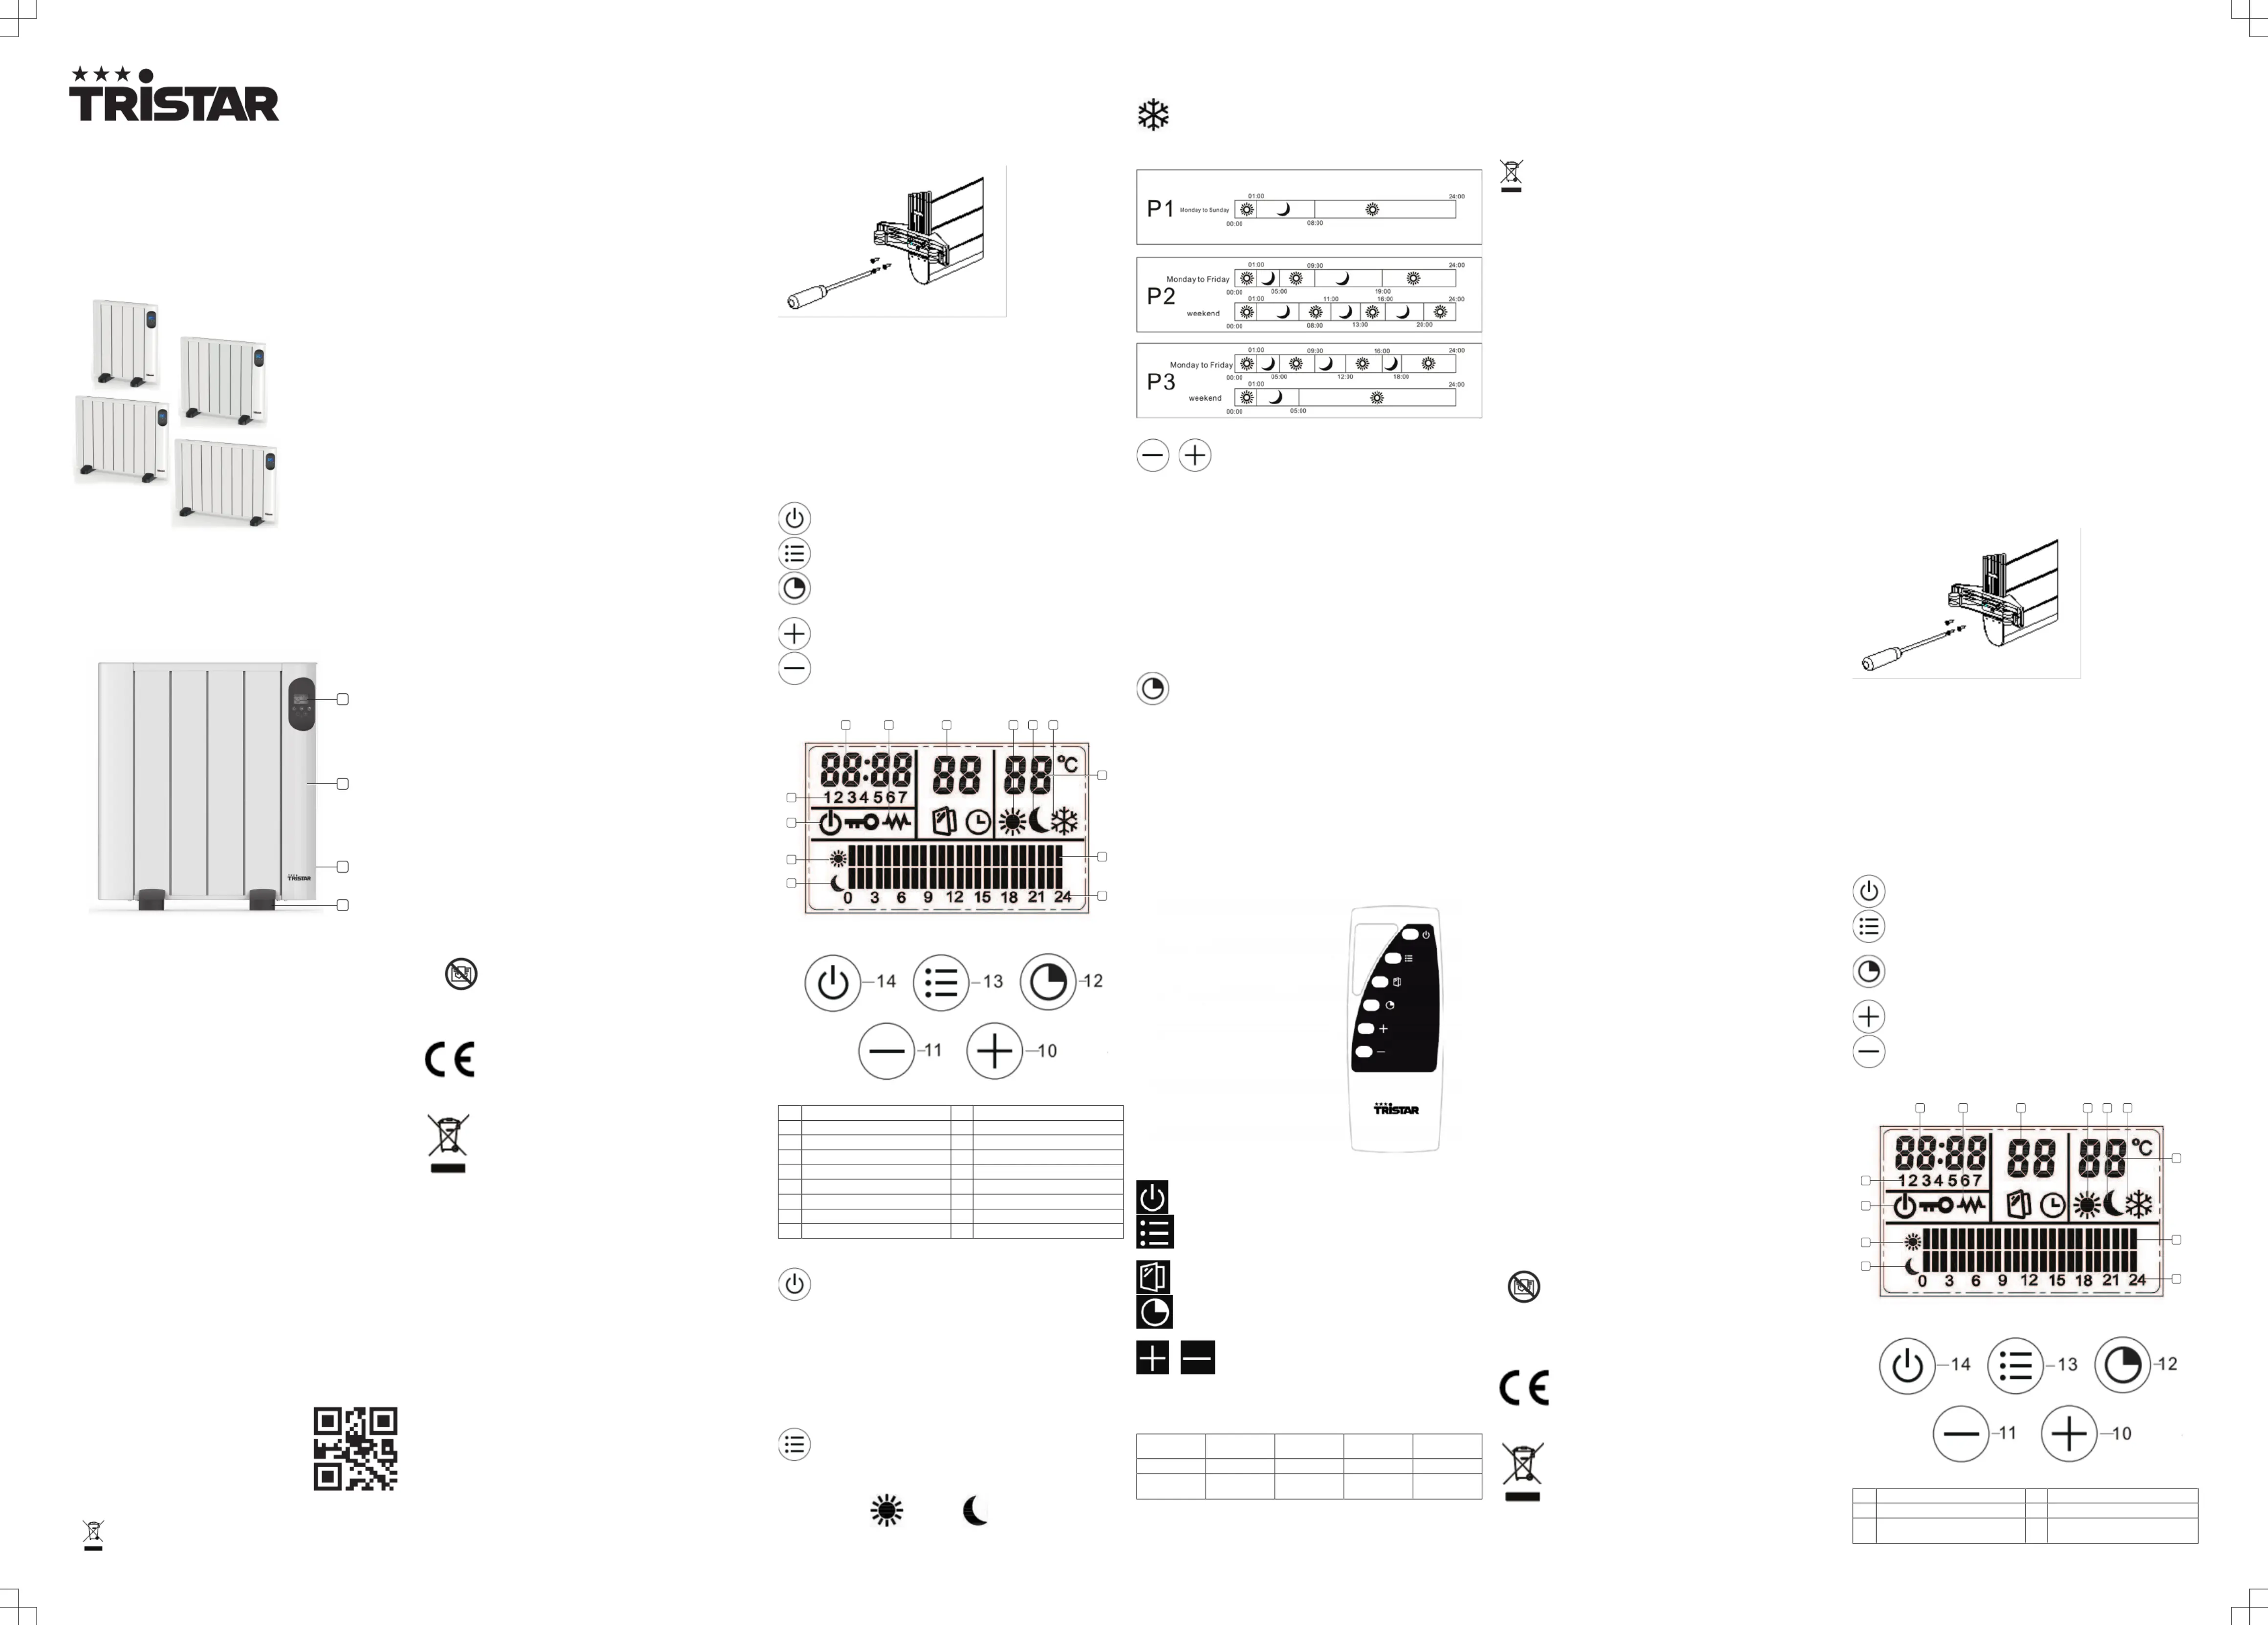
The remote control can only be used in normal mode.
Turn the heater on or off.
Toggle between the different functions (High temp, Low temp or
Open window function button.
Turn Timer function on or off and set the length of time (24h
& Adjust the setting temperature, increase or decrease by
KA-5866 KA-5867 KA-5868 KA-5869
Power 500-600W 900-1000W 1400-1500W 1800-2000W
Heating level 600W 500W/1000W 750W/1500W 1000W/2000
• Before cleaning, unplug the appliance and wait for the appliance to cool
• Clean the appliance with a damp cloth. Never use harsh and abrasive
cleaners, scouring pad or steel wool, which damages the device.
• Clean the two air outlets (above and below) by using a vacuum cleaner
to remove dust from inside.
This appliance should not be put into the domestic garbage at the
end of its durability, but must be offered at a central point for the recycling
of electric and electronic domestic appliances. This symbol on the
appliance, instruction manual and packaging puts your attention to this
important issue. The materials used in this appliance can be recycled. By
recycling of used domestic appliances you contribute an important push to
the protection of our environment. Ask your local authorities for information
regarding the point of recollection.
You can find all available information and spare parts at www.tristar.eu!
• Als u de veiligheidsinstructies negeert, kan de
fabrikant niet verantwoordelijk worden
gehouden voor de mogelijke schade.
• Als het netsnoer beschadigd is, moet het
worden vervangen door de fabrikant, de
onderhoudsmonteur van de fabrikant of door
personen met een soortgelijke kwalificatie om
• Verplaats het apparaat nooit door aan het snoer
te trekken en zorg dat het snoer niet in de war
• Het apparaat moet op een stabiele, vlakke
ondergrond worden geplaatst.
• De gebruiker mag het apparaat niet onbeheerd
achterlaten wanneer de stekker zich in het
• Dit apparaat is uitsluitend voor huishoudelijk
gebruik en voor het doel waar het voor bestemd
• Dit apparaat mag niet worden gebruikt door
kinderen jonger dan 8 jaar. Dit apparaat kan
worden gebruikt door kinderen vanaf 8 jaar en
door personen met verminderde lichamelijke,
zintuiglijke of geestelijke vermogens of gebrek
aan de benodigde ervaring en kennis indien ze
onder toezicht staan of instructies krijgen over
hoe het apparaat op een veilige manier kan
worden gebruikt alsook de gevaren begrijpen
die met het gebruik samenhangen. Kinderen
mogen niet met het apparaat spelen. Houd het
apparaat en het netsnoer buiten bereik van
kinderen jonger dan 8 jaar. Laat reiniging en
onderhoud niet door kinderen uitvoeren, tenzij
ze ouder zijn dan 8 jaar en onder toezicht staan.
• Dompel het snoer, de stekker of het apparaat
niet onder in water of andere vloeistoffen om
elektrische schokken te voorkomen.
• WAARSCHUWING: Sommige onderdelen van
dit product kunnen zeer heet worden en
brandwonden veroorzaken. Wees extra
voorzichtig als u het apparaat gebruikt in de
buurt van kinderen en kwetsbare personen.
• Kinderen jonger dan 3 jaar dienen uit de buurt
te worden gehouden, tenzij onder constante
• Gebruik het apparaat niet met een
programmeringseenheid, timer, afzonderlijk
afstandsbedieningssysteem of andere
apparaten die het verwarmingssysteem
automatisch inschakelen, omdat er brandgevaar
heerst als het verwarmingssysteem op onjuiste
wijze is afgedekt of gepositioneerd.
• Gebruik de verwarmer niet in de directe
omgeving van een bad, douche of zwembad.
• Installeer het apparaat niet in de buurt van
gordijnen en andere brandbare materialen. Dit
• De verwarming dient niet direct onder een
stopcontact geplaatst te worden.
• WAARSCHUWING: Om oververhitting te
voorkomen, raden we u aan om het apparaat
Dit product voldoet aan de conformiteitsvereisten van de toepasselijke
Europese regelgeving en richtlijnen.
Gooi elektrische producten niet weg als huishoudelijk afval. Recycle het
product wanneer dit mogelijk is. Neem contact op met uw plaatselijke
autoriteiten of een lokaal verkooppunt voor advies over recycling.
• Plaats het apparaat op een vlakke, stabiele ondergrond. Houd minimaal
30cm ruimte vrij rond het apparaat. Dit apparaat is niet geschikt voor
installatie in een kast of voor gebruik buitenshuis.
• Sluit de voedingskabel aan op het stopcontact. (Opmerking: Controleer
of het voltage op het apparaat overeenkomt met de plaatselijke
netspanning voordat u het apparaat aansluit. Voltage 220-240V~, 50-60
• Controleer of de aan/uit-schakelaar aan de achterzijde van het apparaat
• Als het apparaat voor de eerste keer wordt aangezet, ontstaat een lichte
geur. Dit is normaal, zorg voor voldoende ventilatie. Deze geur is maar
tijdelijk en zal spoedig vervliegen.
• Stel na de eerste keer inschakelen de huidige tijd en week in. Druk
3seconden op de knop - om de waarde voor de weekkolom in te stellen.
Zodra de waarde begint te knipperen, selecteert u de week die hoort bij
de huidige datum door op de knoppen + en - te drukken. Druk
vervolgens opnieuw 3seconden op de knop -. De waarde voor uren in
de tijdweergavekolom begint te knipperen. U kunt de waarde voor uren
instellen die hoort bij de huidige tijd met de knoppen + en -. Druk
vervolgens opnieuw 3seconden op de knop - om de waarde voor
minuten in te stellen die hoort bij de huidige tijd door op de knoppen + en
- te drukken. Nadat u het bovenstaande proces hebt voltooid, wacht u
10seconden of drukt u op de aan/uit-knop om de instellingen op te
slaan. De tijd die op de heater wordt weergegeven, komt overeen met de
Methode met bevestiging van voetjes
• Voordat u de heater gaat gebruiken, moet u de voetjes (apart
meegeleverd in de verpakking) aan het apparaat bevestigen.
• U zet ze vast aan de basis van de heater met de 4 meegeleverde
• Zorg dat u de voetjes correct plaatst in de onderkant van de heater.
• Het product moet ten minste 15cm boven de grond en 50cm onder het
plafond worden geïnstalleerd.
• De heater moet op 4 punten worden bevestigd, waarbij u dient te zorgen
dat er aan alle kanten van de heater 300mm vrije ruimte is.
• Meet de afstand tussen het midden van elke beugel zowel horizontaal
als verticaal om er zeker van te zijn dat u de gaten op de juiste plaats
boort. Markeer de positie van de 4 gaten die u in de muur moet boren.
• Boor de gaten in de muur. Steek vervolgens de plastic spreidpluggen in
de gaten en schroef de 4 meegeleverde schroeven in de plastic
• Bevestig het heaterpaneel op de schroeven en beweeg de heater naar
rechts zodat de schroeven in de borgsleuven zakken.
Beschrijving van knop/informatie op display
De heater in- en uitschakelen, instellingen opslaan of afsluiten.
Het verwarmingsvermogen selecteren en de wekelijkse
De 24-uurstimer in- of uitschakelen en de functie voor open ramen
De doeltemperatuur of tijd verhogen.
De doeltemperatuur of tijd verlagen.
1 Tijd instellen 10 Knop +
2 Verwarming ingeschakeld 11 Knop -
3 Wekelijks 12 Timer/instelling voor open