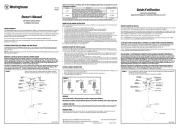
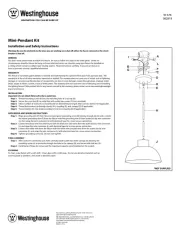
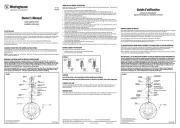
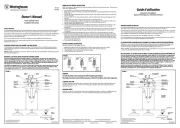
Westinghouse Atler 6575100 Manual

Westinghouse lampe Atler 6575100

Læs gratis den danske manual til Westinghouse Atler 6575100 (2 sider) i kategorien lampe. Denne vejledning er vurderet som hjælpsom af 6 personer og har en gennemsnitlig bedømmelse på 4.4 stjerner ud af 3.5 anmeldelser. Har du et spørgsmål om Westinghouse Atler 6575100, eller vil du spørge andre brugere om produktet?

Side 1/2
Westinghouse Lighting, Philadelphia, PA 19154-1029, U.S.A. www.westinghouselighting.com
, WESTINGHOUSE, and INNOVATION YOU CAN BE SURE OF are trademarks of Westinghouse Electric Corporation.
Used under license by Westinghouse Lighting. All rights reserved. Made in China
MOUNTING AND WIRING INSTRUCTIONS
NOTE: Underwriters Laboratories (UL) does not require all fixtures to have ground wires. These fixtures
meet all UL specifications.
1. Turn off power at circuit box to avoid possible electric shock.
2. Remove mounting plate (C) from fixture and save the screws (H) for late use. Raise mounting plate
3. Identify color coding of fixture wires.
4.
Connect the black wire from the fixture with the black wire (live wire) from the outlet box (B) by wire
connector (D), and wrap the wire connector (D) with electrical tape for a more secure connection.
5.
Connect the white wire from the fixture with the white wire (neutral wire) from the outlet box (B) by
wire connector (D), and wrap the wire connector (D) with electrical tape for a more secure connection
.
6. Partially thread green grounding screw (E) into side hole (F) on mounting plate (C) (see fig.1).
7. Wrap the bare grounding wire (J) from the fixture canopy (G) around the green grounding screw
(E) on the mounting plate (C) leaving 3” to 4” of excess wire to attach to the ground wire from the
outlet box (B). Connect the greenish grounding wires and excess grounding wire from the fixture
canopy (G) with the grounding wire (J) from outlet box (B) by using a wire connector (D), then
wrap the wire connector (D) with electrical tape for a more secure connection.
8. Tighten green grounding screw (E). Do not over tighten.
9. Tuck wires inside outlet box (B).
FIXTURE ASSEMBLY INSTRUCTIONS
Warning: This fixture is for indoor use only.
1. Raise canopy (G) up to mounting plate (C), secure with screws (H).
2. Push or pull the button (I) on the canopy (G) to adjust the cable length to make sure the fixture is
horizontal.
3. Turn power back on at circuit box.
WARNING
Turn off electricity to the mounting site before beginning installation.
Mounting instructions must be followed exactly as shown for the fixture to be safely supported.
CLEANING AND CARE
To clean, wipe fixture with soft cloth. Clean glass with mild soap. Spray from chemical cleaners can
discolor the finish of fixture. Do not use scouring pads, powders, steel wool or abrasive paper to
clean this fixture.
ORDERING PARTS
Keep this manual for future reference, and in case replacement parts are needed. Available parts can
be ordered from place of purchase. Use exact wording from diagrams when ordering parts.
FIGURE 2.
FIXTURE
WIRES:
Black
HOUSE
WIRES:
Black
(Hot)
HOUSE
WIRES:
White
(Neutral)
HOUSE
WIRES:
Bare
Copper
(Ground)
FIXTURE
WIRES:
Bare
Copper
(Ground)
FIXTURE
WIRES:
White
*BOITE DE SORTIE
DE COURANT (B)
PLAQUE DE
MONTAGE (C)
CHAPEAU (G)
VIS DE MISE
A LA TERRE
(VERTE) (E)
CONNECTEURS
DE FIL (D)
*FIL DE MISE
A LA TERRE (J)
*VIS DE LA BOITE
DE SORTIE DE
COURANT (A)
VIS DE
CALAGE (H)
TROU
LATERAL (F)
*NON FOURNI
Il est possible que le dessin illustré ici ne
soit pas la reproduction exacte de l’appareil
d’éclairage contenu dans la boîte.
Les instructions d’installation demeurent
cependant valables.
FIGURE 1.
BOUTON (I)
*OUTLET
BOX (B)
MOUNTING
PLATE (C)
CANOPY (G)
GREEN
GROUNDING
SCREW (E)
WIRE
CONNECTORS (D)
*GROUND
WIRE (J)
*OUTLET BOX
SCREWS (A)
BUTTON (I)
SCREW (H)
SIDE
HOLE (F)
*NOT SUPPLIED
Line art shown may not exactly match the
fixture enclosed. However, the installation
instructions do apply to this fixture.
FIGURE 1.
W-671
042820
ASSEMBLY INSTRUCTIONS FOR INDOOR LIGHTING FIXTURE
Congratulations on your Westinghouse purchase. This fixture has been designed to give you many
years of beauty and service. For questions and comments, please visit www.westinghouselighting.
com/contact-us.
NOTE: Carefully unpack fixture and parts. Make sure all parts are included before discarding any pack-
ing materials (see figure 1).
Owners Manual
LED Indoor Lighting Fixture
Installation Instructions
Fixture Warranty
This Westinghouse lighting fixture is warranted against defects in material and workmanship for a period
of five years from purchase date. This warranty is in lieu of all other warranties expressed or implied.
This warranty does not cover acts of nature such as lightening damage, or corrosion and discoloration
of components, nor does it cover damages caused through abuse, improver installation, surges in
electric current, or acts of third parties.
This warranty does not cover the costs of removing and re-installing the lighting fixture.
If this product fails for any reason covered by this warranty, please contact us at www.westinghouse-
lighting.com/contact-us.
WARNING:
ELECTRICAL SHOCK CAN RESULT IN SERIOUS INJURY.
Read and follow instructions exactly as shown. If instructions are unclear, do not proceed.
Contact a qualified electrician. Read all instructions before beginning. Proper wiring is essen-
tial for safe operation of this fixture. When cutting or drilling into walls or ceilings, do not dam-
age electrical wiring, gas lines, or water lines. If any of the fixture or wiring components are
damaged, do not install fixture. Return to place of purchase.
For fixtures provided with 75° C or 90° C supply wire warning only. (These warnings are provid-
ed on the U.L. label and on the fixture carton.) Risk of fire. Most dwellings built before 1985
have supply wires rated 60° C. Consult a qualified electrician before installing.
Guide d’utilisation
Instructions d’installation
Appareil d’éclairage pour utilisation intérieure avec DEL
LES INSTRUCTIONS D’ASSEMBLAGE DE LAPPAREIL D’ÉCLAIRAGE POUR UTILISATION INTÉRIEURE
Félicitations ! Vous avez acheté un produit de Westinghouse Lighting. Cet appareil d’éclairage a été
conçu pour durer de nombreuses années. Si vous avez des questions ou des commentaires à
nous communiquer, veuillez visiter www.westinghouselighting.com/contact-us.
NOTA : Déballez soigneusement l’appareil d’éclairage et les pièces. Assurez-vous que toutes les pièces
y sont avant de mettre l’emballage au rebut (voir fig. 1).
GARANTIE LIMITÉE DE CINQ ANS
Ce luminaire Westinghouse est garanti pièces et main-doeuvre pour une période de Cinq ans à compter
de la date d’achat. Cette garantie remplace toute autre garantie, explicite ou implicite.
Cette garantie ne couvre pas les phénomènes naturels comme les dommages de la foudre, ni la corro-
sion ou la décoloration des composants, pas plus qu’elle ne couvre les dommages causés par les abus,
une installation inappropriée, les surtensions électriques ou les actes de tiers.
Cette garantie ne couvre pas les coûts de dépose et de pose du luminaire.
En cas de défaillance du produit, pour une raison quelconque, couverte par cette garantie, veuillez
nous contacter via www.westinghouselighting.com/contact-us.
MISE EN GARDE: L’ÉLECTROCUTION POURRAIT CAUSER DE GRAVES BLESSURES PERSONNELLES.
Lisez ces instructions et suivez-les exactement comme illustré. En cas de doute, ne commencez
pas l’installation. Consultez un électricien qualifié. Lisez toutes les instructions avant de com-
mencer l’installation. Un câblage approprié est essentiel au bon fonctionnement de cet appareil
d’éclairage. Lorsque vous faites une entaille ou que vous percez un trou dans un mur ou un
plafond, nendommagez pas les câbles électriques, les canalisations de gaz ou d’eau. Si l’un des
composants de raccordement ou de l’appareil déclairage est endommagé, n’installez pas cet
appareil d’éclairage. Retournez-le à l’endroit où vous l’avez acheté.
Convient uniquement aux appareils comportant un avertissement indiquant que l’appareil
d’éclairage est doté d’un fil supportant une chaleur de 75°C ou 90°C. (Ces avertissements se
trouvent sur l’étiquette U.L. et sur l’emballage de l’appareil d’éclairage.)
NOTE: THIS FIXTURE IS SUITABLE FOR USE WITH DIMMABLE SWITCHES, SEE BELOW FOR LIST OF
COMPATIBLE DIMMERS.
Brand Model # DIMMING RATING
DVCL-153P, DVCL-153PR-WH, MACL-153M, PD-6WCL,
MRF2-6CL, TGCL-153PH-WH-C, SCL-153P, DVCL-253P,
CTCL-153PH, CTCL-153P, PD-10NXD
DDMX1-BLZ, DSL06-1LZ, C22-6672-1LW, C26-RNL06-TW,
R62-6683-IW
Pass&seymour H703PTC
Legrand HLV703PTC
Not recommended for use with motion sensors, light sensors, timers or any other external controls.
Lutron
Leviton
10-100%
10-100%
10-100%
10-100%


Produkt Specifikationer

Mærke: Westinghouse
Kategori: lampe
Model: Atler 6575100

Har du brug for hjælp?

Hvis du har brug for hjælp til Westinghouse Atler 6575100 stil et spørgsmål nedenfor, og andre brugere vil svare dig