08. KARTA GWARANCYJNA/ REKLAMACJE
Produkt objęty jest 24-miesięczną gwarancją. Warunki
gwarancji można znaleźć na stronie:
https://xblitz.pl/gwarancja/
Reklamacje należy zgłaszać za pomocą formularza
reklamacyjnego znajdującego się pod adresem:
http://reklamacje.kgktrade.pl/
Szczegóły, kontakt oraz adres serwisu można znaleźć
na stronie: www.xblitz.pl
Specyfikacje i zawartość zestawu mogą ulec zmianie bez
powiadomienia. Przepraszamy za wszelkie niedogodności.
Moc pracy: 5W, 7.5W, 10W, 15W max
Wejście: 9V-1.67A, 5V-2A, 12V-1.5A
Wyjście: 9V-1.2A, 5V-1A, 12V-1.25A
Detektor ciał obcych: Tak
przepięciem/ przegrzaniem: Tak
Rodzaj sensora: Magnetyczny
Temperatura pracy: -10~45°
Maksymalna rozpiętość ramion: 110 mm
Specifications and contents of the kit are subject to change without
notice. We apologise for any inconvenience.
This product is covered by a 24-month warranty. The
warranty conditions are available on the website:
https://xblitz.pl/warranty/
Complaints should be submitted with the complaint form
which can be found at http://reklamacje.kgktrade.pl/
Contact details and the address of the service can be found
on the website: www.xblitz.pl
dziękujemy za zakup naszego uchwytu samochodowego
Przed użyciem należy dokładnie zapoznać się z załączoną
instrukcją obsługi oraz wskazówkami bezpieczeństwa, aby
uniknąć przypadkowych uszkodzeń sprzętu lub
niezamierzonych obrażeń ciała.
Urządzenie jest uchwytem do smartfonów przeznaczonym
do użytkowania w samochodach. Uchwyt posiada wbudowaną
ładowarkę bezprzewodową, system mocujący smartfon oraz
funkcję automatycznego obrotu.
UWAGA! Uchwyt jest kompatybilny z wszystkimi
urządzeniami obsługującymi funkcję ładowania
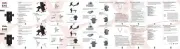
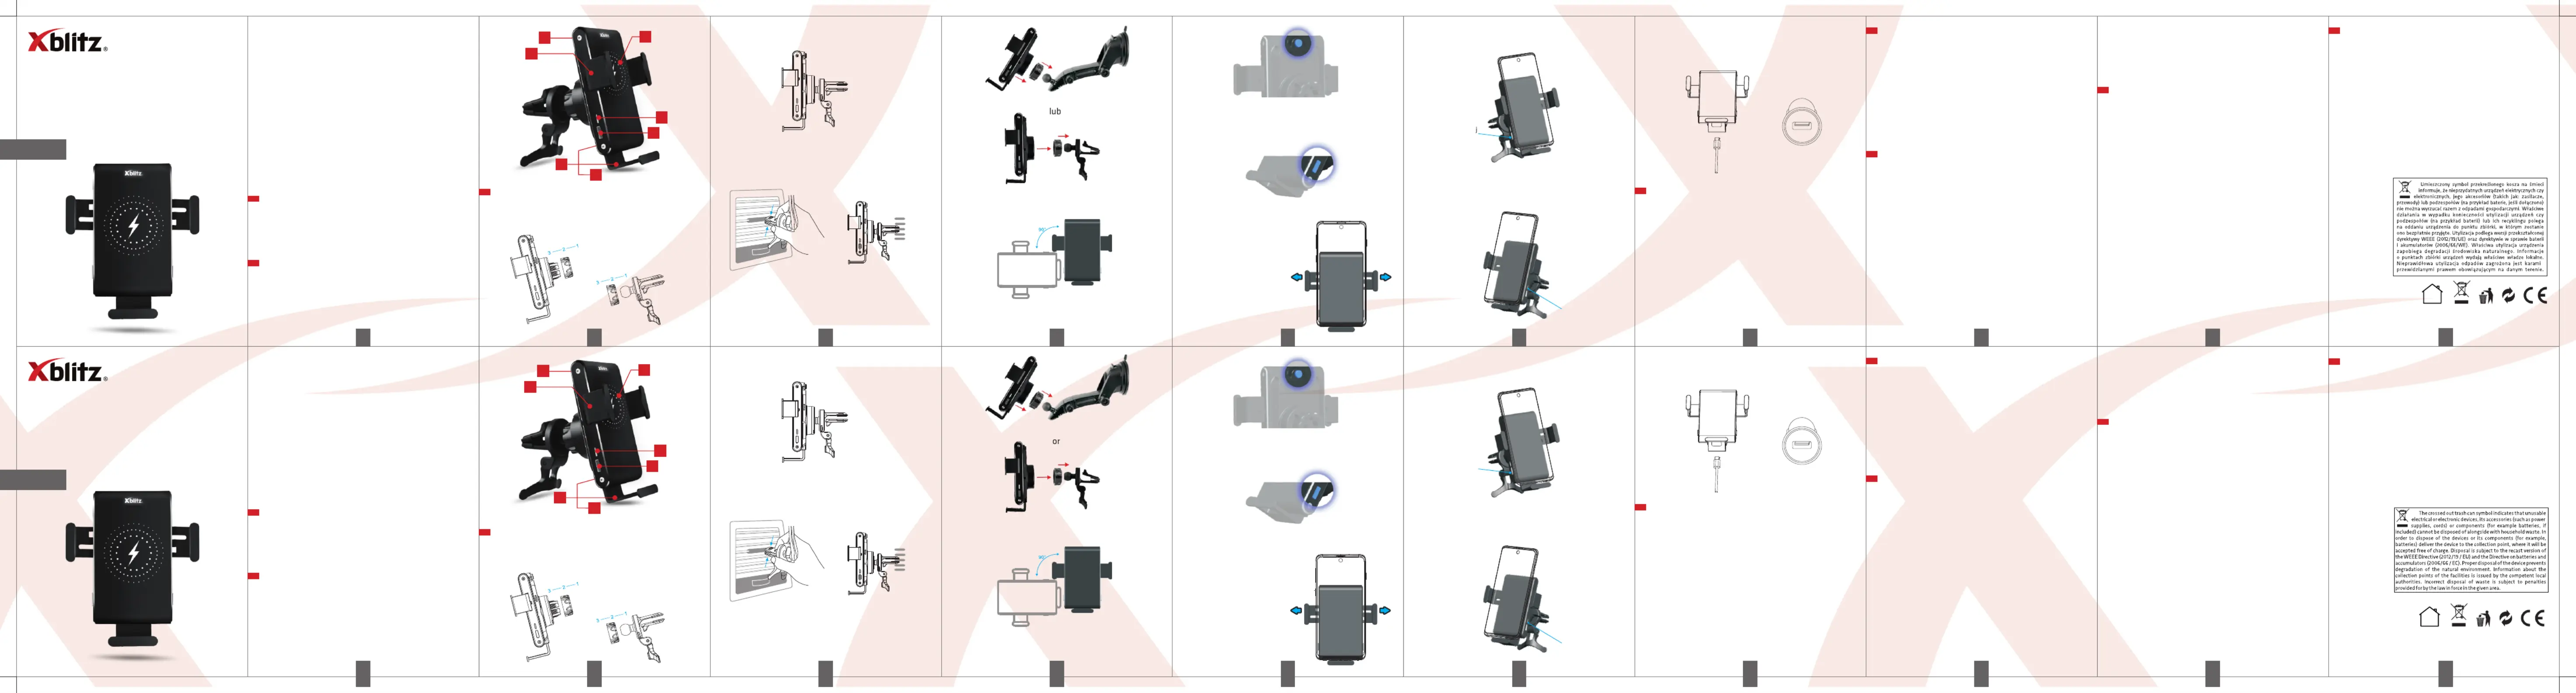
1. Postępuj zgodnie z numerkami na obrazku, aby
zainstalować części urządzenia.
2. Mocowanie do kratki wentylacyjnej
3. Mocowanie teleskopowe do szyby
2. Ustaw uchwyt według preferencji.
3. Wciśnij przycisk na klipsie mocującym, aby ustawić kąt
i zacisnąć uchwyt na kratce wentylacyjnej.
B. Montaż uchwytu na szybie pojazdu lub w kratce
C. Montaż telefonu w uchwycie:
1. System automatycznej rotacji.
2. Aby zmienić pozycję na pionową lub poziomą, wciśnij
przycisk znajdujący się z tyłu uchwytu.
3. Aby przejść z pozycji poziomej do pionowej, naciśnij przycisk
zlokalizowany po prawej stronie uchwytu, a skrzydełka się
D. Mocowanie telefonu w uchwycie:
automatycznie się otwierają
i wyjęciu telefonu z uchwytu.
2. Wyjmowanie telefon - wciśnij przycisk z boku uchwytu,
aby uwolnić telefon, a skrzydełka automatycznie się otworzą.
Niebieski kolor: Ładowanie
Czerwony kolor: Problem z ładowaniem
E. Podłączenie uchwytu do zasilania:
1. Podłącz bezprzewodową ładowarkę do adaptera
samochodowego za pomocą kabla ładowania.
Technologia Qualcomm pozwala na szybkie ładowanie.
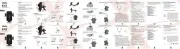
1. Urządzenie posiada system elektrycznego otwierania oraz
zamykania ramion trzymających smartfon.
2. Aby otworzyć ramiona i włożyć/wyjąć smartfon należy
nacisnąć jeden z przycisków z boku urządzenia.
3. Uchwyt posiada wbudowaną bezprzewodową ładowarkę
oraz funkcję automatycznego obrotu. Smartfon
(który obsługuje technologię QI) po włożeniu w uchwyt
będzie automatycznie ładowany oraz zmieni pozycję
na poziomą. W celu poprawy działania tej funkcji dostosuj
położenie stopki tak, aby cewki w telefonie i w uchwycie
znajdowały się w optymalnej pozycji.
UWAGA! Producent nie gwarantuje kompatybilności
ładowarki ze wszystkimi typami smartfonów. Uchwyt
posiada niewielki kondensator, który pozwala na otworzenie
uchwytu do 20 minut po odłączeniu zasilania.
05. PROBLEMY Z ŁADOWANIEM
Jeśli ładowarka ładuje za wolno, przestaje ładować lub
urządzenie się przegrzewa, może być to spowodowane
następującymi problemami:
a. Obudowa telefonu jest zbyt gruba (zalecana grubość
b. Wbudowana cewka indukcyjna nie styka się z cewką
c. Magnes bądź kawałek metalu przysłania cewkę indukcyjną
d. Smartfon nie obsługuje funkcji ładowania
e. Kabel do ładowania nie pasuje do uchwytu.
06. ŚRODKI OSTROŻNOŚCI/ UWAGI
1. Trzymaj uchwyt z daleka od wody i innych płynów.
2. Jeśli potrzebujesz wyczyścić uchwyt, upewnij się, że nie jest
3. Próg temperatury urządzenia wynosi -10°C~45°C.
4. Uszkodzenie spowodowane nieprzestrzeganiem niniejszej
instrukcji powoduje utratę gwarancji.
5. W przypadku uszkodzenia spowodowanego niewłaściwym
użytkowaniem oraz nieprzestrzeganiem zasad.
6. Z uwagi na względy bezpieczeństwa zabronione jest
wprowadzanie zmian oraz modyfikacji produktu.
7. Regularnie należy sprawdzać urządzenie pod kątem
uszkodzeń. W przypadku ich wykrycia należy kontaktować się
z autoryzowanym serwisem.
8. Nie wolno wylewać płynów na produkt, grozi to trwałym
uszkodzeniem sprzętu, a także istnieje duże ryzyko
9. Urządzenie powinno znajdować się poza zasięgiem dzieci.
10. Jeśli czujesz, że urządzenie przegrzewa się, odłącz
je od zasilania i skontaktuj się z autoryzowanym serwisem.
11. Nie podłączać urządzenia do źródeł zasilania o wyższym
napięciu niż zalecane przez producenta (szczególnie
bezpośrednio do gniazdka 220/230 V). Niestosowanie się
do zaleceń może spowodować uszkodzenie lub w skrajnych
przypadkach zapalenie się urządzenia.
Operating power: 5W, 7.5W, 10W, 15W max
Input: 9V-1.67A, 5V-2A, 12V-1.5A
Output: 9V-1.2A, 5V-1A, 12V-1.25A
overheating protection: Yes
Sensor type: Magnetic sensor
Built-in Farah capacitor: Yes
Operating temperature: -10~45°
Thank you for purchasing our product, the Xblitz GX car 3
Read the user manual before use and apply all of the safety
tips and measures to avoid damaging the appliance
This appliance is a car holder designed to use in cars. The car
holder has an automatically built-in wireless charger,
mounting system, and automatic rotation.
The car holder is compatible with all smartphones equipped
with the Qi wireless charging technology.
A. : Installing the holder on an air vent or windshield
1. Follow the numbers on the picture to assemble parts of
3. elescopic windscreen mountT
2. .Adjust the device according to your preference
3. Push the button on the mounting clip to set the angle
of the holder and install the device on the air vent.
B. : Installing the holder on an air vent or windshield
C. : Installing the smartphone in the holder
1. .Automatic rotation system
2. To change the position to vertical or horizontal, press the
button on the back of the holder.
3. To switch the positions from vertical to horizontal, press
the button on the right side of the holder, and the arms will
D. : Placing the smartphone in the holder
1. Both of the arms on the holder
will open automatically after
inserting the smartphone, and
2. - pRemoving the smartphone from the holder ress the
key on the side and the arms will automatically open.
E. :Connecting the holder to the power supply
1. Connect the wireless charger cord to the car adapter.
For fast charging, use the Qualcomm quick charging adapter.
1. Both of the arms on the holder open automatically after
inserting the smartphone, and then hold the smartphone
2. To remove the smartphone from the holder, press the
button on the side and the arms will automatically open.
3. The holder is equipped with a wireless charger and
automatic rotation. After inserting your smartphone in the
holder, it will automatically start charging the phone and
switch to a horizontal position. Remember, your phone must
be compatible with the Qi standard to use wireless charging.
To ensure proper work of the charger, adjust the arms and the
base of the holder so that the charging coil of the smartphone
aligns with the coil in the car holder.
ATTENTION! The producer does not guarantee compatibility
of the wireless charger with all smartphone models. The holder
is equipped with a small capacitor that allows you to use all
of its functions up to 20 minutes after disconnecting from the
If the charger stops charging or is charging too slow, or the
device is overheating, it may be caused by the following
a. The phone case is too thick (2mm thickness
b. The built-in wireless charging coil in the holder does not
match the charging coil in the phone.
c. There is a piece of metal or a magnet on the back of the cell
d. The smartphone does not support wireless charging.
e. The charging cable is not up to standard.
1. Please keep the charger away from water or any other
2. When cleaning the charger, please make sure
it is disconnected from the power supply.
3. Temperature range: - 0~45°C.1
4. Damage caused by failing to comply with the user manual
results in warranty loss.
5. Damage caused by improper use and failure to comply with
the rules results in warranty loss.
6. Due to safety concerns, do not change or modify the
7. It is recommended to regularly check the appliance for
damage. If damage occurs, contact the authorized service
8. Do not pour liquids on the device, risk of permanent
9. Keep the device away from children.
10. If the device is overheating, unplug it from the power
source and contact the authorized service center.
11. Do not plug the device into a power supply with voltage
higher than recommended by the producer (in particular,
do not plug it directly into a socket with a voltage
of 220/230V). Failure to comply with the recommendations
may result in damage or even ignition.
3. Przycisk automatycznej rotacji
4. Ładowarka bezprzewodowa
6. Przycisk otwierający ramiona
3. Automatic rotation button