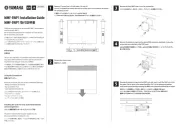
MMF-SWP1 Installation Guide
Remove 17 screws (rear ×3, both sides ×10, top ×4). 
Use a #1 screwdriver to remove the four top screws, and a #2 screwdriver to remove 
17箇所(リア×3、両サイド×10、トップ×4)のネジを外す。
トップの4つのネジを外すときは#1、それ以外は#2のドライバーを使用してください。
Remove the chassis cover.
Remove the front MMF cover. Use a Star screwdriver.
フロントのMMFカバーを外す。ヘクスローブドライバーを使用してください。
Remove the protective cap from the opticalCON connector, and attach it using the 
screws that were attached to the MMF cover.
opticalCON端子の保護キャップを外し、opticalCON端子をMMFカバーについていたネジを
Remove the protective cap from the MMF unit, and insert it until the MMF unit clicks 
into place. Set the lever to the upward position. If it is in the downward position, 
it will not be locked, possibly allowing the MMF unit to become detached by an impact.
MMFユニットの保護キャップを外し、MMFユニットをカチッと鳴るまで差し込む。
レバーは上を向いた状態にしてください。下にするとロックされていない状態なので、
衝撃によってMMFユニットが外れるおそれがあります。
Thank you for choosing the Yamaha MMF-SWP1 (optical option 
Ask an authorized Yamaha service engineer to install the unit. 
Do not install the unit yourself.
この度はヤマハSWP1用光端子拡張ユニットMMF-SWP1をお買上げ
ユニット取り付けは、必ずヤマハサービスエンジニアにご依頼くださ
This is a class A product. In a domestic environment this product 
may cause radio interference in which case the user may be 
required to take adequate measures. (CISPR22)
この装置は、クラスA情報技術装置です。この装置を家庭環境で使用
すると電波妨害を引き起こすことがあります。この場合には使用者が
適切な対策を講ずるよう要求されることがあります。(VCCI-A)
When you install the unit, you use the screwdrivers following:
・Phillips screwdrivers (#1 and #2)
・Laser label (Use only SMF1-8.)
ユニットの取り付けのために、以下のドライバーを使用します。
Installing the unit (For only authorized Yamaha 
The power cord and external power supply must be 
disconnected before installing the unit.
ユニットの装着作業は、電源コードおよび外部電源を必ず抜いてから