Atlas FAP8CXT Manual

Atlas Højttaler FAP8CXT

Læs gratis den danske manual til Atlas FAP8CXT (1 sider) i kategorien Højttaler. Denne vejledning er vurderet som hjælpsom af 4 personer og har en gennemsnitlig bedømmelse på 4.3 stjerner ud af 2.5 anmeldelser. Har du et spørgsmål om Atlas FAP8CXT, eller vil du spørge andre brugere om produktet?

Side 1/1
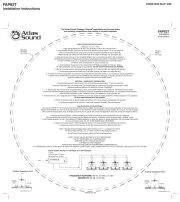
FAP8CXT
Installation Instructions
ATS002573 RevA 12/06
FAP8CXT
Installation
Instructions
Mounting
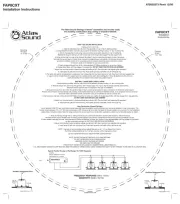
Template
1
8" Dia.
The Atlas Sound Strategy II Series
®
assembles and mounts easily
into
existing construction drop ceiling or drywall materials.
Painting
Shield
3
4" Dia.
DROP TILE CEILING INSTALLATION
1. Remove 2'x2' or 2'x4' tile.
2. Align the adjustable dual rail and C-ring assembly on rear of tile in desired position.
3. Using template provided; mark the cutout circle in the d
esired mounting location, 14" dia. mounting hole.
4. Affix C-ring assembly to rails using screws provided and position assembly on rear of ceiling tile.
Replace tile into grid making sure that formed ends of tile bridge rails engage T-bar tile support rails.
5. Bring service loop from rear of tile, through tile bridge C- ring to access panel located on side of enclosure.
Terminate the service loop to Phoenix style connector provided (please note polarity). Combination knockouts are
provided to facilitate conduit. A UL recognized conduit connector should be used to terminate conduit.
Connection cavity is not intended for use as a junction box.
6. Insert enclosure through front of tile. Using standard #2 Phillips screwdriver or screw-gun, tighten
(4) dogleg assemblies until they engage C-ring assembly. DO NOT OVER-TIGH TEN DOG LEG SCREWS!
7. Adjust front mounted switch to desired wattage tap setting or 8Ω*. (See important note regardi ng operation)
8. Install press-fit grille into front bezel ring. Push baffle upwards until baffle is flush with bezel ring.
9. For safety and seismic considerations a suspension ring is in
tegrated into input panel section of uni
t. Atlas Sound strongly suggests that
a support wire be installe d
from th is support point to a suitable anchor point above ceiling grid. In drop til
e applica tions, this wire can
usually be installed from an adjacent tile access near speaker location.
DRY WALL ("HARD DECK") INSTALLATION
1. Using template provided; mark the cutout circl e in the desired mounting location, 14
" dia. mounting hole.
2. Place tile bridge rai ls and C-ring through
hole. Use V-shaped edge of C-ring t
o align tile bridge assembly above ceiling
(alignment screws provided are not required for this type of installation)
3. Bring service loop from rear of tile, through tile bridge C-ring to access panel locat
ed on sid e of enclosure. Terminate the service loop to
Phoenix style connector provid ed (please note polarity). Comb ination kn
ockouts are
provided to fa
cilitate conduit. A UL recognized conduit connector
should be used to terminate conduit. Connection cavity is not i ntended for use as a jun
cti on box.
4. Insert enclosure into hole. Using standard #2 Phillips screwdriver or screw-gun, tighten (4) dogleg assemblies until they engage the C-ring assembly.
DO NOT OVER-TIGHTEN DOG LEG SCREWS!
5
. Adjust fro nt mounted switch to desired wattage tap setting or 8Ω*. (See important note regardin g operation)
6. Install press-fit grille into front bezel ring. Push baffle upwards until baffle is f
lush with beze
l ring.
New Construction (Drywall Ceilings)
Use of optional FAP82-TR1 new construction bracket essentially reserves speaker mounting location prior to
drywall installation i n n
ew constru ction. The
bracket mounts between 16" or 24" OC studs and include s a 38" downward lip to pro vide a template for drywall installers to cut around. For final installation,
please follow instructions below. Note: tile bridge components are not used in new c
onstruction application s where new construction bracket is utilized.
1. Bring ser vice loop through hole i n ceiling provided by pre construction bracket to access panel located o n side of Enclosure.
Terminate service loop to Phoenix style connector provided (please note polarity). Combination knockouts are provided to facilitate conduit.
2.
Insert speaker assembly into hole. Using standard #2 P h
illips screwdriver or screw-gun
, tighten (4) dog leg assemblies until th ey engag
e rin g provided
on new construction bracket. DO NOT OVER-TIGHTEN DOG LEG SCREWS!
3. Adjust front mounted switch to desired wattage tap setting or 8Ω* (See i mpor
tant no te regarding o peration)
4. Install press-fi t grille in
to front bezel ring. Push baffle upwards until baffle is flush with bezel ring.
NOTE: Do
g legs will accommodate ceiling material
thickness up to 1 1⁄4" as shipped from factory .
For thicker ceiling materials (up to 2") simply unsc rew and f
lip dog legs as shown.
DO NOT OVER-
TIGHTEN DOG LEG
S IN EITHER CONFIGURATION!
NOTE: *DO NOT USE 8Ω SETTING WITH 70.7V/100V S
YSTEMS!
*DO NOT OVERPOWER IN CONFIGURA
TION!
AMPLIFIER OUTPUT SHOULD NOT EXCEED
70W RMS @ PER SP
EAKER
1FAP8 2
-TR NOT TESTED OR EVALUATED BY UNDERWRITERS LABRATORIES (UL)
A UL RECOGNIZED CONDUIT CLAMP MUST BE USED FOR CONDUIT CONNECT IONS. CABLE CONNECTION CAVITY IS NOT INTENDED TO BE USED AS A JUNCTION BOX.
FREQUENCY RESPONSE: 60Hz -15kHz
SENSITIVITY: 92dB (1W/1M)
FAP8CXT
FAP8CXT
FAP8CXT
FAP8CXT
Typical Parallel Hookup of Full Range 70.7/100V Speakers
Auxillary Suspension Point
Dog Leg
In Normal
Position Tile Bridge
Ceiling Material up to 1-1/4
"
Auxillary Suspension Point
Dog Leg
In Inverted
Position Tile Bridge
Ceiling Material up to 2
"


Produkt Specifikationer

Mærke: Atlas
Kategori: Højttaler
Model: FAP8CXT
Bredde: 400 mm
Antal pr. pakke: 1 stk
Produktfarve: Hvid
Pakkevægt: 10430 g
Antal højttalere: 1
Udgangseffekt (RMS): 60 W
Frekvensområde: 60 - 15000 Hz
Impedens: 8 ohm (Ω)
Højttaler, placering: Kan monteres i loftet
Sensitivitet: 92 dB
Woofer diameter: 203 mm
Woofer diameter (britisk mål): 8 "

Har du brug for hjælp?

Hvis du har brug for hjælp til Atlas FAP8CXT stil et spørgsmål nedenfor, og andre brugere vil svare dig


Højttaler Atlas Manualer
Atlas

Atlas FAP8CXT Manual

2 September 2025
Atlas

Atlas ALA5T Manual

8 August 2025
Atlas

Atlas ALS-LFI220 Manual

7 August 2025
Atlas

Atlas ALA10T Manual

7 August 2025
Atlas

Atlas ALS-LFI350 Manual

7 August 2025
Atlas

Atlas ALS-LFI450 Manual

7 August 2025
Atlas

Atlas ALA15T Manual

7 August 2025
Atlas

Atlas ALA20T Manual

7 August 2025
Atlas

Atlas ALS-LFI120 Manual

7 August 2025
Atlas

Atlas AL123A Manual

7 August 2025

Højttaler Manualer

Nyeste Højttaler Manualer

LG

LG RN5 Manual

2 September 2025
Eton

Eton RSC 165 Manual

2 September 2025
JBL

JBL Studio 625C Manual

2 September 2025
LG

LG RN9 Manual

2 September 2025
Fosi Audio

Fosi Audio LC30 Manual

2 September 2025