Atlona AT-VTP-800 Manual


Læs gratis den danske manual til Atlona AT-VTP-800 (12 sider) i kategorien Ikke kategoriseret. Denne vejledning er vurderet som hjælpsom af 22 personer og har en gennemsnitlig bedømmelse på 4.6 stjerner ud af 11.5 anmeldelser. Har du et spørgsmål om Atlona AT-VTP-800, eller vil du spørge andre brugere om produktet?

Side 1/12
Installation Guide
AT-VTP-800
1
Velocity 8” Touch Panel
AT-VTP-800
1 x AT-VTP-800
1 x Metal mounting plate
4 x Mounting screws
1 x Wall installation template
1 x 2-gang mud ring
1 x Installation Guide
Package Contents
Operating Notes
The Velocity 8” Touch Panel (AT-VTP-800) must be on the same network as the Velocity
Gateway (AT-VGW-HW) or it will be unable to sync for control.
The AT-VTP-800 is PoE capable, to power the unit, simply plug it into a 802.3at compatible
network switch. If the network switch is not PoE capable, a PoE injector (purchased separately)
can be used.
IMPORTANT: Velocity Gateway (AT-VGW-HW) must be set up before the AT-VTP-800 is
fully functional.
The Atlona AT-VTP-800-BL and AT-VTP-800-WH are 8” touch panels in black and white,
respectively, for the Atlona Velocity™ Control System. They feature contemporary, rened styling
for modern presentation environments with 1280x800 native resolution, and a capacitive glass
surface that supports multi-touch and gesture interactions. These touch panels conveniently
install into a wall or furniture via a US two-gang opening. Also available is the optional AT-VTP-
TMK tabletop mounting kit for placement on a meeting table or lectern. The VTP-800-BL and
VTP-800-WH feature Power over Ethernet (PoE), enabling a single network connection for data
and power. Setting up the touch panels is eortless as the AV control GUI is automatically
uploaded from the Velocity Control Gateway processor during system conguration.
Installation Guide
AT-VTP-800
2
The AT-VTP-800 has two mounting options. In-wall or an optional stand (available through atlona.
com).
Mounting Instructions
In-wall
1 Use the included wall mount template to create a hole in the wall the correct 2-Gang size for
the unit.
2 Install the back box (not included) or mud ring (included) into the wall.
3 Screw the included metal mounting plate into the mud ring using the 4 included screws.
4 Remove the two screws from the bottom of the touch panel.
5 Run the Ethernet cable through the mud ring and metal mounting plate.
6 Connect the Ethernet and/or power cable into the back of the touch panel.
7 Line up the touch panel with the mounting plate and thread the metal hooks into the four
holes on the back of the panel.
8 Gently press the touch panel down to ensure it is fully seated on the mounting plate.
9 Replace the two bottom screws to secure the touch panel to the metal mounting plate.


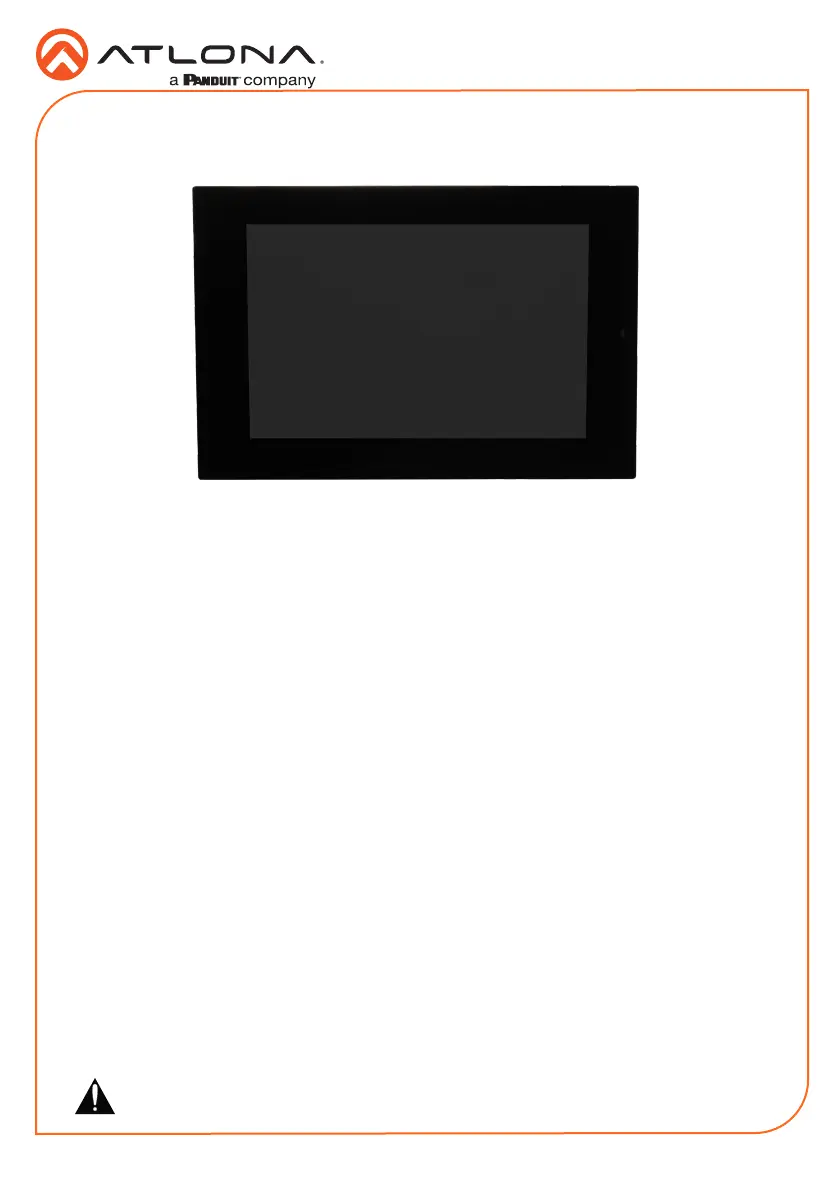
Produkt Specifikationer

Mærke: Atlona
Kategori: Ikke kategoriseret
Model: AT-VTP-800

Har du brug for hjælp?

Hvis du har brug for hjælp til Atlona AT-VTP-800 stil et spørgsmål nedenfor, og andre brugere vil svare dig