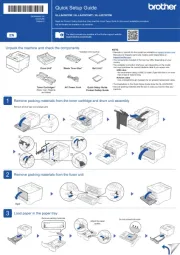
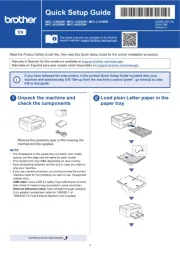
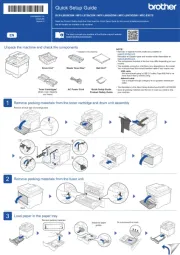
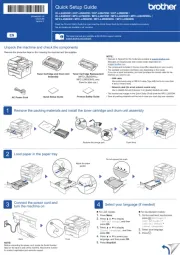
Brother DCP-9045CDN Manual

Brother Printer DCP-9045CDN

Læs nedenfor 📖 manual på dansk for Brother DCP-9045CDN (191 sider) i kategorien Printer. Denne guide var nyttig for 9 personer og blev bedømt med 4.5 stjerner i gennemsnit af 5 brugere

Side 1/191
USER’S GUIDE
DCP-9045CDN
If you need to call Customer Service
Please complete the following information for future
reference:
Model Number: DCP-9045CDN
Serial Number: 1
Date of Purchase:
Place of Purchase:
1The serial number is on the back of the unit. Retain
this User’s Guide with your sales receipt as a
permanent record of your purchase, in the event of
theft, fire or warranty service.
Register your product on-line at
http://www.brother.com/registration
By registering your product with Brother, you will be recorded as the
original owner of the product. Your registration with Brother:
may serve as confirmation of the purchase date of your product
should you lose your receipt;
may support an insurance claim by you in the event of product loss
covered by insurance; and,
will help us notify you of enhancements to your product and special
offers.
The most convenient and efficient way to register your new product is
online at http://www.brother.com/registration
© 2007 Brother Industries, Ltd.
i
Brother numbers
IMPORTANT
For technical help, you must call the country where you bought the machine. Calls must be
made from within that country.
Register your product
By registering your product with Brother International Corporation, you will be recorded as the
original owner of the product. Your registration with Brother:
may serve as confirmation of the purchase date of your product should you lose your receipt;
may support an insurance claim by you in the event of product loss covered by insurance; and,
will help us notify you of enhancements to your product and special offers.
Please complete and fax the Brother Warranty Registration And Test Sheet or, for your
convenience and most efficient way to register your new product, register on-line at.
http://www.brother.com/registration
FAQs (frequently asked questions)
The Brother Solutions Center is our one-stop resource for all your Fax Machine/Multi-Function
Center needs. You can download the latest software and utilities and read FAQs and
troubleshooting tips to learn how to get the most from your Brother product.
http://solutions.brother.com
Note
You can check here for Brother driver updates.
To keep your machine performance up to date, check here for the latest firmware upgrade (for
Windows® only).
For Customer Service
In USA: 1-877-BROTHER (1-877-276-8437)
1-901-379-1215 (fax)
In Canada: 1-877-BROTHER
(514) 685-4898 (fax)
viii
Table of Contents
Section I General
1 General information 2
Using the documentation .......................................................................................2
Symbols and conventions used in the documentation ....................................2
Accessing the Users Guides .................................................................................2
Viewing documentation ...................................................................................3
Accessing Brother support (for Windows ®) ...........................................................5
Control panel overview ..........................................................................................6
Status LED indications...........................................................................................8
2 Loading paper and documents 10
Acceptable paper and other media......................................................................10
Recommended paper ....................................................................................10
Type and size of paper ..................................................................................10
Handling and using special paper .................................................................12
Unprintable area .................................................................................................. 15
Unprintable area for copies ...........................................................................15
Unprintable area when printing from a computer ..........................................16
Loading paper and envelopes .............................................................................16
Loading documents .............................................................................................19
Using the ADF (automatic document feeder) ................................................19
Using the scanner glass ................................................................................20
3 General setup 21
Paper settings......................................................................................................21
Paper type .....................................................................................................21
Paper size......................................................................................................21
Tray use in copy mode ..................................................................................22
Tray use in print mode................................................................................... 22
Volume settings ...................................................................................................23
Beeper volume ..............................................................................................23
Automatic daylight savings time ..........................................................................23
Ecology features ..................................................................................................23
Toner save.....................................................................................................23
Sleep time......................................................................................................24
Turning off the scanner lamp.........................................................................24
LCD contrast........................................................................................................24
User Settings List.................................................................................................24
4 Security features 25
Security ................................................................................................................ 25
Secure Function Lock.................................................................................... 25
ix
Section II Copy
5 Making copies 30
How to copy ......................................................................................................... 30
LCD display for Copy mode...........................................................................30
Making a single copy ..................................................................................... 30
Making multiple copies .................................................................................. 30
Stop copying.................................................................................................. 30
Copy options (temporary settings).......................................................................31
Improving copy quality...................................................................................31
Enlarging or reducing the image copied ........................................................32
Making N in 1 copies (page layout) ...............................................................33
Duplex (2-sided) copying............................................................................... 34
Sorting copies using the ADF ........................................................................36
Adjusting brightness, contrast and color........................................................36
Tray selection ................................................................................................ 38
Out of memory message .....................................................................................38
Section III Walk-up printing
6 Printing photos from a digital camera 40
Before using PictBridge ....................................................................................... 40
PictBridge requirements ................................................................................40
Using PictBridge .................................................................................................. 40
Setting your digital camera ............................................................................ 40
Printing images ....................................................................................................41
DPOF printing................................................................................................ 42
Connecting a camera as a storage device .......................................................... 42
Understanding the error messages .....................................................................43
7 Printing data from a USB flash memory drive 44
Supported file formats..........................................................................................44
Creating a PRN or PostScript ® 3™ file for direct printing.................................... 44
Printing data directly from the USB flash memory drive ......................................45
Understanding the error messages .....................................................................46
Section IV Software
8 Software and network features 48
How to read HTML User’s Guide......................................................................... 48
For Windows ®...............................................................................................48
For Macintosh ®..............................................................................................48
x
Section V Appendixes
A Safety and legal 50
Choosing a location ............................................................................................. 50
To use the machine safely...................................................................................51
Important information...........................................................................................54
Federal Communications Commission (FCC) Declaration of Conformity
(USA only) .................................................................................................54
Industry Canada Compliance Statement (Canada only) ..............................55
Disconnect device .........................................................................................55
LAN connection ............................................................................................55
International E NERGY STAR ® Compliance Statement.....................................55
Laser safety ...................................................................................................55
FDA regulations............................................................................................. 56
Important safety instructions..........................................................................56
Legal limitations for copying ................................................................................58
Trademarks..........................................................................................................59
B Option 60
Option ..................................................................................................................60
Optional paper tray ..............................................................................................61
Installing the optional paper tray....................................................................61
Memory board......................................................................................................62
SO-DIMM types .............................................................................................62
Installing extra memory .................................................................................63
C Troubleshooting and routine maintenance 64
Troubleshooting ...................................................................................................64
If you are having difficulty with your machine ................................................64
Improving the print quality .............................................................................70
Error and maintenance messages.......................................................................81
Document jams..............................................................................................86
Paper jams .................................................................................................... 87
Routine maintenance...........................................................................................98
Cleaning the outside of the machine .............................................................98
Cleaning the scanner.....................................................................................99
Cleaning the laser scanner windows ...........................................................100
Cleaning the corona wires ...........................................................................104
Cleaning the drum unit ................................................................................108
Replacing the consumable items.......................................................................114
Replacing a toner cartridge .........................................................................117
Replacing the drum unit...............................................................................122
Replacing the belt unit .................................................................................128
Replacing the waste toner box ....................................................................133
Packing and shipping the machine ....................................................................139
Repacking the machine ...............................................................................141
Machine information ..........................................................................................148
Checking the serial number.........................................................................148
Checking the page counters........................................................................148
Checking the remaining life of parts ............................................................148
xi
D Menu and features 149
On-screen programming....................................................................................149
Menu table...................................................................................................149
Memory storage........................................................................................... 149
Menu keys ......................................................................................................... 149
How to access the menu mode ...................................................................150
Menu table......................................................................................................... 151
Entering text ......................................................................................................160
E Specifications 162
General ..............................................................................................................162
Print media.........................................................................................................164
Copy .................................................................................................................. 165
Scan ..................................................................................................................166
Print ...................................................................................................................167
Interfaces ...........................................................................................................168
PictBridge .......................................................................................................... 168
Direct print feature .............................................................................................168
Computer requirements.....................................................................................169
Consumable items.............................................................................................170
Ethernet wired network......................................................................................171
F Glossary 172
G Index 173
xii
Section I
General I
General information 2
Loading paper and documents 10
General setup 21
Security features 25
2
1
Using the
documentation 1
Thank you for buying a Brother machine!
Reading the documentation will help you
make the most of your machine.
Symbols and conventions
used in the documentation 1
The following symbols and conventions are
used throughout the documentation.
Accessing the Users
Guides 1
The advanced features of the Printer,
Network and Scanner are explained in the
Software and Network Users Guides that you
can find on the CD-ROM.
General information 1
Bold Bold style identifies keys on the
machine control panel or
computer screen.
Italics Italicized style emphasizes an
important point or refers you to
a related topic.
Courier
New
Courier New font identifies the
messages shown on the LCD
of the machine.
Warning icons tell you what to do to
avoid the risk of injury.
Electrical Hazard icons alert you to a
possible electrical shock.
Hot Surface icons warn you not to
touch machine parts that are hot.
Caution icons tell you about
procedures you must follow to
prevent damaging the machine.
Incorrect setup icons alert you to
devices and operations that are not
compatible with the machine.
Note icons give useful tips.
Chapter 1
4
Viewing documentation (Macintosh®) 1
aTurn on your Macintosh®.
Insert the Brother CD-ROM labeled
Macintosh® into your CD-ROM drive.
bThe following window will appear.
cDouble-click the Documentation icon.
dIf the language selection screen
appears, double-click your language.
eDouble-click the top page file to view the
User’s Guide, Software User’s Guide
and Network User’s Guide in HTML
format.
fClick the documentation you want to
read.
User’s Guide
Software User’s Guide
Network User’s Guide
Note
The documents are also available in PDF
format (4 manuals):
PDF User’s Guide for stand-alone
operations, Software User’s Guide,
Network User’s Guide and Quick Setup
Guide.
The PDF format is recommended for
printing the manuals.
Double-click Brother Solutions Center
icon to go to the Brother Solutions Center,
where you can view or download the PDF
documents. (Internet access and PDF
Reader software are required.)
How to find scanning instructions 1
There are several ways you can scan
documents. You can find the instructions as
follows:
Software User's Guide: 1
Scanning in Chapter 9
Using ControlCenter2 in Chapter 10
Network Scanning in Chapter 11
Presto!® PageManager® User's Guide:1
Instructions for scanning directly from
Presto!® PageManager ® The complete
Presto!® PageManager ® User’s Guide
can be viewed from the Help selection in
the Presto!® PageManager® application.
General information
5
1
Accessing Brother
support
(for Windows ®)1
You can find all the contacts you will need,
such as Web support (Brother Solutions
Center), Customer Service and Brother
Authorized Service Centers on page i and on
the Brother CD-ROM.
Click Brother Support on the main menu.
The following screen will appear:
To access our web site
(www.brother.com) click
Brother Home Page.
To view all Brother Numbers, including
Customer Service numbers for the USA
and Canada, click Support Information.
To access the USA Brother online
shopping mall (www.brothermall.com) for
additional product and service
information, click Brother Mall.com.
For the latest news and product support
information
(http://solutions.brother.com/), click
Brother Solutions Center.
To visit our web site for original/genuine
Brother supplies
(http://www.brother.com/original/), click
Supplies Information.
To return to the main page, click Back.
Or, if you have finished, click Exit.
Chapter 1
6
Control panel overview 1
1Print keys:
Direct
Lets you print data from a USB flash
memory drive that you can connect
directly to the machine. You can also print
images directly from your PictBridge
compatible camera.
Secure
When using Secure Function Lock, you
can switch restricted users by holding
down d as you press the Secure key. (See
Turning Secure Function Lock
on on page 27.)
You can print data saved in memory when
you enter your four-digit password. (For
details about using the Secure key, see
the Software User’s Guide on the
CD-ROM.)
Job Cancel
Cancels a programmed print job and
clears print data in machine’s memory.
2LCD
Displays messages to help you set up and
use your machine.
3Status LED
The LED will flash and change color
depending on the machine’s status.
4Menu keys:
Menu
Lets you access the Menu to program
your settings in the machine.
Clear/Back
Deletes entered data or lets you cancel
the current setting.
OK
Lets you store your settings in the machine.
d c or
Press to scroll backwards or forwards
through menu selections.
a b or
Press to scroll through the menus and
options.
2
10
1
General information
7
1
5Numeric keys
Use to enter information into the machine.
6Stop/Exit
Stops an operation or exits from a menu.
7Start
Color
Lets you start making copies in full color.
Black
Lets you start making copies in black &
white.
8Copy keys:
Contrast/Quality
Lets you change the quality or contrast for
the next copy.
Enlarge/Reduce
Reduces or enlarges copies.
Tray Select
Lets you change which tray will be used
for the next copy.
Sort
Sorts multiple copies using the ADF.
N in 1
You can choose N in 1 copy to 2 or 4
pages onto one page.
9Duplex
You can choose Duplex to copy on both
sides of the paper.
10 Scan
Puts the machine in Scan mode. (For
details about scanning, see the Software
Users Guide on the CD-ROM.)
Chapter 1
8
Status LED indications 1
The Status LED (light emitting diode) will flash and change color depending on the machine’s
status.
The LED indications shown in the table below are used in the illustrations in this chapter.
LED LED Status
LED is off.
Green
Yellow
Red
LED is on.
Green
Yellow
Red
LED is blinking.
LED Machine Status Description
Sleep Mode The power switch is off or the machine is in Sleep Mode.
Green
Warming Up The machine is warming up for printing.
Green
Ready The machine is ready to print.
Yellow
Receiving Data The machine is either receiving data from the computer,
processing data in memory, or printing data.
Yellow
Data Remaining in
Memory
Print data remains in the machine’s memory.
General information
9
1
Note
When the power switch is off or the machine is in sleep mode, the LED is off.
Red
Service error Follow the steps below.
1. Turn off the power switch.
2. Wait a few seconds, and then turn it back on and try to print
again.
If you cannot clear the error and you see the same service call
indication after turning the machine back on, please call
Brother Customer Service. (See Brother numbers on page i.)
Red
Cover open The front cover or back cover is open. Close the cover.
Toner life end Replace the toner cartridge with a new one.
Paper error Put paper in the tray or clear the paper jam. Check the LCD
message.
Scan lock Check that the scanner lock lever is released.
Out of memory Memory is full.
Others Check the LCD message.
LED Machine Status Description
10
2
Acceptable paper and
other media 2
Recommended paper 2
To get the best print quality, we suggest using
the following paper.
Print quality may vary according to the type of
paper you are using.
You can use the following types of media:
plain paper, labels or envelopes.
For best results, follow the steps below:
Use paper made for plain paper copying.
Use paper that is 20 to 24 lb (75 to
90 g/m 2).
Use labels which are designed for use in
laser printers.
Avoid touching the printed surface of the
paper immediately after printing.
Use long grain paper with a neutral Ph
value, and a moisture content of approx
5%.
CAUTION
DO NOT load envelopes, labels or thick
paper (more than 28 lb or 105 g/m 2) into the
paper tray or optional lower tray. It may
cause paper jams.
Type and size of paper 2
The machine loads paper from the installed
standard paper tray, or multi-purpose tray, or
optional lower tray.
Standard paper tray 2
Since the standard paper tray is a universal
type, you can use any of the paper sizes (one
paper type and size at a time) listed in the
table in Paper capacity of the paper
trays on page 11. The standard paper tray
can hold up to 250 sheets of Letter/A4, legal
and folio size paper (20 lb or 80 g/m 2). Paper
can be loaded up to the maximum paper mark
on the sliding paper width guide.
Multi-purpose tray (MP tray) 2
The MP tray can hold up to 50 sheets of
paper (20 lb or 80 g/m 2) or up to 3 envelopes.
Paper can be loaded up to the maximum
paper mark on the sliding paper width guide.
Optional lower tray (LT-100CL) 2
The optional lower tray can hold up to 500
sheets of Letter/A4, legal and folio size paper
(20 lb or 80 g/m2). Paper can be loaded up to
the top line of the maximum paper mark on
the sliding paper width guide.
Loading paper and documents 2
Paper Type Item
Plain paper Xerox 4200DP 20 lb
Hammermill Laser Paper
(24 lb=90 g/m 2)
(Xerox Premier 80 g/m 2)
(Xerox Business 80 g/m 2)
Recycled paper (Xerox Recycled Supreme)
Labels Avery laser label #5160
(Avery laser label L7163)
Envelope Columbian #138 (COM10)
Loading paper and documents
11
2
The names for the paper trays in the printer driver and this Guide are as follows: 2
Paper capacity of the paper trays 2
1Folio size is 8 in. × 13 in.
Recommended paper specifications 2
The following paper specifications are
suitable for this machine.
Tray and optional unit Name
Standard paper tray Tray 1
Optional lower tray Tray 2
Multi-purpose tray MP tray
Paper size Paper types No. of sheets
Paper Tray
(Tray #1)
A4, Letter, Legal,
Executive, A5, A6, B5,
B6 and Folio 1
Plain paper, Thin paper
and Recycled paper
up to 250
[20 lb (80 g/m 2)]
Multi-purpose tray
(MP tray)
Width: 2.75 to 8.5 in.
(69.9 to 215.9 mm)
Length: 4.57 to 16.0 in.
(116.0 to 406.4 mm)
Plain paper, Thin paper,
Thick paper, Recycled
paper, Bond paper,
Envelope and Labels
up to 50 (plain paper)
[20 lb (80 g/m 2)]
up to 3 (envelopes)
Paper Tray
(Tray #2)
A4, Letter, Legal,
Executive, A5, B5, B6
and Folio 1
Plain paper, Thin paper
and Recycled paper
up to 500
[20 lb (80 g/m 2)]
Basis weight (lb (g/m 2)) 20-24 (75-90)
Thickness (µm) 80-110
Roughness (sec.) Higher than 20
Stiffness (cm3/100) 90-150
Grain direction Long grain
Volume resistivity (ohm) 10e9-10e 11
Surface resistivity (ohm-cm) 10e9-10e 12
Filler CaCO 3 (Neutral)
Ash content (wt%) Below 23
Brightness (%) Higher than 80
Opacity (%) Higher than 85
Chapter 2
12
Handling and using special
paper 2
The machine is designed to work well with
most types of xerographic and bond paper.
However, some paper variables may have an
effect on print quality or handling reliability.
Always test samples of paper before
purchasing to ensure desirable performance.
Store paper in its original packaging and keep
it sealed. Keep the paper flat and away from
moisture, direct sunlight and heat.
Some important guidelines when selecting
paper are:
Your supplier should be informed that the
paper or envelopes will be used in a color
laser machine.
Preprinted paper must use inks that can
withstand the temperature of the
machines fusing process (392 degrees
Fahrenheit or 200 degrees centigrade for
a period of 0.1 seconds).
If you have selected a cotton bond paper,
paper having a rough surface, such as
cockle or laid finished paper or paper that
is wrinkled or puckered, the paper may
exhibit degraded performance.
Types of paper to avoid 2
CAUTION
Some types of paper may not perform well
or may cause damage to your machine.
DO NOT use paper:
that is highly textured
that is extremely smooth or shiny
that is curled or warped
1 0.08 in. (2 mm) or greater
that is coated or has a chemical finish
that is damaged, creased or folded
that exceeds the recommended weight
specification in this guide
with tabs and staples
with letterheads using low temperature
dyes or thermography
that is multipart or carbonless
that is designed for inkjet printing
If you use any of the types of paper listed
above, they may damage your machine.
This damage is not covered under any
Brother warranty or service agreement.
1
1
Loading paper and documents
13
2
Envelopes 2
Most envelopes will be suitable for your
machine. However, some envelopes will
have feed and print-quality problems
because of the way they have been made.
A suitable envelope should have edges with
straight, well-creased folds and the leading
edge should not be thicker than two pieces of
paper. The envelope should lie flat and not be
of baggy or flimsy construction. You should
buy quality envelopes from a supplier who
understands that you will be using the
envelopes in a laser machine.
Envelopes can only be fed from MP tray.
Before you put envelopes in the tray, check
the following:
Envelopes should have a lengthwise
sealing flap.
The sealing flaps should be folded crisply
and correctly (irregularly cut or folded
envelopes may cause paper jams).
Envelopes should consist of two layers of
paper in the area circled in figure below.
1 Feeding direction
Note
Before you print envelopes, you must fan’
the stack to avoid paper jams and
misfeeds.
Before you print a lot of envelopes, test
one to make sure that the print results are
what you want.
Envelope joints that are sealed by the
manufacturer should be secure.
DO NOT put different types of paper in the
paper tray at the same time because it
may cause paper jams or misfeeds.
DO NOT print envelopes using duplex
printing.
For proper printing, you must choose the
same paper size from your software
application as the paper in the tray.
We recommend that you do not print
within 0.6 in. (15 mm) of the edges of
envelopes.
See Acceptable paper and other
media on page 10.
1
1
Chapter 2
16
Unprintable area when
printing from a computer 2
When using the default driver the printable
area is smaller than the paper size, as shown
below.
Portrait
1 0.16 in. (4.23 mm)
2 0.16 in. (4.23 mm)
Landscape
1 0.16 in. (4.23 mm)
2 0.16 in. (4.23 mm)
Note
The unprintable area shown above is for
Letter size paper. The unprintable area
changes with the paper size.
Loading paper and
envelopes 2
The machine can feed paper from the
standard paper tray, optional lower tray or
multi-purpose tray.
When printing on plain paper 16 to 28 lb
(60 to 105 g/m2) use the paper tray.
For printing on other types of media use the
MP tray (multi-purpose tray).
When you put paper into the paper tray, note
the following:
If your application software supports
paper size selection on the print menu,
you can select it through the software. If
your application software does not
support it, you can set the paper size in
the printer driver or by using the control
panel buttons.
Before using paper that has holes in it,
such as organizer sheets, you must ‘fan
the stack to avoid paper jams and
misfeeds.
2 2
1
1
22
1
1
Loading paper and documents
17
2
Loading plain paper in the paper tray 2
aUnfold the output paper tray support
flap (1).
bPull the paper tray completely out of the
machine.
cWhile pressing the green paper-guide
release lever (1), slide the paper guides
to fit the paper size. Make sure that the
guides are firmly in the slots.
dFan the stack of paper well to avoid
paper feeding problems.
ePut the paper into the paper tray with the
top edge of the paper in first and the
print side face down.
Make sure that the paper is flat in the
tray and below the maximum paper
mark (1).
fPush the paper tray firmly back into the
machine.
1
1
1
Chapter 2
18
Loading envelopes or other media in
the multi-purpose tray (MP tray) 2
Use the MP tray when printing envelopes,
labels, and thick paper.
Before loading, press the corners and sides
of the envelopes to make them as flat as
possible.
aUnfold the output paper tray support
flap (1).
bOpen the MP tray and lower it gently.
cPull out the MP tray support flap (1).
dPut the envelopes (up to 3) or media in
the MP tray with the top edge first and
the print side face up.
1
1
Loading paper and documents
19
2
Loading documents 2
You can make copies, and scan from the ADF
(automatic document feeder) and from the
scanner glass.
Using the ADF (automatic
document feeder) 2
The ADF can hold up to 50 pages and feeds
each sheet individually. Use standard 20 lb
(80 g/m2) paper and always fan the pages
before putting them in the ADF.
Make sure documents written with ink are
completely dry.
CAUTION
DO NOT leave thick documents on the
scanner glass. If you do this, the ADF may
jam.
DO NOT use paper that is curled, wrinkled,
folded, ripped, stapled, paper-clipped,
pasted or taped.
DO NOT use cardboard, newspaper or
fabric.
aUnfold the ADF document output
support flap (1) and the ADF support
flap (2).
bFan the pages well.
cPlace your document, face up top edge
first, in the ADF until you feel it touch the
feed roller. The LCD will show
ADF Ready.
dAdjust the paper guides to fit the width of
your document.
CAUTION
To avoid damaging your machine while
using the ADF, DO NOT pull on the
document while it is feeding.
To scan non-standard documents see
Using the scanner glass on page 20.
1
2
Chapter 2
20
Using the scanner glass 2
You can use the scanner glass to scan or
copy the pages of a book or one page at a
time. Documents can be up to 8.5 inches
wide and up to 14 inches long (215.9 mm
wide to 355.6 mm long).
To use the scanner glass, the ADF must be
empty.
aLift the document cover.
bUsing the document guidelines on the
left, center the document face down on
the scanner glass.
cClose the document cover.
CAUTION
If the document is a book or is thick,
DO NOT slam the cover or press on it.
21
3
3
Paper settings 3
Paper type 3
Set up the machine for the type of paper you
are using. This will give you the best print
quality.
aDo one of the following:
To set the paper type for the
MP Tray press Menu, 1 1 1, , .
To set the paper type for Tray#1
press Menu, , 1 1, 2.
To set the paper type for Tray#2
press Menu, , 1 1, 3 if you installed
the optional tray.
11.Paper Type
1.MP Tray
aPlain
bThick
Select or OKab
bPress a b or to choose Thin Plain, or
Recycled Paper Tray#1 for and
Tray#2.
Choose Thin, Plain, , Thick
Thicker Recycled Paper or for
MP Tray.
Press OK.
cPress Stop/Exit.
Paper size 3
You can use nine sizes of paper for printing
copies: A4, Letter, Legal, Executive, A5, A6,
B5, B6 and Folio.
When you change the size of paper in the
tray, you will also need to change the setting
for paper size at the same time so your
machine can fit the document on the page.
aDo one of the following:
To set the paper size for the
MP Tray press Menu, 1 2 1, , .
To set the paper size for Tray#1
press Menu, , 1 2, 2.
To set the paper size for Tray#2
press Menu, , 1 2, 3 if you installed
the optional tray.
12.Paper Size
1.MP Tray
aA4
bLetter
Select or OKab
bPress a or b to choose A4 Letter, ,
Legal Executive A5 A6 B5, , , , , B6,
Folio Any or .
Press OK.
cPress Stop/Exit.
Note
Any (size) appears only when you choose
the MP tray (Menu, 1 2 1, , ).
If you choose Any for the MP Tray Paper
Size: You must choose MP Only for the
Tray Use setting. You cannot use the Any
Paper Size selection for the MP tray when
making N in 1 copies. You must choose
one of the other available Paper Size
selections for the MP tray.
A6 size is not available for the optional
Tray #2.
General setup 3
Chapter 3
22
Tray use in copy mode 3
You can change the priority tray that the
machine will use for printing copies.
When you choose Tray#1 Only MP Only,
or Tray#2 Only 1, the machine pulls the
paper only from that tray. If the selected tray
is out of paper, No Paper will appear on the
LCD. Insert the paper in the empty tray.
To change the tray setting follow the
instructions below:
aPress Menu, , 1, 6 1.
16.Tray Use
1.Copy
aMP>T1
bT1>MP
Select or OKab
bPress a or b to choose Tray#1 Only,
Tray#2 Only 1, MP Only,
MP>T1>T2 1 or T1>T2>MP 1.
Press OK.
1Tray#2 Only T2 or appears only if the
optional tray is installed.
cPress Stop/Exit.
Note
When loading the documents in the ADF
and MP>T1>T2 or T1>T2>MP is selected,
the machine looks for the tray with the
most suitable paper and pulls paper from
that tray. If no tray has suitable paper, the
machine pulls paper from the higher
priority tray.
When using the scanner glass, your
document is copied from the higher
priority tray even if more suitable paper is
in another paper tray.
Tray use in print mode 3
You can change the default tray the machine
will use for printing from your computer.
aPress Menu, 1, , 6 2.
16.Tray Use
2.Print
aMP>T1
bT1>MP
Select or OKab
bPress a or b to choose Tray#1 Only,
Tray#2 Only 1, , MP Only
MP>T1>T2 1 or T1>T2>MP 1.
Press OK.
1Tray#2 Only T2 or appears only if the
optional tray is installed.
cPress Stop/Exit.
Note
The setting in the printer driver will take
priority over the setting made on the
control panel.
If the control panel is set to
Tray#1 Only MP Only, or
Tray#2 Only 1 and you choose
Auto Select in the printer driver, the
machine pulls the paper from that tray.
1Tray#2 Only appears only if the optional tray is
installed.
General setup
23
3
Volume settings 3
Beeper volume 3
When the beeper is on, the machine will beep
when you press a key or make a mistake. You
can choose a range of volume levels, from
High Off to .
aPress Menu, 1 3, .
13.Beeper
a Low
Med
b High
Select or OKab
bPress a b or to choose Off, Low, Med or
High.
Press OK.
cPress Stop/Exit.
Automatic daylight
savings time 3
You can set the machine to change
automatically for Daylight Savings Time. It
will set itself forward one hour in the Spring,
and back one hour in the Fall.
aPress Menu, 1 4, .
14.Auto Daylight
aOn
bOff
Select or OKab
bPress a or b to choose On (or Off).
Press OK.
cPress Stop/Exit.
Ecology features 3
Toner save 3
You can save toner using this feature. When
you set toner save to On, print appears
lighter. The default setting is Off.
a Press Menu, 1 5 1, , .
15.Ecology
1.Toner Save
aOn
bOff
Select or OKab
bPress a or b to choose On (or Off).
Press OK.
cPress Stop/Exit.
Note
We do not recommend Toner Save for
printing Photo or Grayscale images.
Chapter 3
24
Sleep time 3
Setting the sleep time reduces power
consumption by turning off the fuser while the
machine is idle.
You can choose how long the machine must
be idle (from 000 to 240 minutes) before it
goes into sleep mode. When the machine
receives computer data or makes a copy, the
timer will be reset. The default setting is 005
minutes.
While the machine is in sleep mode the LCD
will display Sleep. When printing or copying
in sleep mode, there will be a short delay
while the fuser warms up.
aPress Menu, , 1, 5 2.
15.Ecology
2.Sleep Time
005Min
Enter & OK Key
bEnter the length of time the machine is
idle before entering sleep mode (000 to
240).
Press OK.
cPress Stop/Exit.
Turning off the scanner lamp 3
The scanner lamp stays on for 30 minutes
before automatically switching off to preserve
the life of the lamp and reduce power
consumption.
To turn the scanner lamp off manually press
the d c and keys simultaneously. The scanner
lamp will remain turned off until the next time
you use the scanning feature.
Note
Turning the lamp off regularly will reduce
the lamp’s life.
LCD contrast 3
You can change the contrast to make the
LCD look lighter or darker.
aPress Menu, 1, 7.
17.LCD Contrast
-nnonn+
Select d c & OK
bPress d to make the LCD darker. Or,
press c to make the LCD lighter.
Press OK.
cPress Stop/Exit.
User Settings List 3
You can print a list of the settings you
programmed including the network
configuration.
aPress Menu, 6, 4.
64.User Settings
Press Start
bPress Black Start or Color Start.
cPress Stop/Exit.
25
4
4
Security 4
Secure Function Lock 4
Secure Function Lock lets you restrict Public
access to certain machine functions (Copy,
Scan and Print).
This feature also prevents users from
changing the Default settings of the machine
by limiting access to the Menu settings.
Disabling at least one function is required to
turn on Secure Function Lock for the Public
user.
Access to restricted operations can be
enabled by creating a restricted user.
Restricted users must select the stored name
and enter a password to use the machine.
Make a careful note of your password. If you
forget it, please call Brother Customer
Service.
Note
You can set up to 25 individual users and
one Public user.
When you set up a Public user, you can
restrict one or more of the machine’s
functions to all users who do not have a
password.
Only administrators can set limitations
and make changes for each user.
When Print is disabled, PC print jobs will
be lost without notification.
Setting the password for the
administrator 4
The password you set in these steps is for the
administrator. This password is used to set
up users and to turn Secure Function Lock on
or off. (See Setting up restricted
users on page 26 and Turning Secure
Function Lock on on page 27.)
aPress Menu, , 1 8.
18.Function Lock
New Passwd:XXXX
Enter & OK Key
bEnter a four-digit number for the
password using numbers 0-9, l or #.
Press OK.
cRe-enter the password when the LCD
shows Verify:.
Press OK.
dPress Stop/Exit.
Security features 4


Produkt Specifikationer

Mærke: Brother
Kategori: Printer
Model: DCP-9045CDN
Vægt: 32800 g
Indbygget skærm: Ja
USB-port: Ja
Ethernet LAN: Ja
Strømforbrug (standby): 95 W
Udskrivningsteknologi: Laser
Maksimal opløsning: 2400 x 600 dpi
Udskrivningshastighed (sort, normal kvalitet, A4/amerikansk papirformat): 20 sider pr. minut
Udskrivning: Farveudskrivning
Maksimal ISO A-serie papirstørrelse: A4
ISO A-serie, størrelser (A0...A9): A4,A5,A6
ISO B-serie, størrelser (B0...B9): B5,B6
Ikke-ISO udskriftsmedier størrelse: Executive (184 x 267mm),Folio (media size),Legal (media size),Letter (media size)
Samlet inputkapacitet: 250 ark
Samlet outputkapacitet: 150 ark
Input farvedybde: 48 Bit
Scanning: Mono scanning
Kopiering: Farvekopiering
Maksimal kopiopløsning: 1200 x 600 dpi
Maksimalt antal kopier: 99 Kopier
Skærm: LCD
Markedspositionering: Forretning
Fax: Ingen
Intern hukommelse: 128 MB
Dimensioner (BxDxH): 432 x 487 x 482 mm
Strømforbrug (strømbesparelse): 28 W
Duplex udskrivning: Ja
Bæredygtighedscertifikater: ENERGY STAR
Processorfrekvens: 300 Mhz
Maksimal intern hukommelse: 640 MB
Tid til første side (farve, normal): 16 sek./side
Udskrivningshastighed (farve, normal kvalitet, A4/amerikansk papirformat): 20 sider pr. minut
Lydtryksniveau (udskrivning): 54.5 dB
Standard grænseflader: USB 2.0
Tid til første side (sort, normal): 16 sek./side
Ændre størrelse på kopimaskine: 25 - 400 %
Kopieringshastighed (sort, normal kvalitet, A4): 16 Kopier pr minut
Kopihastighed (normal kvalitet, farve, A4): 16 Kopier pr minut
Duplekskopiering: Ja
Duplex scanning: Ja
Digital afsender: Ingen
Strømforbrug ( gennemsnitlig drift ): 495 W
Universal-magasin kapacitet: 50 ark
Multifunktionsbakke: Ja
Netværk klar: Ja
Scan til: e-mail,file,image,OCR
Pc-fri kopiering: Ja
Lydeffektniveau (standby): 30 dB
Netværksfunktioner: 10/100 Base-TX
Automatisk dokumentføder (ADF) indgangskapacitet: 35 ark
Alt-i-en-funktioner: Copy,Scan
Farve alt-i-én-funktioner: copy,print
JIS B-seriens størrelser (B0…B9): B5
Automatisk dokumentføder (ADF): Ja
Emuleringer: PCL6, BR-Script 3
Skrifttyper: 66 Scaleable fonts, 12 Bitmap fonts, 13 Barcodes
Papirhåndtering valgfrit/input: 500

Har du brug for hjælp?

Hvis du har brug for hjælp til Brother DCP-9045CDN stil et spørgsmål nedenfor, og andre brugere vil svare dig